Advertisement
Safety InStructIonS
1. Always use eye protection when using power tools. Wear
safety goggles that comply with ANSI 287.1.
2. Always unplug your power drill before changing bits and
attaching drill stops.
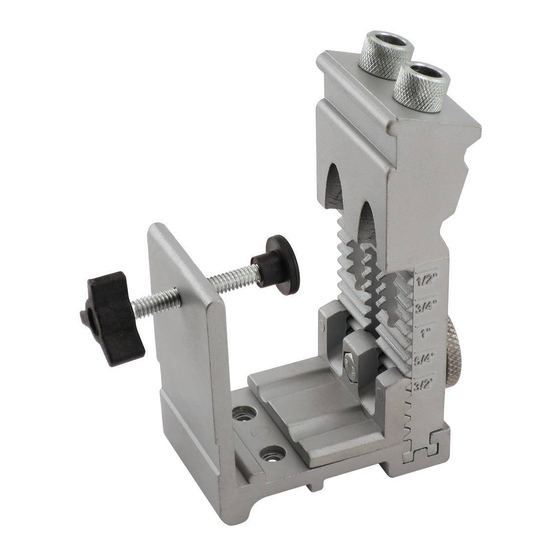
WHat'S IncLuDeD
(see figure above)
CALLOUT # DESCRIPTION
1
Wood thickness adjustment thumbwheel 1
2
Step drill bit, 3/8"
3
Stop collar
4
Hex wrench
5
#2 x 6" square drive bit
6
1" long coarse thread wood screws
with #2 washer head
7
1" long fine thread wood screws
with #2 washer head
8
Spare hex head screws
9
Work piece clamp with
plastic thumbnut
10
Jig mounting holes
11
Hex head screws (hidden)
securing jig base to vertical piece
SetuP InStructIonS
To familiarize yourself with the jig and
avoid ruining good stock, practice making
a few pocket holes on scrap pieces of
wood before starting your project.
Secure the jig to your workbench or fixed
work surface using the two mounting
holes on the bottom of the jig (Callout 10).
oPeratInG InStructIonS
QUANTITY
1. Adjust the height of the drilling platform
1
for the nominal work piece thickness by
1
aligning the top of the platform with the
1
correct line on the scale marked on the
1
jig body. Secure the platform by hand-
24
tightening the metal thumbwheel
(Callout 1).
24
2. To set the drill bit to the correct drilling
2
length, ensure that the stop collar
1
(Callout 3) on the step drill bit (Callout 2)
2
is positioned at the correct height to
prevent drilling into the jig. The tip of the
2
bit should be close to the platform—but
not touch it. Use the included hex
wrench to loosen/tighten the set screw
on the stop collar.
ADJUSTABLE
POCKET HOLE
JIG KIT
#854
INSTRU TIONS
Please read these instructions carefully
and thoroughly before using this product.
Advertisement
Table of Contents

Related Manuals for General 854


Summary of Contents for General 854
- Page 1 ADJUSTABLE POCKET HOLE JIG KIT #854 INSTRU TIONS Please read these instructions carefully and thoroughly before using this product. Safety InStructIonS SetuP InStructIonS 1. Always use eye protection when using power tools. Wear To familiarize yourself with the jig and safety goggles that comply with ANSI 287.1.
- Page 2 Warranty InforMatIon limited to the above. General shall not be liable for loss of use of the product or other incidental or consequential General warrants its instruments and accessories, and...
Need help?
Do you have a question about the 854 and is the answer not in the manual?
Questions and answers