Advertisement
This document provides a brief introduction and instructions to install and run the MachXO2™ Pico
Development Kit on Windows 7/Vista/XP/2000. Please refer to the complete documentation at
www.latticesemi.com/alpha-mxo2-pico-kit.
Check Kit Contents
The MachXO2 Pico Development Kit contains
the following items:
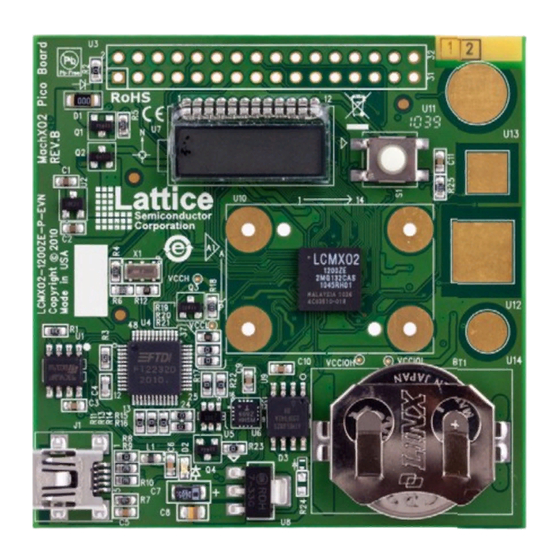
• MachXO2 Pico Evaluation Board pre-loaded
with the Environment Scanning Demo
• USB cable
• QuickSTART Guide
Note: Detailed information is provided in the
MachXO2 Pico Development Kit User's Guide at
www.latticesemi.com/alpha-mxo2-pico-kit.
Storage and Handling Tips:
Static electricity can shorten the lifespan of
electronic components. Please observe these tips
to prevent damage that could occur from electro-
static discharge:
• Use anti-static precautions such as operating on an anti-static mat and wearing an anti-static
wristband.
• Store the MachXO2 Pico Evaluation Board in the anti-static bag provided.
• Touch the metal USB housing to equalize voltage potential between you and the board.
Download Windows Hardware Drivers
Before you begin, you will need to obtain the necessary hardware drivers for Windows from
the Lattice web site.
1. Browse to www.latticesemi.com/alpha-mxo2-pico-kit and locate the hardware device
drivers for the USB interface.
2. Download the ZIP file to your system and unzip it to a location on your PC.
Linux Support:
The USB interface drivers for the evaluation board are included in Linux kernel v.2.4.20 or
later, including distributions compatible with Lattice Diamond™ 1.1 and ispLEVER
(Red Hat Enterprise v.3, v.4 or Novell SUSE Enterprise v.10).
MachXO2 Pico
Development Kit
8.1 SP1
®
Advertisement
Table of Contents

Related Manuals for Lattice Semiconductor MachXO2 Pico

Summary of Contents for Lattice Semiconductor MachXO2 Pico
- Page 1 • MachXO2 Pico Evaluation Board pre-loaded with the Environment Scanning Demo • USB cable • QuickSTART Guide Note: Detailed information is provided in the MachXO2 Pico Development Kit User’s Guide at www.latticesemi.com/alpha-mxo2-pico-kit. Storage and Handling Tips: Static electricity can shorten the lifespan of electronic components. Please observe these tips to prevent damage that could occur from electro- static discharge: • Use anti-static precautions such as operating on an anti-static mat and wearing an anti-static...
- Page 2 MachXO2 Pico Development Kit Assemble and Connect to the MachXO2 Pico Evaluation Board In this step, power the board and connect it to your PC using the USB cable provided. 1. Connect the USB cable provided from a USB port on your PC to the board’ s USB interface socket on the bottom of the board as shown in the layout diagram below. MachXO2 Pico Evaluation Board Layout Diagram GSR Push-button 2x16 GPIO Header Screen Capacitive Touch Buttons MachXO2- 1200/640 Coin Battery Slot Interface Socket 2.
- Page 3 MachXO2 Pico Development Kit Set Up a Terminal Program You will use a terminal program to communicate with the evaluation board. The following instructions describe the Windows HyperTerminal program which is found on most Windows PCs. You may use another terminal program but setup will be different. Note that Windows 7 does not include HyperTerminal. Tera Term has been verified to work with Windows 7. For Linux, Minicom is a good alternative.
- Page 4 SPI Flash device and displayed on the HyperTerminal. You can display additionally logged data points until a “No More Data” message is displayed. 4. To display the logged data again, press ‘c’. This will clear the page address pointers and data will be read beginning with page 0 of the SPI Flash. 5. Press ‘e’ to erase the content of the SPI Flash device. Done! Congratulations! You have successfully connected and demonstrated the MachXO2 Pico Development Kit. Please refer to the MachXO2 Pico Development Kit User’s Guide available on the Lattice web site at www.latticesemi.com/alpha-mxo2-pico-kit for the following: • Running advanced demos • Details on additional evaluation board features and operation • Programming the MachXO2 Pico Evaluation Board with the USB cable • Modifying and generating the demo bitstreams from the Diamond project source files • Schematics Technical Support...
Need help?
Do you have a question about the MachXO2 Pico and is the answer not in the manual?
Questions and answers