
Related Manuals for Cosori CS100-AO


Summary of Contents for Cosori CS100-AO
- Page 1 User Manual Smart Air Fryer Toaster Oven Model: CS100-AO Questions or Concerns? Mon–Fri, 9:00 am–5:00 pm PST/PDT support@cosori.com | (888) 402-1684...
- Page 2 CONTACT OUR CHEFS Our helpful, in-house chefs are ready to assist you with any questions you might have! Email: recipes@cosori.com Toll-Free: (888) 402-1684 M-F, 9:00 am–5:00 pm PST/PDT On behalf of all of us at Cosori,...
-
Page 3: Table Of Contents
Table of Contents Specifications VeSync App Troubleshooting Package Contents FCC Statement Important Safeguards FCC Radiation Exposure Statement · Key Safety Points Warranty Information · General Safety Customer Support · While Cooking · Plug & Cord Specifications · Electromagnetic Fields (EMF) Getting to Know Your Smart Air Fryer Toaster Oven Power Supply... -
Page 4: Important Safeguards
READ AND SAVE THESE INSTRUCTIONS IMPORTANT SAFEGUARDS Follow basic safety precautions when using your smart air fryer toaster oven. Read all instructions. Key Safety Points • Do not use third-party replacement parts or accessories, as this may cause injuries. • Do not use outdoors. •... -
Page 5: While Cooking
Plug & Cord • Do not place oversized foods or metal • Your oven has a polarized plug (one utensils (except for Cosori accessories) prong is wider than the other), which fits into your oven. into a polarized outlet only one way. If the plug does not fit, reverse the plug. -
Page 6: Getting To Know Your Smart Air Fryer Toaster Oven
GETTING TO KNOW YOUR SMART AIR FRYER TOASTER OVEN Power Button Temp/Time Button Start/Pause Button Housing Crumb Tray Shake Button LED Display Fry Basket Fan/Light Button Heating Elements Wire Rack Preheat Button Door Food Tray Control Knob Handle Power Cord... -
Page 7: Display
DISPLAY WiFi Icon* ® *Note: This indicates app configuration status. See the VeSync in-app instructions for Celsius/Fahrenheit more information. Indicators Shake Reminder Fan Indicator Cooking Temperature Time Display Status Display Cooking Functions... -
Page 8: Controls
CONTROLS Control Knob Fan/Light Button • Turn the knob to change cooking functions. • Press to turn the fan on/off. The current function will blink on the display. • The fan can be used with all cooking • After pressing , turn the knob to change functions. -
Page 9: Temp/Time Button
PREHEAT Button TEMP/TIME Button • Selects the Preheat function. • Press once to adjust temperature. Press again to adjust time. Turn the control • For more information, see Preheat Function knob clockwise to increase the setting and (page 12). counterclockwise to decrease the setting. •... -
Page 10: Before First Use
BEFORE FIRST USE Setting Up 1. Remove all packaging around and inside the oven. 2. Place on a stable, level, heat-resistant surface, away from anything that can be damaged by heat. 3. Wash all accessories and clean the oven’s interior (see page 27). Dry and place accessories back in oven. -
Page 11: Cooking With Your Smart Air Fryer Toaster Oven
COOKING WITH YOUR SMART AIR FRYER TOASTER OVEN Note: You can use the VeSync app to control your For Toast, turn the control knob smart air fryer toaster oven, follow in-app recipes, to change the darkness level. and more. For Preheat, turn the control knob to change the temperature. -
Page 12: Cooking Functions Quick Reference Chart
Cooking Functions Quick Reference Chart Suggested Accessory Name Range & Position Preheat • 150°–450°F / • Manually preheat oven None 66°–232°C “PREHEAT” • Keep food warm at the • 140°–230°F / Keep Warm recommended temperature Food tray or wire rack at 60°–110°C to prevent bacterial growth low position... - Page 13 • Simmer food for long periods of time at low temperatures • 150°–250°F / Slow Cook Food tray or wire rack at • Cook soup 66°–121°C low position “SLOW COOK” • Note: Usually requires • 1 min–12 hr placing cookware on top of tray or rack.
-
Page 14: Vesync App Functions
• Cooking progress can be monitored from a distance. In-App Cosori Recipes • Pre-programmed recipes made by Cosori’s in-house chefs are available in the app. Selecting a recipe automatically sets the recommended time and temperature. • Create and save custom recipes. -
Page 15: Preheat Function ("Preheat")
Preheat Function (“PREHEAT”) Automatic Preheat This function allows you to manually preheat your oven without selecting another preset. Air Fry, Bake, Pizza, Roast, and Broil all use Press PREHEAT. “PREHEAT” will blink automatic preheat. You can also use the manual on the display. -
Page 16: Keep Warm Function ("Keep Warm")
Keep Warm Function (“KEEP WARM”) This function is designed to keep food warm Press to begin warming. The button at the recommended temperature to prevent will light up, and the display will show bacterial growth (160°F / 71°C or above). the timer counting down. -
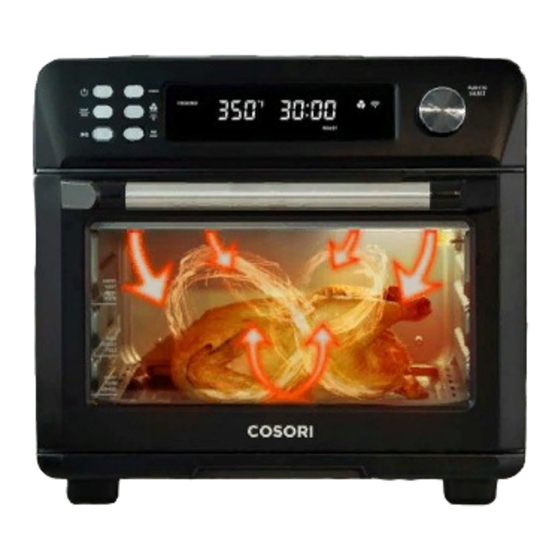
Page 17: Air Fry Function ("Airfry")
Air Fry Function (“AIR FRY”) This function is ideal for cooking a variety of When preheating completes, the oven food, including french fries and chicken wings. will beep several times, the display Uses intense heat and maximized airflow. will flash, and the button will blink continuously. -
Page 18: Dehydrate Function ("Dehyd")
Dehydrate Function (“DEHYD”) This function combines low and stable heat with Optionally, customize the temperature steady airflow to evenly dry out foods without and time. You can do this anytime cooking. Ideal for drying fruit or vegetable chips. during cooking. Heating Elements: Bottom heating elements Press once to control... -
Page 19: Bake Function ("Bake")
Bake Function (“BAKE”) This function cooks food evenly throughout. When preheating is finished, the oven Ideal for baking cakes, muffins, brownies, and will beep several times, the display pastries. Also ideal for cooking pre-packaged will flash, and the button will blink frozen meals, including lasagna and pot pies. -
Page 20: Pizza Function ("Pizza")
Pizza Function (“PIZZA”) This function melts and browns cheese and When preheating is finished, the oven toppings while crisping crust. will beep several times, the display will flash, and the button will blink Heating Elements: Top and bottom heating continuously. elements cycle on and off. -
Page 21: Toast Function ("Toast")
Toast Function (“TOAST”) This function browns the outside of your bread Note: while keeping the inside soft. Also ideal for • When setting the darkness level, consider the English muffins and frozen waffles. type, thickness, and freshness of the bread. Heating Elements: Top and bottom heating •... -
Page 22: Slow Cook Function ("Slow Cook")
Slow Cook Function (“SLOW COOK”) COOK”, This function is ideal for simmering food for Turn the control knob to “SLOW long periods of time at low temperatures, such as which will blink on the display. Press the when cooking soup. control knob to confirm your selection. -
Page 23: Roast Function ("Roast")
Roast Function (“ROAST”) This function is ideal for cooking a variety of When preheating completes, the oven meats and poultry. Food will be tender and juicy will beep several times, the display on the inside and well-roasted on the outside. will flash, and the button will blink continuously. -
Page 24: Defrost Function ("Defrost")
Defrost Function (“DEFROST”) This function is designed to thaw frozen food for Press to begin cooking. The button cooking. will light up, and the display will show the timer counting down. Heating Elements: 2 Upper and all bottom The oven will stop heating and beep heating elements cycle on and off. -
Page 25: Broil Function ("Broil")
Broil Function (“BROIL”) This function is ideal for cooking open-faced Place food on the food tray. sandwiches, thin cuts of meat (such as bacon), poultry, fish, sausages, and vegetables. Optionally, lightly grease the enamel food tray or line with foil to prevent Heating Elements: Upper heating elements food from sticking. -
Page 26: Ferment Function ("Ferment")
Ferment Function (“FERMENT”) This function is designed to precisely hold low Optionally, customize the temperature temperatures, providing an ideal environment and time. You can do this anytime for proofing bread, rolls, pizza, and dough. during cooking. Can also be used for making yogurt with Press once to control an appropriate recipe (using 110°F / 43°C... -
Page 27: Care & Maintenance
CARE & MAINTENANCE Cleaning the Accessories Clean oven accessories (including trays, etc.) and oven interior after every use. Note: After each use, slide out the crumb tray and Note: discard crumbs. • The walls on the inside of the oven have a nonstick coating for easy cleaning. -
Page 28: Troubleshooting
TROUBLESHOOTING Problem Possible Solution The oven will not turn on. Make sure the oven is plugged in. Food is not completely Increase cooking temperature or time. cooked. Decrease cooking temperature or time. Food is overcooked or Make sure food items are not too large and are not touching the burned. -
Page 29: Vesync App Troubleshooting
VESYNC APP TROUBLESHOOTING Problem Possible Solution During the setup process, you must be on a secure 2.4 GHz WiFi ® network. Confirm that the network is working correctly. Make sure the WiFi password you entered is correct. Why isn’t my oven Turn on Bluetooth on your phone (for Android users, make sure ®... -
Page 30: Fcc Statement
FCC STATEMENT This device complies with Part 15 of the FCC Rules. Operation is subject to the following two conditions: 1. This device may not cause harmful interference, and 2. This device must accept any interference received, including interference that may cause undesired operation. -
Page 31: Warranty Information
There is no other express warranty. contact Customer Support via support@ This warranty does not apply: cosori.com. DO NOT dispose of your product before contacting us. Once our • If the product has been modified from Customer Support Team has approved your its original condition;... -
Page 32: Customer Support
Arovast Corporation 1202 N. Miller St., Suite A Mon–Fri, 9:00 am–5:00 pm PST/PDT Anaheim, CA 92806 Email: support@cosori.com Toll-Free: (888) 402-1684 * Please have your invoice and order ID ready before contacting Customer Support. Attributions Apple App Store is a trademark of Apple Inc. - Page 33 NOTES...
- Page 34 NOTES...
- Page 35 MORE COSORI PRODUCTS If you’re happy with this air fryer toaster oven, the line doesn’t stop here. Check out www.cosori.com for a line of all our beautiful and thoughtfully designed cookware. They might be right at home in your kitchen, too!
- Page 36 Questions or Concerns? support@cosori.com | (888) 402-1684 Mon–Fri, 9:00 am–5:00 pm PST/PDT JJ082020GY-M1_0720CS100-AO...
Need help?
Do you have a question about the CS100-AO and is the answer not in the manual?
Questions and answers