Advertisement
MT20 Installation Guide - Open/Close Detection
Overview
The Cisco Meraki MT20 is a cloud managed Intrusion Detection sensor that is exceptionally simple to configure and deploy due to its integration with the Meraki
dashboard and the use of BLE technology. The MT family eliminates the complex and costly setup required by traditional solutions by removing the limitations of
placement of these sensors.
About this Guide
This guide provides instructions on how to install and configure your MT20 Environmental Sensors.
Product Overview
Physical Specifications
Dimensions
Power
Operating Environment
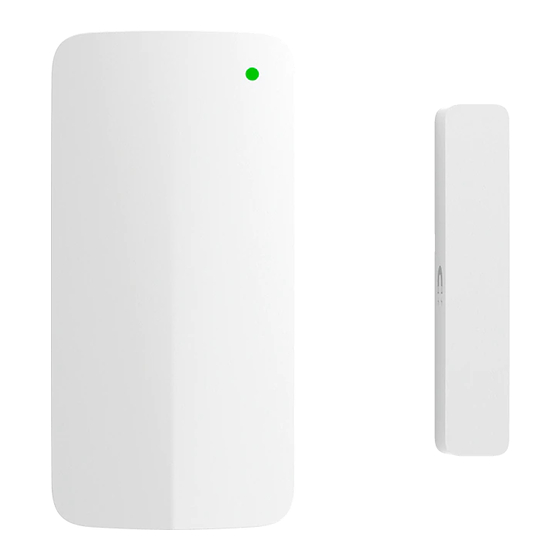
Hardware
Main device: 81.2mm x 39.7mm x 19.5mm
(length x width x height)
Magnet cover: 59.5mm x 12mm x 13.35mm
(length x width x height)
•
1x AA Alkaline Battery
•
Rating: 1.5V; 100mA
•
Temperature: 0°C - 55°C (32F - 131F)
•
Relative Humidity: 0 - 95% RH
•
Multicolor, multifunction status LED
•
General purpose button
•
Reset button
•
Main device and a magnet enclosure
1
Advertisement
Table of Contents

Related Manuals for Cisco MERAKI MT20


Summary of Contents for Cisco MERAKI MT20
- Page 1 Overview The Cisco Meraki MT20 is a cloud managed Intrusion Detection sensor that is exceptionally simple to configure and deploy due to its integration with the Meraki dashboard and the use of BLE technology. The MT family eliminates the complex and costly setup required by traditional solutions by removing the limitations of placement of these sensors.
- Page 2 To conserve battery life, the LEDs on the MT20 don't always remain ON. General Purpose Button The MT20 has a pinhole general purpose button on the top which allows you to wake up the sensor and test if it is able to connect to a gateway. Factory Reset Button Next to the battery compartment, there is a pinhole button to factory reset the sensor.
-
Page 3: Package Contents
Package Contents Unit MT20-HW Guides Quick Install Guide Battery 1x AA Batteries Magnet Enclosure Cover with a magnet attached to the bottom 1x Torx key Mounting equipment 4x Screws 2x VHB Tape Pre-Installation Preparation You should complete the following steps before going on-site to perform an installation Configure Your Network in Dashboard The following is a brief overview only of the steps required to add an MT12 to your network. - Page 4 box. 4. Add the gateway (MV or MR) to the same network as the sensor. NOTE: Make sure the gateway is in the same network and is online and operational. MV Set up Instructions MR Set up Instructions. WARNING: Environmental Sensors are only supported with 2nd Gen MV Cameras and Wifi 6 Compatible APs List of Compatible Gateways: MV12(W/NE), MV22(X), MV32, MV72(X) MR36, MR45, MR44, MR46, MR46E, MR55, MR56, MR76, MR86...
-
Page 5: Installation Instructions
1. Doors and rack enclosures with a flushed frame: In this scenario, the installation is pretty straightforward and either mounting options can be used. 2. Sliding Doors: The MT20 can also be installed on sliding doors with up to 2 cm of Z-axis separation between the sensor and the magnet enclosure. - Page 6 Detected. Make sure there’s at least a 5 mm gap between the sensor and the magnet. For most mounting scenarios, the MT20 has flexible options to provide quick and simple mounting. The instructions are as follows: 1. Start by removing the battery compartment cover by unscrewing it from the grey panel. Insert the AA battery into the battery compartment.
-
Page 7: Incorrect Installation
Alternatively, the 2 double sided VHB tape can also be used for a less permanent solution. Note this option doesn’t ensure the security of the sensor. Incorrect Installation In order for the MT20 to detect the correct magnetic field, the Main sensor body and the magnet needs to be aligned properly. - Page 8 As noted in the illustration above, all of these orientations are an example of an incorrect installation and can result in inaccurate readings.
- Page 9 WARNING: Magnet polarity can also cause incorrect readings. Do make sure when installing the magnet cover, the arrows on the plastic is facing the sensor body Support and Additional Information If issues are encountered with device installation or additional help is required, contact Meraki Support by logging in to dashboard.meraki.com and opening a case by visiting the Get Help section.
Need help?
Do you have a question about the MT20 and is the answer not in the manual?
Questions and answers
Can the MT20 be installed outdoors?