Table of Contents
Advertisement
Advertisement
Table of Contents

Related Manuals for NOVO MARK II

Summary of Contents for NOVO MARK II
- Page 1 Ver010 0.1UL+cUL Instruction Manual Original Instructions...
-
Page 2: Table Of Contents
●「NOVO MARKⅡ」 is the roaster. ●Please read and comprehend this manual carefully for proper operations. ●Please keep this manual in sight for whom operates properly. Contents 1.Before use 1-1.Important notice for safety -------------- P4 1-2.Where to place --------------------------- P4 1-3.Primary specification -------------------- P5 1-4.Preparation ------------------------------P6... - Page 3 The instructions shall state the substance of the following: This machine can be used by children aged from 8 years and above and persons with reduced physical, sensory or mental capabilities or lack of experience and knowledge if they have been given supervision or instruction concerning use of the machine in a safe way and understand the hazards involved.
-
Page 4: Before Use
1.Before use 1-1.Important notice for safety This “NOVO MARKⅡ” is exclusive use for Coffee or Cacao Roasting purpose ONLY. Do not use for other than intended purpose. 「NOVO MARKⅡ」is safe, easy to use and high maintainability machine. To keep this machine optimum condition, please operate correctly. -
Page 5: 1-3.Primary Specification
1-3.Primary specification ・Machine size width :635mm height :1950mm depth :635mm ・power :220-240VAC 40A 60Hz ・electric consumption :8.5kw ・weight :210kg ・operation temperature :15℃~35℃ ・storage and maintenance temperature :-20℃~55℃ ・operation humidity :45%~85% RH ・storage humidity :45%~85% RH ・install location :less than 2000 m ・exhaust temperature :100℃~260℃... -
Page 6: 1-4.Preparation
Safety Precautions Observe the following instructions to prevent injury to the user and others and damage to property. In addition, the precautions provided throughout this manual should be read carefully and the machine should be used correctly. Precautions shown here The harm or damage that could result from ignoring the following precautions and incorrectly using. - Page 7 the machine are classified and explained using the following symbols and massages. Warning This symbol designates information that, if not followed, “could result in death or serious injury.” Caution This symbol designates information that, if not followed, “could result in injury or property damage.” Examples of symbols The information calls for “warning or caution.”...
- Page 8 ●Do not use the machine if the power cord or power plug is damaged or if the power plugs is loosen when plugged into the power outlet. ●Do not damage, modify, excessively bend, pull on, twist, or fold up the power cord or place it near a hot object or under a heavy object.
- Page 9 During operation ●Beans immediately after roasted are very hot. Never take beans-tray out until cooling down is over. ※After cooling down, beans may be still hot. ●Exhaust air and air pipes are very hot during operation. Never touch until the machine cooling down is over. ※After cooling down, Air pipes may be still hot.
-
Page 10: 1-5.Machine Outline
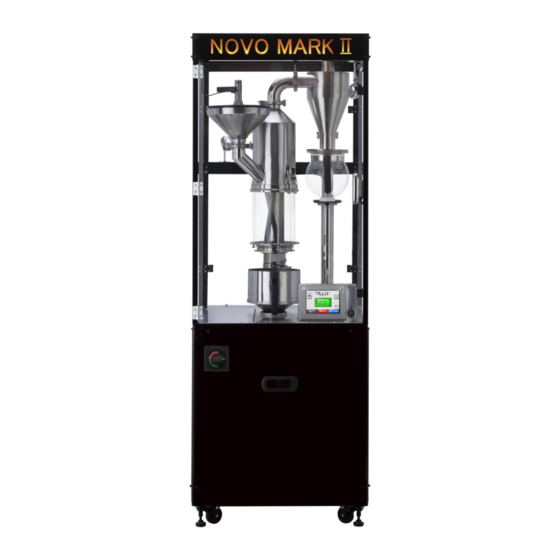
1-5.Machine outline Chaff-bottle Hopper All Chaffs derived by This is where to place roasting are green beans. gathered into this Minimum 100g bottle. Keep clean Maximum 1kg daily basis. Touch panel Roasting-Glass Operating this machine by This is where to Easy visual screen. - Page 11 1-6. Touch panel is easy to roast for anyone by simply touching this panel. 「NOVO MARKⅡ」 ① [Start screen] After turning Main switch ON, [Start screen] appears on the panel as below. By touching anywhere on the panel, automatically goes to [Menu screen] Every operation starts from this screen.
- Page 12 SETTING By touching this button, you can create/modify data of each roasting program. Detail setting will be explained in page 14. SHUT DOWN By touching this button, cooling-down process will be automatically start for 10 min. After 10 min cooling, you can turn off the main switch. MAINTANANCE Use this button for maintenance of this machine.
-
Page 13: 1-7.How To Use Eject Button
1-7.How to use Eject button How to use this button in case of immediate stop for roasting, in occurrence of abnormality, or any other case of emergency. Touch this button. 200g-1 Emergency shut-down will be displayed. Blower will immediately stop and shutter will open automatically. -
Page 14: 1-8.Setting For Roasting Program
1-8.Setting for roasting program How to set up (create new, modify) Roasting program will be explained as follows; Warming Up Roasting Program By Touching Roasting Program name, “Edit roasting program” screen will be displayed. 200g-1 200g-1 200g-2 200g-3 200g-4 200g-5 “Edit roasting program”... - Page 15 Here you can learn how to create new program by learning how to modify the program. 「 First, select the profile「200g-1」 200g-1 (Select the Blank one when creating new program.) 200g-1 You can set upto 150 programs. 200g-2 You cannot copy or search the program from this screen. 200g-3 200g-4 200g-5...
- Page 16 Press the program 200g-1 Touch where you wish to create/modify. Editing Screen Set the name of the Program Here, how to name「Roast 1」as an example. Touch the name of the existing Program. 「200g-1」 200g-1 Typing-Keys will be displayed automatically. Touch「CLR」to erase [200g-1]...
- Page 17 Input the name of the Program. Roast 1 It switched uppercase and lowercase letters, when you touch「CAPS」. Roast 1 Touch the「ENT」, input is completed. Changed section is flashing red. By touching the「Write」, to confirm the edit.
- Page 18 How to create/modify the profile Here add 8 stages as an example Temperature(℃), Air-flow(%),Time (sec) Roast 1 As an example, set 100℃, 75%, 25sec You cannot enter 0 for temperature as wll asair-flow. When you wish to delete the stage, enter 0 for sec, and touch Touching temperature you wish to set.
- Page 19 Set the data To set the data, press “Write” Roast 1 If you wish to undo modification, read next page for more detail. Confirmation message will be displayed. Roast 1 Press “OK” Roast 1 Roast 1 After checking edited data, Press “BACK”.
- Page 20 Changes or Suspension You can suspense any time during blinking in red by pressing “Back”. ロースト 1 Back to previous screen. Nothing has modified. Press “name of the program” or▲▼ Suspension has done. 200g-1 Modification remains until selecting other program. 200g-2 200g-3 200g-4...
-
Page 21: 1-9.Notes On Editing/Creating Programs
1-9.Notes on editing/creating programs. ・When you edit the program which has been selected. 200g-1 By press “Select” once again after editing, Roasting program will be updated. 200g-1 200g-2 200g-3 200g-4 200g-5 ・Note for setting temperature Roasting Program goes from first stage to the 2 and so on. -
Page 22: 1-10.Program Management
1-10 Program management You can store roasting program by using USB memory. ・How to store roasting program into USB memory. Insert USB memory into slot. ※ DO NOT take out USB memory while red-light blinking. ※ If roasting program stored in USB memory, will be over-written automatically. Edit screen 200g-1 Press this button... - Page 23 Press this button only after USB memory stop blinking. To take out USB memory, press this button. “Now you can remove the USB memory out” displays, press this button. You can go back to main menu by pressing “Main Menu”.
- Page 24 How to read out from USB memory. Insert USB memory into slot. ※ DO NOT take out USB memory while red-light blinking. Edit screen Press this button When left screen displayed, press this button. Press this button only after USB memory stop blinking.
- Page 25 To take out USB memory, press this button. “Now you can remove the USB memory out” displays, press this button. You can go back to main menu by pressing “Main Menu”. Important note ・ In case of freezing computer while memory being forward, Turn of the main switch and try again.
-
Page 26: How To Use
2How to use Preparation and check list before use. ・ This “NOVO MARKⅡ” is exclusive use for Coffee or Cacao Roasting purpose ONLY. ・Make sure the room is well ventilated during operation. ・Do not use this machine without ventilation. ・Make sure that front door being locked before use. -
Page 27: 2-3.Selecting Roasting Program
2-2 Warming up LIGHTING Turning on/off the light. In the main menu screen, by pressing “WARMING-UP” will automatically move to Roasting screen. Pressing “Start Warming-up”, 200g-1 machine start warming up followed by Hopper and Shatter movement check. In case of failure of Hopper or Shatter movement, press “EJECT”... - Page 28 Selecting Program screen ▲▼or press directly program name you which to select. 200g-2 Here press 200g-2 as an example. 200g-1 200g-2 200g-3 200g-4 Press this button to select the program 200g-5 you have chosen. Confirmation message will be displayed. Press “OK”. By pressing “WARMING-UP”...
-
Page 29: 2-4.Set Green Beans
2-4 Set Green beans 200g-2 Hold down “SET” until the wind stop, then press to set the green beans. 。 1 Open the door. *Caution – some parts get extremely hot. *Wear long sleeve and hand-grove and do not touch inside metal and glass parts for your safety. -
Page 30: 2-5.Start Roasting
2-5 Start roasting Roasting screen After setting the green beans, close the door. Then Press “Start Roasting” 200g-2 Press “EJECT” in case of immediate stop for roasting, in occurrence of abnormality, or any other case of emergency. 2-6 Roasting During Roasting If you wish to add extra time on each 200g-2 stage, press “ADD 10 sec”... - Page 31 In case of a few beans left in roasting-grass after roasting. *this likely to happen when you dark-roast beans as beans oil seeped out and gets easy to stick to the grass or shatter. 200g-2 Press “EJECT” and take out remained beans out from grass or shatter.
- Page 32 Roast screen 200g-1 Press “EJECT” for cleaning. Detail instruction refer in page 13. CAUTION! Shutter becomes extremely HOT! Wear long sleeve and hand-grove and do not touch inside metal and glass parts for your safety. Take off the portions and wipe off the oil. Make sure to clean the bottom of the roasting-glass as per below pics.
-
Page 33: 2-8.Shutting Down
2-8 Shutting down Hold “SHUT DOWN” for 2 sec to shutting down the machine properly. Cooling screen Automatically starts 10 min cooling down. Press “STOP” in case of immediate stop for roasting, in occurrence of abnormality, or any other case of emergency. - Page 34 2-9 ALERT This button will be lightend in occurrence of abnormality. Press “ALERT” to verify on going alert point. Alert screen On going alert button will be red blinking. Press red button. Brief explanation message will be displayed. Press “BACK” after confirmation. Press “clear”...
- Page 35 Error list Shutter Sensor Heater Power Blower Power Shutter Movement Max temp reached Inverter...
- Page 36 DC24V control circuit Set temp limits Control power Lighting equipment...
-
Page 37: 3-1.Daily Maintenance
3Maintenance To keep the best performance of this machine, daily and yearly maintenance is strongly recommended. Tools for maintenance ・ Neutral Detergent ・ Kitchen Sponge ・ Copper Brush 3-1 Daily maintenance ・Take out Roasting-Glass ・Washing Roasting-Glass In Main screen, press “SETTING”. - Page 38 Shutter Movement Hold “OPEN” till shutter moves all way to right to stop. Press Open/Close with interval more than 1 sec. *Green turns Red by holding till stop. If color does not changes even after stop by holding button, sensor may be misplaced or sensor failure. Call your mechanic with turning main switch OFF.
- Page 39 Take out the shutter and wash by detergent. Lock the arm of the shutter using metal hook. Unlock the Roasting-glass lock as pics. To avoid breakage by falling, grab the bottom of the grass by hand. Unlock the back-side of the lock. Keep the fitting parts upward.
- Page 40 Keep Roasting-glass horizontally and rotate clockwise to release. Then carefully move downward. CAUTION: Roasting-glass is heavier than as it looks. How to take Roasting-glass to pieces. Place on flat surface with Knurling-screw on upward. *Upside down as it was loaded in the machine. Rotate screw clockwise.
- Page 41 Wash each parts by detergent. Especially shutter gets burned by beans oil. Keep them clean daily basis. For metal parts, use tools or cleanse as pics for easy cleaning. ※DO NOT use cleanser on Glasses. ・Cleaning metal parts Use Furbishing preparations with copper brush for easy cleaning. With 40℃...
- Page 42 Assembly process is reverse order. Place Roasting-glass on the metal parts. Grooves part on upward. Place metal part on the Roasting glass with its grooves. Make sure to set properly. Adjust the holes of both metal parts for screws. Place each lod perpendicularly. Tightening each screw by hand.
- Page 43 Tighten each screw until no space in between screw and metal parts. After assembled, make sure with no space or backlash. Note that glass moves a little as being just put in between metal parts. Place the Teflon-seal on top. Place the Roasting-glass with adjusting with grooves.
- Page 44 Rotate the glass to set. Lock with both fitting parts. Take out the metal hook and place the shutter. Now you can turn on the main switch and hold “CLOSE” button till stops in Setting screen. Cleaning Nozzle Although it is not necessary to clean the nozzle, clean as below instruction in case you wish to clean.
- Page 45 Take out the saucer, roasting-glass and chaff-bottle and cover the intake hole. Caution ・ Do not take out the nozzle. ・ Avoid the nozzle gets wet. ・ Do not put too much pressure. Scrub with copper brush. DO Not use water nor detergent.
- Page 46 Cleaning Chaff-bottle Take out Chaff-bottle ※ Caution: Make sure the bottle is completely cooled down. On Roast screen press this button. Do not press this button during warming-up or roasting. Discharge the chaffs when it fills more than half of the bottle. Automatically Blower starts turning off, wait until “Pause”...
- Page 47 Hold Depressing lever, set the Chaff-bottle. Make sure no space in between. Close the door and press “OK”, automatically start warming up to be ready. Make sure air is not leaking. and press to lock. ※Caution: Some parts get extremely hot. Changing paper-filter ※Clogged filter may cause uneven roasting.
- Page 48 Take out the filler by lifting upward. Avoid to drop any objects in the intake hole. ※in case of any objects dropped in the hole, call the mechanic to remove. Change the filter and set. When you use up all filters, place an order with the buyer for it.
- Page 49 Maintenance Weekly ・Hopper cleaning Clean the dust of green beans by vacuum cleaner. Turn off the main switch and open the Hopper. Clean with dry close or brush. Close the Hopper. Caution:Air leakage from Hopper may cause parts failure by hot air directly from Roasting room.
- Page 50 3-2 Instruction on touch panel for Maintenance This setting for Maintenance ONLY. You can only operate when adjusting time. Main Menu Press “SETTING”. Press “MAINTENANCE”. Press “YES” on confirmation screen. Press “Time adjustment”...
- Page 51 Time Adjust screen Set in order by Year, Month, Day, Hour, Minute Press “ENT” to start. After adjusting time, press “over-write”. ※Other Setting as “FUNCTION” “BASIC” and/or “OPERATE” is for professional mechanic ONLY. Strongly recommended for NOT TO USE.
-
Page 52: 3-3.Lifetime Prediction On Each Part
3-3 Lifetime prediction on each part By changing each parts proper timing, keep this machine optimum condition and safety. Above list is only predictions which may vary depends on usage, conditions, or any other factors. -
Page 53: How To Restore Hopper Alert
4.How to restore Hopper Alert This Alert appears when the Hopper keeps open for 60 sec. Close the Hopper and automatically back to warming-up. *In set of green beans, close the Hopper and press “SET” once again. When Hopper is properly closed, green light will light as left. -
Page 54: In Case Of Trouble
5.In case of trouble 1 No power supply Where to check Cause Solution Circuit breaker Circuit breaker is turned off. Turn on the breaker. Need to check the power supply. Circuit breaker activated or Breaker activated by detecting Call mechanic cannot tuned on failure. - Page 55 4 Abnormal odour Where to check Cause Solution Roasting-glass, Burned any objects stick in Take off the object and clean Chaff-bottle, or any other glass, bottle or any other hot after shutting down the machine. parts become hot. surface. Call mechanic Burned dust out from outlet professional...
- Page 56 6 Air-leakage Where to check Cause Solution Objects stuck in between the Clean the Hopper after shutting Hopper Hopper. down the machine. Objects stuck in between the Clean the shutter and glass after Shutter Shutter. shutting down the machine. Clean the Chaff-bottle and set Chaff-bottle Bottle is not set properly.
- Page 57 8 Shutter Alert Where to check Cause Solution Objects stuck in between the Clean the shutter and glass after Shutter Shutter. shutting down the machine. Wrong assemble Roasting Perform proper assemble as per Roasting-glass glass. explained in 3-1. Teflon-seal Missing Teflon-seal Place the seal.
- Page 58 9 Unfamiliar screen displayed Where to check Cause Solution movement while Processing stop by occurance of Turn off the main switch and redo transferring data through error while transferring data. the operation as explained 1-10. USB memory. “Transferring time over” displayed in lower part of Internal parts failure.
Need help?
Do you have a question about the MARK II and is the answer not in the manual?
Questions and answers