
Related Manuals for eBike P850C


Summary of Contents for eBike P850C
- Page 1 P850C Manual August 2020 01392 580040 info@custombuilt-ebikes.co.uk https://custombuilt-ebikes.co.uk...
- Page 2 1. Features Suitable for low temperatures - Max -20℃. High-contrast 3.2inch IPS colour matrix screen. Ergonomic external button design, easy to operate. Speed display : AVG SPEED, MAX SPEED, SPEED(Real-time). Kilometer / Mile : Can be set according to your requirements ...
-
Page 3: Usage Description
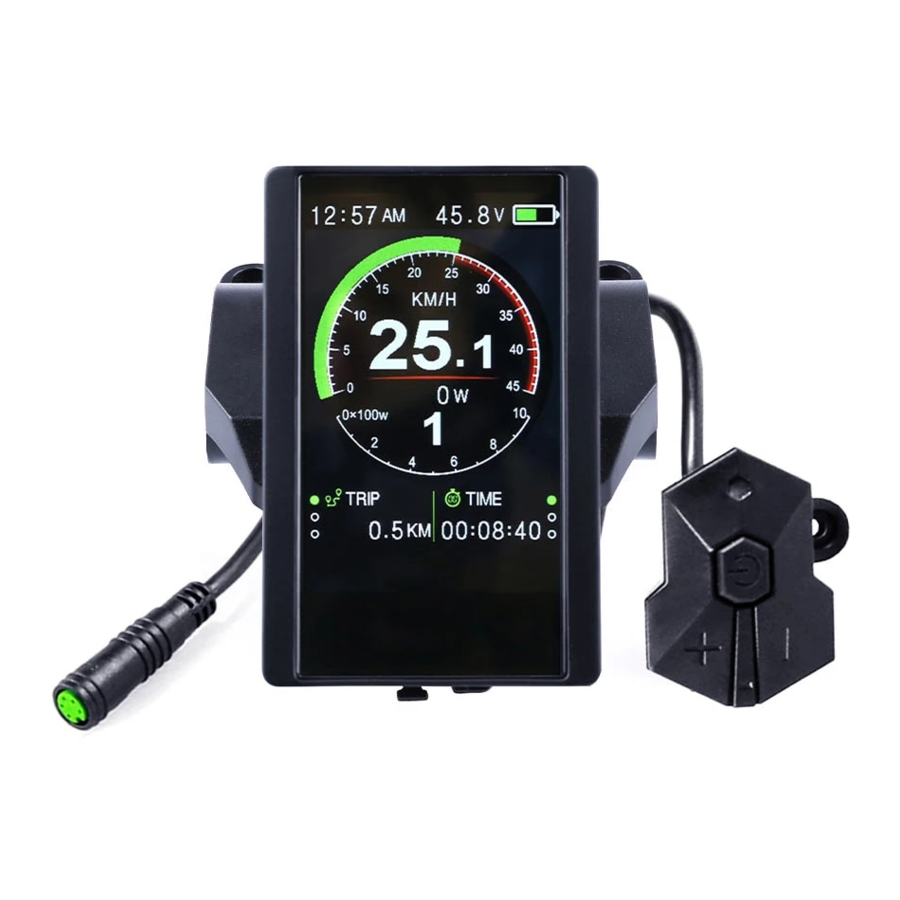
2. TFT screen instructions Battery Clock Brake Signal Front Light Power loop Speed Scale Speed value Power Power indicator Assist level Power Scale Time Mileage LOGO Switchover area 3. Usage Description 7.1 Power On/Off Press and hold the Power button for 1 second to turn the display on/off. The Display will automatically shut down when it isn’t in use. - Page 4 7.3 Speed & Mileage mode switch Short press POWER button change speed mileage mode, TRIP→ODO→RANGE→TRIP→TIME→MAX SPEED→AVG SPEED *Range needs smart BMS support. **If there is no operation for 5 seconds, the display will return to the Speed (Real-Time) display automatically. 7.4 Headlight/backlight On/Off Press and hold the UP button for 1 second to turn on/off the headlight, and the screen will switch to the corresponding mode (only if integrated headlight is fitted).
-
Page 5: Settings Menu
7.5 Walking mode (6km) Press and hold DOWN button for 2 seconds to select walking mode. Walking mode provides a small amount of power to help you push your bike along if walking. * This feature needs to be supported by controller. 7.6 Data cleanup Press and hold UP &... - Page 6 8.1 Language:Default EN ,Un adjustable 8.2 System : Press Up / Down button to switch between Metric / Imperial. 8.3 Brightness : Press Up / Down button to change the brightness of the backlight, ׀is dark, ׀׀׀׀׀is very bright, default value is .׀ Note : You can set the brightness independently between Daytime mode and Night mode.
- Page 7 8.4 Auto off : Press UP/DOWN button to change the auto power off time, from 1 to 9/OFF. The numbers represent minutes. When off is selected, the screen will only turn off when the on/off button is pressed. By default, this is set to 5 minutes. 8.5 Scenes : Analogue only 8.6 Battery Ind : Press UP/DOWN button to change the battery indicator, Voltage / Percentage / OFF.
- Page 8 Voltage Percentage Pow Ind : Press UP/DOWN button to change the Power indicator, Power / Current. * This data represents the power output of the battery (not motor). 8.8 Clock : Clock setting, press POWER button get into the clock setting menu, press UP/DOWN button to set Year/Month/Day/Hour/Min/Sec.
- Page 9 Note : There is a battery inside the screen to ensure the clock keeps time even when display is powered off. This battery is charged when the screen is turned on. If you don’t use your bike for a very long period of time, it can go flat. 8.9 Start password : Press the POWER button to get into the password setting menu.
- Page 10 Basic Settings *Press the DOWN button to move the red arrow to , press POWER button to show all items of the Basic Setting. 8.10 Wheel : Press UP/DOWN to change the wheel size setting. The wheel diameter optionals are 16/18/20/22/24/26/27/27.5/28/29/30/31 inch, 8.11 Battery : This option is not set for a Bafang motor.
- Page 11 low. 8.14 Advance setting : Pressing the POWER button allows you to get into the advance setting menu. The default password is ‘1919’. Speed limit Assist levels Error code 8.15 Speed limit : Pressing UP/DOWN will change speed limit. The allowable options are 10km/h~45km/h.
- Page 12 8.16 Assistance levels : This setting allows you to customise the assistance levels, options are 3/5/9/UBE, UBE represent factory default settings. Advance Setting Advance Setting Advance Setting Advance Setting Speed limit 25km/h Speed limit 25km/h Speed limit 25km/h Speed limit 25km/h Assist levels Assist levels Assist levels...
- Page 13 8.20Information : Shows information about your ebike. Information Speed 15.4 Km/h 32.4 Km/h Mileage Trip 9999.9 Km 99999.9 Km Range 59.9 Km BACK Product Infor Battery Infor 8.21 Product info : This shows the hardware and software versions. Information Product Information...
-
Page 14: Error Codes
5. Error Codes 850C can show warning messages. The icon shows that there is an error code, displayed on the bottom of the screen. Error Code Error description Error diaplay 0x01 Normal No error 0x03 Brake signal No error 0x04 Throttle on high position Display 04H on LOGO position 0x05... - Page 15 6. Assembly instructions Please pay attention to the screw’s maximum torque value. Damage caused by over tightening of the bolts is not covered by warranty. There are 2 options for the clamp installation, forward or backward. The clamps suit 3 sizes of handlebar - 31.8mm, 25.4mm and 22.2mm. There are optional rubber spacer rings for 25.4mm and 22.2mm handlebars.
-
Page 16: Connector Descriptions
7. Connector descriptions 1、 Red wire : Anode(24v/36v/48V) 2、 Blue wire : Power cord to the controller 3、 Black wire : 4、 Green wire : RxD (controller -> display) 5、 Yellow wire : TxD (display -> controller) 8. Assistance level instructions The assistance levels can be customised. -
Page 17: Specifications
10. Specifications 3.2inch IPS screen 24V/36V/48V battery supply Rated operating current : 40mA Max operating current : 100mA (36V battery, with USB equipment changed) USB changing port : 5V 500mA Off leakage current < 1uA ...
Need help?
Do you have a question about the P850C and is the answer not in the manual?
Questions and answers
Hallo ich habe fehlercode 11h wie bekomme ich das weg?
Error code 11H on the P850C eBike display indicates a motor over-temperature issue. To resolve this:
1. Stop using the eBike and allow the motor to cool down.
2. Check for any obstructions or excessive load that may be causing overheating.
3. Ensure proper ventilation around the motor.
4. Restart the eBike after it has cooled.
5. If the issue persists, inspect the motor connections or consult a technician.
If the problem continues, professional service may be required.
This answer is automatically generated
@Mr. Anderson ich habe den motor aber **** benutzt wie kann der überhitzt sein