
Related Manuals for Salora CR618P


Summary of Contents for Salora CR618P
- Page 1 RADIOWEKKER MET PROJECTOR RADIO RÉVEIL PROJECTEUR PROJECTION ALARM CLOCK RADIO CR618P GEBRUIKSAANWIJZING MANUEL D’INSTRUCTIONS INSTRUCTION MANUAL ...
-
Page 2: Belangrijke Veiligheidsinstructies
WAARSCHUWINGEN Dit apparaat is alleen bedoeld voor huishoudelijk gebruik en mag niet voor andere doeleinden of toepassingen worden gebruikt, zoals niet-huishoudelijk gebruik of in een commerciële omgeving. Ventilatie Laat minstens een vrije ruimte van 10cm rond het product. ... - Page 3 Symbolen Waarschuwing: om het risico op een elektrische schok te verkleinen, dient u de voor- en achterkant niet te verwijderen. Binnenin zitten geen onderdelen voor onderhoud door de gebruiker. Neem contact op met een gekwalificeerde onderhoudsmonteur voor onderhoud. In het inwendige van Er bevinden zich het apparaat bestaat belangrijke gebruiks- en...
-
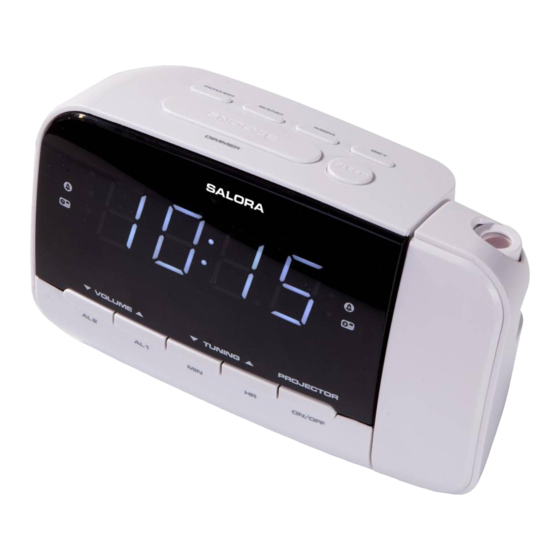
Page 4: Omschrijving Van De Onderdelen
OMSCHRIJVING VAN DE ONDERDELEN Boven- en zijaanzicht Vooraanzicht 1. AAN/UIT knop 11. BAND 2. Display 12. MEM knop 3. VOLUME / AL2 knop 13. Batterijdeksel (onderaan) 4. VOLUME / AL1 knop 14. PROJECTOR ON/OFF knop 5. FM-antenne 15. Projectorwiel 6. TUNING / HR knop 16. -
Page 5: De Klok Instellen
DE KLOK INSTELLEN In de stand-bymodus, druk en houd SET ingedrukt totdat het display knippert. Terwijl het display knippert, druk herhaaldelijk op HR en MIN totdat de gewenste tijd wordt weergegeven. Druk en houd HR en MIN ingedrukt om snel vooruit te gaan. Druk op SET om te bevestigen. - Page 6 UW FAVORIETE RADIOSTATIONS IN HET GEHEUGEN OPSLAAN U kunt tot 10 FM en 10 AM radiostations in het geheugen opslaan. Volg de stappen onder "DE RADIO BEDIENEN" en stem af op het radiostation dat u in het geheugen wilt opslaan. Druk en houd SET gedurende circa 2 seconden ingedrukt, “P01”...
- Page 7 Snoozefunctie Deze functie kan worden gebruikt om de wektijd gedurende circa 9 minuten te onderbreken eenmaal deze geactiveerd is. Door op SNOOZE te drukken wordt de zoemer of radio onderbroken en wordt na negen minuten weer hoorbaar. WERKING VAN DE INSLAAPTIMER De inslaapfunctie is bedoeld om de radio automatisch uit te schakelen.
-
Page 8: Technische Gegevens
TECHNISCHE GEGEVENS Voeding: AC 230V~ 50Hz, 5W AM: 522-1620 kHz FM: 87.5 – 108 MHz Elektrische apparaten mogen niet bij het huishoudelijke afval worden gegooid. We verzoeken u het apparaat naar een afvalscheidingsstation te brengen. Neem contact op met de plaatselijke autoriteiten of uw dealer voor advies over recycling. -
Page 9: Instructions Importantes De Sécurité
AVERTISSEMENTS Cet appareil est destiné à un usage domestique uniquement. Toute utilisation autre que celle prévue pour cet appareil, ou pour une autre application que celle prévue, par exemple une application commerciale, est interdite. Aération Prévoyez un espace libre d'au moins 10 cm tout autour du produit. ... - Page 10 Symbols Attention : pour réduire les risques de choc électrique, n’enlevez pas le couvercle (ou l'arrière). Il n'y a pas de pièce réparable par l'utilisateur, faites appel à du personnel qualifié pour toute réparation. Cet appareil contient La documentation des pièces sous haute accompagnant cet tension pouvant appareil contient...
- Page 11 EMPLACEMENT DES BOUTONS DE CONTRÔLE Vues avant et latérale Vue avant 1. Bouton POWER 11. Bouton de BANDE (ALIMENTATION) 12. BOUTON MEM 2. Écran d'affichage (MÉMORISATION) 3. Bouton VOLUME / AL2 13. Couvercle du compartiment des button piles (au fond) 14.
-
Page 12: Mode De Veille
MODE DE VEILLE Posez l’appareil sur une surface plane et stable, puis branchez son câble d’alimentation dans une prise électrique. L’appareil entre en mode veille et « 0:00 » clignote sur l’écran. RÉGLAGE DE L'HORLOGE En mode de veille, appuyez sur SET jusqu’à ce que l’affichage se mette à... - Page 13 REMARQUES : Pour optimiser la réception FM, déployez complètement l’antenne FM. Pour améliorer la réception AM, tournez l’appareil dans la position dans laquelle la réception est la meilleure. MÉMORISATION DE VOS STATIONS DE RADIO PRÉFÉRÉES Vous pouvez mémoriser jusqu'à 10 stations FM et 10 stations AM. Réglez la fréquence de la station de radio désirée en procédant comme indiqué...
- Page 14 Pour éteindre une alarme quand elle se déclenche, appuyez sur POWER, elle s’éteindra et se déclenchera à nouveau les jours suivants à l’heure programmée. Pour désactiver une alarme, appuyez plusieurs fois sur AL1 / AL2 jusqu’à ce que l'indicateur d'alarme correspondant s’éteigne sur l’écran. Fonction de rappel d'alarme Cette fonction permet d'arrêter momentanément l’alarme pendant 9 minutes quand elle se déclenche.
-
Page 15: Spécifications
PROJECTION Grâce à cette fonction de projection, vous pouvez facilement projeter l’heure sur une surface, par exemple sur un mur. Pour activer ou désactiver la projection, appuyez sur PROJECTOR ON/OFF. Pour faire la mise au point de l’heure projetée, tournez la molette du projecteur. -
Page 16: Important Safety Instructions
WARNINGS This appliance is intended for domestic household use only and should not be used for any other purpose or in any other application, such as for non domestic use or in a commercial environment. Ventilation Allow at least a 10 cm gap all around the product. ... -
Page 17: Location Of Control
The marking plate is located at the bottom of the apparatus. Battery handling and usage Only adults should handle battery. Do not allow a child to use this apparatus unless the battery cover is securely attached to the unit. The battery type used in the unit is 2 x 1.5V AAA size batteries (not included) which are accessible and can be replaced. - Page 18 BATTERY BACKUP The clock, alarm and preset stations settings can be protected against AC power failure with the batteries for a short period of time. If no backup batteries are installed or the power failure is prolonged, you will need to set the clock again. STANDBY MODE Place the unit on a flat stable surface and plug the power cord into the mains socket.
-
Page 19: Presetting Your Favourite Radio Stations
NOTE: For the best FM reception, extend the FM aerial to its full length. For the best AM reception, rotate the unit to the position giving best reception. PRESETTING YOUR FAVOURITE RADIO STATIONS Up to 10 FM and 10 AM radio stations can be preset. Follow steps in "RADIO OPERATION"... -
Page 20: Sleep Timer Operation
Snooze function This function can be used to stop the alarm temporarily for about 9 minutes once the alarm is activated. When you press SNOOZE, the buzzer or radio alarm sounds will stop and sound again after about 9 minutes. SLEEP TIMER OPERATION The sleep function is designed to automatically turn off the Radio. -
Page 21: Specifications
SPECIFICATIONS Power source: AC 230V~ 50Hz, 5W AM: 522-1620 kHz FM: 87.5 – 108 MHz Electrical products should not be disposed of with household waste. We kindly ask that you use the recycle collection points provided for this purpose. Consult with your local authorities or dealer for advice on recycling. We apologise for any inconvenience caused by minor inconsistencies in these instructions, which may occur as a result of product improvement and development.
Need help?
Do you have a question about the CR618P and is the answer not in the manual?
Questions and answers