Advertisement
Quick Links
1.1 Remove the protection film , avoid using utensils that can damage the surfaces , check that
the unit is not damaged. If damage is found please contact the manufacturer.
1.2 The machine must be installed in dry environment with good lighting. Position the unit on
a flat, level surface, leaving at least 6" around the unit for ease of use and cleaning.
1.3 The unit comes with a Nema5-15P plug and must be on a dedicated grounded circuit.
1.4 Please check the cable and plug for damage before plugging into the outlet.When unplugging
the unit, do not pull on the cable, use the plug.
Note : The machine has been installed and tested by technical personal before leaving the factory.
Modifying the unit from its original will void the warranty.
Service and repairs should only performed by an approved service technician.
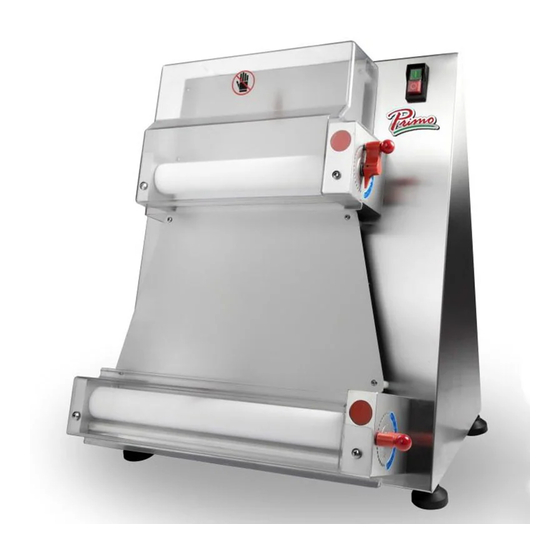
2.1 The machine has the following control devices on the front panel:
A: Red Stop Button
B: Green Start Button
2.2 Functional test
Once plugged in the machine is ready for the functional test. Start the unit by pushing the
green button. Run the unit for a minute to make sure it is working correctly. Push the red button
to switch off the unit.
2.3 Before every work-cycle , always make sure the machine is perfectly clean , in particular
the surfaces that come in contact with the dough. If necessary clean the machine.
Warning:Take sundries and hands away from the rollers before turning on the machine!
2.4 Operation for the shaping of round disks
2.4.1 After turning on the machine ,insert dough(2-17oz) previously fermented for at least
4-6 hours , squash the sides slightly and put some dry flour on it so it can pass through
the upper rollers easily. (Pic.1)
2.4.2 When the dough comes through the upper roller , it will be thin with an oval shape. Turn
the dough 90ºand reinsert through the lower roller. It will now have a disk shape. If this
shape is not perfect it can be touched up by hand. Pic.2
PDR-16 DOUGH ROLLER
INSTRUCTION MANUAL
1.Installation
2.Operation
Advertisement

Subscribe to Our Youtube Channel
Related Manuals for Primo Water PDR-16


Summary of Contents for Primo Water PDR-16
- Page 1 PDR-16 DOUGH ROLLER INSTRUCTION MANUAL 1.Installation 1.1 Remove the protection film , avoid using utensils that can damage the surfaces , check that the unit is not damaged. If damage is found please contact the manufacturer. 1.2 The machine must be installed in dry environment with good lighting. Position the unit on a flat, level surface, leaving at least 6"...
- Page 2 2.5 Shaping of rectangles , squares , etc. The method is the same as the point 2.4 . If you want to obtain different dough shapes , you can cut the dough to the approximate shape , for example squares , rectangle etc. with a knife or a special tool , and then place into the top roller.
-
Page 3: Maintenance
4.Maintenance 4.1 Before performing maintenance or cleaning, unplug the unit. It is important not to use any chemical , abrasive or corrosive products to clean the unit. 4.2 The cleaning must be done every time the machine has been used following all the instructions to prevent malfunctions and for hygienic purposes. -
Page 4: Troubleshooting
Only one roller working 1. Change the belt. 1.The belt is broken. 2.The worm gear is worn. 2. Change the worm gear. 6、Specification PDR-16 Model ~110 Voltage(V) Frequency(Hz) Motor power(kW) 0.37 2-17oz Dough weight(oz) 4-16"... - Page 5 Primo Dough Roller Limited Warranty MVP GROUP (“Primo”) warrants to the original purchaser of new equipment that said equipment, when installed in accordance with our instructions within North America and subjected to normal use, is free from defects in material or workmanship for a period of 1 year on parts (excludes wear/expendable parts).
Need help?
Do you have a question about the PDR-16 and is the answer not in the manual?
Questions and answers