Advertisement
Quick Links
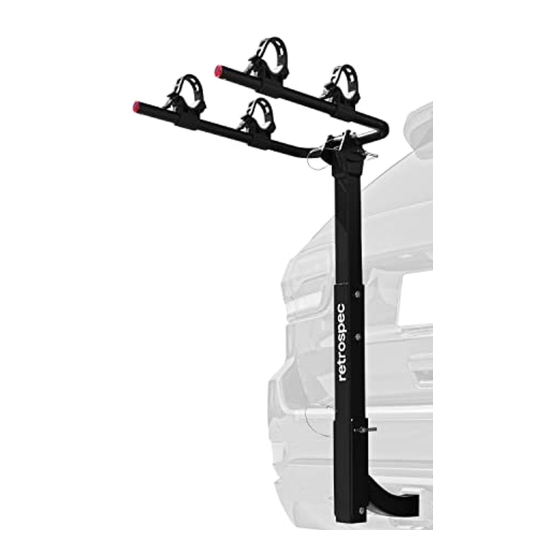
LENOX TRAY HITCH RACK
ASSEMBLY INSTRUCTIONS
Only install rack on vehicles with a 1 ¼" (Class II) or 2" (Class III) receiver hitches.
Never use on trailers, RV's, hitch adapters, or front of vehicle.
Bikes must be secured to the rack using the trays, supplied tie-downs and additional straps if
necessary (not supplied).
Check regularly during use that all bicycles remain secured and all bolts and pins are tight
and secured.
Bicycle tires should not be placed directly in front of an exhaust pipe. Tires can melt.
Not safe for Tandem Bikes, Recumbent Bikes, Motorized Bikes, or other non-standard bikes.
Do not block tail-lights or other car lights with bikes.
Drive carefully. Drive slowly over bumps. Do not Drive off-road.
ASSEMBLY INSTRUCTIONS
STEP 1: UNPACKING CONTENTS
MAIN PARTS:
Fig. 1
A
B
C
A: 1 x Main Support Hub with 1 – Main Center Mast (vertical) factory installed
(with 3 Push Pins – leash-attached)
B: 2 x Wheel Tray Support Beams (horizontal)
C: 4 x Wheel Trays with 4 rubber straps
D: 1 x Hitch Tongue 1 ¼"
E: 2 x Ratcheting Lock-Down Hooks (1- long, 1-short)
F: 1 x 2" Receiver Adapter
* PLEASE READ INSTRUCTIONS ENTIRELY BEFORE BEGINNING ASSEMBLY *
1 – Unpack the contents of your bike carrier and lay the parts out on a flat surface (Fig. 1).
D
E
WA R N I N G & C A U T I O N
Improperly installed rack or bikes can fall onto roadway
potentially causing a serious accident resulting in bodily
injury. Do not use rack on any vehicle where the rack cannot
be properly and safely installed. Max weight: 2 bike rack =
80lbs / 36kgs. Do not exceed.
Be aware that the rear of the vehicle is much longer when the rack is installed and needs
additional clearance when moving in reverse.
Do not use the rack if any parts are missing. Contact Retrospec for replacement parts.
Bikes should never extend beyond side of vehicle.
Stow carry arms or remove rack when not in use.
Never mount the rack on the front of a vehicle. Mounting the rack on the front of a vehicle can
obstruct the headlights, directional lamps, and your forward visibility creating an unsafe
driving condition.
This rack is only intended to be installed on a vehicle with a receiver hitch that is attached to
the vehicle's frame.
HARDWARE:
A
F
D
A: 2 x 1 ¼" length x 8mm hex head bolts with 2 lock washers
(to secure Hitch Tongue to Main Support Hub)
B: 1 x 2" length x 6mm hex head Flush-Mount Bolt (for 2" Adapter)
C: 1 x 3 ½" half-thread Anti-Rattle Hitch Bolt with lock washer + Hairpin Cotter Pin
D: 1 x 2-Hole Anti-Rattle Threaded Plug (for Hitch Tongue to Main Support Hub)
E: 1 x 1-Hole Anti-Rattle Threaded Plug (for Hitch Bolt into Vehicle Receiver)
F: 1 x 6mm hex wrench
G: 1 x 8mm hex wrench
B
C
E
F
G
Advertisement

Related Manuals for Retrospec LENOX


Summary of Contents for Retrospec LENOX
- Page 1 Bikes must be secured to the rack using the trays, supplied tie-downs and additional straps if Do not use the rack if any parts are missing. Contact Retrospec for replacement parts. necessary (not supplied).
- Page 2 STEP 2: HITCH TONGUE TO MAIN SUPPORT HUB 1. Align and insert 2-Hole Anti-Rattle Threaded Plug into Hitch Tongue (end with 2 closely spaced/same size holes (Fig. 2). 2. Align and insert the 2-Hole Hitch Tongue with Plug inserted into the Main Support Hub (Fig. 3). 3.
- Page 3 STEP 4: RECEIVER ADAPTER 1 ¼” RECEIVER: 2” RECEIVER: 1. Rack is factory-ready for installation into 1 ¼” (Class II) vehicle hitch receiver. 1. Align and install 2” length x 6mm hex head Flush-Mount Bolt through 2” Adapter Sleeve into 2.
- Page 4 STEP 6: RATCHING LOCK-DOWN HOOKS 1. Locate the 2 – Ratcheting Lock-Down Hooks. These hooks ratchet down the vertical Center Mast and secure the frame(s) of the bicycle(s) to the rack (Fig. 14). a. Notice that one arm is longer than the other. This allows you to accommodate different sizes and styles of frames.
- Page 5 All provisions in this limited warranty are separate and severable. If any provision is held invalid and unenforceable, such determination shall not affect the validity or enforceability of the other provisions hereof. Except to the extent specifically prohibited by law, Retrospec shall in no way be responsible for direct, incidental or consequential damages, including, without limitation, damages for personal injury, property...
Need help?
Do you have a question about the LENOX and is the answer not in the manual?
Questions and answers