Table of Contents
Advertisement
Advertisement
Table of Contents

Related Manuals for XS Scuba VX200-N-VI Series


Summary of Contents for XS Scuba VX200-N-VI Series
- Page 1 XS Scuba Valves Service Manual XS Scuba Valve Service Manual www.XSscuba.com...
- Page 2 XS Scuba Valves Service Manual Modu This manual covers the service and repair of all XS Scuba Valve products, including, but not limited to, K Valves, PRO Valves, DIN Valves, Modular Valves and Manifolds. A complete list of specific models is found below.
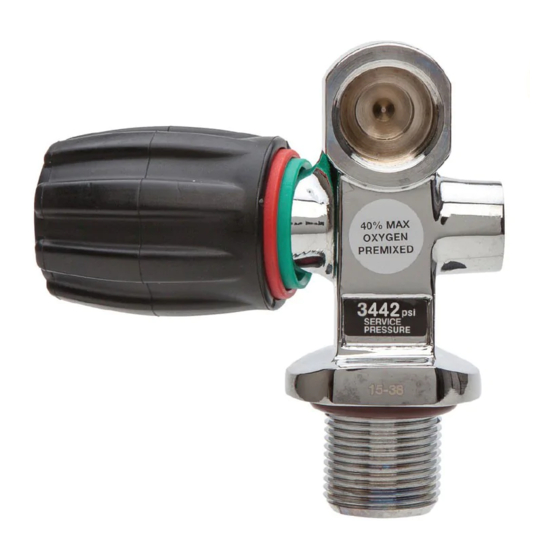
- Page 3 XS Scuba Valves Service Manual ular PRO Valve Part Number Description Image VX378-43A-VI DIN Valve 7/8”-14 UNF Threads VX2J-xxN-VI Reserve J Valve VX200L-xxN-VI, VX200R-xxN-VI Modular PRO Valve VX0V0-N-VI Crossbar with Isolator VMX200-xxN-VI Isolation PRO Manifold Since some valve models are offered with different working pressures, we use a “xx” in the part number as a variable to denote an abbreviation for the different working pressures.
-
Page 4: Table Of Contents
XS Scuba Valves Service Manual Introduction procedures outlined in this manual, contact This manual outlines manufacturer prescribed XS Scuba and speak with a Technical Advisor servicing procedures for the XS Scuba before proceeding any further. There are many Valve products described within. It covers XS Scuba Valve products. -
Page 5: Maintenance Schedules
Corrosion on the exterior finish service. The service designation is shown in the XS • The handwheel does not spin true on its axis. It has a Scuba catalog, the XS Scuba website and on the valve wobble to it. itself. •... - Page 6 ALWAYS OPEN VALVE SLOWLY UNTIL PRESSURE BUILDS UP THROUGHOUT THE REGULATOR! All XS Scuba Valves and scuba valve parts are to be used, installed and maintained per Compressed Gas Association Pamphlet V-9 “STANDARD FOR COMPRESSED GAS CYLINDER VALVES”.
-
Page 7: Required Tools
XS Scuba Valves Service Manual Required Tool List Part # Description Application Holds valve while TL119 Scuba Valve Tester servicing / pressurizes valve for leak checks Removal and instal- TL113 Valve Handwheel Tool lation of handwheel retaining nut(4) 11/16” wrench... -
Page 8: Exploded Diagrams And Parts Lists
50 ft. lbs 690 kg. cm 40 in. lbs 46 kg. cm Part # Description Part # Description VKX-K SERVICE KIT - XS SCUBA DELUXE K VALVE VP01S-30 Sticker - 3000 psi VP07 Stem VP01-20 Safety Assembly 2015 psi (3358 burst) VP08-E O-ring - EPDM (Stem) - Page 9 690 kg. cm 40 in. lbs 46 kg. cm Part # Description Part # Description VKX-P SERVICE KIT - XS SCUBA PRO VALVE VP07 Stem VP08-E O-ring - EPDM (Stem) VP01-20 Safety Assembly 2015 psi (3358 burst) VP09 Teflon Washer (Stem)
- Page 10 115 kg. cm 50 ft. lbs 690 kg. cm 40 in. lbs 46 kg. cm Part # Description Part # Description VKX-D SERVICE KIT - XS SCUBA DIN VALVE VP08-E O-ring - EPDM (Stem) VP09 Teflon Washer (Stem) VP01-34 Safety Assembly 3442 psi and 3500 psi VX10 Bonnet 11081A-A...
- Page 11 XS Scuba Valves Service Manual Reserve “J” Valve 85 in. lbs 100 kg. cm 33 ft. lbs 460 kg. cm 100 in. lbs 115 kg. cm 50 ft. lbs 690 kg. cm 29 ft. lbs 400 kg. cm 40 in. lbs 46 kg.
- Page 12 XS Scuba Valves Service Manual Part # Description VKX-P SERVICE KIT - XS SCUBA PRO VALVE, Modular PRO Valve - Right Hand +2 ea. VP25-V O-rings Required to service each Modular PRO Valve VKX-D SERVICE KIT - XS SCUBA DIN VALVE, 85 in.
- Page 13 XS Scuba Valves Service Manual Modular Valves - Crossbar Part # Description VKX-K SERVICE KIT - XS SCUBA K VALVE, +4 ea. VP25-V O-rings Required to Service Crossbar VP05 Seat VP07 Stem VP08-E O-ring - EPDM (Stem) VP09 Teflon Washer (Stem) VX10...
-
Page 14: Pre-Test And Inspection Prior To Disassembly
If NOTE: Prior to inspection, please note that you find leaks, the valve MUST undergo full the XS Scuba K valve is designed with an “upset” maintenance. in the bottom of the o-ring groove. This allows air •... - Page 15 XS Scuba Valves Service Manual 3. Mount the Valve A. While you can mount the valve in an empty scuba cylinder, it is much more effective to mount it in a built-for-purpose Scuba Valve Tester, p/n TL119. C. DIN Valve – There is not an outlet o-ring.
- Page 16 XS Scuba Valves Service Manual WARNING: If you are working on a valve that is located in a cylinder, you must insure that the cylinder is completely empty before the next step: loosening the bonnet nut. WARNING: Removing a bonnet nut(10) while the valve is pressurized will result in a rapid and violent release of air.
-
Page 17: Cleaning And Lubricating
If all are good, the bonnet may be reused. is hard, consider using distilled water. Dry with hyper- filtered compressed air. Seat(5): The HP Seat, a mandatory replacement part, VP05, is used in all XS Scuba Valve models. www.XSscuba.com... - Page 18 Safety Assembly(1) Service Kits: The best way to service a valve is to use the appropriate XS Scuba Valve service kit. It contains all the mandatory replacement parts that go into a routine servicing of the valve except the Safety Assembly(1) which must get ordered separately.
- Page 19 XS Scuba Valves Service Manual Recommended Cleaners and Lubricants Lubricant / Cleaner Application Source Liquid dishwashing detergent Degreaser for all metallic parts; Household grade - “Dawn” works diluted with warm water general cleaning solution for plas- very well tic and rubber parts...
-
Page 20: Reassembly Procedure
XS Scuba Valves Service Manual Reassembly Procedure 1. Install Inlet (Neck) O-ring(3) A. Install a lubricated inlet o-ring(3) onto the valve neck. A Buna-N o-ring is good for compressed air use only, a viton o-ring is required for oxygen enriched mixtures 21.5% - 40% pre-mixed. - Page 21 XS Scuba Valves Service Manual 6. Install Stem Washer(9) A. Install the stem washer(9) on to the stem(7). WARNING: Failure to provide proper torque on the bonnet nut could lead to the bonnet nut backing out, which in turn could lead to a catastrophic loss of cylinder contents.
-
Page 22: Testing
XS Scuba Valves Service Manual C. Apply a proper functioning regulator to the outlet 11. Install Outlet O-ring(s) of the valve. A. K Valve - Using your thumb or the backside of 13. Inspect for Leaks a TL136 Multi-purpose tool, install an unlubricated outlet o-ring(2) into its groove. -
Page 23: Final Assembly
Final Assembly 15. Install the Safety Handwheel Assembly WARNING: The Safety Handwheel is designed for use on XS Scuba branded valves only. E. While holding the red sleeve stationary, It does not work on Thermo branded valves. It is install the handwheel(22) so that the inner not designed for use on any other manufacturer’s... -
Page 24: Servicing Lh & Rh Modular Valves
XS Scuba Valves Service Manual CAUTION: Over-tightening the handwheel nut(14) will make it very difficult to turn the handwheel. Only tighten the nut until it is flush with the end of the stem(7). This Completes the Reassembly Procedure Servicing XS Scuba LH and... -
Page 25: Servicing Crossbar With Isolation Valve
“Assembling Twin Cylinders”, found at www.xsscuba.com under the “Support” header. 4. Remove both jam nuts(18 & 19) for cleaning if With the Crossbar and the two XS Scuba Modular Valves necessary. still installed in the twin cylinders, perform the Inspection and Pre-Test prior to disassembly as outlined earlier in 5. -
Page 26: Servicing The "J" Reserve Mechanism
XS Scuba Valves Service Manual Reassembly: 1. Reassemble the Isolator Valve as per previous assembly instructions. 2. Install the jam nuts(18 & 19) as far up the connector as possible. 3. Install four, new, side connector o-rings(23). 4. Install the Crossbar. - Page 27 XS Scuba Valves Service Manual Remove Reserve Mechanism(23) The reserve mechanism is “disengaged” - lever in the up position. A. Grasp the back end of the reserve mechanism(23) with needle nose pliers and pull straight up. B. Separate the stainless-steel washer(24) from the reserve mechanism(23).
-
Page 28: Dip Tube Instructions
XS Scuba Valves Service Manual A. Perform the following simple test to ensure that the 5. Insert Stem(25) into the Reserve Bonnet(26). reserve lever(27) is positioned correctly. i Open the on/off handwheel CCW. ii Pull the reserve lever(27) down to engage the reserve mechanism(23). -
Page 29: Safety Handwheel
Tighten the dip tube to a torque of 40 lbs*in (46 kg*cm) (4.5 N*m). Safety Handwheel One of the features that make XS Scuba Valves so popular 4. Thread the red sleeve on to the green sleeve. is the Safety Handwheel. It is an excellent visual indicator for you, your buddy, the divemaster, or your instructor, that i. -
Page 30: Safety Assembly
100% on = 100% green Important Information Regarding Safety Assemblies (Burst Plugs) All safety assemblies, aka burst plugs, sold by XS Scuba / Sea Pearls are engineered products designed for use in cylinder valves branded Thermo or XS Scuba only. Use... -
Page 31: Troubleshooting Guide
Bad copper sealing gasket on the safety Replace the safety assembly(1) assembly(1) Only safety assemblies originating from The wrong safety assembly(1) is being used XS Scuba / Sea Pearls will work in Thermo Air leak from safety Valves. assembly(1) Safety assembly(1) not torqued to proper... -
Page 32: Torque Specifications
XS Scuba Valves Service Manual Torque Specifications eSCription orque VP01-xx Safety Assembly(1) 100 lbs*in. 115 kg*cm 11 N*m VT10 Bonnet(10) 33 lbs*ft. 460 kg*cm 45 N*m VP29-PVD Reserve Bonnet 29 lbs*ft. 400 kg*cm 39 N*m VP04 Dip Tube(4) 40 lbs*in. - Page 33 XS Scuba Valves Service Manual Notes www.XSscuba.com...
- Page 34 XS Scuba equipment is for use only by persons trained and certified International Email: export@XSscuba.com by a nationally recognized scuba training agency. XS Scuba and the XS Scuba logo are trademarks of XS Scuba, Inc. facebook.com/XSscuba which may be registered in certain jurisdictions.
Need help?
Do you have a question about the VX200-N-VI Series and is the answer not in the manual?
Questions and answers