Table of Contents
Advertisement
Quick Links
Advertisement
Table of Contents

Related Manuals for MS Schippers MS Pigsleeper Flexy


Summary of Contents for MS Schippers MS Pigsleeper Flexy
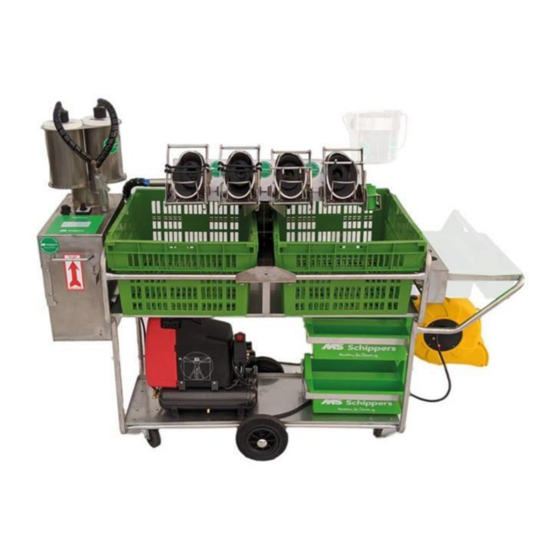
- Page 1 Assembly instructions MS Pigsleeper Flexy...
-
Page 2: Introduction
Introduction This document describes how to correctly assemble the Pigsleeper Flexy. Everything is explained with pictures. -
Page 3: Table Of Contents
Content Introduction ............................. 2 Mounting the crossbar ..........................4 Mounting the upper section........................10 Mounting the Cup holder and bucket holder (OPTIONAL) ..............12 Mounting the cup holder on top ......................15 Installing the anaesthesia unit ......................16 Isoflurane filter holder .......................... 17 Installing the compressor ........................ -
Page 4: Mounting The Crossbar
Mounting the crossbar 1. Take the crossbar (traverse) and remove the foil. 2. The crossbar is delivered with all necessary nuts and bolts. Now remove the side plate, which is attached with nuts and bolts (see drawing and picture). You will need a size 13 wrench and a M8 Allen key. - Page 5 3. Loosen the two Allen screws on the other side of the crossbar slightly so that they are flush with the plate. 4. Now remove the support mounted on top of the crossbar. This can be done manually, as it is equipped with a rotary knob.
- Page 6 5. Place the crossbar on the middle beam of the trolley frame. 6. Then slide the side plate that you removed in step 2 back onto the frame. Push it between the bar of the frame and the side of the crossbar. Tip: First place the lock nut on the inside of the metal plate.
- Page 7 8. Now take the 2 green boxes and the 2 toolboxes. Place them into the frame as shown below. 9. Now insert the support back into the holder and tighten it to the desired working height. The rotary knob is located on the rear.
- Page 8 Mounting the cable drum 10. The cable drum is mounted with the provided holder as follows. Take the bracket and remove the bolts and nuts with a size 10 wrench and a M5 Allen key. 11. The support can be mounted in 2 ways. Mount it according to the working height.
- Page 9 12. Make sure that the screw heads protrude, not the nuts. Then hook the black bracket of the cable drum onto the two support bolts. 13. Then tighten the support bolts and nuts so that the cable drum is firmly attached.
-
Page 10: Mounting The Upper Section
Mounting the upper section 14. Now remove the 4 bolts and the 2 black buttons from the crossbar. You will need a M8 Allen key. 15. Then place the upper part on the crossbar as follows. - Page 11 16. Screw the bolts and star-shaped rotary knobs back into the crossbar so that the upper section is firmly attached. You will need a M8 Allen key. The Pigsleeper now looks like this:...
-
Page 12: Mounting The Cup Holder And Bucket Holder (Optional)
Mounting the Cup holder and bucket holder (OPTIONAL) 18. If you have the optional cup holder for the side, then this must be mounted first. Take the cup holder and remove the bolts. You will need the size 10 wrench and a M5 Allen key. 19. - Page 13 20. Take the bucket holder and unscrew 1 nut. 21. Fasten the support in the hole of the holder. Then place the bucket in the bucket holder.
- Page 14 22. The PigSleeper now looks like this.
-
Page 15: Mounting The Cup Holder On Top
Mounting the cup holder on top Green cups: Item No. 8802770 Take the cup holder. Remove the two M6 bolts in the upper part. 23. Fasten the support to the upper part with the holes provided. Then tighten it with a M6 Allen key. 24. -
Page 16: Installing The Anaesthesia Unit
Installing the anaesthesia unit 1. Take the anaesthesia unit and hang it on the free, short side of the trolley. 2. Take the two plugs (Blue: Electric/Sensors, Black: Air) of the piglet bowls (“upper part”) and plug them into the anaesthesia unit. (See picture.) Lock them by tightening it. -
Page 17: Isoflurane Filter Holder
3. Attach one side of the blue “vacuum” hose to the piglet bowl unit. Attach the other side to the supplied Y-Piece. Also montage the other two blue “vacuum” hoses on to the Y-Piece. Isoflurane filter holder 1. Take 2 isoflurane filters and place them in the intended holder. 2. -
Page 18: Installing The Compressor
Installing the compressor 1. Take the thin blue hose and 2 couplings (1 in bags in the compressor box and 1 in bags with the USB stick and purple hose). 2. Attach both couplings to the hose. (See picture.) Connection, side of the compressor Connection, side of the anesthesia unit... -
Page 19: Usb Flash Drive
5. Put the plug of the compressor in the cable reel. And put the cable reel power plug in the socket. (230V) 6. Switch on the compressor and check that it is set to 4 bar. A lower pressure to a minimum of 1.7 bar is possible. This results in a lower consumption of anesthetic gas, but possibly also a less deep anesthetic.
Need help?
Do you have a question about the MS Pigsleeper Flexy and is the answer not in the manual?
Questions and answers