American Bath Factory Sistine Stone CORNER Manual
Hide thumbs
Also See for Sistine Stone CORNER:
- Installation manual (12 pages) ,
- Installation manual (11 pages) ,
- Installation manual (12 pages)
Advertisement
Quick Links
TM
CORNER
Corner Shower System Installation Guide for Basic & Hinged Packages
Congratulations on the purchase of your new shower package. This guide will give you
the instructions on the installation of your new shower.
Sistine Stone
showers are ideal for an experienced "DIYer". Please read through this entire installation
™
guide before beginning your installation. If you feel you can not confidently install this shower by yourself
hire a licensed contractor, handyman, or professional installer that can do it for you. Installation time may
vary depending on your experience, complexity of shower, and "Pre-Install Prep Work" which may
include: plumbing and/or drain relocation, bathroom demolition, and squaring up studs and floor.
Watch our Installation and Product Videos on americanbathfactory.com/pages/videos
Prior to demolition, scheduling your installer, or building your shower, double check that you have all the
parts from the factory. Some applications may require a licensed plumber or contractor. Do not use any
product spec sheets to begin installation before receiving product. These spec sheets are for reference
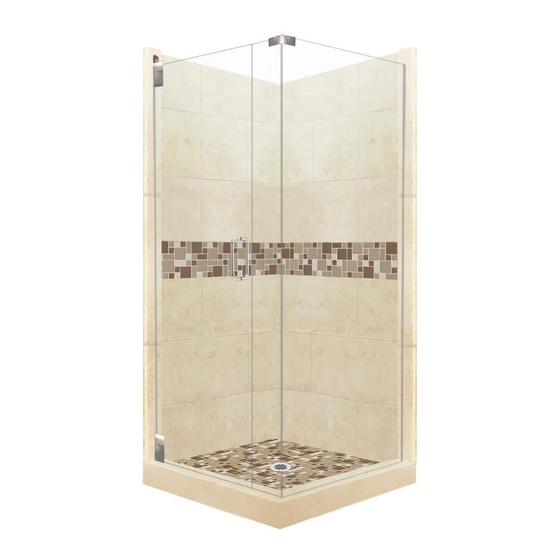
only. Use actual product measurements only. The diagrams throughout this guide illustrate a 48" x 36"
shower with a hinged door. Depending on the size of the shower purchased, actual parts may vary in size
from the diagrams shown.
Our goal is to help you achieve a quick and successful shower installation.
See the clock in each section for estimated installation time.
Please inspect shipment thoroughly upon receipt and before starting the installation.
Missing or damaged hardware and tiles should be reported within 24 hours of receiving this
shipment. If you need assistance, call 1-800-454-2284 Mon - Fri from 7:15am - 4 pm (PT)
ABF Corner Basic Hinged Install Guide Rev J
Advertisement

Related Manuals for American Bath Factory Sistine Stone CORNER


Summary of Contents for American Bath Factory Sistine Stone CORNER
- Page 1 CORNER Corner Shower System Installation Guide for Basic & Hinged Packages Congratulations on the purchase of your new shower package. This guide will give you the instructions on the installation of your new shower. Sistine Stone showers are ideal for an experienced "DIYer". Please read through this entire installation ™...
- Page 2 CHECK YOUR SHIPMENT AGAINST APPROPRIATE PACKING LIST Make sure you have received all the items necessary for the installation. This will also familiarize you with all the parts and hardware you will need to install your shower. Package contents are dependent upon which package you ordered. SISTINE STONE PAN HINGED GLASS DOOR SET Leak-Free Shower Pan...
-
Page 3: Optional Items
OPTIONAL ITEMS SHOWER BENCH SHAMPOO BOX GRAB BAR TIME REQUIRED PRE-INSTALLATION TEAR DOWN 8-16 HRS This shower system is designed to be installed on a level, bare floor. It is necessary for any existing shower to be completely removed. Tear out and remove all old material to expose the 2 x 4 wall studs. Clean up the shower area, removing all dust and old material from the area. -
Page 4: Time Required
TIME REQUIRED 2 x 4 STUDS ALIGNMENT & POSITIONING ½ to 1 HR Using the pan and wall panels, you will be able to check to make sure your 2 x 4 studs are in the needed position and supported adequately. You will see in ( ) extra 2 x 4 studs are added to the door and glass side thresholds dia. - Page 5 TIME REQUIRED SETTING PAN ½ HR 1. Now that the drain is installed onto the pan and has dried, dry fit the pan and your drain for alignment. Check to make sure the 2" drain pipe is in the center of the pan drain hole and that the 2"...
- Page 6 TIME REQUIRED PAN & WALL THRESHOLD TRIM 1/2 - 1 HR A - Pan Thresholds 1. Locate the threshold pieces: Threshold for No Glass or Hinged Door No glass showers have 2-3 threshold pieces TD (dia. 6A & 7 top) Hinged glass showers have 1 door threshold and 2 glass channel thresholds T P (dia.
- Page 7 TIME REQUIRED WALL PANEL/LINER INSTALLATION 3-4 HR A - Inspecting Wall Panels/Liners Inspecting panels at this point will give you confidence that the wall panels are straight and square from the factory. When installing wall panels, you may need to make adjustments to the panels to accommodate for unevenness of your existing walls.
- Page 8 TIME REQUIRED WALL PANEL/LINER INSTALLATION (continued) 3-4 HR C - Installing Panels Remove all dust and dirt with a clean dry cloth. This will increase the bond to the 100% silicone. Start with the bottom panel apply a generous amount of 100% silicone to the cement board and to the back side of the wall panel.
- Page 9 HINGED DOOR INSTALLATION SKIP THIS SECTION FOR NO GLASS A - Handle Installation clear clear 1. Set the glass door in a position to enable the assembly of the handle. washer spacer clear washer Be careful not to rest the edges of the glass on hard surfaces.
- Page 10 C - Dry-fit Fixed Glass Panel & Glass Door set screws 1. Gently insert the side glass panel into the channels. With someone helping you, place the door return glass panel into the door rail. Install the corner support gasket gasket bracket.
- Page 11 ACCESSORIES Tools/Supplies: Corner Shelves ▫Level ▫Pencil ▫Painter's Tape ▫Sponge ▫Caulk Gun ▫Silicone ▫Caulk ▫Clean Cloth ▫Drill ▫Drill Bit ▫Phillip's Head Screwdriver ▫Fine Grit Sandpaper 1. Thoroughly clean the surface on which the shelf will be adhered. 2. Plan height for installation of the shelf. Dry fit the shelf and sand the back edge as needed to allow for a good fit.
- Page 12 GROUT Your American Bath Factory shower has a non-porous surface, which makes it easy to clean. Decorative lines in the shower wall panels and Sistine Stone floor accents can be grouted if preferred, but it is not necessary. (e.g. 4x4 Diamond) Showers with any glass tile accents must be grouted.
Need help?
Do you have a question about the Sistine Stone CORNER and is the answer not in the manual?
Questions and answers