Table of Contents
Advertisement
Available languages
Available languages
FUNK-TEMPERATURSTATION / RADIO-CONTROLLED
TEMPERATURE STATION / STATION MÉTÉO RADIOGUIDÉE
FUNK-TEMPERATURSTATION
Bedienungs- und Sicherheitshinweise
STATION MÉTÉO RADIOGUIDÉE
Instructions d'utilisation et consignes de sécurité
STACJA METEO STEROWANA RADIOWO
Wskazówki dotyczące obsługi i bezpieczeństwa
BEZDRÔTOVÁ METEOSTANICA
Pokyny pre obsluhu a bezpečnostné pokyny
IAN 317484_1904
RADIO-CONTROLLED
TEMPERATURE STATION
Operation and safety notes
DRAADLOOS TEMPERATUURSTATION
Bedienings- en veiligheidsinstructies
BEZDRÁTOVÁ METEOSTANICE
Pokyny pro obsluhu a bezpečnostní pokyny
Advertisement
Chapters
Table of Contents

Subscribe to Our Youtube Channel
Related Manuals for OWIM HG05686A-DCF


Summary of Contents for OWIM HG05686A-DCF
- Page 1 FUNK-TEMPERATURSTATION / RADIO-CONTROLLED TEMPERATURE STATION / STATION MÉTÉO RADIOGUIDÉE FUNK-TEMPERATURSTATION RADIO-CONTROLLED TEMPERATURE STATION Bedienungs- und Sicherheitshinweise Operation and safety notes STATION MÉTÉO RADIOGUIDÉE DRAADLOOS TEMPERATUURSTATION Instructions d‘utilisation et consignes de sécurité Bedienings- en veiligheidsinstructies STACJA METEO STEROWANA RADIOWO BEZDRÁTOVÁ METEOSTANICE Wskazówki dotyczące obsługi i bezpieczeństwa Pokyny pro obsluhu a bezpečnostní...
- Page 2 DE / AT / CH Bedienungs- und Sicherheitshinweise Seite GB / IE Operation and safety notes Page FR / BE Instructions d‘utilisation et consignes de sécurité Page NL / BE Bedienings- en veiligheidsinstructies Pagina 98 Wskazówki dotyczące obsługi i bezpieczeństwa Strona 128 Pokyny pro obsluhu a bezpečnostní...
- Page 3 5 6 7 8...
- Page 4 32 31...
-
Page 5: Table Of Contents
Legende der verwendeten Piktogramme .................. Seite Einleitung ................................Seite Bestimmungsgemäße Verwendung ........................Seite Teilebeschreibung ..............................Seite Technische Daten ..............................Seite 10 Lieferumfang ................................Seite 11 Sicherheit ................................Seite 12 Allgemeine Sicherheitshinweise ........................... Seite 12 Sicherheitshinweise für Batterien / Akkus......................Seite 13 Vor der Inbetriebnahme .......................... -
Page 6: Legende Der Verwendeten Piktogramme
Legende der verwendeten Piktogramme Spritzwassergeschützt Alkalibatterien enthalten Funkgesteuert 100 m Sendereichweite zwischen Sende- und Empfangsstation Weckfunktion Außentemperaturanzeige Innentemperaturanzeige Zeitanzeige DE/AT/CH... -
Page 7: Einleitung
Funk-Temperaturstation Einleitung Wir beglückwünschen Sie zum Kauf Ihres neuen Produkts. Sie haben sich damit für ein hochwertiges Produkt entschieden. Die Bedienungsanleitung ist Teil dieses Produkts. Sie enthält wichtige Hinweise für Sicherheit, Gebrauch und Entsorgung. Machen Sie sich vor der Benutzung des Produkts mit allen Bedien- und Sicherheits- hinweisen vertraut. -
Page 8: Teilebeschreibung
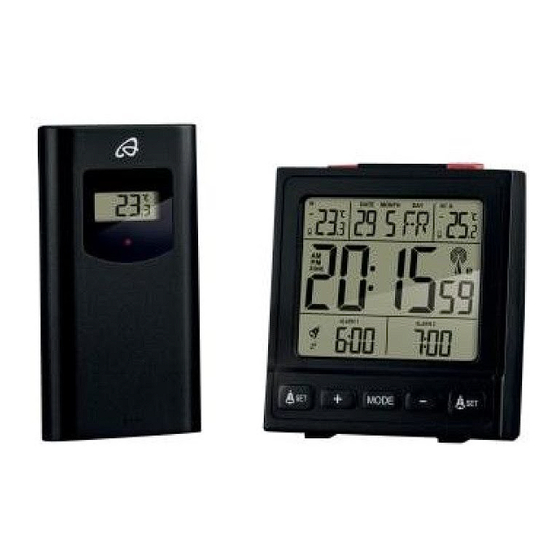
den privaten Haushalt und nicht für den gewerblichen Einsatz bestimmt. Teilebeschreibung Funk-Temperaturstation: Innentemperatur DCF-Symbol MAX- / MIN-Anzeige DST-Anzeige für Innentemperatur (Sommerzeit) Datum -Symbol (Alarm 2) Monat -Symbol (Schlummer- Wochentag funktion) (Alarm 2) -Symbol (niedriger Alarm 2 Batteriestand) (Außenfühler) SET-Taste (Alarm 2) -Radio-Signal-Symbol –... - Page 9 -Symbol (Schlummer- RESET-Taste funktion) (Alarm 1) Aufhängevorrichtung -Symbol (Alarm 1) Dübel (ø 6 mm) Zeit Schraube (ø 3 mm) 2. Zeitzone Außenfühler: -Symbol (niedriger Batteriestand) (Temperatur- Hochfrequenz-Strahlung station) -Symbol (niedriger Temperaturtrend Batteriestand) (Innentemperatur) Außentemperatur AL1-ON- / OFF-Taste Batteriefachabdeckung SNOOZE- / LIGHT-Taste Batteriefach AL2-ON- / OFF-Taste Aufhängevorrichtung...
-
Page 10: Technische Daten
Technische Daten Funk-Temperaturstation: Temperaturmessbereich: 0 °C bis + 50 °C +32 °F bis +122 °F Temperaturauflösung: 0,1 °C Funksignal: DCF77 Batterien: 2 x AAA 1,5 V (Gleichstrom) Frequenz Band: 77,5 kHz, 433,050 MHz–434,79 MHz Außenfühler: Temperaturmessbereich: –20 °C bis +60 °C –4 °F bis +140 °F HF Übertragungssignal: 433 MHz HF Übertragungs-... -
Page 11: Lieferumfang
Max. übertragene Leistung: < 10 dBm Hinweis: Wenn das LC-Display „LL.L“ oder „HH.H“ anzeigt, liegt die Temperatur außerhalb des Messbereichs. Lieferumfang 1 Funk-Temperaturstation 2 Dübel (ø 6 mm) 1 Außenfühler 1 Bedienungsanleitung 4 Batterien AAA, 1,5 V 1 Kurzanleitung 2 Schrauben (ø 3 mm) DE/AT/CH... -
Page 12: Sicherheit
Sicherheit BEWAHREN SIE ALLE SICHERHEITSHINWEISE UND ANWEISUNGEN FÜR DIE ZUKUNFT AUF! Allgemeine Sicherheitshinweise Dieses Produkt kann von Kindern ab 8 Jahren und darüber sowie von Personen mit verringerten physischen, sensorischen oder mentalen Fähigkeiten oder Mangel an Erfahrung und Wissen benutzt werden, wenn sie beaufsichtigt oder bezüglich des sicheren Gebrauchs des Produkts unterwiesen wurden und die daraus resultierenden Gefahren verstehen. -
Page 13: Sicherheitshinweise Für Batterien / Akkus
Setzen Sie das Produkt keinem extrem hohen elektromagnetischen Feld aus. Dieses kann die Funktion des Produkts beeinträchtigen. Beachten Sie, dass Beschädigungen durch unsachgemäße Handhabung, Nichtbeachtung der Bedienungsanleitung oder Eingriff durch nicht autorisierte Personen von der Garantie aus- geschlossen sind. Sicherheitshinweise für Batterien / Akkus LEBENSGEFAHR! Halten Sie Batterien / Akkus außer Reich- weite von Kindern. - Page 14 Werfen Sie Batterien / Akkus niemals in Feuer oder Wasser. Setzen Sie Batterien / Akkus keiner mechanischen Belastung aus. Risiko des Auslaufens von Batterien / Akkus Vermeiden Sie extreme Bedingungen und Temperaturen, die auf Batterien / Akkus einwirken können, z. B. auf Heizkörpern / direkte Sonneneinstrahlung.
-
Page 15: Vor Der Inbetriebnahme
Entfernen Sie die Batterien / Akkus, wenn das Produkt längere Zeit nicht verwendet wird. Risiko der Beschädigung des Produkts Verwenden Sie ausschließlich den angegebenen Batterietyp / Akkutyp! Achten Sie beim Einlegen auf die richtige Polarität! Diese wird im Batteriefach angezeigt! Reinigen Sie Kontakte an der Batterie und im Batteriefach vor dem Einlegen! Entfernen Sie erschöpfte Batterien / Akkus umgehend aus dem... -
Page 16: Allgemeine Hinweise
Hinweis: Entfernen Sie vor dem ersten Gebrauch die Schutzfolie vom LC-Display. Allgemeine Hinweise VORSICHT! Stellen Sie bei der Wahl des Aufstellortes sicher, dass das Produkt keiner direkten Sonneneinstrahlung, Vibration, Staub, Hitze, Kälte und Feuchtigkeit ausgesetzt ist. Stellen Sie das Produkt nicht in der Nähe von Hitzequellen, z. B. Heizkörpern, auf. Andernfalls droht eine Beschädigung des Produkts. -
Page 17: Außenfühler In Betrieb Nehmen
Ihre Temperaturstation empfängt diese Signale unter optimalen Be- dingungen bis zu einer Distanz von ca. 1.500 km um Frankfurt / Main. Außenfühler in Betrieb nehmen Entfernen Sie die Batteriefachabdeckung auf der Rückseite des Außenfühlers. Legen Sie die mitgelieferten Batterien mit der richtigen Polarität ein. - Page 18 Temperaturstation mit dem Außenfühler und dem DCF-Funksignal verbinden: Nachdem Sie die Batterien eingesetzt haben, versucht die Tempe- raturstation eine Verbindung zum Außenfühler herzustellen. Dieser Vorgang kann einige Minuten dauern. Das -Radio-Signal-Symbol blinkt. Bei erfolgreicher Verbindung zum Außenfühler hört das -Radio-Signal-Symbol auf zu blinken und die Temperatur wird im LC- Display angezeigt.
- Page 19 Hinweis: Wechseln Sie während des Empfangs nicht den Standort der Temperaturstation. Andernfalls kann es zu Empfangsstörungen kommen. Wenn zum Zeitpunkt der Inbetriebnahme keine Synchro- nisation mit der Atomuhr möglich ist, wechseln Sie zunächst den Standort der Temperaturstation (z. B. in die Nähe eines Fensters). Der Empfang kann durch Hindernisse (z.
- Page 20 Halten Sie die – -Taste wieder für ca. 3 Sekunden gedrückt. Das DCF Symbol erlischt. Die automatische Funkzeit-Emp- fangsfunktion ist eingeschaltet. Die Temperaturstation startet den Empfang der Funkzeit am frühen Morgen. Temperaturstation und / oder Außenfühler an der Wand montieren: Hinweis: Sie benötigen für diesen Arbeitsschritt eine Bohrmaschine und einen Kreuzschlitzschraubendreher.
-
Page 21: Zeitformat / Zone / Datum / Uhrzeit / Sprache / Temperatureinheit Manuell Einstellen
Drehen Sie mit einem Kreuzschlitzschraubendreher die Schraube in den Dübel ein. Hängen Sie die Temperaturstation bzw. den Außenfühler mit der Aufhängevorrichtung an der Schraube auf. Hinweis: Stellen Sie sicher, dass der Außenfühler nicht in Wasser eingetaucht und keinem direkten Sonnenlicht ausgesetzt wird. Elektronische Geräte können den Funkempfang stören. - Page 22 Tipp: Drücken und halten Sie die +-Taste oder die – -Taste , um schnell vorwärts oder rückwärts die Nummern durch- zublättern. Wenn Sie innerhalb von 20 Sekunden keine Taste drücken, kehrt das LC-Display automatisch zur Standardanzeige zurück. 3. Drücken Sie die MODE-Taste , um Ihre Eingabe zu bestätigen.
-
Page 23: Sommerzeit Anzeigen
6. Wiederholen Sie die Arbeitsschritte 4. und 5., um die Werte für Jahr, Monat und Datum, Stunde, Minute, Sprache (GE = Deutsch, FR = Französisch, SP = Spanisch, IT = Italienisch, DU = Nieder- ländisch, DA = Dänisch, EN = Englisch) und Temperatureinheit einzustellen. -
Page 24: Alarmzeit Einstellen
Drücken Sie die MODE-Taste . Das Symbol für 2. Zeitzone und die entsprechende Zeit erscheinen im LC-Display. Drücken Sie die MODE-Taste erneut, um zur Standardan- zeige zurückzugelangen. Alarmzeit einstellen Sie haben die Möglichkeit, zwei unterschiedliche Alarmzeiten einzustellen. 1. Drücken und halten Sie die SET-Taste (Alarm 1) oder die SET-Taste (Alarm 2) für ca. -
Page 25: Alarm Ein- / Ausschalten
4. Drücken Sie die +-Taste oder die – -Taste , um den gewünschten Wert einzustellen. 5. Drücken Sie die SET-Taste (Alarm 1) oder die SET-Taste (Alarm 2) , um Ihre Eingabe zu bestätigen. Alarm ein- / ausschalten Drücken Sie 1 x die AL1-ON- / OFF-Taste oder AL2-ON- / OFF-Taste herunter, um Alarm 1 oder Alarm 2 zu aktivieren. -
Page 26: Temperatur Anzeigen
Das Alarmsingnal verstummt und -Symbol (Alarm 1) blinken mit dem Z -Symbol (Alarm 2) -Symbol (Schlum- merfunktion) (Alarm 1) -Symbol (Schlummerfunktion) (Alarm 2) Das Alarmsignal ertönt nach ca. 5 Minuten erneut. Drücken Sie die die AL1-ON- / OFF-Taste oder AL2-ON- / OFF-Taste hoch, um die Snooze-Funktion zu deaktivieren. -
Page 27: Temperaturtrend Anzeigen
Drücken Sie die + -Taste , um sich die Maximal-Werte der Innen- und Außentemperatur anzeigen zu lassen. Drücken Sie erneut die + -Taste , um sich die Minimal- Werte der Innen- und Außentemperatur anzeigen zu lassen. Drücken und halten Sie die + -Taste und die –... -
Page 28: Batterieanzeige
Batterieanzeige Die -Symbole erscheinen im LC-Display der Temperatur- station und des Außenfühlers, wenn die Batterien des Außenfühlers oder der Temperaturstation schwach sind. Batterien wechseln Öffnen Sie das Batteriefach bzw. Entfernen Sie die verbrauchten Batterien. Setzen Sie je zwei neue 1,5 V (Gleichstrom) Batterien (AAA) in die Batteriefächer ein. - Page 29 Entfernen Sie solche Geräte aus der Reichweite der Tempera- turstation / des Außenfühlers, oder entnehmen Sie kurzzeitig die Batterien aus der Temperaturstation / dem Außenfühler, wenn das Display Störungen anzeigt. Hindernisse wie z. B. Betonwände können auch dazu führen, dass der Empfang empfindlich gestört wird.
-
Page 30: Reinigung Und Pflege
Ein weiterer Faktor, der zu Empfangsstörungen führen kann, sind leere oder zu schwache Batterien des Außenfühlers. Tauschen Sie diese gegen neue aus. Aktivieren Sie die Batterien zuerst im Außenfühler, dann erst in der Temperaturstation. -> Nur wenn Probleme auftreten, muss der Außenfühler neu gestartet werden, indem Sie die + -Taste drücken oder die Temperatursta- tion neu starten. -
Page 31: Entsorgung
Entsorgung Die Verpackung besteht aus umweltfreundlichen Materialien, die Sie über die örtlichen Recyclingstellen entsorgen können. Beachten Sie die Kennzeichnung der Verpackungs- materialien bei der Abfalltrennung, diese sind gekenn- zeichnet mit Abkürzungen (a) und Nummern (b) mit folgender Bedeutung: 1–7: Kunststoffe / 20–22: Papier und Pappe / 80–98: Verbundstoffe. - Page 32 Werfen Sie Ihr Produkt, wenn es ausgedient hat, im Interesse des Umweltschutzes nicht in den Hausmüll, sondern führen Sie es einer fachgerechten Entsorgung zu. Über Sammelstellen und deren Öffnungszeiten können Sie sich bei Ihrer zuständigen Verwaltung informieren. Defekte oder verbrauchte Batterien müssen gemäß Richtlinie 2006/66/EG und deren Änderungen recycelt werden.
-
Page 33: Vereinfachte Eu-Konformitätserklärung
Vereinfachte EU-Konformitätserklärung Hiermit erklärt OWIM GmbH & Co. KG, Stiftsbergstraße 1, 74167 Neckarsulm, DEUTSCHLAND, dass das Produkt Funk-Temperatur- station, Modell-Nr.: HG05686A-DCF / HG05686B-DCF den Richtlinien 2014/53/EU und 2011/65/EU entspricht. Der vollständige Text der EU-Konformitätserklärung ist unter der folgenden Internetadresse verfügbar: www.owim.com Garantie Das Produkt wurde nach strengen Qualitätsrichtlinien sorgfältig... -
Page 34: Abwicklung Im Garantiefall
den Original-Kassenbon gut auf. Diese Unterlage wird als Nach- weis für den Kauf benötigt. Tritt innerhalb von 3 Jahren ab dem Kaufdatum dieses Produkts ein Material- oder Fabrikationsfehler auf, wird das Produkt von uns – nach unserer Wahl – für Sie kostenlos repariert oder ersetzt. Diese Garantie verfällt, wenn das Produkt beschädigt, nicht sachgemäß... -
Page 35: Service
Kaufbelegs (Kassenbon) und der Angabe, worin der Mangel besteht und wann er aufgetreten ist, für Sie portofrei an die Ihnen mitgeteilte Service-Anschrift übersenden. Service Service Deutschland Tel.: 0800 5435 111 (kostenfrei aus dem dt. Festnetz / Mobilfunknetz) E-Mail: owim@lidl.de DE/AT/CH... - Page 36 Service Österreich Tel.: 0820 201 222 (0,15 EUR / Min.) E-Mail: owim@lidl.at Service Schweiz Tel.: 0842 665566 (0,08 CHF / Min., Mobilfunk max. 0,40 CHF / Min.) E-Mail: owim@lidl.ch DE/AT/CH...
- Page 37 List of pictograms used ..........................Page 38 Introduction ................................ Page 39 Proper use ................................Page 39 Description of parts and features ......................... Page 40 Technical data............................... Page 41 Scope of delivery ..............................Page 42 Safety ..................................Page 43 General safety information ..........................Page 43 Safety instructions for batteries / rechargeable batteries ...................
-
Page 38: List Of Pictograms Used
List of pictograms used Splashproof Includes alkaline batteries Radio-controlled 100 m transmission range between transmitter and receiver station Alarm function Outdoor temperature display Indoor temperature display Time display GB/IE... -
Page 39: Introduction
Radio-controlled temperature station Introduction We congratulate you on the purchase of your new product. You have chosen a high quality product. The instructions for use are part of the product. They contain important information concerning safety, use and disposal. Before using the product, please familiarise your- self with all of the safety information and instructions for use. -
Page 40: Description Of Parts And Features
Description of parts and features Radio-controlled temperature station: Indoor temperature Snooze function symbol MAX / MIN display (Alarm 2) (indoor temperature) Alarm time 2 Date SET button Month – button MODE button Low battery symbol + button (outdoor sensor) SET button Radio signal symbol Alarm time 1 MAX / MIN display... -
Page 41: Technical Data
Outdoor sensor: Temperature trend (indoor temperature) RF radiation AL1 ON / OFF button Low battery symbol SNOOZE / LIGHT button Outdoor temperature AL2 ON / OFF button Battery compartment cover Battery compartment cover Battery compartment Battery compartment Handing slot RESET button Dowel (ø... -
Page 42: Scope Of Delivery
Frequency band: 77.5 kHz, 433.050 MHz–434.79 MHz Outdoor sensor: Temperature measurement range: –20 °C to +60 °C –4 °F to +140 °F HF transmission signal: 433 MHz HF transmission range: max. 100 metres (in open area) Batteries: 2 x AAA 1.5 V (direct current) Degree of protection: IPX4 (splash-proof) -
Page 43: Safety
2 Screws (ø 3 mm) 1 Instructions for use 2 Dowels (ø 6 mm) 1 Quick start guide Safety YOU SHOULD STORE ALL SAFETY INFORMATION AND INSTRUCTIONS IN A SAFE PLACE IN CASE YOU NEED TO REFER TO THEM AGAIN IN THE FUTURE! General safety information This product can be used by children aged from 8 years and above and persons with reduced physical, sensory or mental... -
Page 44: Safety Instructions For Batteries / Rechargeable Batteries
Children shall not play with the product. Cleaning and user maintenance shall not be made by children without supervision. Do not expose the product to an extremely high electromagnetic field. This may impair the correct functioning of the product. Please note that the guarantee does not cover damage caused by incorrect handling, non-compliance with the operating instructions or interference with the product by unauthorised individuals. - Page 45 Never throw batteries / rechargeable batteries into fire or water. Do not exert mechanical loads to batteries / rechargeable batteries. Risk of leakage of batteries / rechargeable batteries Avoid extreme environmental conditions and temperatures, which could affect batteries / rechargeable batteries, e.g. radiators / direct sunlight.
-
Page 46: Before Initial Use
Only use the same type of batteries / rechargeable batteries. Do not mix used and new batteries / rechargeable batteries. Remove the batteries / rechargeable batteries if the product will not be used for a longer period. Risk of damage of the product Only use the specified type of battery / rechargeable battery! When inserting ensure the correct polarity! This is shown inside the battery compartment! -
Page 47: General Information
Note: Before initial use, remove the protective film from the LC display. General information CAUTION! When choosing where to position the product, make sure it is not exposed to direct sunlight, vibrations, dust, heat, cold or moisture. Do not place the product near to heat sources, e.g. -
Page 48: Preparing To Use The Outdoor Sensor
In ideal conditions, your temperature station can pick up this signal over a distance of up to approx. 1,500 km around Frankfurt / Main. Preparing to use the outdoor sensor Remove the battery compartment cover from the back of the outdoor sensor. Insert the supplied batteries with the correct polarity. - Page 49 Connecting the temperature station with the outdoor sensor and the DCF radio signal: After insert the batteries, the temperature station attempts to establish a connection with the outdoor sensor. This process can take a few minutes. The radio signal symbol flashes.
- Page 50 try changing the location (e.g. place the temperature station near to a window). Reception may be considerably reduced by obstructions (e.g. con- crete walls) or sources of interference (e.g. other electrical devices). If the reception of the radio signal continues to be interrupted, you can turn on / off the automatic radio time receive function manually.
- Page 51 Mounting the temperature station and / or the outdoor sensor on a wall: Note: You will require an electric drill and a crosshead screwdriver for this step. CAUTION! DANGER TO LIFE, RISK OF INJURY AND MATERIAL DAMAGE! Read the operating and safety instructions for your drill carefully.
-
Page 52: Setting The Time Format / Zone / Date / Time / Language / Temperature Unit Manually
Note: Ensure that the outdoor sensor shouldn’t be immersed into water and not contact with direct sunlight. Electronic devices may adversely affect the wireless signal reception. Setting the time format / zone / date / time / language / temperature unit manually The reception of DCF radio signal where the temperature station has been positioned may become degraded or interrupted. -
Page 53: Displaying Summer Time
Note: Should you be in a country in which the DCF radio signal can be received but the time is different to your current local time, you can use the time zone setting to have the clock display your current local time. If you find yourself in a country in which, for example, the local time is an hour ahead of Central European Time (CET), you set the time zone to +01. -
Page 54: Calling Up The Time Zone
Calling up the time zone The default display shows the time zone according to the information provided by the DCF radio signal. Press the MODE button . The second time zone symbol and the according time appear in the LC display. Press the MODE button again to return to the default display. -
Page 55: Switching The Alarm On / Off
4. Press the + button or – button to set the desired value. 5. Press the SET button SET button to confirm your settings. Switching the alarm on / off Press down the AL 1 ON / OFF button or AL 2 ON / OFF button once to activate Alarm 1 or Alarm 2. -
Page 56: Displaying Temperature
The alarm signal is silenced and the Alarm 1 symbol flash with the Z Alarm 2 symbol snooze function symbol Alarm 1 snooze function symbol Alarm 2 The alarm signal sounds again after approx. 5 minutes. Press up the AL 1 ON / OFF button or AL 2 ON / OFF button to deactivate the snooze function. -
Page 57: Displaying Temperature Trends
Press the + button to display the maximum values of the indoor and outdoor temperature. Press the + button again to display the minimum values of the indoor and outdoor temperature. Press and hold + button and – button while the maximum and minimum values, are being displayed to reset the values. -
Page 58: Battery State Display
Battery state display The low battery symbols appear in the temperature station’s and outdoor sensor LC display if the batteries in the outdoor sensor or the temperature station are weak. Replacing the batteries Open the battery compartment Remove the exhausted batteries. Insert two new 1.5 V (direct current) batteries (AAA) into the battery compartments. - Page 59 If the display indicates a problem, move such objects away from the temperature station / outdoor sensor or remove the batteries for a short while from the temperature station / outdoor sensor and then replace them. Obstacles such as concrete walls can also cause that the reception is disturbed.
-
Page 60: Cleaning And Maintenance
Another factor that may cause harmful interference, are dead or weak batteries in the outdoor sensor. Replace them by new ones. Activate the batteries first inside the outdoor sensor, then inside the temperature station. -> Only if problems occur, the outdoor sensor has to be restarted with keep pressed the + button or the temperature station has to be restarted. -
Page 61: Disposal
Disposal The packaging is made entirely of recyclable materials, which you may dispose of at local recycling facilities. Observe the marking of the packaging materials for waste separation, which are marked with abbreviations (a) and numbers (b) with following meaning: 1–7: plastics / 20–22: paper and fibreboard / 80–98: composite materials. - Page 62 To help protect the environment, please dispose of the product properly when it has reached the end of its use- ful life and not in the household waste. Information on collection points and their opening hours can be obtained from your local authority. Faulty or used batteries must be recycled in accordance with Directive 2006/66/EC and its amendments.
-
Page 63: Simplified Eu Declaration Of Conformity
Simplified EU declaration of conformity Hereby, OWIM GmbH & Co. KG, Stiftsbergstraße 1, 74167 Neckarsulm, GERMANY, declares that the product Radio-controlled temperature station, model no.: HG05686A-DCF / HG05686B-DCF, is in compliance with Directives 2014/53/EU and 2011/65/EU. The full text of the EU declaration of conformity is available at the following internet address: www.owim.com... -
Page 64: Warranty Claim Procedure
The warranty period begins on the date of purchase. Please keep the original sales receipt in a safe location. This document is required as your proof of purchase. This warranty becomes void if the product has been damaged, or used or maintained improperly. The warranty applies to defects in material or manufacture. -
Page 65: Service
(till receipt) and information about what the de- fect is and when it occurred. Service Service Great Britain Tel.: 0800 404 7657 E-Mail: owim@lidl.co.uk Service Ireland Tel.: 1890 930 034 (0,08 EUR / Min., (peak)) (0,06 EUR / Min., (off peak)) E-Mail: owim@lidl.ie... - Page 66 Légende des pictogrammes utilisés ....................Page 67 Introduction ................................ Page 68 Utilisation conventionnelle ............................ Page 68 Descriptif des pièces ............................. Page 69 Données techniques.............................. Page 70 Contenu de la livraison ............................Page 72 Sécurité ................................... Page 72 Instructions générales de sécurité ........................Page 72 Consignes de sécurité...
-
Page 67: Légende Des Pictogrammes Utilisés
Légende des pictogrammes utilisés Protégé contre les projections d'eau Utiliser des piles alcalines Radioguidé Portée de transmission de 100 m entre la station émettrice et la station réceptrice Fonction réveil Affichage de la température extérieure Affichage de la température ambiante Affichage de l'heure FR/BE... -
Page 68: Introduction
Station météo radioguidée Introduction Nous vous félicitons pour l‘achat de votre nouveau produit. Vous avez opté pour un produit de grande qualité. Le mode d‘emploi fait partie intégrante de ce produit. Il contient des indications importantes pour la sécurité, l’utilisation et la mise au rebut. Veuillez lire conscien- cieusement toutes les indications d‘utilisation et de sécurité... -
Page 69: Descriptif Des Pièces
Descriptif des pièces Station météo radioguidée : Température ambiante Symbole (alarme 2) Symbole Z Affichage MAX / MIN pour (répétition la température ambiante d‘alarme) (alarme 2) Date Alarme 2 Mois Touche SET (alarme 2) Jour de la semaine Touche – Symbole (niveau de pile Touche MODE faible) (sonde externe) -
Page 70: Données Techniques
Sonde externe : Tendance de la température (température ambiante) Rayonnement haute Touche AL1 ON / OFF fréquence Touche SNOOZE / LIGHT Symbole (niveau de Touche AL2 ON / OFF pile faible) Couvercle du compartiment Température extérieure à piles Couvercle du compartiment Compartiment à... - Page 71 Piles : 2 x AAA 1,5 V (courant continu) Bande de fréquence : 77,5 kHz, 433,050 MHz–434,79 MHz Capteur extérieur : Plage de température : de -20 °C à +60 °C de -4 °F à +140 °F Signal de transmission HF : 433 MHz Amplitude de transmission HF :...
-
Page 72: Contenu De La Livraison
Contenu de la livraison 1 station météo radioguidée 2 chevilles (ø 6 mm) 1 capteur extérieur 1 mode d‘emploi 4 piles AAA, 1,5 V 1 guide rapide 2 vis (ø 3 mm) Sécurité CONSERVEZ TOUTES LES CONSIGNES DE SÉCURITÉ ET INSTRUCTIONS POUR L‘AVENIR ! Instructions générales de sécurité... -
Page 73: Consignes De Sécurité Relatives Aux Piles / Aux Piles Rechargeables
de l‘utilisation sûre du produit et comprennent les risques liés à son utilisation. Les enfants ne doivent pas jouer avec le pro- duit. Le nettoyage et l‘entretien du produit ne doivent pas être effectués par des enfants laissés sans surveillance. N‘exposez pas le produit à... - Page 74 RISQUE D‘EXPLOSION ! Ne rechargez jamais des piles non rechargeables. Ne court-circuitez pas les piles / piles rechargeables et / ou ne les ouvrez pas ! Autrement, vous risquez de provoquer une surchauffe, un incendie ou une explosion. Ne jetez jamais des piles / piles rechargeables au feu ou dans l’eau.
- Page 75 PORTER DES GANTS DE PROTECTION ! Les piles / piles rechargeables endommagées ou sujettes à des fuites peuvent provoquer des brûlures au contact de la peau. Vous devez donc porter des gants adé- quats pour les manipuler. En cas de fuite des piles / piles rechargeables, retirez-les aussitôt du produit pour éviter tout endommagement.
-
Page 76: Avant La Mise En Service
Nettoyez les contacts de la pile / pile rechargeable et du compartiment à pile avant d‘insérer la pile ! Retirez immédiatement les piles / piles rechargeables usées du produit. Avant la mise en service Activez tout d‘abord les piles dans le capteur extérieur, puis seulement ensuite dans la station de température. - Page 77 chaleur, par exemple de radiateurs. Risque d‘endommagement du produit dans le cas contraire. Assurez-vous que des appareils proches ne fonctionnent pas sur la même fréquence de 433 MHz. Ces produits pourraient causer un dysfonctionnement de la transmission radio. N’installez pas les produits à côté de plaques métalliques ou sur des plaques métalliques.
-
Page 78: Mise En Service Du Capteur Extérieur
Mise en service du capteur extérieur Démontez le couvercle du boîtier à piles sur la face arrière de la station météo. Insérez les piles fournies en respectant la polarité. La sonde externe est alors prête à l‘emploi et le voyant à LED s‘allume brièvement. - Page 79 Relier la station de température avec le chargeur externe et le signal radio DCF : Après l‘insertion des piles, la station météo tente d‘établir une connexion avec le capteur extérieur. Cette procédure peut durer quelques minutes. Le symbole de signal radio clignote.
- Page 80 Indication : Ne changez pas l‘emplacement de la station de température pendant la réception. Sinon, la réception risque d’être perturbée. Lorsque lors de la mise en marche la synchronisation avec l‘horloge atomique est impossible, changez d‘abord l‘emplacement de la station de température (p. ex. à proximité d‘une fenêtre). La réception peut être significativement entravée par des obstacles (par exemple des murs en béton) ou des sources parasites (par exemple d’autres appareils électriques).
- Page 81 (voir « Réglage manuel du fuseau horaire / zone / date / heure / langue / unité de température »). Maintenez de nouveau la touche – enfoncée pendant env. 3 secondes. Le symbole DCF s‘éteint. La fonction de ré- ception automatique de l‘heure radio est activée. La station de température démarre la réception de l‘heure radio tôt le matin.
-
Page 82: Réglage Manuel Du Fuseau Horaire / Zone / Date / Heure / Langue / Unité De Température
Marquez le trou de perçage (ø env. 6 mm) sur le mur. Percez le trou à l’aide d’une perceuse électrique. Insérez la cheville dans le trou. À l’aide d’un tournevis cruciforme, vissez la vis dans la cheville. Accrochez la station de température ou la sonde externe à la vis à... - Page 83 1. Appuyez sur la touche MODE et maintenez-la enfoncée pendant env. 3 secondes. 2. Appuyez sur la touche + ou sur la touche – pour sélec- tionner le format horaire 12 h ou 24 h. Astuce : Appuyez sur la touche + ou sur la touche –...
- Page 84 fuseau horaire sur +01. Le produit est désormais encore contrôlé par le signal radio DCF, mais l‘heure affichée est en avance d‘une heure sur l‘heure HNEC. 5. Appuyez sur la touche MODE pour confirmer votre saisie. 6. Répétez les étapes de travail 4 et 5, afin de régler les valeurs pour l‘année, le mois et la date, l‘heure, les minutes, la langue (GE = allemand, FR = français, SP = espagnol, IT = italien, DU = néerlandais, DA = danois, EN = anglais).
-
Page 85: Consulter Le Fuseau Horaire
Consulter le fuseau horaire Dans l‘affichage standard, le fuseau horaire est affiché en fonction du signal radio DCF. Appuyez sur la touche MODE . Le symbole pour la 2e zone horaire et le temps correspondant apparaissent sur l‘écran LCD. Rappuyez sur la touche MODE pour revenir à... -
Page 86: Activation / Coupure De L'alarme
3. Appuyez sur la touche SET (alarme 1) ou sur la touche SET (alarme 2) , pour confirmer votre saisie. L‘affichage des minutes clignote. 4. Appuyez sur la touche + ou sur la touche – pour régler la valeur désirée. 5. -
Page 87: Utilisation De La Fonction Répétition D'alarme
Appuyez vers le haut sur la touche AL1 ON / OFF ou sur la touche AL2 ON / OFF pour couper prématurément le signal sonore d‘alarme. Utilisation de la fonction répétition d‘alarme Pendant le signal sonore d‘alarme, appuyez sur la touche SNOOZE / LIGHT pour activer la fonction de répétition d‘alarme. -
Page 88: Affichage De La Température
Appuyez sur cette touche lors du fonctionnement normal, afin d‘activer le rétroéclairage pendant env. 10 secondes. Affichage de la température La température intérieure ainsi que la température extérieure s’affichent sur l’écran à cristaux liquides. Affichage des valeurs minimales / maximales La station de température enregistre les valeurs maximales et minimales de la sonde extérieure reliée ainsi que de la station de température elle-même. -
Page 89: Affichage Tendance Températures
Pour remettre les valeurs à zéro, appuyez sur la touche + et sur la touche – pendant l‘affichage des valeurs maxi- males et minimales. Appuyez sur la touche + pour revenir à l‘affichage standard. Affichage tendance températures Dès que la connexion au capteur externe est établie, la station de température indique la tendance de la température (extérieure) ainsi que la tendance de température (intérieure) Les affichages suivants sont possibles :... -
Page 90: Remplacement Des Piles
Remplacement des piles Ouvrez le boîtier à piles Retirez les piles usagées. Placez respectivement 2 piles neuves 1,5 V (courant continu) (AAA) dans le boîtier à piles. Remarque : Veillez à respecter la polarité. Celle-ci est indiquée dans le boîtier à piles (voir également ill. B + D). Fermez les boîtiers à... - Page 91 Les obstacles, comme par ex. les murs en béton, peuvent sensible- ment gêner la réception. Si nécessaire, changez l‘emplacement du produit (par ex. près d‘une fenêtre). Veuillez impérativement veiller à ce que le capteur extérieur soit toujours installé dans un périmètre de max.
-
Page 92: Nettoyage Et Entretien
Activez tout d‘abord les piles dans le capteur extérieur, puis seule- ment ensuite dans la station météo. -> Seulement en cas de problème, la sonde externe doit être redé- marrée en appuyant sur la touche + ou en redémarrant la station de température. - Page 93 Veuillez respecter l‘identification des matériaux d‘em- ballage pour le tri sélectif, ils sont identifiés avec des abbréviations (a) et des chiffres (b) ayant la signification suivante : 1–7 : plastiques / 20–22 : papiers et cartons / 80–98 : matériaux composite. Le produit et les matériaux d’emballage sont recyclables, mettez-les au rebut séparément pour un meilleur traite- ment des déchets.
- Page 94 collecte et leurs horaires d’ouverture, vous pouvez contacter votre municipalité. Les piles défectueuses ou usagées doivent être recyclées conformé- ment à la directive 2006/66/CE et ses modifications. Les piles et / ou le produit doivent être retournés dans les centres de collecte proposés.
-
Page 95: Déclaration De Conformité Ue Simplifiée
Déclaration de conformité UE simplifiée Par la présente, OWIM GmbH & Co. KG, Stiftsbergstraße 1, 74167 Neckarsulm, ALLEMAGNE, déclare que le produit Station météo radioguidée, No. de modèle : HG05686A-DCF / HG05686B-DCF est conforme aux directives 2014/53/UE et 2011/65/UE. La déclaration de conformité européenne est disponible en version complète à... -
Page 96: Faire Valoir Sa Garantie
Si un problème matériel ou de fabrication devait survenir dans 3 ans suivant la date d‘achat de ce produit, nous assurons à notre discrétion la réparation ou le remplacement du produit sans frais supplémentaires. La garantie prend fin si le produit est endommagé suite à... -
Page 97: Service Après-Vente
(ticket de caisse) et d’une description écrite du défaut avec mention de sa date d’apparition. Service après-vente Service après-vente France Tél. : 0800 919270 E-Mail : owim@lidl.fr Service après-vente Belgique Tél. : 070 270 171 (0,15 EUR / Min.) E-Mail : owim@lidl.be FR/BE... - Page 98 Legenda van de gebruikte pictogrammen ................Pagina Inleiding ................................Pagina 100 Doelmatig gebruik ............................Pagina 100 Beschrijving van de onderdelen ........................Pagina 101 Technische gegevens ............................Pagina 102 Omvang van de levering ..........................Pagina 103 Veiligheid ................................. Pagina 104 Algemene veiligheidsinstructies ........................Pagina 104 Veiligheidsinstructies voor batterijen / accu‘s ....................
-
Page 99: Legenda Van De Gebruikte Pictogrammen
Legenda van de gebruikte pictogrammen Spatwaterdicht Alkali-batterijen inbegrepen Radiografisch aangestuurd 100 m zenderreikwijdte tussen zender en ontvanger Wekfunctie Weergave buitentemperatuur Weergave binnentemperatuur Tijdweergave NL/BE... -
Page 100: Inleiding
Draadloos temperatuurstation Inleiding Hartelijk gefeliciteerd met de aankoop van uw nieuwe product. U heeft voor een hoogwaardig product gekozen. De gebruiksaanwij- zing is een deel van het product. Deze bevat belangrijke aanwijzin- gen voor veiligheid, gebruik en verwijdering. Maakt U zich voor de ingebruikname van het product met alle bedienings- en veiligheids- voorschriften vertrouwd. -
Page 101: Beschrijving Van De Onderdelen
Beschrijving van de onderdelen Draadloos temperatuurstation: Binnentemperatuur -symbool (alarm 2) MAX- / MIN-weergave -symbool (sluimerfunctie) voor binnentemperatuur (alarm 2) Datum Alarm 2 Maand SET-toets (alarm 2) Weekdag – -toets -symbool (laag batterijni- MODE-toets veau) (buitensensor) + -toets -radiosignaal-symbool SET-toets (alarm 1) MAX- / MIN-weergave voor Alarm 1 buitentemperatuur... -
Page 102: Technische Gegevens
Buitensensor: Temperatuurtrend (binnentemperatuur) Hoogfrequentiestraling AL1-ON- / OFF-toets -symbool (laag SNOOZE- / LIGHT-toets batterijniveau) AL2-ON- / OFF-toets Buitentemperatuur Afdekking van het batterijvak Afdekking van het batterijvak Batterijvak Batterijvak RESET-toets Ophangmogelijkheid Ophangmogelijkheid Plug (ø 6 mm) Plug (ø 6 mm) Schroef (ø 3 mm) Schroef (ø... -
Page 103: Omvang Van De Levering
Frequentieband: 77,5 kHz, 433,050 MHz–434,79 MHz Buitensensor: Temperatuurmeetbereik: –20 °C tot +60 °C –4 °F tot +140 °F HF overdrachtssignaal: 433 MHz HF overdrachtsreikwijdte: max. 100 meter op open terrein Batterijen: 2 x AAA 1,5 V (gelijkstroom) Beschermingsklasse: IPX4 (spatwaterdicht) Frequentieband: 433,050 MHz–434,79 MHz Max. -
Page 104: Veiligheid
1 bedieningshandleiding 1 korte handleiding Veiligheid BEWAAR ALLE VEILIGHEIDSINSTRUCTIES EN AANWIJZINGEN OM DEZE EVENTUEEL LATER TE KUNNEN RAADPLEGEN! Algemene veiligheidsinstructies Dit product kan door kinderen vanaf 8 alsmede door personen met verminderde fysieke, sensorische of mentale vaardigheden of een gebrek aan ervaring en kennis worden gebruikt, als zij onder toezicht staan of geïnstrueerd werden met betrekking tot het veilige gebruik van het product en zij de hieruit voort- vloeiende gevaren begrijpen. -
Page 105: Veiligheidsinstructies Voor Batterijen / Accu's
Stel het product niet bloot aan een extreem hoog elektromag- netisch veld. Hierdoor kan de functie van het product worden beïnvloed. Beschadigingen door ondeskundig gebruik, negeren van de handleiding of ingrepen door niet-geautoriseerde personen zijn van de garantieverlening uitgesloten. Veiligheidsinstructies voor batterijen / accu‘s LEVENSGEVAAR! Houd batterijen / accu‘s buiten het bereik van kinderen. - Page 106 Risico dat de batterijen / accu’s lekken Vermijd extreme omstandigheden en temperaturen die invloed op de batterijen / accu‘s zouden kunnen hebben bijv. radiatoren / direct zonlicht. Bij lekkende batterijen / accu‘s het contact van de chemicaliën met de huid, ogen en slijmvliezen vermijden! Spoel de desbe- treffende plekken direct af met schoon water en raadpleeg onmiddellijk een arts! DRAAG VEILIGHEIDSHANDSCHOENEN!
-
Page 107: Vóór De Ingebruikname
Risico op beschadiging van het product Gebruik uitsluitend het aangegeven type batterij / accu! Plaats de batterijen / accu‘s volgens de weergegeven polariteit (+) en (-) op batterij / accu en op product. Reinig de contacten van de batterij / accu en die in het batterij- vak, voordat u deze plaatst! Verwijder verbruikte batterijen / accu‘s direct uit het product. -
Page 108: Algemene Instructies
Algemene instructies VOORZICHTIG! Waarborg bij de keuze van de locatie dat het product niet wordt blootgesteld aan directe zonlicht, trillingen, stof, hitte, kou en vocht. Plaats het product niet in de buurt van hittebronnen, bijv. verwarmingen. Anders dreigt het product te beschadigen. -
Page 109: Buitensensor In Gebruik Nemen
Uw temperatuurstation ontvangt deze signalen onder optimale omstandigheden tot op een afstand van ca. 1.500 km rondom Frankfurt am Main. Buitensensor in gebruik nemen Open het batterijvak aan de achterzijde van de buitensensor. Plaats de meegeleverde batterijen en let op de juiste polariteit. De buitensensor is nu gebruiksklaar en de controle-led licht even op. - Page 110 Temperatuurstation met de buitensensor en het radio- grafisch DCF-signaal verbinden: Na het plaatsen van de batterijen probeert het temperatuurstation contact met de buitensensor te maken. Dit kan enkele minuten duren. -radiosignaal-symbool knippert. Als de verbinding met de buitensensor voltooid is, stopt het -radiosignaal-symbool knipperen en wordt de temperatuur op het LC-display weergegeven.
- Page 111 Als op het tijdstip van de ingebruikname geen synchronisatie met de atoomklok mogelijk is, verandert u eerst de standplaats van het temperatuurstation (bijv. dichter naar een raam). De ontvangst kan door hindernissen (bijv. betonnen muren) of storingsbronnen (bijv. andere elektrische apparaten) aanzienlijk worden gestoord.
- Page 112 radiotijd-ontvangstfunctie is ingeschakeld. Het temperatuurstation start de ontvangst van de radiotijd in de vroege ochtend. Temperatuurstation en / of buitensensor aan de wand monteren: Opmerking: Voor deze handeling heeft u een kruiskopschroeven- draaier nodig. VOORZICHTIG! LEVENSGEVAAR EN GEVAAR VOOR LETSEL EN MATERIËLE SCHADE! Lees ook de bedienings- en veiligheidsinstructies van uw boormachine zorgvuldig door.
-
Page 113: Tijdformaat / Zone / Datum / Tijd / Taal / Temperatuureenheid Handmatig Instellen
Hang het temperatuurstation resp. de buitensensor op met de ophanginrichting aan de schroef. Opmerking: controleer of de buitensensor niet in water is gedom- peld en niet aan direct zonlicht wordt blootgesteld. Elektronische apparatuur kan de radio-ontvangst storen. Tijdformaat / zone / datum / tijd / taal / temperatuureenheid handmatig instellen De ontvangst van het radiografisch DCF-signaal kan op de stand- plaats van het temperatuurstation gestoord resp. - Page 114 u niet binnen 20 seconden een andere toets indrukt, keert het LC-display automatisch terug naar de standaardweergave. 3. Druk op de MODE-toets om uw invoer te bevestigen. 4. Druk op de +-toets of de – -toets om de gewenste tijdzone voor de tweede tijdzone (-12 uur tot +12 uur) in te stellen.
-
Page 115: Zomertijd Weergeven
Opmerking: de secondewijzer kan alleen maar worden teruggezet naar ‚00‘. 7. Het LC-display bevindt zich vervolgens weer in de standaard- modus. Zomertijd weergeven De zomertijd wordt op het LC-display door het DST-symbool weergegeven. Via het radiografisch DCF-signaal herkent het tempe- ratuurstation automatisch of de zomertijd geldt of niet. -
Page 116: Wekkertijd Instellen
Wekkertijd instellen U kunt twee verschillende alarmtijden instellen. 1. Houd de SET-toets (alarm 1) of de SET-toets (alarm 2) ca. 3 seconden ingedrukt. Opmerking: als tevoren een alarmtijd is ingesteld, verschijnt deze op het LC-display. Anders verschijnt de weergave 0:00 of AM 12:00. -
Page 117: Sluimerfunctie Gebruiken
Opmerking: Het -symbool (alarm 1) -symbool (alarm 2) verschijnt op het LC-display. Het alarmsignaal klinkt zodra de ingestelde alarmtijd bereikt is. Na afloop van 2 minuten verstomt het alarmsignaal automatisch. Beweeg de AL1-ON- / OFF-toets of de AL2-ON- / OFF-toets omhoog om het alarmsignaal vroegtijdig uit te schakelen. -
Page 118: Temperatuur Weergeven
Temperatuur weergeven Op het LC-display wordt zowel de binnen- als de buitentempe- ratuur weergegeven. Minimale / maximale waarde oproepen Het temperatuurstation slaat de maximale en minimale waarden van de aangesloten buitensensor net zoals die van het temperatuurstation zelf op. Druk op de +-toets om de maximale waarden van de binnen- en buitentemperatuur op te roepen. -
Page 119: Temperatuurtrend Weergeven
Temperatuurtrend weergeven Nadat de verbinding met de buitensensor voltooid is, geeft het temperatuurstation de temperatuurtrend (buiten) en de tempe- ratuurtrend (binnen) weer. De volgende weergaven zijn mogelijk: = de temperatuur stijgt. = de temperatuur blijft constant. = de temperatuur daalt. Batterij-weergave De -symbolen verschijnen op het LC-display van het... -
Page 120: Storingen Verhelpen
Plaats 2 nieuwe 1,5 V (gelijkstroom) batterijen (AAA) in het batterijvakje. Opmerking: let op de juiste polariteit. Deze wordt in de batterijvakjes aangegeven (zie ook afb. B + D). Sluit het batterijvakje. Storingen verhelpen Opmerking: het product bevat elektrische componenten. Daarom is het mogelijk dat het door radiografische apparaten in de directe omgeving wordt verstoord. - Page 121 locatie (bijv. in de buurt van een raam). Houd er rekening mee dat de buitensensor altijd binnen een straal van max. 100 meter (vrije ruimte) van het temperatuurstation kan worden geplaatst. De aange- geven reikwijdte is de reikwijdte voor een vrije ruimte en wil zeggen dat er geen hindernis tussen de buitensensor en het temperatuurstation mag staan.
-
Page 122: Reiniging En Onderhoud
-> Alleen als er problemen optreden, moet de buitensensor opnieuw worden gestart door op de + -toets te drukken of het tempera- tuurstation opnieuw te starten. Om het temperatuurstation opnieuw te starten, verwijdert u de batterijen eventjes en plaatst deze dan weer terug. - Page 123 Neem de aanduiding van de verpakkingsmaterialen voor de afvalscheiding in acht. Deze zijn gemarkeerd met de afkortingen (a) en een cijfers (b) met de volgende betekenis: 1–7: kunststoffen / 20–22: papier en vezel- platen / 80–98: composietmaterialen. Het product en de verpakkingsmaterialen zijn recycle- baar;...
-
Page 124: Verklaring Van Overeenstemming
Cd = cadmium, Hg = kwikzilver, Pb = lood. Geef verbruikte batterijen daarom af bij een gemeentelijk inzamelpunt. Verklaring van overeenstemming Hiermee verklaart OWIM GmbH & Co. KG, Stiftsbergstraße 1, 74167 Neckarsulm, DUITSLAND, dat het product Draadloos 124 NL/BE... -
Page 125: Garantie
Modelnr.: HG05686A-DCF / HG05686B-DCF voldoet aan de richtlijnen 2014/53/EG en 2011/65/EG. De volledige tekst van de EU-conformiteitsverklaring staat ter beschikking via het volgende internetadres: www.owim.com Garantie Het product wordt volgens strenge kwaliteitsrichtlijnen zorgvuldig geproduceerd en voor levering grondig getest. In geval van schade aan het product kunt u rechtmatig beroep doen op de verkoper van het product. -
Page 126: Afwikkeling In Geval Van Garantie
Wanneer binnen 3 jaar na de aankoopdatum van dit product een materiaal- of productiefout optreedt, dan wordt het product door ons – naar onze keuze – gratis voor u gerepareerd of vervangen. Deze garantie komt te vervallen als het product beschadigd wordt, niet correct gebruikt of onderhouden wordt. -
Page 127: Service
Service Service Nederland Tel.: 0900 0400 223 (0,10 EUR / Min.) E-Mail: owim@lidl.nl Service Belgiё Tel.: 070 270 171 (0,15 EUR / Min.) E-Mail: owim@lidl.be NL/BE... - Page 128 Legenda zastosowanych piktogramów ................. Strona 129 Wstęp ................................... Strona 130 Zastosowanie zgodne z przeznaczeniem ...................... Strona 130 Opis części ................................ Strona 131 Dane techniczne ............................... Strona 133 Zawartość................................Strona 134 Bezpieczeństwo ............................Strona 135 Wskazówki ogólne dotyczące bezpieczeństwa .................... Strona 135 Wskazówki bezpieczeństwa dla baterii / akumulatorów ................
-
Page 129: Legenda Zastosowanych Piktogramów
Legenda zastosowanych piktogramów Ochrona przed pryskającą wodą Zawarte baterie alkaliczne Sterowanie radiowe 100 m zasięg przesyłania między stacją nadawczą a odbiorczą Funkcja budzenia Wskaźnik temperatury zewnętrznej Wskaźnik temperatury wewnętrznej Wskaźnik czasu... -
Page 130: Wstęp
Stacja meteo sterowana radiowo Wstęp Gratulujemy Państwu zakupu nowego produktu. Tym samym zdecy- dowali się Państwo na zakup produktu wysokiej jakości. Instrukcja obsługi jest częścią tego produktu. Zawiera ona ważne wskazówki dotyczące bezpieczeństwa, użytkowania i utylizacji. Przed pierw- szym użyciem produktu należy zapoznać się ze wszystkimi wska- zówkami dotyczącymi obsługi i bezpieczeństwa. -
Page 131: Opis Części
produkt posiada dwie funkcje alarmu. Ten produkt przeznaczony jest wyłącznie do prywatnego gospodarstwa domowego, nie zaś do zastosowania komercyjnego. Opis części Stacja pomiaru temperatury: Temperatura wewnętrzna Tendencja temperatury Wskaźnik MAX / MIN dla (temperatura zewnętrzna) temperatury wewnętrznej Temperatura zewnętrzna Data Symbol DCF Miesiąc Wskaźnik DST (czas letni) - Page 132 Przycisk SET (alarm 1) Przycisk RESET Alarm 1 Uchwyt do zawieszania Symbol (funkcja drzemki) Kołek (ø 6 mm) (alarm 1) Śruba (ø 3 mm) Symbol (alarm 1) Czujnik zewnętrzny: Czas 2 strefa czasowa Promieniowanie o Symbol (niski stan baterii) wysokiej częstotliwości (stacja pomiaru temperatury) Symbol (niski poziom Tendencja temperatury...
-
Page 133: Dane Techniczne
Dane techniczne Stacja meteo sterowana radiowo: Zakres pomiaru temperatury: 0 °C do +50 °C +32 °F do +122 °F Dokładność pomiaru temperatury: 0,1 °C Sygnał radiowy: DCF77 Baterie: 2 x AAA 1,5 V (prąd stały) Pasmo częstotliwości: 77,5 kHz, 433,050 MHz–434,79 MHz Czujnik zewnętrzny: Zakres pomiaru temperatury:... - Page 134 Stopień ochrony: IPX4 (ochrona przed pryskającą wodą) Pasmo częstotliwości: 433,050 MHz–434,79 MHz Maks. przesył mocy: < 10 dBm Wsazówka: Jeśli wyświetlacz LCD pokazuje „LL.L“ lub „HH.H“, temperatura leży poza zakresem pomiaru. Zawartość 1 stacja meteo sterowana 2 śruby (ø 3 mm) radiowo 2 kołki (ø...
-
Page 135: Bezpieczeństwo
Bezpieczeństwo PRZED UŻYCIEM PRZECZYTAĆ INSTRUKCJĘ OBSŁUGI I ZACHOWAĆ JĄ NA PRZYSZŁOŚĆ! Wskazówki ogólne dotyczące bezpieczeństwa Niniejszy produkt może być używany przez dzieci od lat 8 oraz przez osoby z obniżonymi zdolnościami fizycznymi, sensorycznymi lub mentalnymi lub brakiem doświadczenia i / lub wiedzy, jeśli pozostają... -
Page 136: Wskazówki Bezpieczeństwa Dla Baterii / Akumulatorów
Należy pamiętać, że uszkodzenia spowodowanie nieodpo- wiednią obsługą, nieprzestrzeganiem instrukcji obsługi lub in- gerencją osób nieupoważnionych są wyłączone z gwarancji. Wskazówki bezpieczeństwa dla baterii / akumulatorów ZAGROŻENIE ŻYCIA! Baterie / akumulatory należy trzy- mać poza zasięgiem dzieci. W przypadku połknięcia należy natychmiast udać... - Page 137 Ryzyko wycieku kwasu z baterii / akumulatorów Należy unikać ekstremalnych warunków i temperatur, które mogą oddziaływać na baterie / akumulatory, np. kaloryferów / bezpośredniego działania promieniowania słonecznego. Jeśli wyciekną baterie / akumulatory, należy unikać kontaktu skóry, oczu i błon śluzowych z chemikaliami! Dotknięte miejsca natychmiast przepłukać...
-
Page 138: Przed Uruchomieniem
Ryzyko uszkodzenia produktu Używać wyłącznie zalecanego rodzaju baterii / akumulatora! Włożyć baterie / akumulatory zgodnie z oznaczeniem biegu- nów (+) i (-) na baterii / akumulatorze i produkcie. Jeśli to konieczne, oczyścić styki baterii / akumulatora i w komorze baterii przed włożeniem baterii! Zużyte baterie / akumulatory wyjąć... -
Page 139: Wskazówki Ogólne
Wskazówki ogólne OSTROŻNIE! Przy wyborze miejsca ustawienia należy zadbać, aby produkt nie był narażony na bezpośrednie promienie słoneczne, wibracje, pył, gorąco, zimno i wilgoć. Nie ustawiać produktu w pobliżu źródeł gorąca, np. kaloryferów. Powyższe działania grożą uszkodzeniem produktu. Należy upewnić się, że urządzenia używane w bliskiej odle- głości nie korzystają... -
Page 140: Uruchomienie Czujnika Zewnętrznego
Stacja pomiaru temperatury odbiera te sygnały w optymalnych wa- runkach w odległości do około 1.500 km od Frankfurtu nad Menem. Uruchomienie czujnika zewnętrznego Zdjąć osłonę komory baterii znajdującą się na tylnej ściance czujnika zewnętrznego. Włożyć dołączone baterie uwzględniając prawidłową biegunowość. Czujnik zewnętrzny jest teraz gotowy do pracy, a kontrolka LED świeci przez krótki czas. - Page 141 Połączenie stacji pomiaru temperatury z czujnikiem zewnętrznym oraz sygnałem radiowym DCF: Po włożeniu baterii stacja pomiaru temperatury próbuje nawiązać połączenie z czujnikiem zewnętrznym. Proces ten może trwać kilka minut. Symbol sygnału radiowego miga. Po udanym połą- czeniu z czujnikiem zewnętrznym symbol sygnału radiowego przestaje migać, a na wyświetlaczu LCD wskazywana jest tempe- ratura.
- Page 142 Wskazówka: Nie należy zmieniać pozycji stacji pomiaru tem- peratury w trakcie odbioru. W przeciwnym razie może dojść do zakłóceń odbioru. Jeżeli podczas uruchomienia stacji pomiaru temperatury synchro- nizacja z zegarem atomowym jest niemożliwa, należy najpierw zmienić miejsce ustawienia (np. bliżej okna). Przeszkody (np. ściany betonowe) oraz źrόdła zakłόceń (np. inne urządzenia elektryczne) mogą...
- Page 143 ustawianie formatu czasu / strefy / daty / godziny / języka / jednostki temperatury”). Ponownie przytrzymać przycisk wciśnięty przez ok. 3 sekundy. Symbol DCF gaśnie. Automatyczna funkcja odbioru czasu radiowego jest włączona. Stacja pomiaru temperatury rozpo- czyna odbiór czasu radiowego wczesnym rankiem. Montaż...
-
Page 144: Ręczne Ustawianie Formatu Czasu / Strefy / Daty / Godziny / Języka / Jednostki Temperatury
Zaznaczyć na ścianie miejsce wiercenia otworu (ø ca. 6 mm). Wywiercić otwór za pomocą wiertarki. Włożyć kołek w wywiercony otwór. Za pomocą śrubokręta krzyżowego wkręcić śrubę w kołek. Korzystając z otworu do zawieszania zawiesić stację pomiaru temperatury lub czujnik zewnętrzny na śrubie. Wskazówka: Zadbać o to, by czujnik zewnętrzny nie był zanu- rzony w wodzie ani narażony na bezpośrednie promienie słoneczne. - Page 145 1. Nacisnąć i przytrzymać przycisk MODE przez ok. 3 sekundy. 2. Nacisnąć przycisk + lub przycisk – , aby wybrać format 12- lub 24-godzinny. Rada: Nacisnąć i przytrzymać przycisk + lub przycisk – , aby szybko przełączać numery do przodu lub do tyłu. Jeżeli w ciągu 20 sekund nie zostanie naciśnięty żaden przycisk, wyświetlacz powróci automatycznie do wskazania domyślnego.
-
Page 146: Wskazywanie Czasu Letniego
należy ustawić strefę czasową na +01. Produkt jest wprawdzie sterowany teraz sygnałem radiowym DCF, wskazuje jednak czas o godzinę wcześniejszy niż CET. 5. Nacisnąć przycisk MODE , aby potwierdzić swoje ustawienia. 6. Powtórzyć kroki robocze 4. i 5., aby ustawić wartości dla roku, miesiąca i daty, godzinę, minutę, język (GE = niemiecki, FR = francuski, SP = hiszpański, IT = włoski, DU = niderlandzki, DA = duński, EN = angielski) i jednostkę... -
Page 147: Wyświetlanie Strefy Czasowej
Wyświetlanie strefy czasowej W pozycji standardowej wyświetlana jest strefa czasowa zgodnie z sygnałem radiowym DCF. Nacisnąć przycisk MODE . Na wyświetlaczu LCD wyświe- tlają się symbol dla 2 strefy czasowej i odpowiedni czas. Nacisnąć ponownie przycisk MODE , aby powrócić do pozycji standardowej. -
Page 148: Włączanie / Wyłączanie Alarmu
3. Nacisnąć przycisk SET (alarm 1) lub przycisk SET (alarm 2) , aby potwierdzić swoje wprowadzenie. Wskaźnik minut zacznie migać. 4. Nacisnąć przycisk + lub przycisk – , aby ustawić żądaną wartość. 5. Nacisnąć przycisk SET (alarm 1) lub przycisk SET (alarm 2) , aby potwierdzić... -
Page 149: Drzemka
Drzemka Aby uaktywnić funkcję drzemki, w trakcie sygnału alarmu nacisnąć przycisk SNOOZE / LIGHT Sygnał alarmu cichnie i migają symbol (alarm 1) z symbolem Z symbol (alarm 2) (funkcja drzemki) (alarm 1) / symbol Z (funkcja drzemki) (alarm 2) Sygnał alarmu włączy się ponownie po upływie ok. 5 minut. Wycisnąć... -
Page 150: Wyświetlanie Wartości Minimalnych / Maksymalnych
Wyświetlanie wartości minimalnych / maksymalnych Stacja wyboru temperatury zapisuje maksymalne i minimalne wartości połączonego czujnika zewnętrznego oraz samej stacji. Nacisnąć przycisk + , aby wyświetlić wartości maksymalne temperatury wewnętrznej oraz zewnętrznej. Nacisnąć ponownie przycisk + , aby wyświetlić minimalne wartości temperatury wewnętrznej oraz zewnętrznej. Nacisnąć... -
Page 151: Wskaźnik Stanu Baterii
Możliwe są następujące wskazania: = Wzrost temperatury. = Temperatura pozostaje stała. = Spadek temperatury. Wskaźnik stanu baterii Symbole wskazywane są na wyświetlaczu LCD stacji pomiaru temperatury i czujnika zewnętrznego, jeśli baterie czuj- nika lub stacji pomiaru temperatury są za słabe. Wymiana baterii Otworzyć... -
Page 152: Usuwanie Usterek
Usuwanie usterek Wskazówka: Produkt zawiera wrażliwe części elektroniczne. Dlatego możliwe jest jego zakłócenie przez znajdujące się w jego bezpośrednim pobliżu urządzenia emitujące fale radiowe. Jeżeli na wyświetlaczu pojawią się zakłócenia, należy usunąć tego rodzaju urządzenia z pola zasięgu stacji pomiaru tem- peratury / czujnika zewnętrznego lub na krótko wyjąć... - Page 153 stać żadna przeszkoda. „Kontakt wzrokowy“ między czujnikiem i stacją temperatury często poprawia transmisję. Zimno (temperatury zewnętrzne poniżej 0 °C) mogą negatywnie ograniczać moc baterii czujnika zewnętrznego, a przekaz radiowy. Kolejnym czynnikiem, który może prowadzić do zakłóceń odbioru, są puste lub słabe baterie czujnika zewnętrznego. Należy je wy- mienić...
-
Page 154: Czyszczenie I Konserwacja
Czyszczenie i konserwacja Obudowę produktu należy czyścić wyłącznie z zewnątrz miękką, suchą szmatką. W żadnym wypadku nie należy spryskiwać czujnika zewnętrz- nego wodą, np. przy użyciu węża ogrodowego. Czujnik zewnętrzny posiada ochronę przed pryskającą wodą ze wszystkich kierunków. Utylizacja Opakowanie wykonane jest z materiałów przyjaznych dla środo- wiska, które można przekazać... - Page 155 Produkt i materiał opakowania nadają się do ponow- nego przetworzenia, należy je zutylizować osobno w celu lepszego przetworzenia odpadów. Logo Triman jest ważne tylko dla Francji. Informacji na temat możliwości utylizacji wyeksploato- wanego produktu udziela urząd gminy lub miasta. Z uwagi na ochronę środowiska nie wyrzucać urządze- nia po zakończeniu eksploatacji do odpadów domo- wych, lecz prawidłowo zutylizować.
-
Page 156: Uproszczona Deklaracja Zgodności Ue
Uproszczona deklaracja zgodności UE Niniejszym OWIM GmbH & Co. KG, Stiftsbergstraße 1, 74167 Neckarsulm, NIEMCY oświadcza, że produkt Stacja meteo stero- wana radiowo, Nr modelu: HG05686A-DCF / HG05686B-DCF spełnia wymagania dyrektyw 2014/53/EU i 2011/65/EU. -
Page 157: Gwarancja
Gwarancja Produkt wyprodukowano według wysokich standardów jakości i poddano skrupulatnej kontroli przed wysyłką. W przypadku wad produktu nabywcy przysługują ustawowe prawa. Gwarancja nie ogranicza ustawowych praw nabywcy produktu. Produkt objęte jest 3 gwarancją, licząc od daty zakupu. Gwarancja wygasa w razie zawinionego przez użytkownika uszkodzenia produktu, niewłaściwego użycia lub konserwacji. -
Page 158: Sposób Postępowania W Przypadku Naprawy Gwarancyjnej
uszkodzeń części łamliwych, np. przełączników, akumulatorów lub wykonanych ze szkła. Zgodnie z Kodeksem Cywilnym art. 581 §1 wraz z wymianą urzą- dzenia lub ważnej części czas gwarancji rozpoczyna się na nowo. Sposób postępowania w przypadku naprawy gwarancyjnej Aby zapewnić szybkie rozpatrzenie Państwa wniosku, prosimy stosować... -
Page 159: Serwis
Produkt uznany za uszkodzony można następnie z dołączeniem dowodu zakupu (paragonu) i podaniem, na czym polega wada i kiedy wystąpiła, przesłać bezpłatnie na podany Państwu adres serwisu. Serwis Serwis Polska Tel.: 22 397 4996 E-Mail: owim@lidl.pl... - Page 160 Legenda použitých piktogramů ..................... Strana 161 Úvod ..................................Strana 162 Použití ke stanovenému účelu .......................... Strana 162 Popis dílů ................................Strana 163 Technické údaje ..............................Strana 164 Obsah dodávky ..............................Strana 165 Bezpečnost ..............................Strana 166 Všeobecná bezpečnostní upozornění ......................Strana 166 Bezpečnostní...
-
Page 161: Legenda Použitých Piktogramů
Legenda použitých piktogramů Ochrana před stříkající vodou Alkalické baterie v obsahu Řízení rádiovými signály 100 m dosah mezi vysílací a přijímací stanicí Funkce buzení Ukazatel venkovní teploty Ukazatel vnitřní teploty Ukazatel času... -
Page 162: Použití Ke Stanovenému Účelu
Bezdrátová meteostanice Úvod Blahopřejeme Vám ke koupi nového výrobku. Rozhodli jste se pro kvalitní produkt. Návod k obsluze je součástí tohoto výrobku. Ob- sahuje důležité pokyny pro bezpečnost, použití a likvidaci. Před použitím výrobku se seznamte se všemi pokyny k obsluze a bez- pečnostními pokyny. -
Page 163: Popis Dílů
Popis dílů Bezdrátová meteostanice: Vnitřní teplota Symbol (funkce dřímání) Ukazatel MAX/ MIN (alarm 2) vnitřní teploty Alarm 2 Datum Tlačítko SET (alarm 2) Měsíc Tlačítko – Den v týdnu Tlačítko MODE Symbol (nízký stav nabití Tlačítko + baterie) (venkovní čidlo) Tlačítko SET (alarm 1) Symbol rádiového signálu Alarm 1 Ukazatel MAX / MIN... -
Page 164: Technické Údaje
Venkovní čidlo: Trend teploty (vnitřní teploty) Vysokofrekvenční záření Tlačítko AL1 ON/ OFF Symbol (nízký stav Tlačítko SNOOZE / LIGHT nabití baterie) Tlačítko AL2 ON / OFF Venkovní teplota Kryt přihrádky na baterie Kryt přihrádky na baterie Přihrádka na baterie Přihrádka na baterie Tlačítko RESET Závěs Závěs... -
Page 165: Obsah Dodávky
Venkovní čidlo: Rozsah měření teploty: –20 °C až + +60 °C –4 °F až +140 °F VF přenosový signál: 433 MHz VF dosah přenosu: max. 100 metrů na volném prostranství Baterie: 2 x AAA 1,5 V (stejnosměrný proud) Stupeň ochrany: IPX4 (chráněno proti stříkající... -
Page 166: Bezpečnost
Bezpečnost USCHOVEJTE SI VŠECHNY BEZPEČNOSTNÍ UPOZORNĚNÍ A POKYNY PRO BUDOUCNOST! Všeobecná bezpečnostní upozornění Tento výrobek mohou používat děti od 8 let, osoby se sníže- nými fyzickými, smyslovými nebo duševními schopnosti nebo s nedostatečnými zkušenostmi a znalostmi, jestliže budou pod dohledem nebo byly poučeny o bezpečném používání výrobku a chápou nebezpečí, která... -
Page 167: Bezpečnostní Pokyny Pro Baterie A Akumulátory
Mějte na paměti, že poškození způsobená neodborným zacházením, nedbáním na návod k obsluze nebo zásahem neautorizované osoby jsou vyloučeny ze záruky. Bezpečnostní pokyny pro baterie a akumulátory NEBEZPEČÍ OHROŽENÍ ŽIVOTA! Uchovávejte baterie a akumulátory mimo dosah dětí. V případě spolknutí okamžitě vyhledejte lékařskou pomoc! NEBEZPEČÍ... - Page 168 Nebezpečí vytečení baterií / akumulátorů Zabraňte extrémním podmínkám a teplotám, např. na topení anebo na slunci, které mohou negativně ovlivnit funkci baterií nebo akumulátorů. V případě vytečení baterií / akumulátorů zabraňte kontaktu chemikálií s pokožkou, očima a sliznicemi! Omyjte ihned posti- žená místa dostatečným množstvím čisté vody a vyhledejte lékařskou pomoc! NOSTE OCHRANNÉ...
-
Page 169: Před Uvedením Do Provozu
Nebezpečí poškození výrobku Používejte jen udaný typ baterie nebo akumulátoru! Nasazujte baterie nebo akumulátory podle označení polarity (+) a (-) na bateriích nebo akumulátorech a na výrobku. Vyčistěte před vložením kontakty baterie nebo akumulátoru a kontakty v přihrádce na baterie! Vybité... -
Page 170: Uvedení Venkovního Čidla Do Provozu
chladnu ani vlhkosti. Nestavte výrobek do blízkosti zdrojů tepla, např. topení. Jinak hrozí poškození výrobku. Ujistěte se, že sousední zařízení nejsou provozována se stejnou frekvencí 433 MHz. Tyto výrobky mohou způsobit poruchu rádiového spojení. Nestavte výrobky na kovové desky nebo vedle nich. Mohl by se tím omezit rádiový... -
Page 171: Uvedení Do Provozu Stanice Teploměru S Venkovním Čidlem
Venkovní čidlo je nyní připraveno k provozu a kontrolní LED se krátce rozsvítí. Venkovní teplota se zobrazuje na ven- kovním čidle. Uzavřete kryt přihrádky na baterii Uvedení do provozu stanice teploměru s venkovním čidlem Sejměte kryt přihrádky na baterie na zadní straně stanice teploměru. - Page 172 Upozornění: Nepřijme-li stanice teploměru do 3 minut signál venkovního čidla, zahájí automaticky příjem rádiového signálu. Příjem rádiového signálu zahájí stanice teploměru po úspěšném příjmu signálu venkovního čidla resp. po 3 minutách s příjmem rádiového signálu. Tento proces trvá až 5 minut a na displeji se zobrazuje blikajícím -DCF symbol Při úspěšném příjmu rádiového signálu DCF se -DCF symbol na LC displeji zobrazí...
- Page 173 Stiskněte na cca 3 vteřiny tlačítko – . Symbol DCF se zobrazí na LC-Display. Automatická rádiová funkce příjmu času je vypnutá. Nyní můžete nastavit čas a datum manuálně (viz „Formát času/ Zóna/ Datum / Čas/ Jazyk/ Manuální na- stavení jednotky teploty”). Stiskněte znovu na cca 3 vteřiny tlačítko Taste –...
-
Page 174: Formát Času/ Zóna/ Datum / Čas/Jazyk / Manuální Nastavení Jednotky Teploty
Označte na stěně vrtací díru (ø cca 6 mm). Vyvrtejte vrtačkou otvor. Zasuňte do vyvrtaného otvoru hmoždinku Šroubovákem na šrouby s křížovou drážkou našroubujte šroub do hmoždinky. Zavěste meteostanici nebo venkovní čidlo závěsem šroub. Upozornění: zajistěte, aby nebylo venkovní čidlo ponořené do vody ani vystavené... - Page 175 1. Stiskněte a přidržte na cca 3 vteřiny tlačítko MODE 2. Pro volbu 12 hodinového nebo 24hodinového formátu času stiskněte tlačítko + nebo tlačítko – Tip: Stiskněte a přidržte tlačítko + nebo tlačítko – rychlé nalistování čísel. Jestliže nestisknete 20 vteřin žádné tlačítko, vrátí...
-
Page 176: Zobrazení Letního Času
5. Pro potvrzení Vašeho zadání stiskněte tlačítko MODE 6. Opakujete kroky 4. a 5., pro nastavení roku, měsíce, data, hodiny, minuty, jazyka (GE = němčina, FR = francouzština, SP = španělština, IT = italština, DU = nizozemština, DA = dán- ština, EN = angličtina) a jednotky teploty. -
Page 177: Nastavení Alarmu
Stiskněte znovu tlačítko MODE pro přepnutí zpět na standardní zobrazení. Nastavení alarmu Máte možnost nastavit dva různé časy alarmu. 1. Stiskněte a přidržte na cca 3 vteřiny tlačítko SET (alarm 1) nebo tlačítko SET (alarm 2) Upozornění: Jestliže byl již předtím nastavený alarm, objeví se čas tohoto alarmu na LC displeji. -
Page 178: Zapínání A Vypínání Alarmu
Zapínání a vypínání alarmu Pro aktivování alarmu 1 nebo alarmu 2 stiskněte 1 x dolů tlačítko AL1 ON / OFF nebo tlačítko AL2 ON / OFF Upozornění: Symbol (alarm 1) nebo symbol (alarm 2) se objeví na LC displeji. Po dosažení nastaveného času zazní alarm. Po 2 minutách alarm automaticky skončí. -
Page 179: Zobrazení Teploty
Poznámka: Když zazní alarm, stiskněte toto tlačítko pro ak- tivaci funkce dřímání na 5 minut. Stisknutím tohoto tlačítka při normálním provozu se aktivuje na cca 10 vteřin osvětlení po- zadí. Zobrazení teploty Na displeji LC se zobrazuje jak teplota uvnitř , tak i teplota venku Vyvolání... -
Page 180: Zobrazení Trendu Teploty
Pro vynulování hodnot stiskněte a přidržte tlačítko + tlačítko – při zobrazených maximálních a minimálních hodnotách. Stiskněte tlačítko + pro návrat do standardního zobrazení. Zobrazení trendu teploty Po úspěšném spojení s venkovním čidlem ukazuje stanice trend teploty (venku) a teplotní trend (uvnitř) Jsou možná... -
Page 181: Výměna Baterií
Výměna baterií Otevřete schránku na baterie resp. Vyjměte opotřebované baterie. Vložte dvě nové baterie 1,5 V (stejnosměrný proud) (AAA) do schránky na baterie. Upozornění: Dbejte na správnou polaritu. Polarita je zná- zorněna v přihrádkách na baterie (viz též obr. B + D). Zavřete schránku na baterie. - Page 182 že má být venkovní čidlo umístěné vždy v okruhu maximálně 100 metrů (ve volném terénu) od stanice. Udaný dosah je dosah ve vol- ném terénu což znamená, že při něm není mezi venkovním čidlem a stanicí žádná překážka. „Vizuální kontakt“ mezi venkovním čidlem a stanicí...
-
Page 183: Čistění A Ošetřování
Čistění a ošetřování Výrobek čistěte jen na povrchu měkkým suchým hadrem. Nikdy neostřikujte venkovní čidlo, např. zahradní hadicí. Ven- kovní čidlo je ze všech stran chráněno před stříkající vodou. Zlikvidování Obal se skládá z ekologických materiálů, které můžete zlikvidovat prostřednictvím místních sběren recyklovatelných materiálů. Při třídění... - Page 184 O možnostech likvidace vysloužilých zařízení se informujte u správy vaší obce nebo města. V zájmu ochrany životního prostředí vysloužilý výrobek nevyhazujte do domovního odpadu, ale předejte k od- borné likvidaci. O sběrnách a jejich otevíracích hodinách se můžete informovat u příslušné správy města nebo obce. Vadné...
-
Page 185: Zjednodušené Eu Prohlášení O Konformitě
Hg = rtuť, Pb = olovo. Proto odevzdejte opotřebované baterie u komunální sběrny. Zjednodušené EU prohlášení o konformitě Tímto prohlačuje firma OWIM GmbH & Co. KG, Stiftsbergstraße 1, 74167 Neckarsulm, NĚMECKO, že výrobek Bezdrátová meteosta- nice, Model č.: HG05686A-DCF / HG05686B-DCF odpovídá... -
Page 186: Postup V Případě Uplatňování Záruky
Na tento artikl platí 3 záruka od data zakoupení. Záruční lhůta za- číná od data zakoupení. Uschovejte si dobře originál pokladní stvr- zenky. Tuto stvrzenku budete potřebovat jako doklad o zakoupení. Pokud se do 3 let od data zakoupení tohoto výrobku vyskytne vada materiálu nebo výrobní... -
Page 187: Servis
Výrobek registrovaný jako vadný potom můžete s přiloženým dokla- dem o zakoupení (pokladní stvrzenkou) a údaji k závadě a kdy k ní došlo, bezplatně zaslat na adresu servisu, která Vám byla sdělena. Servis Servis Česká republika Tel.: 800 143 873 E-Mail: owim@lidl.cz... - Page 188 Legenda použitých piktogramov ....................Strana 189 Úvod ..................................Strana 190 Používanie v súlade s určením ........................Strana 190 Popis častí ................................. Strana 191 Technické údaje ............................... Strana 193 Obsah dodávky ............................... Strana 194 Bezpečnosť ..............................Strana 194 Všeobecné bezpečnostné upozornenia ......................Strana 194 Bezpečnostné...
-
Page 189: Legenda Použitých Piktogramov
Legenda použitých piktogramov S ochranou proti striekajúcej vode Obsahuje alkalické batérie Riadené rádiovo 100 m rozsah prenosu medzi vysielacou a prijímacou stanicou Funkcia budíka Zobrazenie vonkajšej teploty Zobrazenie vnútornej teploty Zobrazenie času... -
Page 190: Úvod
Bezdrôtová meteostanica Úvod Blahoželáme Vám ku kúpe Vášho nového výrobku. Rozhodli ste sa pre veľmi kvalitný výrobok. Návod na obsluhu je súčasťou tohto výrobku. Obsahuje dôležité upozornenia týkajúce sa bezpečnosti, používania a likvidácie. Skôr ako začnete výrobok používať, oboz- námte sa so všetkými pokynmi k obsluhe a bezpečnosti. Výrobok používajte iba v súlade s popisom a v uvedených oblastiach pou- žívania. -
Page 191: Popis Častí
určený výhradne pre súkromné domácnosti a nie na priemyselné nasadenie. Popis častí Bezdrôtová meteostanica: Vnútorná teplota Vonkajšia teplota Ukazovateľ MAX / Symbol DCF MIN vnútornej teploty Ukazovateľ DST (letný čas) Dátum Symbol (Alarm 2) Mesiac Symbol (funkcia odlože- Deň v týždni ného budenia) (Alarm 2) Symbol (nízky stav Alarm 2... - Page 192 Symbol (funkcia odlože- Tlačidlo RESET ného budenia) (Alarm 1) Závesné zariadenie Symbol (Alarm 1) Hmoždinka (ø 6 mm) Čas Skrutka (ø 3 mm) 2. časová zóna Vonkajší senzor: Symbol (nízky stav nabitosti batérie) (teplotná Vysokofrekvenčné žiarenie stanica) Symbol (nízky stav Teplotný...
-
Page 193: Technické Údaje
Technické údaje Bezdrôtová meteostanica: Rozsah merania teploty: 0 °C až + 50 °C +32 °F až +122 °F Teplotné rozlíšenie: 0,1 °C Rádiový signál: DCF77 Batérie: 2 x AAA 1,5 V (jednosmerný prúd) Frekvenčné pásmo: 77,5 kHz, 433,050 MHz–434,79 MHz Vonkajší... -
Page 194: Obsah Dodávky
Poznámka: Ak LC-displej ukazuje „LL.L“ alebo „HH.H“, leží teplota mimo oblasti merania. Obsah dodávky 1 bezdrôtová meteostanica 2 hmoždinky (ø 6 mm) 1 vonkajší senzor 1 návod na používanie 4 batérie AAA, 1,5 V 1 krátky návod 2 skrutky (ø 3 mm) Bezpečnosť... -
Page 195: Bezpečnostné Upozornenia Týkajúce Sa Batérií / Akumulátorových Batérií
nosťami alebo s nedostatkom skúseností a vedomostí, ak sú pod dozorom, alebo ak boli poučené ohľadom bezpečného používania výrobku, a ak porozumeli nebezpečenstvám spoje- ným s jeho používaním. Deti sa s výrobkom nesmú hrať. Čistenie a údržbu nesmú vykonávať deti bez dozoru. Výrobok nevystavujte extrémne vysokému elektromagnetickému poľu. - Page 196 NEBEZPEČENSTVO EXPLÓZIE! Nenabíjateľné batérie nikdy znova nenabíjajte. Batérie / akumulá- torové batérie neskratujte a / alebo neotvárajte. Následkom môže byť prehriatie, požiar alebo explózia. Batérie / akumulátorové batérie nikdy nehádžte do ohňa alebo vody. Nevystavujte batérie / akumulátorové batérie mechanickej záťaži.
- Page 197 NOSTE OCHRANNÉ RUKAVICE! Vytečené alebo poškodené batérie / akumulátorové batérie môžu pri kontakte s pokožkou spôsobiť poleptanie. V takom prípade preto noste vhodné ochranné rukavice. V prípade vytečenia batérií / akumulátorových batérií ich ihneď vyberte z výrobku, aby ste predišli vzniku škôd. Používajte iba batérie / akumulátorové...
-
Page 198: Pred Uvedením Do Prevádzky
Pred uvedením do prevádzky Aktivujte batérie najskôr vo vonkajšom senzore, až potom v meteostanici. Poznámka: Odstráňte celý obalový materiál z výrobku. Poznámka: Pred prvým použitím odstráňte z LC-displeja ochrannú fóliu. Všeobecné pokyny POZOR! Pri výbere miesta postavenia zabezpečte, aby výrobok nebol vystavený priamemu slnečnému žiareniu, vibrácii, prachu, chladu a vlhkosti. -
Page 199: Uvedenie Vonkajšieho Snímača Do Prevádzky
Rádiový signál (DCF): Signál DCF (vysielač časových signálov) sa skladá z časových impulzov, ktoré vysielajú jedny z najpresnejších hodín na svete neďaleko Frankfurtu nad Mohanom v Nemecku – ich odchýlka dosahuje 1 sekundu za 1 milión rokov. Digitálny teplomer prijíma tieto signály za optimálnych podmienok až... -
Page 200: Uvedenie Teplotnej Stanice Do Prevádzky
Uvedenie teplotnej stanice do prevádzky Odstráňte kryt priečinka na batérie zo zadnej strany teplotnej stanice. Vložte dodané batérie s ohľadom na správnu polaritu. Zatvorte kryt priečinka pre batérie Spojenie digitálneho teplomera s vonkajším snímačom a s rádiovým signálom DCF: Po vytiahnutí bezpečnostného pásika batérie sa meteostanica po- kúsi vytvoriť... - Page 201 proces môže trvať až 5 minút a zobrazí sa na LC displeji blikaním symbol DCF Pri úspešnom prijatí rádiového signálu DCF sa na LC displeji trvalo zobrazí symbol DCF Poznámka: Počas prijímania nemeňte umiestnenie digitálneho teplomera. Inak sa môžu vyskytnúť poruchy príjmu. Ak v čase uvedenia do prevádzky nie je možná...
- Page 202 manuálne (pozri kapitolu „Manuálne nastavenie časového formátu / zóny / dátumu / času / jazyka / teplotnej jednotky“). Opäť podržte tlačidlo – cca. 3 sekundy stlačené. DCF Symbol zhasne. Funkcia automatického príjmu rádiového času je zapnutá. Teplotná stanica spustí príjem rádiového času skoro ráno.
-
Page 203: Manuálne Nastavenie Časového Formátu / Zóny / Dátumu/Času / Jazyka / Teplotnej Jednotky
Na stenu vyznačte otvor pre vŕtanie (ø cca. 6 mm). Otvor vyvŕtajte pomocou vŕtačky. Do vyvŕtaného otvoru vložte hmoždinku Pomocou krížového skrutkovača zaskrutkujte skrutku do hmoždinky. Meteostanicu resp. vonkajší senzor zaveste pomocou záves- ného zariadenia na skrutku. Poznámka: Zabezpečte, aby vonkajší senzor nebol ponorený do vody a nebol vystavený... - Page 204 1. Stlačte a podržte cca. 3 sekundy stlačené tlačidlo MODE 2. Stlačte tlačidlo + alebo tlačidlo – , aby ste vybrali medzi 12- a 24-hodinovým formátom. Tip: Stlačte a podržte tlačidlo + alebo tlačidlo – , aby ste rýchlo listovali dopredu alebo dozadu číslami. Ak do 20 sekúnd nestlačíte žiadne tlačidlo, LC-displej sa automaticky prepne na štandardné...
-
Page 205: Zobrazenie Letného Času
5. Stlačte tlačidlo MODE pre potvrdenie Vášho zadania. 6. Opakujte pracovné kroky 4. a 5., aby ste nastavili hodnoty pre rok, mesiac a dátum, hodinu, minútu, jazyk (GE = nemčina, FR = francúzština, SP = španielčina, IT = taliančina, DU = holan- dčina, DA = dánčina, EN = angličtina) a teplotnú... -
Page 206: Nastavenie Času Alarmu
Stlačte tlačidlo MODE . Na LC-displeji sa objaví symbol pre 2. časovú zónu a príslušný čas. Stlačte znovu tlačidlo MODE pre návrat k štandardnému zobrazeniu. Nastavenie času alarmu Máte možnosť nastavenia dvoch rozdielnych časov alarmu. 1. Stlačte a podržte tlačidlo SET (Alarm 1) alebo tlačidlo SET (Alarm 2) na cca. -
Page 207: Zapnutie / Vypnutie Alarmu
5. Stlačte tlačidlo SET (Alarm 1) alebo tlačidlo SET (Alarm 2) pre potvrdenie Vášho zadania. Zapnutie / vypnutie alarmu Stlačte 1x tlačidlo AL1 ON / OFF alebo tlačidlo AL2 ON / dole, aby ste aktivovali alarm 1 alebo alarm 2. Poznámka: Symbol (Alarm 1) alebo symbol... -
Page 208: Zobrazenie Teploty
/ symbolom Z budenia) (Alarm 1) (funkcia opakovaného budenia) (Alarm 2) Signál alarmu zaznie po cca. 5 minútach znovu. Vytlačte tlačidlo AL1 ON / OFF alebo tlačidlo AL2 ON / hore pre deaktivovanie funkcie opakovaného budenia. Poznámka: Keď zaznie alarm, znova stlačte toto tlačidlo, aby ste aktivovali funkciu opakovaného budenia na 5 minút. -
Page 209: Zobrazenie Teplotného Trendu
Stlačte tlačidlo + pre zobrazenie maximálnych hodnôt vnútornej a vonkajšej teploty. Opäť stlačte tlačidlo + pre zobrazenie minimálnych hodnôt vnútornej a vonkajšej teploty. Stlačte a podržte tlačidlo + a tlačidlo – počas zobra- zených maximálnych a minimálnych hodnôt, aby ste hodnoty vynulovali. -
Page 210: Ukazovateľ Batérií
Ukazovateľ batérií Symboly sa objavia na LC-displeji teplotnej stanice a vonkajšieho senzora, ak sú batérie vonkajšieho senzora alebo teplotnej stanice slabé. Výmena batérií Otvorte priečinok na batérie , resp. Vyberte vybité batérie. Do priečinka na batérie vložte po dve nové batérie (AAA) 1,5 V (jednosmerný... - Page 211 Ak displej zobrazuje poruchy, takéto prístroje odstráňte z dosahu digitálneho teplomera / vonkajšieho snímača, alebo nakrátko vyberte z digitálneho teplomera / v onkajšieho snímača batérie. Prekážky ako napr. betónové steny môžu tiež viesť k tomu, že príjem bude rušený. V tomto prípade eventuálne zmeňte umiestnenie (napr. do blízkosti okna).
-
Page 212: Čistenie A Starostlivosť
Aktivujte batérie najskôr vo vonkajšom snímači, až potom v mete- ostanici. -> Iba ak sa vyskytnú problémy, je nutné znova spustiť vonkajší senzor tak, že stlačíte tlačidlo + alebo nanovo zapnete teplotnú stanicu. Pre nové spustenie teplotnej stanice odstráňte prosím na krátku chvíľu batérie a následne ich znova vložte. - Page 213 Všímajte si prosím označenie obalových materiálov pre triedenie odpadu, sú označené skratkami (a) a číslami (b) s nasledujúcim významom: 1–7: Plasty / 20–22: Papier a kartón / 80–98: Spojené látky. Výrobok a obalové materiály sú recyklovateľné, zlikvidujte ich oddelene pre lepšie spracovanie odpadu.
-
Page 214: Zjednodušené Konformitné Prehlásenie
Cd = kadmium, Hg = ortuť, Pb = olovo. Spotrebované batérie preto odovzdajte v komunálnej zberni. Zjednodušené konformitné prehlásenie Týmto OWIM GmbH & Co. KG, Stiftsbergstraße 1, 74167 Neckarsulm, NEMECKO, prehlasuje, že výrobok Bezdrôtová meteostanica, Model č.: HG05686A-DCF / HG05686B-DCF zodpovedá... -
Page 215: Záruka
Úplný text EÚ konformitného prehlásenia je k dispozícii na nasle- dujúcej internetovej adrese: www.owim.com Záruka Tento výrobok bol dôkladne vyrobený podľa prísnych akostných smerníc a pred dodaním svedomito testovaný. V prípade nedostat- kov tohto výrobku Vám prináležia zákonné práva voči predajcovi produktu. -
Page 216: Postup V Prípade Poškodenia V Záruke
zaniká, ak bol produkt poškodený, neodborne používaný alebo neodborne udržiavaný. Poskytnutie záruky sa vzťahuje na chyby materiálu a výrobné chyby. Táto záruka sa nevzťahuje na časti produktu, ktoré sú vystavené normálnemu opotrebovaniu, a preto ich je možné považovať za opotrebovateľné diely (napr. batérie) alebo na poškodenia na rozbitných dieloch, napr. -
Page 217: Servis
Produkt označený ako defektný potom môžete s priloženým dokla- dom o kúpe (pokladničný lístok) a uvedením, v čom spočíva nedo- statok a kedy sa vyskytol, bezplatne odoslať na Vám oznámenú adresu servisného pracoviska. Servis Servis Slovensko Tel.: 0850 232001 E-pošta: owim@lidl.sk... - Page 220 OWIM GmbH & Co. KG Stiftsbergstraße 1 74167 Neckarsulm GERMANY Model no.: HG05686A-DCF / HG05686B-DCF Version: 10 / 2019 Stand der Informationen · Last Information Update · Version des informations · Stand van de informatie · Stan informacji · Stav informací...
Need help?
Do you have a question about the HG05686A-DCF and is the answer not in the manual?
Questions and answers