Middle Atlantic WoodKit C3 Series Instruction Sheet
Hide thumbs
Also See for WoodKit C3 Series:
- Instruction sheet (14 pages) ,
- Instruction sheet (8 pages) ,
- Instruction sheet (12 pages)
Table of Contents
Advertisement
Quick Links
Instruction Sheet
C3 Series
WoodKit
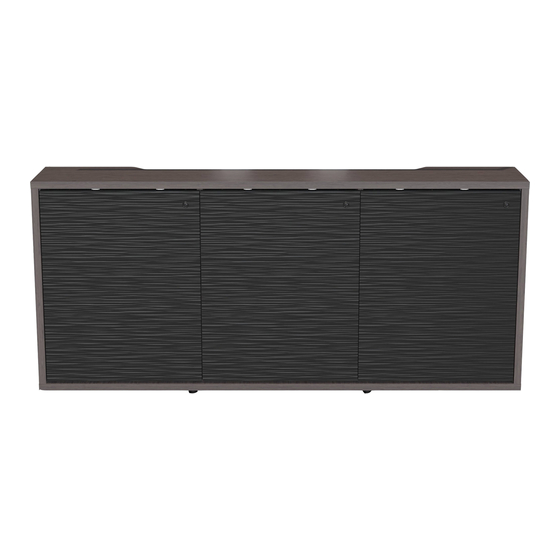
NOTE: The 1-, 2-, 3-, and 4-bay C3 woodkit models are available
for 24" (610 mm) and 32" (813 mm, shown) frame heights.
THANK YOU
Thank you for purchasing a C3 Series WoodKit. Please read these instructions thoroughly before
installing or assembling this product.
100-00040
Rev A
Advertisement
Table of Contents

Related Manuals for Middle Atlantic WoodKit C3 Series


Summary of Contents for Middle Atlantic WoodKit C3 Series
- Page 1 Instruction Sheet C3 Series WoodKit NOTE: The 1-, 2-, 3-, and 4-bay C3 woodkit models are available for 24” (610 mm) and 32” (813 mm, shown) frame heights. THANK YOU Thank you for purchasing a C3 Series WoodKit. Please read these instructions thoroughly before installing or assembling this product.
-
Page 2: Important Safety Instructions
It is the responsibility of the Installer/User to ensure that this product is loaded according to specifications. WARNING: Middle Atlantic Products, electrical systems conform to and should be properly grounded in compliance with require- ments of the current National Electrical Code or codes administered by local authorities. All electrical products may present a possible shock or fire hazard if improperly installed or used. -
Page 3: Instructions Importantes Sur La Sécurité
AVERTISSEMENT: Les produits Middle Atlantic, les systèmes électriques sont conformes et doivent être correctement mis à la terre conformément aux exigences du Code national de l'électricité en vigueur ou aux codes administrés par les autorités locales. -
Page 4: Required Tools
SUPPLIED COMPONENTS AND HARDWARE Horizontal (3x) Cover 10-32 x ⅜” Pan Head Screws NOTE: Cover for dual and single displays shown. Pre-Assembled WoodKit 10-32 x ¾” Truss (Includes Doors) Screw With #10 x ⅝” Wood Screw Washer NOTE: The 1-, 2-, 3-, and 4-bay C3 woodkits are shown in 32”... - Page 5 INTRODUCTION (CONTINUED) NOTE: If your installation includes a purchased fan kit and/or a large cover option (for your display option), after installing the other options you may have purchased for your credenza and then installing this woodkit, refer to the C3 Series Fan Kit (C3-FANKIT) instruction sheet (100-00039) and/or C3 Series Display Mount Large Cover Option instruction sheet (100-00035) to install your fan kit and/or your large cover option, respectively.
- Page 6 REMOVING PRE-INSTALLED DOOR(S) FROM YOUR WOODKIT NOTE: • For ease of woodkit (C) installation, we recommend removing the doors first as shown in this procedure. • When removing doors from a 3- or 4-bay model, keep track of which bay each door came from for easy reinstallation.
- Page 7 ATTACHING THE WOODKIT TO THE FRAME 1. Team lift the woodkit (C, oriented as shown with the fan opening(s) on the bottom) and carefully attach it over your frame. (FIGURE E) NOTE: • Be careful not to pinch any cables while securing the woodkit to the frame. •...
-
Page 8: Reinstalling The Door(S)
ATTACHING THE WOODKIT TO THE FRAME (CONTINUED) 4. After making slight woodkit depth adjustments on the frame, use power driver to fully tighten the top and bottom 10-32 x ¾” truss screws (D). Do not overtighten. (FIGURE F) 5. Use power driver and #10 x ⅝” wood screws (E) to secure the secure the woodkit to the frame top and bottom more permanently. -
Page 9: Adjusting The Doors
REINSTALLING THE DOOR(S) (CONTINUED) 2. Press the outer section of the hinge hardware into the hinge plate until it clicks into place. (FIGURE H) Press outer section of hinge into the plate until it clicks into place. Hinge Plate Hinge FIGURE H ADJUSTING THE DOOR(S) NOTE: Generic hinges shown. - Page 10 INSTALLING POWER STRIP INTO MOUNTING CLIPS (SLIDE-OUT AND FIXED RACK OPTIONS ONLY) NOTE: The power strip mounting clips and the slide-out rack or fixed rack options are installed before the woodkit, while the actual power strip is installed into the clips after the woodkit is attached to the frame. For more information, refer to the C3 Series Slide-Out Rack Option instruction sheet (100-00036) or C3 Series Fixed Rack Option instruction sheet (100-00037).
-
Page 11: Warranty
Factory Distribution United States: New Jersey, California, Illinois - Canada: Ontario - The Netherlands: Weert At Middle Atlantic Products we are always listening. Your comments are welcome. Middle Atlantic Products is an ISO 9001 and ISO 14001 Registered Company. Page 11...
Need help?
Do you have a question about the WoodKit C3 Series and is the answer not in the manual?
Questions and answers