
Related Manuals for mundoclima MUPO-H6


Summary of Contents for mundoclima MUPO-H6
- Page 1 MUPO-H6 HEAT PUMP Installation and owner's manual CL20007 to CL20008 English www.mundoclima.com...
-
Page 2: Table Of Contents
CONTENTS Brief Introduction ................Safety Precaution ................Parts Description ................Accessories..................Control Panel..................Operation..................Installation ................ -
Page 3: Brief Introduction
Bried Introduction This mobile air conditioner is a new generation air conditioner which is designed for being used in bedroom, study room, lobby, office, meeting room, warehouse, attics, sports hall and other entertainment room. Its characteristic of flexibility characteristic enable easy adjustment to desirable room temperature and humidity. -
Page 4: Safety Precaution
Safety Precaution Your safety and safety of others are very important. We have provided many important safety message in this manual and on your appliance. Always read and obey all safety message. This symbol indicates the possibility of death ! WARNING or serious injury. - Page 5 CAUTION Don’t apply the cold air to the body for a long time. It will deteriorate your physical conditions and cause health problems. Clean the air conditioner with a piece of soft and dry cloth. Don’t use these stuffs for cleaning: chemical solvent, insecticide,inflammable spraying materials which will damage the appearance of air conditioner .Don’t sprinkle water directly on the indoor unit.
-
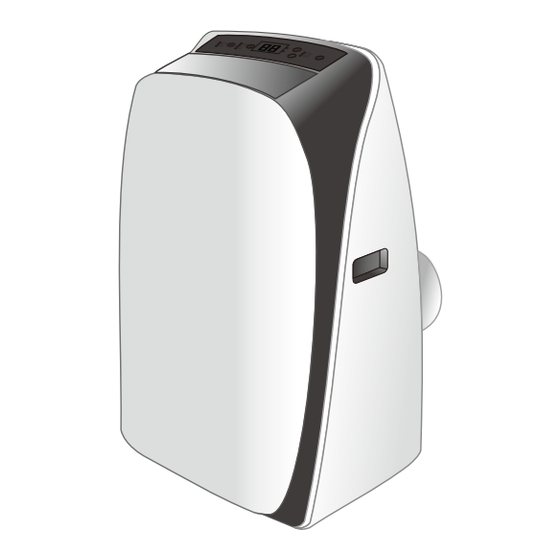
Page 6: Parts Description
Parts Description FRONT VIEW Control panel Air outlet Signal receiver windows Handle recess Air outlet Front panel Remote controller REAR VIEW Upper air filter (Behind the grille) Upper air intake Handle recess Drain outlet (by gravity) Air outlet Lower air filter (Behind the grille) (disabled) -
Page 7: Accessories
Accessories Parts Quantity Parts name Exhaust hose Adaptor and Adaptor B (flat mouth or 1set round mouth: depending on models ) Window Slider Kit and bolt Wall Exhaust Adaptor A(#) Adaptor B(round mouth)(#) Bolt and Nut Drain hose (#) SET TEMPERATUR(℃) AUTO 自动... -
Page 8: Control Panel
Control Panel COOL HIGH TIMER SLEEP HEAT SWING TEMP. indicator HIGH-High speed indicator MID-Mid speed indicator LOW-Low speed indicator COOL-Cool indicator DRY-Dry indicator HEAT-Heating indicator FAN-Fan indicator TIMER-Time indicator SLEEP-Sleep indicator SWING-Swing indicator Function buttons button Press this button to make the unit run or stop. button Press button to make the room setting temperature increase or decrease. -
Page 9: Operation
Operation WARNING Failure to follow the below precaution could result in electrical shock, fire or personal injury. 1.The plug must be plugged into an outlet that is properly installed and grounded. 2.Do not use an extension cord or plug adaptor with this unit. Before starting the unit 1. -
Page 10: Installation
Installation Guide of customer ●The customer should have a qualified power supply coincident with that printed on the tag of the air conditioner. Its voltage should be in the range of 220~240V. ●Must use special circuit and efficient grounding outlet matching with the plug of the air conditioner. - Page 11 Water drainage The unit is capable of removing condensate itself, so it is not necessary to connect the drain, however, if using the dehumidification mode or high humidity in the environment, it is recommended to connect the equipment a drain of the opposite when the condensate tank is full the unit will stop and shows "P1".
- Page 12 Duct mount instruction 1. Put the side of duct to the exhaust air outlet of mobile air conditioner. Fix it with unit correspondingly, then turn right. Push it downwards, make sure that it is fixed thoroughly. 2. Put the other side of the duct to adaptor. 3.
-
Page 13: Maintenance
Window kit installation Your window kit has been designed to fit most standard vertical and horizontal window applications. However, it may be necessary for you to improve or modify some aspects of the installation procedure for certain types of window. Please refer to fig. -
Page 14: Troubleshooting
Cleaning The Unit 1.For the purpose of safety, please turn off the air conditioner and cut off the power supply . 2.Wipe the unit with dry cloth . 3.If the unit is very dirty, please wipe with wet cloth dipped by cold water . Note: if you don’... -
Page 15: Disposal
The Wind Blowing Out, But The Cooling Effect Is Bad Causes Solutions Mistakes in temperature setting. Set a proper temperature, setting ● ■ temperature should be lower than ambient temperature. The air filter is blocked by dust. Clean the air filter. ●... -
Page 16: Remote Controller
REMOTE CONTROLLER SET TEMPERATURE( ) ºC ׶ ׶ ׶ AUTO Ö Ö Ö COOL HIGH ł ł ł ÖČ ÖČ ÖČ HEAT ON/OFF MODE CLEAN SPEED SLEEP FRESH STRONG SWING DUST FEELING HEALTH FUNGUSPROOF SCREEN TIMER “ ” Read this instructions carefully so that ●... - Page 17 Buttons description LCD displays ins truction TRANSM IT DIGITAL O N/OFF 自动 自动 自 动 AU TO RUNN ING SE T ROO M 制冷 制冷 制 冷 MO DE COOL HIG H 除湿 除湿 除 湿 RUNNING MODE 制热 制热 制...
- Page 18 “ ” FEELING button “ ” When it displays FEELING button Pres s this bu tton can be used to set the feeling function. The LCD sho ws the a ctual room temperature when the function set and it shows the setting temperature when the function cancelle d.
- Page 19 “ ” “ ” button “ ” “ ” Press the + or - button,you can set the temperature ℃ ℃ range from to 32 ,Display will change as you touch the button. “ ” CLEAN button “ ” a. When remo te controlle r is at the off state, press clean bu tton , the win d guiding ba rs turn to initial p ostio ns for “...
- Page 20 ” button 13.“ SWING Press this button, the horizontal wind direction vanes can rotate automatically, when you have the desired vertical wind direction, press it again, the horizontal wind direction vanes will be stopped at th e situation of your choice. ”...
- Page 21 Usage Fix batteries 1.Slide open the cover according the direction indicated by arrowhead. 2.Put into two brand new batteries (7#), position the & batteries to right electric poles (+ -). 3.Put back the cover. Automatic operation mode 1.Press the MODE button, select the automatic operation mode.
- Page 22 Fan operation mode 1.Press the MODE button, select the C ooling or Heating operation mode. 2.Press the SPEED button, you can select fan speed. You can select fan speed from LOW, MID, HIGH. 3.Press the ON/OFF b utton, th e operation indicator is o n, the air-condition er starts to operate the a utomatic mode.
- Page 23 Attention 1.Aim the remote con troller toward s the receiver on the air- conditio ner. 2.The remote controller s hould be within 8 meters away from the receiver. 3.No obstacle s be tween the re mo te controller and receiver. 4.Do not drop or throw the remote con trolle r.
- Page 24 ASK FOR MORE INFORMATION Phone: (+34) 93 446 27 80 eMail: info@mundoclima.com TECHNICAL ASSISTANCE Phone: (+34) 93 652 53 57 www.mundoclima.com...
Need help?
Do you have a question about the MUPO-H6 and is the answer not in the manual?
Questions and answers