
Subscribe to Our Youtube Channel
Related Manuals for Romus Alpha


Summary of Contents for Romus Alpha
- Page 1 « ALPHA » Réf. 94519 Ponceuse de sol ‐ Bodenschleifmaschine ‐ Floor grinder Manuel d’instructions ‐ Betriebsanleitung ‐ Instruction manual ...
- Page 2 Declaration of Conformity according to EN ISO/IEC 17050‐1 EC‐Declaration of Conformity Month.Year: . For the machine described below Product denomination: Floor Grinder ® Model: Alpha Serial number: Herewith we declare, that the machine is complying with all the essential requirements of the Machine Directive 2006/42/EC of the EUROPEAN PARLIAMENT of the 17th of Mai 2006 The person authorized to compile the relevant technical documentation (According to Appendix II Nr. 1. A. Nr. 2, 2006/42/EG): Name, Surname: Function: Address: More information on the compliance with the directive is contained in Appendix 1. This Declaration is given by the manufacturer: Name: Romus Address: 13‐15 Rue du Taillefer – 91160 Champlan France Given by: Name, Surname: ...
- Page 3 Appendix 1 of the Declaration of Conformity Month.Year: . For the machine described below Product denomination: Floor Grinder ® Model: Alpha Herewith we declare, that the machine is complying with all the essential requirements of the: Directive 2004/108/EC of the EUROPEAN PARLIAMENT of the 15th of December 2004 on Electromagnetic Compatibility Directive 2006/42/EC of the EUROPEAN PARLIAMENT of the 17th of Mai 2006 Harmonised Standards used: EN 12100 ‐ 1 „Safety of Machinery – Basic concepts“ EN 12100 ‐ 2 „Safety of Machinery – Technical principles” ...
-
Page 4: Précautions D'utilisation
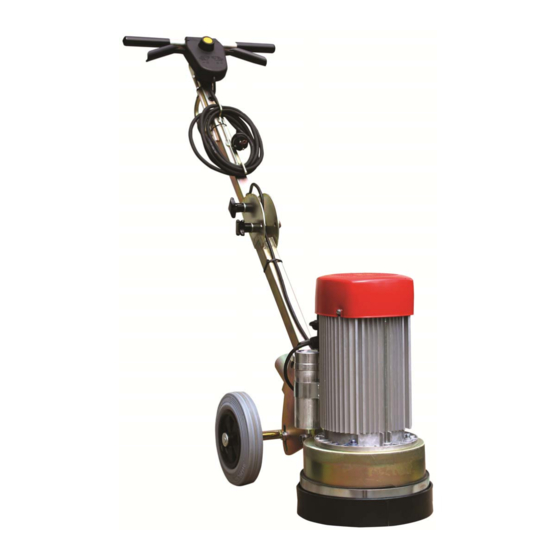
Largeur de ponçage 230 mm Largeur 30 cm Longueur 60 cm Hauteur 51 cm Poids 42 kg Vitesse de ponçage de la tête 1500 rpm Volume sonore 90 dB(A) 4 Précautions d’utilisation Attention : la ponceuse ALPHA est fabriquée selon les normes de sécurité existantes. Les précautions techniques ne doivent pas être retirées ou modifiées sous aucune condition. Au cours d’utilisation de la machine il est important de garder les points suivants en tête. 1. La ponceuse doit toujours être utilisée selon les règles de sécurité et les consignes techniques. 2. Au cours d’une opération de transport, de nettoyage, de réparation ou de maintenance la ponceuse doit toujours être hors tension et débranchée. Egalement lors du changement d’outils. 3. La bague de sécurité peut uniquement être retirée lors d’un ponçage contre un mur. Il est possible d’utiliser la machine sans la bague de sécurité mais dans ce cas l’opérateur devra porter un masque. Dans tous les autres cas la ponceuse peut être utilisée avec la bague de sécurité. 4. L’opérateur ne doit jamais laisser la machine sans surveillance lorsqu’elle est en fonctionnement. 5. Avant de laisser la machine, s’assurer que tout est déconnecter. Contrôler également que la machine ne peut pas rouler ou bouger toute seule. 6. Après une opération de maintenance ou de réglage toutes les pièces de sécurité doivent être remise en place. 7. Des protections auditives doivent être portées. 8. Des protections pour les yeux doivent être portées. ... - Page 5 5 Mise en œuvre – Utilisation Débrancher la ponceuse. Après avoir monté les accessoires/ outils appropriés, l’utilisation de la ponceuse peut débuter. Ajuster la ponceuse en retirant la vis au niveau de la roue arrière et changer la position dans la fente de façon que l’axe du moteur soit à 90° par rapport au sol. Resserrer la vis. Connecter la machine à la prise principale. Relever les outils du sol en inclinant sur la roue arrière. Allumer la machine. Attention : Lors de la mise en toute la machine peut avoir un léger sursaut. Lorsque le moteur a atteint sa plein vitesse, placer la tête de ponçage avec précaution sur le sol. Si la machine est correctement réglée il est facile de se déplacer. Si la ponceuse pousse vers la gauche ou la droite, elle doit être re‐réglée en changeant la position des roues. Attention : Ne jamais allumer la machine lorsque la tête de ponçage est au sol. Les émissions de poussières doivent être prévenues via la mise en place d’un aspirateur. Avant de terminer la procédure de ponçage la ponceuse doit être éteinte et les segments de ponçage ne doivent pas être en contact avec le sol. Débrancher ensuite la machine. 6 Remplacer les outils Attention : avant d’intervenir sur la machine mettre le moteur complètement à l’arrêt et le débrancher d’une prise courant. Attention : Les outils peuvent être chauds après utilisation. Incliner la machine sur les roues arrière. Tous les outils sont fixés avec 3 vis Allen. Retirer les outils avec une clé de 8mm. Vérifier les outils de ponçage montés pour la prochaine utilisation. Ajuster les différentes hauteurs d’outils en corrigeant la position de la roue arrière. Le moteur doit toujours être à 90° du sol. ...
- Page 6 Dauerschallpegel Leq * 90 dB(A) 4 Sicherheitsregeln f. den Betrieb der Bodenschleifmaschine Achtung ! ® Die Bodenschleifmaschine ALPHA ist unter Berücksichtigung geltender Sicherheitsstandards entwickelt worden. Die technischen Sicherheitsvor‐ kehrungen dürfen auf keinen Fall entfernt oder verändert werden. Beim Betrieb der Schleifmaschine sollten außerdem folgende Punkte beachtet werden: 1. Die Bodenschleifmaschinen dürfen nur mit sämtlichen Schutzvorrichtungen betrieben werden. 2. Bei Transport, der Reinigung, der Reparatur oder der Wartung der Maschine muss der Netzstecker gezogen werden. Dies gilt auch für den Werkzeugwechsel. 3. Der Schutzring (Skizze Nr. 17) darf nur bei dem Betrieb der Maschine direkt an der Wand abgenommen werden. Dabei kann eine erhöhte Staubentwicklung auftreten. Eine Atemschutzmaske muss vom ...
-
Page 7: Inbetriebnahme Und Schleifen
‐ Maschine über die Hinterräder kippen und umlegen. ‐ Die Scheibenaufnahmen für Schleif‐schuhe (Anhang Werkzeuge No. 11) wird mit drei Innensechskantschrauben auf der Werkzeugaufnahmen (Anhang Werk‐zeuge No 10) befestigt. ‐ Die Schrauben mit einem 8 mm Innen‐sechskantschlüssel lösen und entfernen. ‐ Schleifwerkzeug abnehmen u. f. nächsten Einsatz auf Verschleiß überprüfen. ® ‐ Neues Werkzeug gemäß Anhang „Alpha Werkzeuge“ anbringen. ‐ Die verschiedenen Höhen der Werkzeuge müssen durch Ändern der Stellung der Hinterradschwinge angepasst werden. Der Motor der Schleifmaschine muß immer 90° zum Boden stehen. ... -
Page 8: Machine Applications
Noise level Leq * 90 dB(A) 4 Safety rules for the operation of the floor grinder ® Attention! The ALPHA floor grinders are constructed according to existing safety rules and regulations. These technical precautions should not be removed or changed under any circumstances. While operating the machines the following points should also be kept in mind: 1. The grinders should always be operated with all safety covers and technical precautions. 2. During transport, cleaning, repair or maintenance the grinder must be disconnected from the mains. That also ... - Page 9 6 Changing of the tools Attention: Before working on the grinder bring the motor to a total stand still and disconnect from the power supply. Attention: Tools can be hot after use. ‐ Tilt the machine onto the back wheels and rest it on the handlebar. ® ‐ All tool discs are fixed with three Allen screws to the tool bracket. Appendix „Alpha tools“ No. 10. ‐ Remove the screws with an 8mm Allen key. ‐ Check the grinding tool for wear and tear for the next application. ® ‐ Fix new tools according to the appendix „Alpha tools“. ‐ Adjust the different heights of the tools by changing the position of the rear wheel swing (see chapter 6 ...
Need help?
Do you have a question about the Alpha and is the answer not in the manual?
Questions and answers