
Related Manuals for Gardenline Essentials


Summary of Contents for Gardenline Essentials
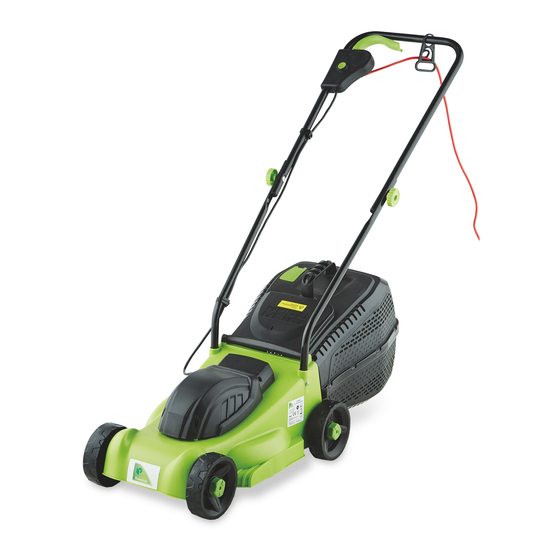
- Page 1 1000w Electric Lawn Mower User Guide 30cm cutting width 28 litre detachable grass collection box 3 adjustable cutting heights Integrated safety switch 8m cable...
-
Page 2: Table Of Contents
Contents Introduction General Information & Safety Instructions Assembly and Parts List Features Instructions Other Useful Information Warranty Card Packaging The unit is supplied in packaging to prevent its contents being damaged in transit. This packaging is raw material and can therefore be reused or can be returned to the raw material system. -
Page 3: Introduction
Introduction Congratulations on choosing to buy a Gardenline ® Essentials product. By doing so you now have the assurance and peace of mind that comes with purchasing a product made by one of Europe’s leading manufacturers. All products brought to you by Gardenline ®... -
Page 4: General Information & Safety Instructions
General Information & Safety Instructions Safety information General safety regulations for this electrical tool This equipment is not designed to be used by people (including children) with limited physical, sensory or mental capacities or those with no experience and/or knowledge unless they are supervised by a person who is responsible for their safety or they have received instructions from such a person in how to use the equipment safely. - Page 5 Keep extension cables away from the cutters. The cutters can damage the cables and result in contact with live parts. Break the connection with the mains supply (in other words pull the plug out of the socket): • whenever you leave the machine unattended; •...
- Page 6 c) Before using the lawnmower, visually inspect it to ensure that the blade, mounting bolts and the entire cutting apparatus are in good working order (i.e. not worn out or damaged). To prevent any imbalance, replace worn out or damaged blades and mounting bolts as a set only (if applicable).
- Page 7 n) Never move your hands or feet toward or under any rotating parts. Keep clear of the chute opening at all times. o) Never lift or carry a lawn mower with the engine running. p) Switch off the motor and pull the power plug: •...
-
Page 8: Assembly And Parts List
Assembly & Parts List Layout (Fig. 1-2) ON/OFF switch Cable strain-relief clamp Carry handle Grass basket Ejector flap Power Cable Top push bar Bottom push bar Fastening screws for bottom push bar Fastening screws for top push bar Cable clips Grass box housing halves Grass box handle Helpline No. - Page 9 Helpline No. UK/Northern Ireland 0151 6491500 Rep. Ireland 1890 946244 Model Number: 41688...
- Page 10 Assembling the lawn mower Before starting the equipment The lawn mower is delivered unassembled. The complete push bar and the grass collector must be assembled before using the lawn mower. Follow the operating instructions step-by-step and use the pictures provided as a visual guide to easily assemble the machine. Fitting the push bar (Fig.
- Page 11 Fitting the grass box (Fig. 4a to 4f) Fit the two halves of the grass box together (Fig. 4a / Item 12). The two halves are identical. Ensure that all the plastic lugs engage correctly (Fig. 4b). Next push the grass box handle (Fig. 4c / Item 13) into the openings on the grass box.
- Page 12 Setting the cutting heights - Important! Adjust the cutting height only when the engine is switched off and the power cable has been disconnected. Before you begin to mow, check to ensure that the blade is not blunt and that none of the fasteners are damaged. To prevent any imbalance, replace blunt and/or damaged blades.
-
Page 13: Features
Features Explanation of the warning signs on the equipment (see Fig. 8) 1 = Read the directions for use before operating the equipment. 2 = Wear ear guards and goggles. 3 = Keep all other persons away from the danger zone. 4 = Caution! -Sharp blades- Before carrying out any maintenance work or if you damage the cable, pull the plug out of the socket. -
Page 14: Instructions
Instructions Proper use The lawn mower is designed for use in private gardens. The machine is to be used only for its prescribed purpose. Any other use is deemed to be a case of misuse. The user / operator and not the manufacturer will be liable for any damage or injuries of any kind caused as a result of this. - Page 15 Operation Important! To prevent the machine switching on accidentally, the lawn mower is equipped with a safety lock-off (Fig. 5a/Item A) which must be pressed before the switching bar (Fig. 5a/Item B) can be activated. The lawn mower switches itself off when the switch is released. Repeat this process several times so that you are sure that the machine functions properly.
- Page 16 Information on correct mowing We recommend that you mow in overlapping lines. Only mow with sharp, perfect blades so that the blades of grass do not fray, making the lawn turn yellow. To achieve a good cut, guide the lawn mower in lines that are as straight as possible.
- Page 17 Important! Before you remove the grass bag switch off the motor and wait until the cutting tool reaches a standstill. To remove the grass bag, raise the discharge flap with one hand and remove the grass bag using its handle with your other hand. To maintain safety, the discharge flap will close when you remove the grass back to seal the rear discharge opening.
- Page 18 Useful Information Cleaning, maintenance and ordering of spare parts Always pull out the mains power plug before starting any cleaning work. Cleaning • Keep all safety devices, air vents and the motor housing free of dirt and dust as far as possible. Wipe the equipment with a clean cloth or blow it with compressed air at low pressure.
- Page 19 Replacing the blade For safety reasons, we recommend having the blade replaced by an authorized professional. Important! Wear work gloves! Only replace the blade with a genuine Einhell replacement blade, as this will ensure top performance and safety under all conditions. Carry out the following steps to change the blade: •...
- Page 20 Disposal and recycling The unit is supplied in packaging to prevent its being damaged in transit. This packaging is raw material and can therefore be reused or can be returned to the raw material system. The unit and its accessories are made of various types of material, such as metal and plastic.
- Page 21 Helpline No. UK/Northern Ireland 0151 6491500 Rep. Ireland 1890 946244 Model Number: 41688...
- Page 22 Helpline No. UK/Northern Ireland 0151 6491500 Rep. Ireland 1890 946244 Model Number: 41688...
- Page 24 GLEM 1030...
Need help?
Do you have a question about the Essentials and is the answer not in the manual?
Questions and answers