Table of Contents
Advertisement
ISTRUZIONI PER L'INSTALLAZIONE E LA MANUTENZIONE (IT)
INSTRUCTIONS FOR INSTALLATION AND MAINTENANCE (GB)
INSTRUCTIONS POUR L'INSTALLATION ET LA MAINTENANCE (FR)
INSTALLATIONS- UND WARTUNGSANLEITUNGEN (DE)
INSTRUCCIONES DE INSTALACIÓN Y MANTENIMIENTO (ES)
GEBRUIKS- EN ONDERHOUDSAANWIJZINGEN (NL)
POKYNY K MONTÁŽI A ÚDRŽBĚ (CZ)
INSTRUÇÕES DE INSTALAÇÃO E MANUTENÇÃO (PT)
KURMA VE BAKIM BİLGİLERİ (TR)
E.SWIM
E.PRO
Advertisement
Chapters
Table of Contents

Related Manuals for DAB E.SWIM


Summary of Contents for DAB E.SWIM
- Page 1 INSTRUCTIONS POUR L'INSTALLATION ET LA MAINTENANCE (FR) INSTALLATIONS- UND WARTUNGSANLEITUNGEN (DE) INSTRUCCIONES DE INSTALACIÓN Y MANTENIMIENTO (ES) GEBRUIKS- EN ONDERHOUDSAANWIJZINGEN (NL) POKYNY K MONTÁŽI A ÚDRŽBĚ (CZ) INSTRUÇÕES DE INSTALAÇÃO E MANUTENÇÃO (PT) KURMA VE BAKIM BİLGİLERİ (TR) E.SWIM E.PRO...
- Page 2 ITALIANO pag. ENGLISH page FRANÇAIS page DEUTSCH seite ESPAÑOL pág. NEDERLANDS pag. ČESKY str. PORTUGUÊS pág. TÜRKÇE...
-
Page 3: Table Of Contents
ITALIANO INDICE LEGENDA ................................2 AVVERTENZE IMPORTANTI E RACCOMANDAZIONI PER LA SICUREZZA ..........2 RESPONSABILITA’ ............................5 GENERALITA’ ............................5 Descrizione ............................5 Caratteristiche tecniche ........................6 INSTALLAZIONE ............................6 ... -
Page 4: Legenda
Note ed osservazioni importanti. AVVERTENZE IMPORTANTI E RACCOMANDAZIONI PER LA SICUREZZA Questo manuale riguarda il prodotto DAB E.SWIM / E.PRO. FATTORI GENERALI DI RISCHIO Prima di procedere all’installazione leggere attentamente questo manuale, che contiene informazioni importanti per l’utilizzo del prodotto. - Page 5 ITALIANO ‐ Proteggere la pompa dalle intemperie. ‐ Per lunghi periodi di inattività o di gelo, rimuovere tutti i tappi e svuotare completamente il corpo pompa. Conservare i tappi ! ‐ Per l’impiego come pompa all’aperto, prevedere una adeguata protezione e montare la pompa su una base isolante di almeno 100 mm di altezza.
- Page 6 ITALIANO Avvertenze particolari per gli Stati Uniti d’America (U.S.A.): AVVERTENZE DI SICUREZZA: Pericolo di intrappolamento da aspirazione. Può causare lesioni gravi o morte. Per ridurre il rischio di intrappolamento, è necessario installare la pompa conformemente ai più recenti codici federali, nazionali e locali in materia di piscine e collegarla ad almeno due prese di aspirazione funzionanti per pompa, oppure installarla secondo l’ultimo standard APSP-7.
-
Page 7: Responsabilita
ITALIANO Pressioni pericolose Durante un qualsiasi intervento sull’impianto, l’aria può entrare ed essere messa in pressione. L’aria compressa può provocare l’apertura improvvisa del coperchio e provocare danni, lesioni e perfino la morte. NON SBLOCCARE O INTERVENIRE SUL COPERCHIO QUANDO LA POMPA È IN PRESSIONE. Utilizzare unicamente per impianti fissi di piscine e vasche. -
Page 8: Caratteristiche Tecniche
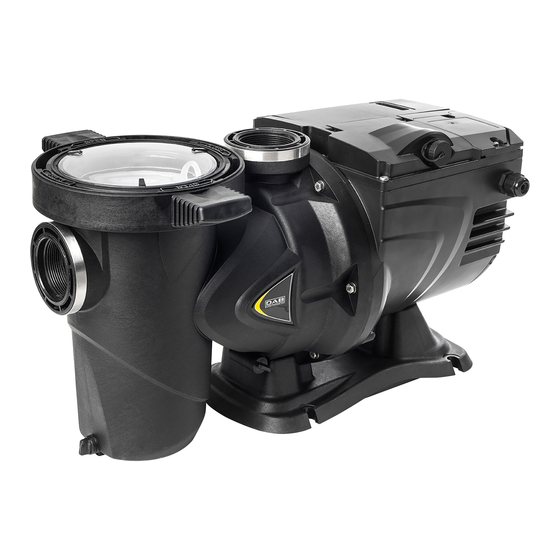
ITALIANO 1- Coperchio pannello utente 2- Pannello utente 3- QR code 4- Quick guide 5- Coperchio morsettiera 6- Connettore esterno 7‐ Entrata cavo alimentazione Figura 2 1.2 Caratteristiche tecniche Le caratteristiche tecniche sono riassunte nella tabella seguente. Argomento Parametro E-SWIM ALIMENTAZIONE Tensione 220-240 V +/- 10%... -
Page 9: Collegamento Elettrico Alla Linea Di Alimentazione
ITALIANO Evitare che il motore si trovi immerso nell’acqua. Per i collegamenti pompa-impianto utilizzare solo sostanze adesive adatte a materiali plastici. Supportare adeguatamente le tubazioni di aspirazione e mandata in modo da non gravare sulla pompa. Non serrare troppo i raccordi tra i tubi. ... -
Page 10: Collegamenti Elettrici Per Ingressi E Uscite Ausiliari
ITALIANO La tensione di linea può cambiare all’avvio dell’elettropompa. La tensione sulla linea può subire variazioni in funzione di altri dispositivi ad essa collegati e alla qualità della linea stessa. 2.3 Collegamenti elettrici per ingressi e uscite ausiliari La pompa dispone di un connettore per ingressi e uscite utente configurabili. Figura 4 L’uscita è... -
Page 11: Il Pannello Operatore
ITALIANO Per collegarsi al connettore degli ingressi e uscite, utilizzare unicamente il kit cavo. I dettagli tecnici del connettore e della connessione sono inclusi nel kit. Attenzione: tenere ben separato il cavo per i segnali di ingresso e uscita dalle linee di potenza e di alimentazione alternata (230V e simili), in modo da limitare disturbi ed interferenze che possano alterare i segnali stessi. -
Page 12: Pagina Principale Del Display (Homepage)
ITALIANO 5. LED spia verde ( ), di segnalazione di pompa in marcia. 6. (Quattro) tasti “SET 1-4” di comando manuale dell’ accensione, per selezionare (o deselezionare) direttamente una portata o velocità preimpostate (setpoint) . La tabella al capitolo 8 riporta i valori di fabbrica dei setpoint associati ai tasti da “SET1” a “SET4”. Questi valori sono adatti per buona parte delle installazioni, ma possono essere facilmente modificati se lo si desidera (vedere 6.2.2). -
Page 13: Messa In Funzione
ITALIANO 2. I valori istantanei delle grandezze elettriche ed idrauliche sono raccolti nello spazio al centro del visore ed aggiornati in continuazione durante il funzionamento. 3. La barra di accesso rapido (in basso): contiene data e ora assieme ad alcune icone; su questi elementi si naviga con i tasti freccia a destra e freccia a sinistra, e si sposta la selezione (evidenziata dal riquadro), poi premendo “ENTER”... -
Page 14: Accensione Ed Utilizzo Della Pompa
ITALIANO Se in seguito si ha necessità di rivedere rapidamente tutti questi parametri , si può richiamare di nuovo Il WIZARD tramite un’apposita voce di menù (paragrafi 6.2 e 6.2.1.1). Il WIZARD presenta in successione le seguenti pagine: 1. Selezione della Lingua (si veda anche il par. 6.2.1.2) 2. -
Page 15: Modi Di Comando
ITALIANO Prevalenza H 100% US GPM Portata Q Figura 11 L’inverter regola automaticamente la velocità di rotazione dell’elettropompa, spostando il punto di lavoro, a seconda delle necessità, in una parte qualsiasi dell’area sottesa dalla curva massima (100%). La regolazione durante il pompaggio può avvenire in modalità a controllo di portata o in quella a curva fissa. ‐... -
Page 16: Avvio Rapido Ed Arresto Della Pompa (Modo "Manuale")
ITALIANO Il modo “Manuale” ed il modo “Auto” possono essere utilizzati anche contemporaneamente; in tal caso, come sarà descritto meglio nel seguito, l’automatismo (“Auto”) rimane attivo in sottofondo, ma se necessario può essere temporaneamente scavalcato da un comando manuale, che ha la precedenza. 5.2 Avvio rapido ed arresto della pompa (modo “Manuale”) La pompa esce dalla fabbrica e viene consegnata con il Priming abilitato: se non si modifica la programmazione del Priming (vedi par. -
Page 17: Modifica Rapida Del Setpoint E Dei Parametri Preimpostati
ITALIANO Dopo uno spegnimento accidentale (black out) durante il funzionamento in modalità Manuale, il sistema non riparte a meno che il tasto SETx che era acceso non avesse durata “per sempre” (“ENDLESS”). In questo caso il sistema riparte con lo stesso setpoint precedente. 5.3 Modifica rapida del setpoint e dei parametri preimpostati Quando la pompa è... -
Page 18: Selezione Delle Modalità Operative Preferite (Menù)
ITALIANO Con una nuova pressione di “RUN/STOP” il sistema si riabilita e tutto si riavvia come in precedenza. Il LED bianco si accende ora in modo fisso. (*) Uniche eccezioni: le funzioni Antifreeze (di protezione dal gelo) e Antilock (di anti bloccaggio) avviano la pompa anche se il sistema è... -
Page 19: Accesso Ad Un Sotto-Menù
ITALIANO 6.1.2 Accesso ad un sotto-menù Accedendo ad alcune voci di menù si può aprire un menù ulteriore, o sotto-menù. Così accade ad esempio nella pagina iniziale del menù, vista sopra: Figura 14 Entrando (con “ENTER” [ ]) nella voce “Settings” (Impostazioni), si accede al relativo “Menu - Settings” : Titolo Posizione nell’albero dei menù... - Page 20 ITALIANO Figura 18 4. Raggiunto il valore voluto, ci si sposta sui minuti con il tasto freccia a destra: Figura 19 5. Lampeggiano adesso le cifre dei minuti, e anch’esse si modificano con le frecce in alto e in basso: Figura 20 6.
-
Page 21: Struttura Del Menù
ITALIANO 6.2 Struttura del menù Questa è la completa struttura (ad albero) del menù. (Main)MENU Menu ‐ Settings Settings Wizard WIZARD W1 /1 1 … W1 1 /1 1 1‐2 Languages Language select 1‐3 Day & Time Time set 1‐4 Unit of Measure Unit select 1‐5 Pump Limits Limit set 1‐6 Screen Preferences 1‐7... -
Page 22: Settings (Menù Impostazioni)
ITALIANO I numeri, riportati sulla destra nelle varie caselle, rappresentano la numerazione di ramo e di voce delle diverse parti del menù e vengono mostrati sul display (fornendo un riferimento rapido per la posizione in cui ci si trova). I paragrafi che seguono descrivono in dettaglio ciascuna voce del menù. 6.2.1 Settings (Menù... -
Page 23: Pump Limits (Limiti Della Pompa)
ITALIANO L’impostazione di fabbrica è riportata nel capitolo 8. 6.2.1.5 Pump Limits (Limiti della pompa) Figura 24 Se l’impianto non è in grado di sopportare pressioni o flussi troppo elevati, è possibile imporre dei limiti massimi al pilotaggio della pompa. I limiti superiori impostabili sono: ‐... -
Page 24: Set Points 1-4
ITALIANO ‐ Impostando nel campo password un valore diverso da zero, e confermandolo con “OK”, il valore visualizzato diventa “XXXX” (nascosto) e si attiva il sistema di protezione. Nella homepage compare il simbolo “lucchetto chiuso” (paragrafo 3.2). Con protezione attiva, è bloccato l’accesso a tutti i tasti, esclusi: ‐... -
Page 25: Set Points 5-8
ITALIANO 6.2.3 Set Points 5-8 Questa voce di menù consente di visualizzare e modificare i parametri associati ai setpoint da 5 a 8. Figura 28 I setpoint da 5 a 8 non possono essere richiamati da tastiera, ma vengono attivati e disattivati solo dal sistema dei TIMERS (paragrafo 6.2.5). -
Page 26: Timer Settings (Impostazione Dei Timer)
ITALIANO Da questo sotto menù si effettuano: ‐ l’impostazione dei timer, ‐ la visualizzazione della programmazione attualmente attiva. All’uscita dalla fabbrica i timer sono disabilitati e non programmati. 6.2.5.1 Timer Settings (Impostazione dei Timer) La programmazione dei timer si esegue in forma “tabulare”: sul display compare una tabella che mostra i dati di attivazione di ciascuno degli otto Timer A –... -
Page 27: External Control (Controllo Esterno)
ITALIANO 6.2.6 External Control (Controllo esterno) Il controllo della macchina può essere effettuato da una centralina esterna o da un PC. Per l’utilizzo di questa modalità si vedano anche i paragrafi 5.1.2 e 5.4. L’impostazione di questa funzionalità si effettua tramite questo sotto menù, che prevede voci separate per ingressi e uscite. -
Page 28: Priming (Adescamento Della Pompa)
ITALIANO Figura 35 6.2.7 Priming (Adescamento della pompa) Ad ogni avvio della pompa il sistema esegue la procedura di adescamento, o “Priming” (se è abilitato). Il Priming consiste in due fasi: ‐ Al termine dello startup della pompa (come descritto al par. 5.2), viene verificato il flusso; se esso risulta regolare il Priming è... -
Page 29: Anti-Lock (Protezione Contro Il Blocco Meccanico Della Pompa)
ITALIANO Nei casi di lunga inattività, si consiglia di non sconnettere l’alimentazione elettrica per mantenere attiva anche la protezione antibloccaggio (si veda il paragrafo seguente). L’intervento della funzione Antifreeze mette in rotazione la pompa anche se il sistema è in stato di STOP (led bianco lampeggiante), e non è... -
Page 30: Sistemi Di Protezione - Blocchi (Fault)
ITALIANO Figura 39 I fault sono visualizzati in ordine cronologico a partire da quello più recente, fino a quello comparso più indietro nel tempo. La lista si scorre con i tasti freccia in alto e freccia in basso. Il numero massimo di fault memorizzati e visualizzabili è 16; arrivati a tale numero si inizia a sovrascrivere i più vecchi. ... -
Page 31: Visualizzazione Dello Storico Dei Blocchi
ITALIANO viene eseguito un nuovo tentativo dopo alcuni minuti, ripetuto ciclicamente. Se durante la sequenza di ripristino un tentativo va a buon fine, la sequenza si interrompe, il LED spia rosso ( ) si spegne e si torna al funzionamento normale. Nel caso dei fault da “Sovratemperatura”,il sistema riprende a funzionare non appena la temperatura ritorna nel normale campo di funzionamento. -
Page 32: Ripristino Delle Impostazioni Di Fabbrica
ITALIANO setpoint % SET6 setpoint Q 12 m3/h 50 GPM setpoint % SET7 setpoint Q 18 m3/h 80 GPM setpoint % SET8 setpoint Q 25 m3/h 110 GPM setpoint % 100% Quick Clean setpoint 100% durata 10 min Priming funzione abilitata (Adescamento) Max Priming Speed... -
Page 33: Manutenzione
ITALIANO Bassa portata : bassa pressione nel filtro. Cestello o girante otturata. Entrata d’aria nella tubazione di aspirazione. Il motore gira nella direzione opposta. Bassa portata : alta pressione nel filtro. Strozzatura nel tubo di mandata. Sezione dei cavi di alimentazione non adeguata. Filtro della pompa intasato. - Page 34 ENGLISH INDEX KEY .................................. 33 IMPORTANT WARNINGS AND SAFETY RECOMMENDATIONS ..............33 RESPONSIBILITY ............................36 GENERAL ..............................36 Description ............................36 Technical characteristics ........................ 37 INSTALLATION ............................37 ...
- Page 35 Notes and important remarks. IMPORTANT WARNINGS AND SAFETY RECOMMENDATIONS This manual concerns the product DAB E.SWIM / E.PRO. GENERAL RISK FACTORS Before installation, carefully read this manual which contains important information for use of the product.
- Page 36 ENGLISH ‐ Protect the pump from unfavourable weather conditions. ‐ For long periods of inactivity or frost, remove all the caps and completely drain the pump body. Keep the caps! ‐ To use as an outdoor pump, provide suitable protection and install the pump on an insulating base at least 100 mm high.
- Page 37 ENGLISH Special warnings for the United States of America (U.S.A.): SAFETY WARNINGS: Suction entrapment hazard. Can cause serious injury or death. To reduce the risk of entrapment the pump must be installed in accordance with the latest federal, state and local swimming pool codes and must be connected to a minimum of two functioning suction outlets per pump or otherwise installed in accordance with the latest APSP-7 standard.
- Page 38 ENGLISH Dangerous pressures During any operation on the system, air can get in and be pressurized. Compressed air can cause the sudden opening of the cover and cause damage, injuries and even death. DO NOT RELEASE OR WORK ON THE COVER WHEN THE PUMP IS UNDER PRESSURE. Use only for fixed facilities of swimming pools and bathing pools.
- Page 39 ENGLISH 1- User panel cover 2- User panel 3- QR code 4- Quick guide 5- Terminal board cover 6- External connector 7‐ Power cable inlet Figure 2 1.2 Technical characteristics The technical characteristics are summed up in the table below. Topic Parameter E-SWIM...
- Page 40 ENGLISH 2.1 Hydraulic connections Follow these recommendations with care: Install the pump horizontally, on a flat and sturdy base, as close as possible to the edge of the pool. The pump is able to overcome a maximum difference in level of 4 m (with non-return valve). ...
- Page 41 ENGLISH The mains terminals may still have dangerous voltage when the motor is stopped and for a few minutes after disconnecting from the power mains. The line voltage may change when the electropump is started. The line voltage may undergo variations depending on other devices connected to it and on the quality of the line.
- Page 42 ENGLISH The inputs are not opto-isolated. To connect to the input and output connector, use only the cable kit. The details of the connector and of the connection are included in the kit. Attention: keep the cable for the input and output signals well away from the power and alternate supply lines (230V and similar), so as to limit disturbances and interference that can alter the signals.
- Page 43 ENGLISH 4. LED white warning light ( ), lit to indicate that the board is live; if it is blinking, it means that the board is live, but the pump is not enabled (see “RUN/STOP” key below). 5. LED green warning light ( ), indicates that the pump is running. 6.
- Page 44 ENGLISH 2. The instantaneous values of the electrical and hydraulic magnitudes, which are grouped in the space in the centre of the screen and continuously updated during operation. The rapid access bar (at the bottom): contains the date and time with some icons; you navigate on these elements with the right arrow and left arrow keys, and move the selection (highlighted by the box), then press “ENTER”...
- Page 45 ENGLISH If you need to revise all these parameters quickly at a later date, you can reload the WIZARD by selecting a specific item on the menu (paragraphs 6.2 and 6.2.1.1). The WIZARD presents the following pages in sequence: 1. Select Language (see also par. 6.2.1.2) 2.
- Page 46 ENGLISH Head H 100% US GPM Flow Q Figure 11 The inverter automatically regulates the rotation speed of the pump, shifting the work point, as necessary, to any part of the area subtended by the maximum curve (100%). Regulation during pumping can takes place in flow control mode or in fixed curve mode. ‐...
- Page 47 ENGLISH 5.2 Rapid starting and stopping of the pump ("Manual" mode). The pump leaves the factory and is delivered with Priming enabled: if the programming of Priming is not changed (see par. 6.2.7), when switched on for the first time, the pump may start at top speed. Before pressing “RUN/STOP”, make sure that the valves are open, the pipes are not blocked, and keep away from the filter and from parts that can be pressurized.
- Page 48 ENGLISH 5.3 Rapid changing of the setpoint and of the pre-set parameters When the pump is running with a “SETx” key pressed (as described above): a “SETx” key different from the active one (e.g. while is active) will perform the pressing “SET3”, “SET1”,...
- Page 49 ENGLISH 6 SELECTING THE PREFERRED MODES (MENU) A rapid and intuitive menu system gives access to the various modes, allowing you to activate and configure them as desired. 6.1 Menu access and navigation The menu is accessed by pressing the “ENTER” key [ ] when the item “Configuration”...
- Page 50 ENGLISH Figure 14 When we press “ENTER” [ ] to access the “Settings” item, we access the respective “Menu - Settings”: Title Position on the menu tree (branch 1) Figure 15 We can also navigate the sub-menus with the arrow keys and access the desired item by pressing “ENTER” [ The symbol at top right represents the position on the menu tree;...
- Page 51 ENGLISH 3. The figures for the hours are flashing and are changed as desired with the up arrow and down arrow keys: Figure 18 4. When we reach the desired value, we proceed to the minutes with the right arrow key: Figure 19 5.
- Page 52 ENGLISH 6.2 Menu structure This is the complete (tree) structure of the menu. (Main)MENU Menu ‐ Settings Settings Wizard WIZARD W1/11 … W11/11 1‐2 Languages Language select 1‐3 Day & Time Time set 1‐4 Unit of Measure Unit select 1‐5 Pump Limits Limit set 1‐6 Screen Preferences 1‐7 Password PW set/reset Set Points 1‐4 SP1‐4 settings Set Points 5‐8 SP5‐8 settings Quick Clean...
- Page 53 ENGLISH The numbers, shown on the right in the various boxes, represent the branch and item numbering of the different parts of the menu and are shown on the display (providing a quick reference for the position where we are). The following paragraphs describe each menu item in detail.
- Page 54 ENGLISH 6.2.1.5 Pump Limits Figure 24 If the system is not able to bear pressures or flows that are too high, it is possible to impose maximum limits on the pump control. The upper settable limits are: ‐ Head H : between 5 m and 16 m, or no limit (MAX), ‐...
- Page 55 ENGLISH With the protection active, access to all the keys is blocked, except: ‐ the “RUN/STOP” key: it can be pressed to stop the pump. ‐ NOTE: pressing it again will not restart the pump, because the system will ask for the password; ‐...
- Page 56 ENGLISH 6.2.3 Set Points 5-8 This menu items allows you to view and change the parameters associated with the setpoints from 5 to 8. Figure 28 The setpoints from 5 to 8 cannot be loaded from the keyboard, but they are activated and deactivated only by the TIMERS system (paragraph 6.2.5).
- Page 57 ENGLISH From this sub-menu you can: ‐ set the timers, ‐ view the currently active program. When the system leaves the factory, the timers are disabled and not programmed. 6.2.5.1 Timer Settings Programming of the timers is carried out in “table” form: a table appears on the display, showing the activation data of each of the eight Timers A –...
- Page 58 ENGLISH 6.2.6 External Control The machine can be controlled by an external control unit or by a PC. To use this mode, see also paragraphs 5.1.2 and 5.4. This function is set by means of this sub-menu, which considers separate items for inputs and outputs. Figure 33 This function is disabled and not configured when the system leaves the factory.
- Page 59 ENGLISH ‐ At the end of pump startup (as described in par. 5.2), the flow is checked; if it regular, Priming has already been completed and it passes to the conditions of the active setpoint. ‐ If this is not the case, the system has discharged and must be primed again: it now enters the second phase, where the pump is activated at Maximum Priming Speed, until it is primed or at any rate for all the time specified by the parameter “Max Priming Time”.
- Page 60 ENGLISH Figure 37 The “Antifreeze” item on the menu allows you to: ‐ enable or disable the function (factory value: enabled); ‐ select the pump rotation speed during the intervention of Antifreeze: between 20% and 100%; ‐ choose the intervention temperature of Antifreeze, between 4°C and 10°C (between 40°F and 50°F). The factory values are given in chapter 8.
- Page 61 ENGLISH The maximum number of faults that can be stored and displayed is 16; when this number is reached, the list starts to overwrite the oldest ones. 7 PROTECTION SYSTEMS – LOCKS (FAULT) The device is equipped with protection systems to preserve the pump, the motor, the supply line and the inverter. If one or more protections trip, the one with the highest priority is immediately notified on the display.
- Page 62 ENGLISH 8 FACTORY SETTINGS The system leaves the factory with a series of preset parameters, which may be changed according to the requirements of the plant and of the user. Each change of the settings is automatically saved in the memory. The factory (or default) settings are summed up in the following table.
- Page 63 ENGLISH Priming function enabled Max Priming Speed 100% 10 min Max Priming Time Anti-Freeze function enabled speed temperature 4 °C 40 °F Anti-Lock function enabled (*) Factory value on some markets Table 6 – Factory (default) settings 8.1 Restoring the factory settings To restore the factory values, switch off the device, wait until the display has switched off completely, press and hold down simultaneously the two keys “SET1”...
- Page 64 ENGLISH 10 MAINTENANCE Disconnect the power supply before starting any work on the system. The system requires no routine maintenance operations. Periodically inspect and clean the pump filter. We suggest special maintenance at least once a year by qualified personnel. 11 DISPOSAL This product or its parts must be disposed of in an environment-friendly manner and in compliance with the local regulations concerning the environment.
- Page 65 FRANÇAIS SOMMAIRE LÉGENDE ................................ 64 AVERTISSEMENTS IMPORTANTS ET RECOMMANDATIONS POUR LA SÉCURITÉ ......64 RESPONSABILITÉS ............................67 GÉNÉRALITÉS ............................67 Description ............................67 Caractéristiques techniques ......................68 INSTALLATION ............................68 ...
-
Page 66: Légende
Remarques et observations importantes. AVERTISSEMENTS IMPORTANTS ET RECOMMANDATIONS POUR LA SÉCURITÉ Ce manuel traite du produit DAB E.SWIM / E.PRO. FACTEURS DE RISQUES GÉNÉRAUX Avant de procéder à l'installation, lire attentivement le manuel présent. Il contient des informations importantes quant à l'utilisation du produit. - Page 67 FRANÇAIS SÉCURITÉ MÉCANIQUE NE JAMAIS FAIRE FONCTIONNER LA POMPE À SEC. L'eau contribue notamment à la lubrification, au refroidissement et à la protection des garnitures : l'allumage à sec peut provoquer des dommages permanents de la pompe et annuler la garantie. Toujours remplir le filtre avant de démarrer la pompe.
- Page 68 FRANÇAIS RISQUES SPÉCIFIQUES LIÉES AUX PISCINES, CUVES ET INSTALLATIONS SEMBLABLES Avertissements particuliers pour les États-Unis : AVERTISSEMENTS QUANT À LA SÉCURITÉ : Risque de rester piégé dans l'aspiration. Peut provoquer des blessures graves ou le décès. Pour réduire le risque de piégeage, installer la pompe conformément aux derniers codes fédéraux, nationaux et locaux en matière de piscine.
-
Page 69: Responsabilités
FRANÇAIS Pressions dangereuses Durant les interventions sur l'installation, quelles qu'elles soient, l'air peut pénétrer et être mis sous tension. L'air comprimé peut provoquer l'ouverture impromptue du couvercle et provoquer des dommages, lésions, voire le décès. NE PAS DÉBLOQUER OU INTERVENIR SUR LE COUVERCLE LORSQUE LA POMPE EST SOUS PRESSION. -
Page 70: Caractéristiques Techniques
FRANÇAIS 1- Couvercle du panneau utilisateur 2- Panneau utilisateur 3- Code QR 4- Guide rapide 5- Couvercle de la boîte à bornes 6- Connecteur externe 7‐ Entrée du câble d'alimentation Figure 2 1.2 Caractéristiques techniques Les caractéristiques techniques sont résumées dans le tableau suivant. E-SWIM Sujet Paramètre... -
Page 71: Raccords Hydrauliques
FRANÇAIS 2.1 Raccords hydrauliques Suivre les recommandations suivantes avec attention : Installer la pompe à l'horizontale, sur un sol plat et résistant, le plus près possible du bord de la cuve. La pompe peut gérer un dénivelé de 4 m au maximum (avec clapet de non-retour). ... -
Page 72: Branchements Électriques Pour Les Entrées Et Sorties Auxiliaires
FRANÇAIS Les bornes du réseau peuvent porter une tension dangereuse, même si le moteur est à l'arrêt, pendant quelques minutes après la mise hors tension. La tension de ligne peut varier au démarrage de l'électropompe. La tension sur la ligne peut subir des variations en fonction des autres dispositifs qui y sont branchés et de la qualité... -
Page 73: Le Panneau Opérateur
FRANÇAIS Les entrées sont opto-isolées. Pour se brancher au connecteur des entrées et des sorties, utiliser uniquement le kit câble. Les détails techniques du connecteur et du branchement sont inclus dans le kit. Attention : les câbles des signaux d'entrée et de sortie des lignes de puissance et d'alimentation alternée (230 V est similaires) doivent être bien séparés, afin de limiter les gênes et interférences qui pourraient altérer ces signaux. -
Page 74: Page D'accueil De L'écran (Homepage)
FRANÇAIS 3. DEL témoin rouge ( ) pour signaler une alarme (défaut). 4. DEL témoin blanche ( ) allumée pour indiquer que la carte est sous tension ; si elle clignote, la tension est présente mais la pompe n'est pas activée (voir la touche « RUN/STOP » plus loin). 5. -
Page 75: Mise En Marche
FRANÇAIS Les informations sont présentées en trois groupes : 1. Les lignes d'état (en-haut) reportent les informations liées à : l'état (marche, arrêt) et la commande en cours (SET1 – SET3, QC, Timer A-H, etc.) ou les avis et blocages (Warning et Fault) éventuellement actifs ; dans l'exemple illustré : « System Running » indique que le système est activé... -
Page 76: Configuration Guidée (Assistant)
FRANÇAIS 4.2 Configuration guidée (ASSISTANT) A la première mise en marche, le dispositif propose d'effectuer une configuration assistée, ASSISTANT, qui aide l'utilisateur à paramétrer facilement et rapidement les paramètres les plus importants. L'exécution de l'ASSISTANT est nécessaire : l'état initial du système est celui de la configuration du fabricant. -
Page 77: Mise En Marche Et Utilisation De La Pompe
FRANÇAIS 5 MISE EN MARCHE ET UTILISATION DE LA POMPE 5.1 Mode de fonctionnement. 5.1.1 Modes de réglage Le graphique ci-dessous indique les courbes indicatives des prestations hydrauliques du système. Prévalence H 100% US GPM Portée Q Figure 11 L’inverseur règle automatiquement la vitesse de rotation de l'électropompe en déplaçant le point de travail, selon les besoins, sur une partie quelconque de la zone qui se trouve sous la courbe maximum (100%). -
Page 78: Mise En Marche Rapide Et Arrêt De La Pompe (Mode " Manuel ")
FRANÇAIS En mode « auto » : les mises en marche et les arrêts sont commandés automatiquement par les temporisateurs (« Timers »), qui peuvent être programmés librement chaque semaine, ou par des signaux provenant d'une centrale externe (« EXT »). ... -
Page 79: Modification Rapide Du Point De Consigne Et Des Paramètres Pré-Réglés
FRANÇAIS Il est très facile d'arrêter manuellement la pompe : lorsqu'elle est en fonction, il suffit d'appuyer sur la touche « RUN/STOP ». La pompe s'arrêtera dans tous les cas (*), interrompant tous les modes actifs (le mode « auto », qui pouvait être activé en arrière-plan, est lui aussi arrêté) ;... -
Page 80: Sélection Des Modes Opératoires Favoris (Menu)
FRANÇAIS Pour désactiver le monde « auto » : appuyer à nouveau sur la touche « auto » (la DEL à côté de la touche s'éteint). Si la pompe doit être arrêtée manuellement, lorsqu'elle est en fonction, il suffit de : ... -
Page 81: Accès À Un Sous-Menu
FRANÇAIS Figure 13 L'encadré clignote (en pointillé sur la figure), indiquant la rubrique qui suit celle de la situation précédente. Sur la barre verticale de gauche, le signe interne est abaissé, indiquant que nous nous trouvons plus bas dans les rubriques qui composent le menu. - Page 82 FRANÇAIS Emplacement dans l'arborescence du menu (branche 1, rubrique 3) Sélection clignotante Figure 16 2. Appuyer sur « ENTER » [ ] pour ouvrir la modification de la ligne sélectionnée : Encadré fixe, seuls les chiffres à modifier clignotent Figure 17 3.
- Page 83 FRANÇAIS Figure 21 Si l'utilisateur le souhaite, il peut maintenant se déplacer dans la page (à l'aide des touches flèche haut et flèche bas) afin de modifier les autres valeurs (format et jour de la semaine). La procédure est exactement la même. Appuyer sur «...
-
Page 84: Structure Du Menu
FRANÇAIS Structure du menu Voici la structure complète (arborescence) du menu. (Main)MENU Menu ‐ Settings Settings Wizard WIZARD W1 /1 1 … W1 1 /1 1 1‐2 Languages Language select 1‐3 Day & Time Time set 1‐4 Unit of Measure Unit select 1‐5 Pump Limits Limit set 1‐6 Screen Preferences 1‐7 Password PW set/reset Set Points 1‐4... -
Page 85: Settings (Paramètres)
FRANÇAIS Les chiffres indiqués à droite dans les différentes cellules représentent le numéro de la branche et de la rubrique des différentes parties du menu. Ils sont affichés à l'écran (afin de fournir une référence rapide de l'emplacement où l'on se trouve). -
Page 86: Pump Limits (Limites De La Pompe)
FRANÇAIS Les unités de mesure de la portée sont les « m /h » (mètres cube par heure) ou « GPM » (gallons américains par minute). Le paramétrage du fabricant est reporté au chapitre 8. 6.2.1.5 Pump Limits (limites de la pompe) Figure 24 Si l'installation n'est pas en mesure de gérer des pressions ou des flux trop élevés, l'utilisateur peut définir des limites maximum au pilotage de la pompe. -
Page 87: Points De Consigne 1-4
FRANÇAIS La valeur du mot de passe peut être réglée à partir de la page de menu : ‐ Lorsque le mot de passe est « 0 » (comme établi par le fabricant), toutes les touches sont débloquées. Elles peuvent être activées afin d'accéder librement à tous les menus et de modifier tous les paramètres. Le symbole «... -
Page 88: Point De Consigne 5-8
FRANÇAIS La modification des valeurs T1 - T4 se fait de la même façon. La valeur de durée indique le temps durant lequel le point de consigne reste actif avant de se fermer ; pour faire en sorte que le point de consigne soit toujours activé, régler la durée sur « pour toujours » («... -
Page 89: Timer Settings (Paramétrage Des Temporisateurs)
FRANÇAIS Figure 30 A partir de ce sous-menu, l'utilisateur peut : ‐ régler le temporisateur, ‐ afficher la programmation actuellement active. Lorsque la machine quitte l'atelier du fabricant, les temporisateurs sont désactivés et ils ne sont pas programmés. 6.2.5.1 Timer Settings (paramétrage des temporisateurs) La programmation des temporisateurs est effectuée sous forme de tableau : l'écran affiche un tableau qui indique les données d'activation de chacun des huit Timer A –... -
Page 90: External Control (Contrôle Externe)
FRANÇAIS Figure 32 6.2.6 External Control (contrôle externe) Le contrôle de la machine peut être effectué depuis une centrale externe ou un ordinateur. Pour l'utilisation de ces modes, voir également les paragraphes 5.1.2 et 5.4. Le réglage de cette fonction est effectué à travers ce sous-menu, qui prévoit des rubriques séparées pour les entrées et les sorties. -
Page 91: Priming (Amorçage De La Pompe)
FRANÇAIS Figure 35 6.2.7 Priming (amorçage de la pompe) A chaque démarrage de la pompe, le système effectue la procédure d'amorçage ou « Priming »” (si elle est activée). Le Priming comprend deux phases : ‐ au terme du startup de la pompe (tel qu'il est décrit au parag. 5.2), le flux est vérifié ; s'il est régulier, le Priming est déjà... -
Page 92: Anti-Lock (Protection Contre Le Blocage Mécanique De La Pompe)
FRANÇAIS ATTENTION : la protection Antifreeze ne fonctionne que lorsque le système est sous tension : si l'alimentation électrique est coupée ou en l'absence de courant (qui peut être accidentelle, comme en cas de coupure de courant), la protection ne peut pas fonctionner. Nous conseillons donc de ne jamais laisser le système chargé... -
Page 93: Système De Protection - Blocages (Fault)
FRANÇAIS Appuyer sur « ENTER » sur la deuxième rubrique pour remettre la liste à zéro. Appuyer sur « ENTER » sur la première rubrique pour accéder à la liste des défauts mémorisés. Pour faire défiler la liste, utiliser les touches flèche (non indiquées à... -
Page 94: Annulation Automatique Des États D'erreur
FRANÇAIS 7.2 Annulation automatique des états d'erreur Des tentatives de rétablissement automatique sont prévues pour certains types de défaut. En particulier pour : ‐ Fonctionnement à sec ‐ Pompe non amorcée Une nouvelle tentative est effectuée après quelques minutes et répétée de manière cyclique. Si une tentative de rétablissement réussit durant la séquence, celle-ci s'interrompt, la DEL témoin rouge ( ) s'éteint et le fonctionnement normal reprend. -
Page 95: Rétablissement Des Paramètres Du Fabricant
FRANÇAIS Points de Flow type de points de consigne consigne 5-8 (portée) point de consigne Q 5 m3/h SET5 point de consigne % SET6 point de consigne Q 12 m3/h 50 GPM point de consigne % SET7 point de consigne Q 18 m3/h 80 GPM point de consigne %... -
Page 96: Entretien
FRANÇAIS Pompe bruyante De l'air pénètre dans la conduite d'aspiration. Présence d'objets étrangers dans le corps de la pompe. Cavitation. Le roulement à billes est endommagé. Portée faible : la pression dans le filtre est basse. Panier ou rotor obstrué. De l'air pénètre dans la conduite d'aspiration. - Page 97 DEUTSCH INHALT LEGENDE ................................ 96 WICHTIGE HINWEISE UND EMPFEHLUNGEN FÜR DIE SICHERHEIT ............96 HAFTUNG ................................ 99 ALLGEMEINES ............................99 Beschreibung ........................... 99 Technische Charakteristiken ......................100 INSTALLATION ............................100 ...
-
Page 98: Legende
Vorschriften kann die Sicherheit von Personen schwerwiegend gefährden. Anmerkungen und wichtige Bemerkungen. WICHTIGE HINWEISE UND EMPFEHLUNGEN FÜR DIE SICHERHEIT In diesem Handbuch wird das Produkt DAB E.SWIM / E.PRO behandelt. ALLGEMEINE RISIKOFAKTOREN Vor der Installation muss dieses Handbuch sorgfältig gelesen werden, denn es enthält wichtige Informationen zum Gebrauch des Produktes. - Page 99 DEUTSCH MECHANISCHE SICHERHEIT DIE PUMPE NIE OHNE WASSER IN BETRIEB NEHMEN. Das Wasser wirkt auch als Schmiermittel, kühlt und schützt die Dichtungen: Trockenlauf kann die Pumpe bleibend beschädigen und lässt den Garantieanspruch verfallen. Vor Einschalten der Pumpe stets den Filter auffüllen. ‐...
- Page 100 DEUTSCH SPEZIFISCHE RISIKEN IN POOLS, WANNEN UND ÄHNLICHEM Sonderhinweise für die Vereinigten Staaten von Amerika (U.S.A.): SICHERHEITSHINWEISE: Gefahr des sich Verfangens durch Ansaugen. Kann zu schweren Verletzungen oder sogar zum Tod führen. Um das Risiko des Verfangens zu vermindern, muss die Pumpe gemäß der neuesten Bundes-, Länder- und lokalen Poolvorschriften installiert und mit mindestens zwei Saugöffnungen pro Pumpe verbunden werden;...
-
Page 101: Haftung
DEUTSCH Gefährliche Drücke Während eines beliebigen Eingriffs an der Anlage kann Luft eintreten und unter Druck gesetzt werden. Durch Druckluft kann der Deckel plötzlich aufgehen und Sachschäden, Verletzungen oder sogar den Tod verursachen. DEN DECKEL NICHT BERÜHREN ODER SONST AUF IHN EINWIRKEN, WÄHREND DIE PUMPE UNTER DRUCK STEHT. -
Page 102: Technische Charakteristiken
DEUTSCH 1- Deckel des Bedienfelds 2- Bedienfeld 3- QR Code 4- Kurzanleitung 5- Deckel der Klemmleiste 6- Externer Verbinder 7‐ Kabeleingang Abbildung 2 1.2 Technische Charakteristiken Die technischen Charakteristiken sind in der folgenden Tabelle zusammengefasst. E-SWIM Gegenstand Parameter ELEKTRISCHE 220-240 V +/- 10% Spannung VERSORGUNG 50/60 Hz... -
Page 103: Hydraulische Anschlüsse
DEUTSCH 2.1 Hydraulische Anschlüsse Die nachstehenden Hinweise sind genau zu befolgen: Die Pumpe so nahe wie möglich am Poolrand waagrecht auf einer ebenen, robusten Unterlage installieren. Die Pumpe kann Höhenunterschiede von max. 4 m überwinden (mit Rückschlagventil). Der Filter und die Pumpe müssen an einem geschützten und gut belüfteten Ort installiert werden. -
Page 104: Elektrische Anschlüsse Für Hilfs-Ein/Ausgänge
DEUTSCH Die Netzanschlussklemmen können auch bei stillstehendem Motor und nach dem Trennen von Stromnetz noch für einige Minuten gefährliche Spannungen führen. Die Leitungsspannung kann beim Einschalten der Elektropumpe wechseln. Je nach der Präsenz anderer angeschlossener Geräte und der Qualität der Leitung selbst, kann die Leitungsspannung variieren. 2.3 Elektrische Anschlüsse für Hilfs-Ein/Ausgänge Die Pumpe verfügt über einen Verbinder für konfigurierbare Nutzer-Ein-/Ausgänge. -
Page 105: Bedienfeld
DEUTSCH Die Eingänge sind nicht optoisoliert. Für den Anschluss an den Verbinder der Ein- und Ausgänge ist ausschließlich dass Kabelkit zu verwenden. Die technischen Details des Verbinders und des Anschlusses sind im Kit enthalten. Achtung: Das Kabel für die Signale für Ein- und Ausgänge sorgfältig von den Leitungen für Leistung und Wechselstromversorgung (230V u.ä.) getrennt halten, damit Störungen und Interferenzen vermieden werden, die die Signale verfälschen könnten. -
Page 106: Hauptseite Des Displays (Homepage)
DEUTSCH 4. Weiße LED Kontrolllampe ( ), bleibend eingeschaltet, wenn die Karte unter Spannung steht; blinkend, wenn Spannung vorhanden, aber die Pumpe nicht freigegeben ist (siehe Taste „RUN/STOP“ weiter unten). 5. Grüne LED Kontrolllampe ( ), meldet Pumpe in Betrieb. 6. -
Page 107: Inbetriebsetzung
DEUTSCH Die Angaben sind in drei Gruppen aufgeteilt: 1. Die Statusleisten (oben) zeigen Informationen zu: Status (Betrieb, Stillstand) zusammen mit dem laufenden Befehl (SET1 – SET3, QC, Timer A-H, usw.), oder eventuell aktiven Meldungen Sperren (Warning Fault); im Beispiel der Abbildung: „System Running“ gibt an, dass das System aktiv ist, gesteuert von „TIMER A“. -
Page 108: Konfigurationsanleitung (Wizard)
DEUTSCH 4.2 Konfigurationsanleitung (WIZARD) Beim ersten Einschalten schlägt das Gerät die vereinfachte WIZARD Konfiguration vor, die den Nutzer bei einer einfachen und schnellen Einstellung der wichtigsten Parameter anleitet. Die Ausführung des WIZARD ist notwendig: Wenn der Ausgangsstatus des Systems der werkseitigen Konfiguration entspricht, wobei Sprache und Maßeinheit unter Umständen nicht mit denen des Anwenderlandes übereinstimmen, die Wochenuhr an einer zufälligen Uhrzeit beginnt und andere Parameter vielleicht nicht für das vorliegende System geeignet sein könnten. -
Page 109: Einschalten Und Einsatz Der Pumpe
DEUTSCH 5 EINSCHALTEN UND EINSATZ DER PUMPE 5.1 Betriebsmodus 5.1.1 Einstellmodi Die folgende Graphik zeigt die Kurven der hydraulischen Leistungen des Systems. Förderhöhe H 100% US GPM Fördermenge Q Abbildung 11 Der Inverter reguliert automatisch die Drehgeschwindigkeit der Elektropumpe, indem der Arbeitspunkt je nach Anforderung auf eine beliebige Stelle des zugrunde liegenden Bereichs der maximalen Kennlinie (100%) verschoben wird. -
Page 110: Schnellstart Und Anhalten Der Pumpe (Modus „Manuell")
DEUTSCH Einschalten und Ausschalten werden automatisch über Zeitgeber („Timer)“ gesteuert, die nach Wunsch auf Wochenbasis, oder von Signalen eines externen Steuergerätes („EXT“) programmierbar sind. Beim Verlassen des Werks ist diese Betriebsmodus deaktiviert. Um ihn zu aktivieren, müssen zunächst die entsprechenden Parameter konfiguriert (siehe 6.2.5 und 6.2.6), und dann die Taste „Auto“... -
Page 111: Schnelle Änderung Des Sollwerts Und Der Voreingestellten Parameter
DEUTSCH Das manuelle Ausschalten der Pumpe ist sehr einfach: es genügt, bei laufender Pumpe: die Taste „RUN/STOP“ zu drücken, die Pumpe hält in jedem Fall an (*), wenn alle aktiven Betriebsmodi abgebrochen werden (auch der eventuell im Hintergrund aktive Modus „Auto“ wird deaktiviert); geht die grüne LED für Betrieb aus. -
Page 112: Selektion Der Bevorzugten Operativen Betriebsmodi (Menü)
DEUTSCH Auch bei aktivem Modus „Auto“ (LED „Auto“ eingeschaltet) wird mit Drücken einer Taste „SETx“ oder „QuickClean“ die Pumpe umgehend mit dem dieser Taste zugeordneten Sollwert und Dauer gestartet. Die Pumpe tritt so in den Modus „Manuell“ ein, die den Vorrang vor dem Modus „Auto“ hat. Der Modus „Auto“... -
Page 113: Zugriff Auf Ein Untermenü
DEUTSCH Abbildung 13 Nun hebt das blinkende Kästchen (hier gestrichelt) den nächsten Eintrag hervor; der Cursor an der vertikalen Leiste am linken Rand ist etwas tiefer und zeigt so an, dass man sich weiter unten in der Liste der Menü-Einträge befindet. Durch Drücken der Pfeiltaste nach oben wird zum oberen Menüpunkt zurückgekehrt. - Page 114 DEUTSCH Position im Baum-Menü (Zweig 1, Eintrag 3) Blinkende Selektion Abbildung 16 3. Durch Drücken auf „ENTER“ [ ] wird die Änderung der selektierten Zeile geöffnet: Feste Zeilenbox, nur die zu verändernden Ziffern blinken Abbildung 17 4. Die Ziffern der Stunden blinken und können mit den Tasten Pfeil nach oben und Pfeil nach unten beliebig verändert werden: Abbildung 18 5.
- Page 115 DEUTSCH 7. Nachdem der neue Wert eingestellt ist (12:34 in unserem Beispiel), wird er mit „OK“ [ ] bestätigt und die Eingabe von Stunden und Minuten wird verlassen, wie in der folgenden Abbildung gezeigt. (Sollen hingegen die durchgeführten Änderungen nicht bestätigt werden, kann mit „ESC“ [ ] zur Abbildung des Punkts 1 zurückgekehrt werden) Abbildung 21...
-
Page 116: Menü-Struktur
DEUTSCH Menü-Struktur Dies ist die komplette Baumstruktur des Menüs. Hauptmenü Einstellungen Menü Einstellungen Installationsassistent Installationsassistent W1 /1 1 … W1 1 /1 1 1‐2 Sprache Sprachauswahl 1‐3 Datum und Uhrzeit Zeiteinstellung 1‐4 Maßeinheit Einstellung Maßeinheiten 1‐5 Ruhezeit Einstellung der Ruhezeit 1‐6 Display Displayeinstellungen 1‐7 Passwort Passwort erstellen / zurücksetzen Sollwert 1‐4 Sollwert 1‐4 Einstellungen Sollwert 5‐8... -
Page 117: Settings (Menü Der Einstellungen)
DEUTSCH Die Zahlen rechts in den Kästchen sind die Nummerierung von Zweig und Eintrag der verschiedenen Menüteile und sind am Display sichtbar (wo sie einen schnellen Bezug auf die derzeit eingenommene Position liefern). Die folgenden Absätze beschreiben jeden Menü-Eintrag im Detail. 6.2.1 Settings (Menü... -
Page 118: Pump Limits (Grenzwerte Der Pumpe)
DEUTSCH 6.2.1.5 Pump Limits (Grenzwerte der Pumpe) Abbildung 24 Wenn das Rohrsystem oder andere Einbauteile nicht in der Lage ist, sehr hohen Drücken oder Flüsse standzuhalten, können an der Pumpensteuerung max. Begrenzungen eingegeben werden. Die einstellbaren oberen Grenzen sind: ‐ Förderhöhe H : zwischen 5 m und 16 m, oder ohne Begrenzung (MAX), ‐... -
Page 119: Sollwerte 1-4
DEUTSCH ‐ Wird als Passwort ein anderer Wert als 0 eingegeben und mit „OK“, bestätigt, wird der angezeigte Wert „XXXX“ (verborgen) sichtbar und das Sicherheitssystem wird aktiviert. Auf der Homepage erscheint das Symbol „verriegeltes Vorhängeschloss“ (Absatz 3.2). Bei aktivem Sicherheitssystem ist der Zugriff auf alle Tasten gesperrt, ausgenommen: ‐... -
Page 120: Sollwerte 5-8
DEUTSCH Die Werkseinstellungen finden sich im Kapitel 8. 6.2.3 Sollwerte 5-8 Dieser Menü-Eintrag ermöglicht die Visualisierung und Änderung der den Sollwerten 5 bis 8 zugeordneten Parameter. Abbildung 28 Die Sollwerte von 5 bis 8 können nicht über die Tastatur abgerufen werden, sondern werden ausschließlich vom System der TIMERS aktiviert und deaktiviert (Absatz 6.2.5). -
Page 121: Timer Settings (Einstellung Der Timer)
DEUTSCH Von diesem Untermenü aus sind möglich: ‐ die Einstellung der Timer, ‐ die Visualisierung der aktuell aktiven Programmierung. Bei Verlassen des Werks sind die Timer deaktiviert und nicht programmiert. 6.2.5.1 Timer Settings (Einstellung der Timer) Die Programmierung der Timer erfolgt tabellarisiert: am Display erscheint eine Tabelle, die die Daten der Aktivierung von jedem der acht Timer A –... -
Page 122: External Control (Externe Kontrolle)
DEUTSCH 6.2.6 External Control (Externe Kontrolle) Die Kontrolle der Pumpe kann über ein externes Steuergerät oder einen PC erfolgen. Für die Verwendung dieses Modus siehe auch die Abs. 5.1.2 und 5.4. Die Eingabe dieser Funktion erfolgt über dieses Untermenü, das separate Einträge für Ein- und Ausgänge vorsieht. Abbildung 33 Beim Verlassen des Werks ist diese Funktionalität nicht aktiviert und nicht konfiguriert. -
Page 123: Priming (Vorfüllen Der Pumpe)
DEUTSCH 6.2.7 Priming (Vorfüllen der Pumpe) Bei jedem Anlaufen der Pumpe führt das System die Prozedur für das Befüllen oder „Priming“ durch (sofern freigegeben). Das Priming besteht aus zwei Phasen: ‐ Nach abgeschlossenem Startup der Pumpe (wie unter Abs. 5.2 beschrieben), wird der Fluss geprüft; ist dieser regulär, ist das Priming bereits abgeschlossen und es wird zur Bedingung des aktiven Sollwerts übergegangen. -
Page 124: Antilock (Schutz Gegen Die Mechanische Blockade Der Pumpe)
DEUTSCH Das Auslösen der Funktion Antifreeze versetzt die Pumpe in Drehung und in Status für STOP (weiße blinkend), und beeinflusst nicht den aktiven Modus (manuell oder automatisch). Wenn nicht erwünscht ist, dass der Frostschutz Antifreeze ausgelöst wird und den Motor anlaufen lässt, muss diese Funktion deaktiviert werden. -
Page 125: Sicherheitssysteme - Blockaden (Fault)
DEUTSCH Abbildung 39 Die Fehler sind in chronologischer Ordnung angezeigt, beginnen mit dem zuletzt aufgetretenen Fehler und reichen bis zu weit zurückliegenden Fehlern. Die Liste kann mit den Pfeiltasten nach oben und Pfeiltasten nach unten durchblättert werden. Die Höchstzahl an gespeicherten und visualisierbaren Fehlern ist 16; ist diese Zahl erreicht, werden die ältesten Fehler überschrieben. -
Page 126: Visualisierung Der Blockade-Historie
DEUTSCH Im Besonderen für: ‐ Trockenlauf ‐ Pumpe saugt nicht an nach einigen Minuten erfolgt ein neuer Versuch, der zyklisch wiederholt wird. Wenn ein Versuch während der Reset-Sequenz erfolgreich sein sollte, wird die Sequenz abgebrochen, die rote LED Kontrolllampe ( ) verlöscht und es wird zur normalen Funktion zurückgekehrt. -
Page 127: Wiederherstellung Der Werkseinstellungen
DEUTSCH SET6 Sollwert Q m3/h Sollwert % SET7 Sollwert Q m3/h Sollwert % SET8 Sollwert Q m3/h 110 GPM Sollwert % 100% Quick Clean Sollwert 100% Dauer Priming Funktion aktiviert (Vorfüllen) Max Priming Speed 100% Max Priming Time Anti-Freeze Funktion aktiviert Geschwindigkeit Temperatur... -
Page 128: Wartung
DEUTSCH Niedrige Fördermenge: Niederdruck im Filter. Korb oder Laufrad abgedichtet. Lufteintritt an der Saugleitung. Der Motor dreht in die entgegengesetzte Richtung. Niedrige Fördermenge: Hochdruck im Filter. Engpass der Druckleitung. Kabelquerschnitt ungeeignet. Pumpenfilter verstopft. 10 WARTUNG Vor jeglichem Eingriff am System muss zunächst die Stromversorgung abgehängt werden. Das System erfordert keine ordentlichen Wartung. - Page 129 ESPAÑOL ÍNDICE LEYENDA ..............................128 ADVERTENCIAS IMPORTANTES Y RECOMENDACIONES PARA LA SEGURIDAD ......128 RESPONSABILIDAD ............................ 131 GENERALIDADES ..........................131 Descripción ............................ 131 Características técnicas ....................... 132 INSTALACIÓN ............................132 ...
-
Page 130: Leyenda
Notas y observaciones importantes. ADVERTENCIAS IMPORTANTES Y RECOMENDACIONES PARA LA SEGURIDAD Este manual se refiere al producto DAB E.SWIM / E.PRO. FACTORES GENERALES DE RIESGO Antes de proceder a la instalación, lea atentamente este manual, que contiene información importante sobre el uso del producto. - Page 131 ESPAÑOL ‐ Proteja la bomba de la intemperie. ‐ En caso de largos períodos de inactividad o de helada, retire todos los tapones y vacíe completamente el cuerpo de la bomba. ¡Conserve los tapones! ‐ En caso de uso como bomba al aire libre, prevea una protección adecuada y monte la bomba sobre una base aislante de al menos 100 mm de altura.
- Page 132 ESPAÑOL Advertencias particulares para los Estados Unidos de América (EE. UU.): ADVERTENCIAS DE SEGURIDAD: Peligro de atrapamiento por aspiración. Puede provocar lesiones graves o la muerte. Para reducir el riesgo de atrapamiento, es necesario instalar la bomba conforme a los códigos federales, nacionales y locales más recientes en materia de piscinas y conectarla a al menos dos tomas de aspiración en funcionamiento por bomba, o instalarla según el último estándar APSP-7.
-
Page 133: Responsabilidad
ESPAÑOL Utilícese únicamente para instalaciones fijas de piscinas y estanques. No la use para instalaciones temporales desmontables (en las cuales las paredes de contención del agua se desinflen o desmonten en el período invernal). RESPONSABILIDAD El fabricante no responde del buen funcionamiento de las electrobombas o de posibles daños provocados por estas cuando sean manipuladas, modificadas y/o hayan funcionado fuera del campo de trabajo aconsejado o en contradicción con otras disposiciones de este manual. -
Page 134: Características Técnicas
ESPAÑOL 1- Tapa del panel del usuario 2- Panel del usuario 3- Código QR 4- Guía rápida 5- Tapa de la regleta de bornes 6- Conector externo 7- Entrada del cable de alimentación Ilustración 2 1.2 Características técnicas Las características técnicas se resumen en la tabla siguiente. E-SWIM Tema Parámetro... -
Page 135: Conexión Eléctrica A La Línea De Alimentación
ESPAÑOL Evite que el motor se encuentre sumergido en el agua. Para las conexiones bomba-instalación, utilice solo sustancias adhesivas adaptadas a materiales plásticos. Sujete adecuadamente las tuberías de aspiración y salida a fin de que no pesen sobre la bomba. ... -
Page 136: Conexiones Eléctricas Para Entradas Y Salidas Auxiliares
ESPAÑOL La tensión de línea puede cambiar al encender la electrobomba. La tensión en la línea puede sufrir variaciones en función de otros dispositivos conectados a esta y de la calidad de la propia línea. 2.3 Conexiones eléctricas para entradas y salidas auxiliares La bomba dispone de un conector para entradas y salidas de usuarios configurables. -
Page 137: El Panel Operador
ESPAÑOL Para conectarse al conector de las entradas y salidas, utilice únicamente el kit cable. Los detalles técnicos del conector y de la conexión se incluyen en el kit. Atención: mantenga bien separado el cable para las señales de entrada y salida de las líneas de potencia y de alimentación alterna (230 V y similares), a fin de limitar las perturbaciones e interferencias que pueden alterar las señales. -
Page 138: Página Principal De La Pantalla (Homepage)
ESPAÑOL 6. (Cuatro) teclas «SET 1-4» de accionamiento manual del encendido, para seleccionar (o deseleccionar) directamente un caudal o velocidad preconfigurados (setpoint). La tabla del capítulo 8 muestra los valores de fábrica de los puntos de ajuste asociados a las teclas de «SET1»... -
Page 139: Puesta En Funcionamiento
ESPAÑOL 2. Los valores instantáneos de las magnitudes eléctricas e hidráulicas se recogen en el espacio situado en el centro del visor y se actualizan continuamente durante el funcionamiento. La barra de acceso rápido (abajo): contiene fecha y hora junto a algunos iconos; se navega por estos elementos con las teclas flecha derecha y flecha izquierda, y se desplaza la selección (destacada en el recuadro), luego... -
Page 140: Encendido Y Uso De La Bomba
ESPAÑOL Si luego es necesario revisar rápidamente todos estos parámetros, se puede abrir de nuevo el WIZARD mediante la opción correspondiente del menú (apartados 6.2 y 6.2.1.1). El WIZARD presenta en sucesión las siguientes páginas: 1. Selección del Idioma (véase también el apart. 6.2.1.2). 2. -
Page 141: Modos De Accionamiento
ESPAÑOL Altura de elevación H 100% US GPM Caudal Q Ilustración 11 El inversor regula automáticamente la velocidad de rotación de la electrobomba, desplazando el punto de trabajo, según las necesidades, a una parte cualquiera del área encerrada en la curva máxima (100 %). La regulación del bombeo puede realizarse en modalidad por control de caudal o en modalidad por curva fija. -
Page 142: Arranque Rápido Y Detención De La Bomba (Modo "Manual")
ESPAÑOL El modo «Manual» y el modo «Auto» pueden utilizarse también simultáneamente; en ese caso, como se describirá mejor a continuación, el automatismo («Auto») permanece activo de fondo, pero si es necesario puede ser desbancado temporalmente por un mando manual, que tiene preferencia. 5.2 Arranque rápido y detención de la bomba (modo «Manual») La bomba sale de la fábrica y se entrega con el Priming activado: si no se modifica la programación del Priming (véase el apartado 6.2.7), en el primer encendido la bomba puede ponerse en marcha a la... -
Page 143: Modificación Rápida Del Punto De Ajuste Y De Los Parámetros Predeterminados
ESPAÑOL Tras un apagado accidental (black out) durante el funcionamiento en modalidad Manual, el sistema no reanuda la marcha a menos que la tecla SETx que estaba encendida tuviese la duración «para siempre» («ENDLESS»). En este caso el sistema reanuda la marcha con el mismo punto de ajuste anterior. -
Page 144: Selección De Las Modalidades Operativas Preferidas (Menú)
ESPAÑOL Pulsando nuevamente «RUN/STOP», el sistema se reactiva y todo retoma el funcionamiento como antes. El LED blanco se enciende ahora en modo fijo. (*) Únicas excepciones: las funciones Antifreeze (de protección frente a la helada) y Antilock (de antibloqueo) arrancan la bomba aunque el sistema esté... -
Page 145: Acceso A Un Submenú
ESPAÑOL 6.1.2. Acceso a un submenú Accediendo a algunas opciones del menú se puede abrir un menú añadido, o submenú. Esto sucede, por ejemplo, en la página inicial del menú, vista superior: Ilustración 14 Entrando (con «ENTER» [ ]) en la opción «Settings» (Ajustes), se accede al relativo «Menu- Settings»: Título Posición en la arborescencia de los menús (rama 1) - Page 146 ESPAÑOL 3. Las cifras de las horas parpadean y se modifican al gusto con las teclas flecha arriba y flecha abajo: Ilustración 18 4. Una vez alcanzado el valor deseado, nos desplazamos a los minutos con la tecla flecha derecha: Ilustración 19 5.
-
Page 147: Estructura Del Menú
ESPAÑOL Estructura del menú Esta es la estructura (arborescente) completa del menú. (Main)MENU Menu ‐ Settings Settings Wizard WIZARD W1/11 … W11/11 1‐2 Languages Language select 1‐3 Day & Time Time set 1‐4 Unit of Measure Unit select 1‐5 Pump Limits Limit set 1‐6 Screen Preferences 1‐7 Password PW set/reset Set Points 1‐4 SP1‐4 settings Set Points 5‐8 SP5‐8 settings Quick Clean Quick Clean set... -
Page 148: Settings (Menú Ajustes)
ESPAÑOL Los números, presentes a la derecha de las diferentes casillas, representan la numeración de rama y opción de las diferentes partes del menú y se muestran en la pantalla (facilitando una referencia rápida sobre la posición en la que nos encontramos). -
Page 149: Pump Limits (Límites De La Bomba)
ESPAÑOL Las unidades de medida del caudal son «m /h» (metros cúbicos por hora) o «GPM» (galones EE. UU. por minuto). La configuración de fábrica se recoge en el capítulo 8. 6.2.1.5 Pump Limits (Límites de la bomba) Ilustración 24 Si la instalación no está... -
Page 150: Puntos De Ajuste 1-4
ESPAÑOL ‐ Ajustando en el menú contraseña un valor diferente de cero, y confirmándolo con «OK», el valor visualizado pasa a «XXXX» (oculto) y se activa el sistema de protección. En la página de inicio aparece el símbolo «candado cerrado» (apartado 3.2). Con la protección activa, está... -
Page 151: Puntos De Ajuste 5-8
ESPAÑOL El valor de duración indica el tiempo durante el cual el punto de ajuste permanece activo, tras el cual termina. Si se desea que el punto de ajuste permanezca activo sin interrumpirse, hay que programar la duración como «para siempre» («ENDLESS»). Los valores de fábrica se indican en el capítulo 8. -
Page 152: Timer Settings (Ajuste De Los Temporizadores)
ESPAÑOL Ilustración 30 Desde este menú: ‐ Se configuran los temporizadores. ‐ Se visualiza la programación actualmente activa. A la salida de fábrica los temporizadores están desactivados y no programados. 6.2.5.1 Timer Settings (Ajuste de los temporizadores) La programación de los temporizadores se realiza de forma «tabular»: en la pantalla aparece una tabla que muestra los datos de activación de cada uno de los ocho Temporizadores A - H. -
Page 153: External Control (Control Externo)
ESPAÑOL Ilustración 32 6.2.6 External Control (Control externo) El control de la máquina puede realizarse desde una centralita externa o desde un PC. En lo referente al uso de esta modalidad, véanse también los apartados 5.1.2. y 5.4. La configuración de esta función se realiza mediante este submenú, que prevé opciones separadas para entradas y salidas. -
Page 154: Priming (Cebado De La Bomba)
ESPAÑOL La configuración se realiza desde esta página de menú. Ilustración 35 6.2.7 Priming (Cebado de la bomba) Cada vez que se arranca la bomba el sistema realiza el procedimiento de cebado, o «Priming» (si está activado). El Priming consiste en dos fases: ‐... -
Page 155: Anti-Lock (Protección Contra El Bloqueo Mecánico De La Bomba)
ESPAÑOL ATENCIÓN: La protección Antifreeze solo funciona mientras el sistema recibe alimentación regularmente: con la alimentación eléctrica desconectada o si se produce un corte de corriente (también accidental, como a raíz de un apagón) la protección no puede funcionar. Por ello se aconseja no dejar el sistema cargado durante los períodos de inactividad invernal, sino que conviene vaciarlo bien. -
Page 156: Sistemas De Protección - Bloqueos (Fault)
ESPAÑOL Ilustración 39 Los fallos se visualizan en orden cronológico a partir del más reciente al más antiguo en el tiempo. La lista se recorre con las teclas flechas arriba y flecha abajo. El número máximo de fallos memorizados y visualizables es de 16; llegados a este número se empieza a sobrescribir los más antiguos. -
Page 157: Borrado Automático De Las Condiciones De Error
ESPAÑOL 7.2 Borrado automático de las condiciones de error Para algunos tipos de fallo se han previsto intentos de restablecimiento automático. En concreto para: ‐ Funcionamiento en seco ‐ Bomba no cebada Se realiza un nuevo intento tras unos minutos, el cual se repite cíclicamente. Si durante la secuencia de restablecimiento un intento llega a buen puerto, la secuencia se interrumpe, el LED testigo rojo ( ) se apaga y retoma el funcionamiento normal. -
Page 158: Restablecimiento De Los Ajustes De Fábrica
ESPAÑOL Puntos de Flow puntos 5-8 tipo de punto de ajuste (caudal) SET5 punto de ajuste Q 20 GPM punto de ajuste % SET6 punto de ajuste Q 12 m 50 GPM punto de ajuste % SET7 punto de ajuste Q 18 m 80 GPM punto de ajuste %... -
Page 159: Mantenimiento
ESPAÑOL Bomba ruidosa: Entrada de aire en la tubería de aspiración. Presencia de objetos extraños en el cuerpo de la bomba. Cavitación. Rodamiento de bolas dañado. Caudal reducido: baja presión en el filtro. Tamiz o rotor obstruido. Entrada de aire en la tubería de aspiración. El motor gira en la dirección opuesta. - Page 160 NEDERLANDS INHOUDSOPGAVE LEGENDA ..............................159 BELANGRIJKE WAARSCHUWINGEN EN AANBEVELINGEN VOOR DE VEILIGHEID ......159 VERANTWOORDELIJKHEID ........................162 ALGEMENE INFORMATIE ........................162 Beschrijving ........................... 162 Technische kenmerken ......................... 164 INSTALLATIE ............................164 ...
-
Page 161: Legenda
Belangrijke opmerkingen. BELANGRIJKE WAARSCHUWINGEN EN AANBEVELINGEN VOOR DE VEILIGHEID Deze handleiding heeft betrekking op het product DAB E.SWIM / E.PRO ALGEMENE RISICOFACTOREN Lees deze handleiding aandachtig door voordat u overgaat tot installatie van het product, want zij bevat belangrijke informatie over het gebruik ervan. - Page 162 NEDERLANDS MECHANISCHE VEILIGHEID LAAT DE POMP NOOIT WERKEN ZONDER WATER. Het water heeft ook een smerende, koelende en beschermende werking op de afdichtingen: droog bedrijf kan permanente schade aan de pomp veroorzaken en de garantie ongeldig maken. Vul het filter altijd voordat u de pomp laat starten. ‐...
- Page 163 NEDERLANDS SPECIFIEKE RISICO’S VAN ZWEMBADEN, BADEN EN DERGELIJKE Bijzondere waarschuwingen voor de Verenigde Staten van Amerika (VS): VEILIGHEIDSAANWIJZINGEN: Gevaar voor verstrikt raken door aanzuiging. Kan ernstig letsel of overlijden veroorzaken. Om het gevaar voor verstrikt raken te beperken, moet de pomp worden geïnstalleerd in overeenstemming met de meest recente federale, nationale en lokale voorschriften die gelden voor zwembaden en moet hij worden aangesloten op minstens twee functionerende aanzuiguitlaten per pomp, of anders worden geïnstalleerd in overeenstemming met de meest...
-
Page 164: Verantwoordelijkheid
NEDERLANDS Er moet dus goed op worden gelet dat regelmatig wordt gecontroleerd of de roosters op de aanzuigopeningen intact en schoon zijn. De roosters verslechteren in de loop der tijd door veroudering, contact met het water en blootstelling aan zonlicht en weersinvloeden: ze moeten regelmatig en zeer aandachtig worden gecontroleerd en iedereen moet uit het gebied worden verwijderd als er beschadiging wordt geconstateerd. - Page 165 NEDERLANDS Afbeelding 1 1- Deksel gebruikerspaneel 2- Gebruikerspaneel 3- QR-code 4- Beknopte handleiding 5- Deksel klemmenbord 6- Externe connector 7‐ Ingang voedingskabel Afbeelding 2...
-
Page 166: Technische Kenmerken
NEDERLANDS 1.2 Technische kenmerken De technische kenmerken zijn samengevat in de onderstaande tabel. Onderwerp Parameter E-SWIM ELEKTRISCHE VOEDING Spanning 220-240 V +/- 10% Frequentie 50/60 Hz Max. stroom 5.6 SFA Max. vermogen 1250 W BOUWKENMERKEN Afmetingen ruimtebeslag 574 x 310 x 316 mm / 22.6 x 12.2 x 12.4 in Leeg gewicht (exclusief de verpakking) 18 kg / 39 lb... -
Page 167: Elektrische Aansluiting Op De Voedingslijn
NEDERLANDS 2.2 Elektrische aansluiting op de voedingslijn Afbeelding 3 Om de immuniteit tegen mogelijk uitgestraald geluid naar andere apparaten te verbeteren, wordt geadviseerd een aparte elektriciteitsleiding te gebruiken voor de voeding van het product. verplicht altijd veiligheidsvoorschriften acht nemen! De elektrische installatie moet worden uitgevoerd door een ervaren, erkende elektricien, die alle verantwoordelijkheid hiervoor op zich neemt. - Page 168 NEDERLANDS Afbeelding 4 De uitgang wordt gevormd door een relais (potentiaalvrij contact) met de volgende technische kenmerken. Kenmerken van het uitgangscontact Type contact NO (normaal open) Max. getolereerde spanning [V] 24Vac / 24Vdc -> resistieve belasting Max. getolereerde stroom [A] 1 A->...
-
Page 169: Het Bedieningspaneel
NEDERLANDS Wanneer de connector op de pomp niet wordt gebruikt, moet hij goed afgesloten gehouden worden met een volledig vastgeschroefde dop. Alleen zo wordt de nodige bestendigheid tegen water en vocht gewaarborgd. 3 HET BEDIENINGSPANEEL 3.1 Toetsenbord en display Afbeelding 6 Beschrijving van de elementen: 1. -
Page 170: Hoofdpagina Van Het Display (Homepage)
NEDERLANDS 7. Activeringstoets van de modus “QuickClean”, voor een snelle reiniging of snelle recirculatie met hoog debiet. 8. Activeringstoets van de modus “Auto”, voor activering van de automatische pompbediening (met tijdklok (“Timers”) of bediening door externe signalen (“EXT”)). 9. Navigatie- en ingangstoetsen in de menu’s: ... -
Page 171: Inbedrijfstelling
NEDERLANDS Zodoende krijgt u eenvoudig en rechtstreeks toegang tot de meestgebruikte items, zonder door het menu te hoeven schuiven. Hieronder volgt de lijst van beschikbare items en de functies waartoe toegang mogelijk is: toegang tot het menu (zie hoofdstuk 6), “Configuratie”... -
Page 172: Inschakeling En Gebruik Van De Pomp
NEDERLANDS De WIZARD presenteert achtereenvolgens de volgende pagina’s: 1. Taalkeuze (zie ook par. 6.2.1.2). 2. Keuze tijdnotatie (24 uur of am/pm). 3. Instelling van de huidige tijd. 4. Instelling van de huidige datum. 5. Keuze van de meeteenheid van de opvoerhoogte. 6. -
Page 173: Bedieningswijzen
NEDERLANDS Opvoerhoogte H 100% US GPM Debiet Q Afbeelding 11 De inverter regelt de draaisnelheid van de elektropomp automatisch door het werkpunt naar behoeve naar een willekeurig gebied onder de maximale curve (100%) te verplaatsen. De regeling tijdens het pompen kan plaatsvinden in de modus met debietregeling of in de modus met vaste curve. ‐... -
Page 174: Snel Starten En Stoppen Van De Pomp ("Handbediening")
NEDERLANDS De modus “Handbediening” en de modus “Automatisch” kunnen ook tijdelijk worden gebruikt; in dat geval blijft de automatisering (“Auto”) actief op de achtergrond, zoals verderop uitgebreider wordt beschreven, maar kan zij indien nodig tijdelijk worden onderdrukt door handbediening, die voorrang heeft. -
Page 175: Snelle Wijziging Van Het Setpoint En De Al Ingestelde Parameters
NEDERLANDS (*) Enige uitzonderingen: de functies Antifreeze (voor vorstbescherming) en Antilock (tegen blokkering) starten de pomp ook als het systeem uitgeschakeld is (zie de paragrafen 6.2.8 en 6.2.9). Na een onopzettelijke uitschakeling (black-out) tijdens de werking met handbediening start het systeem niet opnieuw, tenzij de toets SETx die ingeschakeld was de duur “oneindig”... -
Page 176: Keuze Van De Voorkeursbedrijfswijzen (Menu)
NEDERLANDS Zo worden dus de modus “Auto” en ook de handbedieningsmodus (“SETx” of “QuickClean”) gestopt die eventueel actief is; de groene led van de werking gaat uit. De witte led begint te knipperen, wat aangeeft dat het systeem uitgeschakeld is. Door opnieuw op “RUN/STOP”... -
Page 177: Toegang Tot Een Submenu
NEDERLANDS De lijst van menu-items is cyclisch, d.w.z. vormt een kring: van het laatste item keert u weer terug naar het eerste met de toets pijl omlaag. En vanaf het eerste item gaat u naar het laatste met behulp van de toets pijl omhoog. De volledige menustructuur kunt u vinden in paragraaf 6.2. - Page 178 NEDERLANDS 2. Door op “ENTER” [ ] te drukken wordt het mogelijk de geselecteerde regel te openen: Vast kader, alleen de cijfers die gewijzigd worden knipperen Afbeelding 17 3. De cijfers van de uren knipperen en kunnen naar wens worden veranderd met de toetsen pijl omhoog en pijl omlaag: Afbeelding 18 4.
- Page 179 NEDERLANDS Afbeelding 21 Indien nodig kunt u naar een andere plaats op de pagina gaan (met de pijltoetsen omhoog en omlaag) om de andere waarden te veranderen (notatie en dag van de week), op dezelfde manier als totnogtoe is beschreven. Door op “ESC”...
-
Page 180: Menustructuur
NEDERLANDS Menustructuur Dit is de volledige (vertakte) menustructuur. (Main)MENU Menu ‐ Settings Settings Wizard WIZARD W1 /1 1 … W1 1 /1 1 1‐2 Languages Language select 1‐3 Day & Time Time set 1‐4 Unit of Measure Unit select 1‐5 Pump Limits Limit set 1‐6 Screen Preferences 1‐7 Password PW set/reset Set Points 1‐4 SP1‐4 settings Set Points 5‐8 SP5‐8 settings... -
Page 181: Settings (Menu Instellingen)
NEDERLANDS De cijfers rechts in de verschillende vakken geven het tak- en itemnummer van de verschillende menudelen aan en worden op het display getoond (en vormen zo een snelle verwijzing naar de positie waar u zich bevindt). In de volgende paragrafen wordt elk menu-item gedetailleerd beschreven. 6.2.1 Settings (Menu Instellingen) In het submenu “Settings”... -
Page 182: Pump Limits (Pomplimieten)
NEDERLANDS 6.2.1.5 Pump Limits (Pomplimieten) Afbeelding 24 Als de installatie niet in staat is om te hoge druk of stromingen te tolereren, kunnen er maximumlimieten worden ingesteld voor de pompbesturing. De volgende bovengrenzen kunnen worden ingesteld: ‐ Opvoerhoogte H : tussen 5 m en 16 m, of geen limiet (MAX), ‐... -
Page 183: Set Points 1-4
NEDERLANDS ‐ Door in het wachtwoordveld een andere waarde dan nul in te stellen, en deze met “OK” te bevestigen, wordt de weergegeven waarde “XXXX” (verborgen) en wordt het beveiligingssysteem geactiveerd. Op de homepage verschijnt het symbool “gesloten slot” (paragraaf 3.2). Als de beveiliging actief is, is de toegang tot alle toetsen geblokkeerd, behalve: ‐... -
Page 184: Set Points 5-8
NEDERLANDS De duur geeft de tijd aan gedurende welke het setpoint actief blijft, waarna hij eindigt; als u wenst dat het setpoint zonder onderbreking actief blijft, dient de duur te worden geprogrammeerd als “oneindig” (“ENDLESS”). De fabriekswaarden staan vermeld in hoofdstuk 8. 6.2.3 Set Points 5-8 Met dit menu-item kunnen de parameters die gekoppeld zijn aan de setpoints 5 tot en met 8 worden weergegeven en gewijzigd. -
Page 185: Timer Settings (Instelling Van De Timers)
NEDERLANDS Afbeelding 30 Vanuit dit submenu kunt u het volgende doen: ‐ de timers instellen, ‐ de programmering bekijken die momenteel actief is. Bij het verlaten van de fabriek zijn de timers uitgeschakeld en niet geprogrammeerd. 6.2.5.1 Timer Settings (Instelling van de timers) De programmering van de timers gebeurt in “tabelvorm”: op het display verschijnt een tabel die de activeringsgegevens van elk van de acht timers A –... -
Page 186: External Control (Externe Besturing)
NEDERLANDS Afbeelding 32 6.2.6 External Control (Externe besturing) De machine kan ook worden bestuurd door een externe besturingseenheid of een pc. Zie voor het gebruik van deze modus ook de paragrafen 5.1.2 en 5.4. Deze functie wordt ingesteld via dit submenu, dat aparte items bevat voor ingangen en uitgangen. Afbeelding 33 Bij het verlaten van de fabriek is deze functie uitgeschakeld en niet geconfigureerd. -
Page 187: Priming (Vooraanzuiging Van De Pomp)
NEDERLANDS Afbeelding 35 6.2.7 Priming (Vooraanzuiging van de pomp) Bij elke start van de pomp voert het systeem de vooraanzuigprocedure, “Priming” genoemd, uit (indien geactiveerd). De Priming bestaat uit twee fasen: ‐ Aan het einde van het opstarten van de pomp (zoals beschreven in par. 5.2), wordt de stroming nagegaan; als deze normaal is, is de priming al uitgevoerd en vindt overgang plaats naar de conditie van het actieve setpoint. -
Page 188: Anti-Lock (Beveiliging Tegen Mechanische Blokkering Van De Pomp)
NEDERLANDS LET OP: de Antifreeze-beveiliging functioneert alleen zolang het systeem regelmatig wordt gevoed: als de elektrische voeding is afgekoppeld of uitgevallen (ook ongewenst, bijvoorbeeld bij een black-out), kan de beveiliging niet functioneren. Daarom is het raadzaam het systeem niet gevuld te laten tijdens de inactieve winterperiode, maar het nauwkeurig te legen. -
Page 189: Beveiligingssysteem - Blokkeringen (Fault)
NEDERLANDS Als u daarentegen op “ENTER” drukt op het eerste item, krijgt u toegang tot de lijst van opgeslagen storingen, waardoor u kunt scrollen met de pijltoetsen (niet aangegeven op het display). Afbeelding 39 De storingen worden in chronologische volgorde weergegeven, met de meest recente storing bovenaan, tot aan de storing die het langst geleden heeft plaatsgevonden. -
Page 190: Handmatige Annulering Van De Foutcondities
NEDERLANDS 7.1 Handmatige annulering van de foutcondities In geblokkeerde toestand (fault), kan de gebruiker de momenteel actieve fout annuleren en een nieuwe poging forceren door de toets “Reset” in te drukken en los te laten. Als de actie succes heeft, gaat de rode indicatieled ( ) uit en keert het systeem terug naar de normale werking. -
Page 191: Herstel Van De Fabrieksinstellingen
NEDERLANDS SET3 setpoint Q 18 m3/h 80 GPM setpoint % duur ENDLESS SET4 setpoint Q 25 m3/h 110 GPM setpoint % 100% duur ENDLESS Set Points 5-8 type setpoint Flow (debiet) SET5 setpoint Q 5 m3/h 20 GPM setpoint % SET6 setpoint Q 12 m3/h... -
Page 192: Onderhoud
NEDERLANDS De motor functioneert niet: De elektrische voeding of de stroomschakelaar zijn uitgeschakeld. Elektrische verbindingen van de motor defect. De rotor is geblokkeerd door vreemde voorwerpen, de as draait niet. Pomp maakt lawaai: Er komt lucht in de aanzuigleiding. Vreemde voorwerpen in het pomphuis. - Page 193 ČESKY OBSAH VYSVĚTLIVKY .............................. 192 DŮLEŽITÁ UPOZORNĚNÍ A BEZPEČNOSTNÍ POKYNY ................192 ODPOVĚDNOST ............................195 CELKOVÝ POPIS ........................... 195 Popis ............................... 195 Technické vlastnosti ........................196 INSTALACE ............................196 ...
-
Page 194: Vysvětlivky
Nebezpečí poranění elektrickým proudem. Nedodržením uvedených pokynů se zvyšuje riziko zranění. Poznámky a důležité informace. DŮLEŽITÁ UPOZORNĚNÍ A BEZPEČNOSTNÍ POKYNY Tento návod popisuje výrobek DAB E.SWIM / E.PRO. VŠEOBECNÉ RIZIKOVÉ FAKTORY Než přistoupíte k montáži, přečtěte si pozorně tento návod, neboť obsahuje důležité informace pro použití... - Page 195 ČESKY uschovejte ! Pro použití čerpadla venku je třeba zabezpečit jeho krytí a usadit jej na izolovanou základovou desku s ‐ výškou alespoň 100 mm od země. Čerpadlo se skladuje ve vnitřních prostorách a v suchu se stálou vlhkostí vzduchu. ‐...
- Page 196 ČESKY Zvláštní upozornění pro Spojené státy americké (U.S.A.): BEZPEČNOSTNÍ UPOZORNĚNÍ: Nebezpečí vtažení nebo zachycení z důvodu podtlaku. Může způsobit těžká zranění nebo smrt. Aby se zamezilo tomuto riziku zachycení, je třeba při instalaci čerpadla respektovat státní a místní předpisy určené pro stavbu bazénů a spa a napojit zařízení alespoň na dvě funkční sací přípojky nebo postupovat podle aktuální...
-
Page 197: Odpovědnost
ČESKY ODPOVĚDNOST Výrobce nezodpovídá za správnou činnost čerpadla a případné škody čerpadlem způsobené, pokud došlo k jeho svévolnému poškození, pokud byly provedené na čerpadle změny a/nebo pokud čerpadlo pracovalo v pracovních podmínkách odlišných od doporučených nebo v protikladu s obsahem tohoto návodu. Výrobce se kromě... -
Page 198: Technické Vlastnosti
ČESKY 1- Kryt tlačítkového panelu 2- Tlačítkový panel 3- QR code 4- Quick guide 5- Kryt svorkovnice 6- Vnější přípojka 7‐ Přívodní kabel Obrázek 2 1.2 Technické vlastnosti Technické vlastnosti shrnuje tato tabulka. Obecně Parametr E-SWIM ELEKTRICKÁ Napětí 220-240 V +/- 10% ENERGIE Kmitočet 50/60 Hz... -
Page 199: Hydraulická Připojení
ČESKY 2.1 Hydraulická připojení Věnujte pozornost těmto doporučením: Montujte čerpadlo horizontálně, na plochou a pevnou základovou desku a to co nejblíže k okraji bazénu. Čerpadlo dokáže překonat maximální výškový rozdíl 4 m (se zpětným ventilem). Filtr i čerpadlo musí být umístěné na chráněném a dobře větraném místě. ... -
Page 200: Elektrická Připojení Pomocných Vstupů A Výstupů
ČESKY Po vypojení z elektrické sítě může zůstat na svorkách po několik minut nebezpečné napětí i pokud je motor v klidu. Při spuštění čerpadla může napětí v síti kolísat. Napětí může kolísat v závislosti na další připojených zařízeních a kvalitě samotné sítě. 2.3 Elektrická... -
Page 201: Ovládací Panel
ČESKY Vstupy nejsou opto-izolované. Pro připojení ke vstupu a výstupu používejte výhradně soupravu vodiče. I podrobné technické informace o kontaktu a připojení jsou součástí soupravy. Upozornění: mějte na paměti, že vodič na vstupní a výstupní signály musí být fyzicky oddělený od elektrického kabelu a přívodního kabelu střídavého napětí... -
Page 202: Hlavní Stránka Displeje (Homepage)
ČESKY 3. Kontrolka LED červená ( ), signalizuje alarm u chyby (fault). 4. Kontrolka LED bílá ( ), pokud trvale svítí, signalizuje kartu pod elektrickým napětím; pokud bliká, signalizuje , že na čerpadlo přichází napětí, ale čerpadlo nebylo aktivované (viz tlačítko “RUN/STOP” dále v textu). ), signalizuje čerpadlo v chodu. -
Page 203: Uvedení Do Provozu
ČESKY Údaje se dělí na tři skupiny: 1. Hodnoty stavu (nahoře), uvádí informace o: stavu (chod, stop) spolu s probíhajícím povelem (SET1 – SET3, QC, Timer A-H, atd.), nebo výstrahy a chyby (Warning a Fault), které právě probíhají; příklad na obrázku: “System Running” označuje, že systém je zapnutý a řídí jej “TIMER A”. hodnota aktivního setpointu (“SP”) a předpokládáný... -
Page 204: Naváděná Konfigurace (Wizard)
ČESKY 4.2 Naváděná konfigurace (WIZARD) Při prvním spuštění zařízení do provozu systém nabídne usnadněnou konfiguraci WIZARD, při které navádí uživatele ke snadnému a rychlému nastavení nejdůležitějších parametrů. Provedení konfigurace WIZARD je nutné: systém je v původním továrním nastavení, kde jazyk a měrné jednotky mohou být odlišné... -
Page 205: Zapnutí A Použití Čerpadla
ČESKY 5 ZAPNUTÍ A POUŽITÍ ČERPADLA 5.1 Provozní režimy 5.1.1 Řízení provozu Následující grafické vyobrazení ukazuje orientační křivky hydraulického výkonu systému. Výtlačná výška H 100% US GPM Průtok Q Obrázek 11 Měnič řídí automaticky rychlost rotace čerpadla, přičemž v závislosti na potřebě přemístí pracovní bod do jakékoliv části plochy rozprostírající... -
Page 206: Rychlé Spuštění A Zastavení Čerpadla (Režim "Manuální")
ČESKY kontrolka LED v blízkosti stlačeného tlačítka se nasvítí (např. stištěním tlačítka “SET1” se nasvítí kontrolka LED nad tímto tlačítkem). Režim “Auto”: spuštění a vypnutí je ovládané automaticky prostřednictvím časovačů (“Timers”), u kterých lze naprogramovat dle potřeby týdenní rozvrh nebo na základě signálů, které přicházejí z externí centrální jednotky (“EXT”). ... -
Page 207: Rychlá Změna Setpointu A Přednastavených Parametrů
ČESKY Zastavit manuálně čerpadlo je velmi jednoduché, protože za chodu čerpadla stačí jednoduše: stisknout tlačítko “RUN/STOP”, čerpadlo se zastaví v každém případě (*) s tím, že přeruší všechny aktivní režimy (dojde k vypnutí také režimu “Auto”, , která označuje chod čerpadla. Bílá kontrolka LED případně... -
Page 208: Volba Preferovaného Provozního Režimu (Menu)
ČESKY Na vypnutí režimu “Auto”: stiskněte znovu tlačítko “Auto” (kontrolka LED vedle zhasne). Pokud máte potřebu zastavit manuálně čerpadlo v chodu, stačí: stisknout tlačítko“RUN/STOP”, čerpadlo se zastaví v každém případě (*), protože přeruší všechny zapnuté režimy. Dojde tak k zastavení režimu “Auto” a stejně tak i manuálního režimu (“SETx” nebo “QuickClean”) případně začne blikat, čímž... -
Page 209: Přístup Do Podřízeného Menu
ČESKY Následující obrázek ukazuje, jak se mění vyobrazení stránky při stištění tlačítka šipka dolu. Obrázek 13 Nyní rámeček bliká (zde vyšrafované) a zvýrazňuje následující položku vzhledem k předchozímu vyobrazení; na vertikální liště vlevo značka poklesla směrem dolů, čímž ukazuje, že jsme o něco níže vzhledem k rozsahu menu. Stištěním tlačítka šipka nahoru se vrátíme do situace zobrazené... - Page 210 ČESKY 1. Při navigaci v menu (viz tabulka v odst. 6.2) otevřeme tuto stránku: Pozice na stromu menu (větev 1, položka 3) Blikající volba Obrázek 16 ] se otevře změna zvoleného řádku: 2. Stištěním “ENTER” [ Fixní rámeček, blikají pouze čísla, která...
- Page 211 ČESKY ], čímž 6. Jakmile jste dokončili nové nastavení (12:34 náš příklad), musíte jej potvrdit stištěním “OK” [ opustíte nastavení hodin a minut, jak je patrné z obrázku. (Pokud ale chcete opustit provedené změny, stiskněte “ESC” [ ] a vrátíte se na obrázek bodu 1) Obrázek 21 Pokud je třeba provést změnu jiných hodnot (formátu a dne v týdnu) můžete se přesouvat uvnitř...
-
Page 212: Struktura Menu
ČESKY Struktura menu Kompletní schéma (strom) menu. (Main)MENU Menu ‐ Settings Settings WIZARD Wizard W1 /1 1 … W1 1 /1 1 1‐2 Languages Language select 1‐3 Day & Time Time set 1‐4 Unit of Measure Unit select 1‐5 Pump Limits Limit set 1‐6 Screen Preferences 1‐7 Password PW set/reset Set Points 1‐4 SP1‐4 settings Set Points 5‐8 SP5‐8 settings Quick Clean... -
Page 213: Settings (Nastavení Menu)
ČESKY Čísla uvedená vpravo uvnitř políčka odpovídají číslování větví a položek různých částí menu a zobrazují se na displeji (poskytují rychlou informaci o tom, na jaké pozici se nacházíte). Následují odstavce s podrobým popisem každé jednotlivé položky v menu. 6.2.1 Settings (Nastavení menu) Pod-menu “Settings”... -
Page 214: Pump Limits (Mezní Hodnoty Čerpadla)
ČESKY 6.2.1.5 Pump Limits (Mezní hodnoty čerpadla) Obrázek 24 Pokud zařízení není schopné snášet příliš vysoké tlaky nebo proudění, je možné zadat mezní hodnoty pro řízení čerpadla. Horní mezní hodnoty, které lze nastavit jsou: ‐ Výtlačná výška H : mezi 5 m a 16 m nebo bez omezení (MAX), ‐... -
Page 215: Set Points 1-4
ČESKY ‐ Nastavením hesla do příslušného políčka s jinou než nulovou hodnotou a potvrzením “OK”, se zobrazí “XXXX” (skryté) a dojde k aktivaci ochranného systému. Na homepage se zobrazí symbol “uzamčeného zámku” (odstavec 3.2). Se zapnutou ochranou systému je přístup zablokovaný vyjma tlačítek: čerpadlo. -
Page 216: Set Points 5-8
ČESKY 6.2.3 Set Points 5-8 Tato položka menu umožňuje zobrazit a změnit parametry přidružené se setpointy 5 až 8. Obrázek 28 Setpointy 5 až 8 nelze přivolat pomocí klávesnice, ale jejich aktivace a deaktivace probíhá pouze prostřednictvím systému časovačů TIMERS (odstavec 6.2.5). Na rozdíl od setpointů 1-4 nemají přidružené trvání, protože dobu aktivace rozhodují... -
Page 217: Timer Settings (Nastavení Časovačů)
ČESKY Toto menu lze využít na: nastavení časovačů, ‐ ‐ zobrazení aktuálního naprogramování. V továrním nastavení jsou časovače deaktivované a nejsou naprogramované. 6.2.5.1 Timer Settings (Nastavení časovačů) Programování časovačů se provádí pomocí tabulky: na displeji se zobrazí tabulka, která ukazuje aktivaci každého z osmi časovačů... -
Page 218: External Control (Externí Řízení)
ČESKY 6.2.6 External Control (Externí řízení) Systém čerpadla lze řídit prostřednictvím externí centrální jednotky nebo z počítače. Použití toho režimu je popsané v odstavcích 5.1.2 a 5.4. Nastavení tohoto způsobu řízení se provádí z následujícího menu, kam je třeba vložit vstupní a výstupní položky odděleně. -
Page 219: Priming (Nasávání Čerpadla)
ČESKY 6.2.7 Priming (Nasávání čerpadla) Při každém spuštění čerpadla dojde k proceduře nasávání nebo “Priming” (pokud je aktivní). Priming probíhá ve dvou fázích: Na konci procedury startup čerpadla (jak popsáno v odst. 5.2) dojde k ověření toku; pokud je pravidelný, Priming ‐... -
Page 220: Anti-Lock (Ochrana Proti Mechanickému Zablokování Čerpadla)
ČESKY Obrázek 37 Položka “Antifreeze” z menu umožňuje: ‐ aktivovat nebo deaktivovat funkce (tovární nastavení: aktivace); volit rychlost rotace u čerpadla v průběhu činnosti Antifreeze: v rozmezí 20% - 100% ; ‐ ‐ zvolit teplotu spouštění Antifreeze v rozmezí 4°C - 10°C (40°F - 50°F). Tovární... -
Page 221: Ochranné Systémy - Chyby (Fault)
ČESKY 7 OCHRANNÉ SYSTÉMY - CHYBY (FAULT) Zařízení je vybavené ochranými systémy, jejichž účelem je chránit čerpadlo, motor, přívodní napájení a měnič. Jestliže zasáhne jedna nebo více ochrana, na displeji se nicméně objeví ta, která má vyšší prioritu. Chyby (nebo fault) způsobují vypnutí motoru a nasvícení červené kontrolky LED ( U některých typů... -
Page 222: Tovární Nastavení
ČESKY 8 TOVÁRNÍ NASTAVENÍ Systém opouští výrobní závod s celou řadou již předem nastavených parametrů, které lze měnit na základě potřeb systému a uživatele. Každá změna nastavení se automaticky ukládá do paměti systému. Tovární nastavení (neboli default) jsou shrnuty v následující tabulce. V sloupci “MEMO” si můžete poznamenat změněné... -
Page 223: Reset Továrního Nastavení
ČESKY Priming funkce aktivní (Nasávání) 100% Max Priming Speed Max Priming Time 10 min Anti-Freeze funkce aktivní rychlost teplota 4 °C 40 °F Anti-Lock funkce aktivní (*)Tovární nastavení na některých trzích Tabulka 6 – Tovární nastavení (default) 8.1 Reset továrního nastavení K obnovení... -
Page 224: Údržba
ČESKY 10 ÚDRŽBA Dříve než začnete jakýkoliv zákrok na systému čerpadla, musíte odpojit přívod elektrické energie. Tento systém nevyžaduje žádné zákroky běžné údržby. Doporučuje se periodicky kontrolovat a čistit filtr čerpadla. Kvalifikovaný personál byl měl provést mimořádnou údržbu alespoň jednou za rok. 11 LIKVIDACE Tento výrobek a jeho části se likvidují... - Page 225 PORTUGUÊS ÍNDICE LEGENDA ..............................224 ADVERTÊNCIAS IMPORTANTES E RECOMENDAÇÕES PARA A SEGURANÇA ........224 RESPONSABILIDADES ..........................227 CARACTERíSTICAS GERAIS ....................... 227 Descrição ............................227 Características técnicas ....................... 228 INSTALAÇÃO ............................228 ...
-
Page 226: Legenda
Anotações e observações importantes. ADVERTÊNCIAS IMPORTANTES E RECOMENDAÇÕES PARA A SEGURANÇA Este manual diz respeito ao produto DAB E.SWIM / E.PRO. FACTORES GERAIS DE PERIGO Antes de proceder à instalação, ler com atenção este manual, que contém informações importantes para a utilização do produto. - Page 227 PORTUGUÊS SEGURANÇA MECÂNICA NUNCA MANDAR FUNCIONAR A BOMBA SEM ÁGUA. A água também tem funções de lubrificação, arrefecimento e protecção das vedações: o arranque em água pode causar danos permanentes na bomba e anula a garantia. Encher sempre o filtro antes de pôr em funcionamento a bomba. ‐...
- Page 228 PORTUGUÊS PERIGOS ESPECÍFICOS DE PISCINAS, TANQUES E PARECIDOS Advertências especiais para os Estados Unidos da América (E.U.A.): ADVERTÊNCIAS DE SEGURANÇA: Perigo de ficar preso por aspiração. Pode causar lesões graves ou morte. Para reduzir o risco de ficar presos, é necessários instalar a bomba de maneira conforme com os mais recentes códigos federais, nacionais e locais para as piscinas, e ligá-la a pelo menos duas tomadas de aspiração funcionantes por bomba, ou instalá-la de acordo com o último padrão APSP-7.
-
Page 229: Responsabilidades
PORTUGUÊS Pressões perigosas Durante uma qualquer intervenção na instalação, o ar pode entrar e ser posto em pressão. O ar comprimido pode causar a abertura repentina da tampa e provocar danos, lesões e até a morte. NÃO DESBLOQUEAR OU INTERVIR NA TAMPA ATÉ A BOMBA ESTIVER EM PRESSÃO. Utilizar unicamente para instalações fixas de piscinas e tanques. -
Page 230: Características Técnicas
PORTUGUÊS 1- Tampa painel utilizador 2- Painel utilizador 3- QR code 4- Quick guide 5- Tampa régua de bornes 6- Conector externo 7‐ Entrada cabo alimentação Figura 2 1.2 Características técnicas As características técnicas estão resumidas na tabela que segue. Assunto Parâmetro E-SWIM... -
Page 231: Ligações Hidráulicas
PORTUGUÊS 2.1 Ligações hidráulicas Cumprir com atenção as recomendações seguintes: Instalar a bomba em horizontal, sobre uma base plana e forte e o mais próxima possível do bordo do tanque. A bomba pode ultrapassar um desnível máximo de 4 m (com válvula anti-retorno). ... -
Page 232: Ligações Eléctricas Para Entradas E Saídas Auxiliares
PORTUGUÊS Os grampos de rede podem ter tensão perigosa também com o motor parado e durante alguns minutos após a desconexão da rede eléctrica. A tensão de linha pode mudar ao arranque da electrobomba. A tensão na linha pode sofrer variações em função de outros dispositivos que lhe estão ligados e da qualidade da própria linha. -
Page 233: Painel Do Operador
PORTUGUÊS As entradas não são opto-isoladas. Para ligar-se ao conector de entradas e saídas, utilizar exclusivamente o kit cabo. Os detalhes técnicos do conector e da conexão estão incluídos no kit. Atenção: manter bem separado o cabo para os sinais de entrada e saída das linhas de potência e de alimentação alternada (230V e parecidos), de forma a limitar distúrbios e interferências que podem alterar os próprios sinais. -
Page 234: Página Principal Do Visor (Homepage)
PORTUGUÊS 3. LED luz de aviso vermelha ( ), para sinalização de alarme (fault). 4. LED luz de aviso branca ( ), aceso para assinalar que o cartão está sob tensão eléctrica; se intermitente indica que há tensão, mas a bomba não está habilitada (ver a tecla “RUN/STOP” mais adiante). 5. -
Page 235: Pôr Em Funcionamento
PORTUGUÊS As informações formam três grupos: 1. As linhas de estado (no topo), referem as informações sobre: o estado (marcha, paragem) junto com o comando actual (SET1 – SET3, QC, Timer A-H, etc.), ou os avisos bloqueios (Warning Fault) eventualmente activos;... -
Page 236: Configuração Assistida (Wizard)
PORTUGUÊS 4.2 Configuração assistida (WIZARD) Com o primeiro arranque, o dispositivo propõe de efectuar a configuração facilitada WIZARD, que assiste o utilizador para uma configuração fácil e rápida dos parâmetros mais importantes. A execução do WIZARD é necessária: o estado inicial do sistema é o da configuração de fábrica, e nele o idioma e as unidades de medida podem não ser as do país de instalação;... -
Page 237: Ligar E Utilizar A Bomba
PORTUGUÊS 5 LIGAR E UTILIZAR A BOMBA 5.1 Modalidades de funcionamento 5.1.1 Modos de regulação O gráfico seguinte mostra as curvas indicativas dos rendimentos hidráulicos do sistema. Altura manométrica H 100% US GPM Débito Q Figura 11 O inversor regula automaticamente a velocidade de rotação da electrobomba, movendo o ponto de trabalho, de acordo com as necessidades, para uma parte qualquer da área subjacente à... -
Page 238: Arranque Rápido E Paragem Da Bomba (Modo "Manual")
PORTUGUÊS arranques e paragens são comandados automaticamente por temporizadores (“Timers”), programáveis segundo as necessidades com base semanal, ou por sinais provenientes de uma central externa (“EXT”). À saída da fábrica esta modalidade é desabilitada. Para a activar é necessário antes de mais configurar os parâmetros necessários (ver 6.2.5 e 6.2.6), e acionar então a tecla “Auto”... -
Page 239: Modificação Rápida Do Setpoint E Dos Parâmetros Pré-Configurados
PORTUGUÊS Premindo outra vez “RUN/STOP” o sistema volta a habilitar-se e tudo volta a funcionar; o LED branco acende então de luz fixa. (*) Únicas excepções: as funções Antifreeze (de protecção do gelo) e Antilock (de anti-bloqueio) põem em funcionamento a bomba também se o sistema estiver desabilitado (ver os parágrafos 6.2.8 e 6.2.9). Após um desligamento acidental (black out) durante o funcionamento em modalidade Manual, o sistema não volta a arrancar a não ser que a tecla SETx que estava acesa não tivesse duração “para sempre”... -
Page 240: Selecção Das Modalidades Operacionais Preferidas (Menu)
PORTUGUÊS Tendo a necessidade de parar manualmente a bomba, quando em funcionamento, é suficiente: premir na tecla “RUN/STOP”, a bomba pára assim em todos os casos (*), interrompendo todas as modalidades activas. Quer dizer que param o modo “Auto” e também a modalidade manual (“SETx” ou “QuickClean”) eventualmente activa;... -
Page 241: Acesso A Um Submenu
PORTUGUÊS Agora o quadrado que acende intermitente (aqui tracejado) evidencia o item sucessivo ao da situação anterior; na barra vertical à esquerda o sinal interior baixou, mostrando que estamos posicionados mais em baixo nos itens que formam o menu. Premindo na tecla de seta para cima, retorna-se para a situação da figura anterior. A lista dos itens de menu deve ser considerada cíclica, ou seja em anel: do último item retorna-se para o primeiro com a tecla de seta para baixo. - Page 242 PORTUGUÊS 2. Premindo “ENTER” [ ] abre-se a modificação da linha selecionada: Quadrado fixo, piscam apenas os algarismos a modificar Figura 17 3. Os algarismos das horas piscam e podem ser modificados com as teclas de seta para cima e seta para baixo: Figura 18 4.
-
Page 243: Estrutura Do Menu
PORTUGUÊS Estrutura do menu Esta é a estrutura completa (em árvore) do menu. (Main)MENU Menu ‐ Settings Settings WIZARD Wizard W1 /1 1 .… W1 1 /1 1 1‐2 Languages Language select 1‐3 Day & Time Time set 1‐4 Unit of Measure Unit select 1‐5 Pump Limits Limit set 1‐6 Screen Preferences 1‐7 Password... -
Page 244: Settings (Menu Configurações)
PORTUGUÊS Os algarismos, referidos à direita nas várias caixas, representam a numeração de ramo e de item das diferentes partes do menu e são mostrados no visor (fornecendo uma referência rápida para a posição em que se está). Os parágrafos que seguem descrevem detalhadamente cada item do menu. 6.2.1 Settings (Menu Configurações) O submenu “Settings”... -
Page 245: Pump Limits (Limites Da Bomba)
PORTUGUÊS 6.2.1.5 Pump Limits (Limites da bomba) Figura 24 Se a instalação não pode suportar pressões ou fluxos demasiado elevados, é possível impor limites máximos à pilotagem da bomba. Os limites superiores que podem ser configurados são: ‐ Altura manométrica H : entre 5 m e 16 m, ou nenhum limite (MAX), ‐... -
Page 246: Set Points 1-4
PORTUGUÊS ‐ Configurando no campo password um valor diferente do zero, e confirmando-o com “OK”, o valor visualizado torna-se “XXXX” (escondido) e activa-se o sistema de protecção. Na homepage aparece o símbolo “cadeado fechado” (parágrafo 3.2). Com a protecção activa, é bloqueado o acesso a todas as teclas, com excepção de: ‐... -
Page 247: Set Points 5-8
PORTUGUÊS Os valores de fábrica são referidos no capítulo 8. 6.2.3 Set Points 5-8 Este item de menu permite visualizar e modificar os parâmetros associados aos setpoints de 5 a 8. Figura 28 Os setpoints de 5 a 8 não podem ser recuperados do teclado, mas são activados e desactivados somente pelo sistema dos TIMERS (parágrafo 6.2.5). -
Page 248: Timer Settings (Configuração Dos Temporizadores)
PORTUGUÊS Deste menu efectuam-se: ‐ a configuração dos temporizadores; ‐ a visualização da configuração actualmente activa. À saída da fábrica, os temporizadores são desabilitados e não configurados. 6.2.5.1 Timer Settings (Configuração dos Temporizadores) A configuração dos temporizadores efectua-se de forma “tabular”: no visor aparece uma tabela que mostra os dados de activação de cada um dos oito Timer A –... -
Page 249: External Control (Controlo Externo)
PORTUGUÊS 6.2.6 External Control (Controlo externo) O controlo da máquina pode ser efectuado de uma central externa ou de um PC. Para utilizar esta modalidade, ver também os parágrafos 5.1.2 e 5.4. A configuração desta função é efectuada por meio deste submenu, que prevê itens separados para entradas e saídas. -
Page 250: Priming (Escorva Da Bomba)
PORTUGUÊS 6.2.7 Priming (Escorva da bomba) A cada arranque da bomba o sistema efectua o procedimento de escorva, ou “Priming” (se habilitado). O Priming consiste em duas fases: ‐ No fim do startup da bomba (como descrito no par. 5.2), é verificado o fluxo; se ele resultar regular, o Priming é já completado e passa-se às condições do setpoint activo. -
Page 251: Anti-Lock (Protecção Contra O Bloqueio Mecânico Da Bomba)
PORTUGUÊS Figura 37 O item “Antifreeze” do menu permite: ‐ habilitar ou desabilitar a função (valor de fábrica: habilitada); ‐ selecionar a velocidade de rotação da bomba durante a activação do Antifreeze: entre 20% e 100% ; ‐ escolher a temperatura de activação do Antifreeze, entre 4°C e 10°C (entre 40°F e 50°F). Os valores de fábrica são referidos no capítulo 8. -
Page 252: Sistemas De Protecção - Bloqueios (Fault)
PORTUGUÊS O número máximo de fault memorizados e visualizáveis é 16; chegados a esse número começa-se a sobrescrever os mais antigos. 7 SISTEMAS DE PROTECÇÃO – BLOQUEIOS (FAULT) O dispositivo está provido de sistemas de protecção que têm o fim de preservar a bomba, o motor, a linha de alimentação e o inversor. -
Page 253: Configurações De Fábrica
PORTUGUÊS 8 CONFIGURAÇÕES DE FÁBRICA O sistema sai da fábrica com uma série de parámetros prédefinidos, que podem ser variados com base nas exigências da instalação e do utilizador. Cada variação das configurações é guardada automaticamente na memória. As configurações de fábrica (ou default) são resumidas na tabela que segue. Na coluna “MEMO” é possível tomar nota dos valores modificados para a própria instalação. -
Page 254: Restauração Das Configurações De Fábrica
PORTUGUÊS Priming função habilitada (Escorva) Max Priming Speed 100% Max Priming Time 10 min Anti- função habilitada Freeze Velocidade temperatura 4 °C 40 °F Anti-Lock função habilitada (*)Valor de fábrica em alguns mercados Tabela 6 – Configurações de Fábrica (default) 8.1 Restauração das configurações de fábrica Para restaurar os valores de fábrica, desligar o dispositivo, aguardar que o visor se apague completamente, premir e manter premidas simultaneamente as duas teclas “SET1”... -
Page 255: Manutenção
PORTUGUÊS 10 MANUTENÇÃO Antes de começar uma qualquer intervenção no sistema, desligar a alimentação eléctrica. O sistema não necessita de operações de manutenção de rotina. Aconselha-se a inspecionar e limpar periodicamente o filtro da bomba. Sugerimos uma manutenção extraordinária pelo menos uma vez por ano, por parte de pessoal qualificado. 11 ELIMINAÇÃO Este produto, ou partes dele, deve ser eliminado no respeito do ambiente e em conformidade com as normas locais para a defesa do ambiente. - Page 256 TÜRKÇE İÇİNDEKİLER AÇIKLAMALAR ............................. 255 GÜVENLİK AÇISINDAN ÖNEMLİ UYARILAR VE TAVSİYELER ............... 255 SORUMLULUK .............................. 258 GENEL ..............................258 Tanım .............................. 258 Teknik özellikler ..........................260 KURMA ..............................260 ...
-
Page 257: Açiklamalar
Önemli notlar ve bilgiler. GÜVENLİK AÇISINDAN ÖNEMLİ UYARILAR VE TAVSİYELER Bu kılavuz DAB E.SWIM / E.PRO ürününe ilişkindir. GENEL RİSK FAKTÖRLERİ Kurmaya geçmeden önce, ürünün kullanımı için önemli bilgiler içeren bu kılavuzu dikkatle okuyunuz. - Page 258 TÜRKÇE MEKANİK GÜVENLİK POMPAYI ASLA SUSUZ ÇALIŞTIRMAYINIZ. Su; salmastraları yağlama, soğutma ve koruma işlevleri de gerçekleştirir: Kuru açılma, pompada kalıcı hasarlara neden olabilir ve garantinin geçersiz olmasına neden olur. Pompayı harekete geçirmeden önce filtreyi daima doldurunuz. Pompayı kötü hava şartlarına karşı koruyunuz. ‐...
- Page 259 TÜRKÇE HAVUZ, KÜÇÜK HAVUZ VE BENZERLERİ İÇİN SPESİFİK RİSKLER Amerika Birleşik Devletleri (U.S.A.) için özel uyarılar: GÜVENLİK UYARILARI: Emilmeden kaynaklanan sıkışma tehlikesi. Ciddi yaralanmaya veya ölüme neden olabilir. Sıkışma riskini azaltmak için pompa, en son federal, ulusal ve yerel yüzme havuzu yönetmelikleri uyarınca kurulmalı...
-
Page 260: Sorumluluk
TÜRKÇE Tehlikeli basınçlar Sistem üzerinde herhangi bir müdahale sırasında, hava girebilir ve basınçlandırılabilir. Basınçlı hava, kapağın aniden açılmasına ve hasar, yaralanma ve hatta ölüme neden olabilir. POMPA BASINÇ ALTINDA BULUNDUĞUNDA KAPAĞI DEBLOKE ETMEYİNİZ VEYA KAPAĞA DOKUNMAYINIZ Sadece sabit büyük havuz ve küçük havuz tesisleri için kullanınız. Sökülebilir mevsimlik tesisler için kullanmayınız (yani su çevreleme duvarlarında bulunan havanın indirildiği veya kış... - Page 261 TÜRKÇE Şekil 1 1- Kullanıcı panelinin kapağı 2- Kullanıcı paneli 3- QR kodu 4- Quick guide 5- Terminal kutusu kapağı 6- Dış konnektör 7‐ Besleme kablosu girişi Şekil 2...
-
Page 262: Teknik Özellikler
TÜRKÇE 1.2 Teknik özellikler Teknik özellikler aşağıdaki tabloda özetlenmiştir. Konu Parametre E-SWIM ELEKTRİK Gerilim 220-240 V +/- 10% BESLEMESİ Frekans 50/60 Hz Maksimum akım 5.6 SFA Maksimum güç 1250 W ÜRETİM Yer kaplama boyutları 574 x 310 x 316 mm / 22.6 x 12.2 x 12.4 in ÖZELLİKLERİ... -
Page 263: Güç Besleme Hattına Elektrik Bağlantısı
TÜRKÇE 2.2 Güç besleme hattına elektrik bağlantısı Şekil 3 Diğer teçhizatlara doğru yayılan olası gürültüye karşı bağışıklığı iyileştirmede, ürünün güç beslemesi için ayrı bir elektrik hattının kullanılması tavsiye edilir. Dikkat: Daima güvenlik kurallarına uyulması zorunludur! Elektrik montajı, montaja ilişkin tüm sorumluluğu üstlenen yetkili ve uzman bir elektrikçi tarafından yapılmalıdır. -
Page 264: Operatör Paneli
TÜRKÇE Çıkış, aşağıdaki elektrik özelliklerine sahip bir röle (temiz kontak) ile gerçekleştirilmiştir. Çıkış kontağının özellikleri Kontak tipi NO (normalde açık) Karşılanabilir max gerilim [V] 24Vac / 24Vdc -> rezistif yük Karşılanabilir max akım [A] -> indüktif yük Karşılanabilir max güç 2.5VA / 2W Tablo 2 - Çıkış... - Page 265 TÜRKÇE Şekil 6 Elemanların tanımı: 1. LCD grafik ekran. 2. (Altı) etkin işlevsellik belirtme ikaz LEDİ; LED'lerin her biri, yakın bulunduğu tuşun etkin kılındığını bildirir. 3. Alarm (fault) bildirmek için kırmızı ikaz LEDİ ( 4. Kartın, elektrik gerilimi altında bulunduğunu belirtmek için yanık beyaz ikaz LEDİ ( ); yanıp sönmesi durumunda gerilim bulunduğunu ancak pompanın etkin olmadığını...
-
Page 266: Ekranın Ana Sayfası (Homepage)
TÜRKÇE 11. “ESC”, yani “çıkış”, olası değişiklikleri iptal ve çıkış tuşu (kaydetmeden). 12. “Reset”, muhtemelen devam etmekte olan alarmları (fault) iptal etme tuşu. 13. Pompanın yönlendirilmesini etkinleştirmek veya devreden çıkarmak için “RUN/STOP”, yani “çalıştırma/durdurma” tuşu; etkin pompa durumu, beyaz LEDİN sabit yanması ile bildirilir ;... -
Page 267: İşletmeye Alma
TÜRKÇE 4 İŞLETMEYE ALMA 4.1 Havasızlandırma Düşü yüksekliği altı kurma: Pompayı izole etmek için emme borusuna bir adet ve besleme borusuna bir adet sürgülü vana yerleştiriniz. Havayı çıkarmak için besleme borusundaki sürgülü vanayı açık tutarak emme borusunda bulunan sürgü vanasını yavaş yavaş... -
Page 268: Pompanın Açılması Ve Kullanımı
TÜRKÇE Beher Wizard sayfası, dilden başlayarak, konfigüre edilecek tek bir parametreyi gösterir. Başlık Wizard sayfası (bu sayfa, toplam 11 sayfanın 1. sayfasıdır) Kullanılacak tuşlar (oklar gösterilmemiştir) Şekil 10 Sayfada, başlık ile birlikte aşağıdaki bilgiler yer alır: “1/11” sembolü: WIZARD sayfalarının toplamı (11) üzerinde, güncel sayfanın numarasını (1) belirtir ve tabi ki sayfaların ilerlemesiyle değişir;... -
Page 269: Kumanda Modları
TÜRKÇE Basma yüksekliği H %100 US GPM Debi Q Şekil 11 İnverter, gereksinimlere göre işleme noktasını maksimum eğri (%100) altında bulunan alanın herhangi bir yerine kaydırarak elektro pompanın rotasyon hızını otomatik olarak ayarlar. Pompalama sırasında ayarlama, debi kontrollü modda veya sabit eğrili modda gerçekleşebilir. ‐... -
Page 270: Pompayı Hızlı Başlatma Ve Durdurma ("Manuel" Modda)
TÜRKÇE 5.2 Pompayı hızlı başlatma ve durdurma (“Manuel” modda) Pompa, etkin Priming ile fabrikadan çıkar ve teslim edilir: Priming programlamasının değiştirilmemesi durumunda (bakınız par. 6.2.7), ilk açılmada pompa maksimum hızda harekete geçebilir. “RUN/STOP” tuşuna basmadan önce, vanaların açık olduğundan, boruların tıkanık olmadığından emin olunuz ve filtre ve basınçlandırılabilen parçalardan uzak durunuz. -
Page 271: Setpoint Ve Önceden Ayarlanmış Parametrelerin Hızlı Değiştirilmesi
TÜRKÇE 5.3 Setpoint ve önceden ayarlanmış parametrelerin hızlı değiştirilmesi Pompa işlemedeyken basılı bir “SETx” tuşu ile (yukarıda belirtildiği gibi): Etkin “SETx” tuşundan farklı bir SETx tuşuna basıldığında (örneğin “SET1” tuşu etkinken “SET3” tuşu), yeni tuşa ait setpoint gerçekleştirilmesine geçilir (tüm ilişkin devam etme süresi kadar) ve dolayısıyla LED'lerin yanması... -
Page 272: Tercih Edilen Işletim Modlarının Seçilmesi (Menü)
TÜRKÇE 6 TERCİH EDİLEN İŞLETİM MODLARININ SEÇİLMESİ (MENÜ) Hızlı ve sezgisel menülü bir sistem, çeşitli modları etkin kılmayı ve istenen modda konfigüre etmeyi sağlayarak söz konusu modlara erişmeyi sağlar. 6.1 Menüye giriş ve menüde gezinme “ENTER” [ ] tuşuna basılarak menüye erişilir; homepage bağlamındaki aşağıdaki çubukta “Konfigürasyon” kalemi seçilmiş... -
Page 273: Menüde Bir Parametrenin Değiştirilmesi
TÜRKÇE Şekil 14 (“ENTER” [ ] tuşu ile) “Settings”(Ayarlar) kalemine girildiğinde ilişkin “Menu- Settings” menüsüne erişilir: Başlık Menü ağacındaki pozisyon (dal 1) Şekil 15 Alt menüde de ok tuşları ile gezinilir ve “ENTER” [ ] tuşuna basılarak istenen kaleme erişilir. Sağda yukarıdaki sembol, menü... - Page 274 TÜRKÇE 3. Saat rakamları yanıp söner ve yukarı ok ve aşağı ok tuşları ile isteğe göre değiştirilir: Şekil 18 4. İstenen değere ulaşıldığında, sağ ok tuşu ile dakika rakamlarına geçilir: Şekil 19 5. Şimdi dakika rakamları yanıp söner ve bunlar da yukarı ve aşağı okları ile değiştirilir: Şekil 20 ] tuşuna basılarak onaylanır;...
-
Page 275: Menü Yapısı
TÜRKÇE Menü yapısı Aşağıda belirtilen, menünün komple yapısıdır (ağaç şeklinde). (Main)MENU Menu ‐ Settings Settings WIZARD Wizard W1 /1 1 .… W1 1 /1 1 1‐2 Languages Language select 1‐3 Day & Time Time set 1‐4 Unit of Measure Unit select 1‐5 Pump Limits Limit set 1‐6 Screen Preferences 1‐7 Password PW set/reset Set Points 1‐4 SP1‐4 settings... -
Page 276: Settings (Ayarlar Menüsü)
TÜRKÇE Sağda, çeşitli kutularda belirtilen sayılar, farklı menü kısımlarının dal ve kalem numaralandırmasını temsil eder ve (içinde bulunulan pozisyon için hızlı bir referans sunarak) ekranda gösterilir. Aşağıdaki paragraflar menünün her bir kalemini detaylı olarak tarif eder. 6.2.1 Settings (Ayarlar Menüsü) “Settings”... -
Page 277: Pump Limits (Pompa Limitleri)
TÜRKÇE 6.2.1.5 Pump Limits (Pompa limitleri) Şekil 24 Tesisin, aşırı yüksek basınç veya akışı karşılayacak kapasitede olmaması durumunda pompanın yönlendirilmesine maksimum limitleri koymak mümkündür. Ayarlanabilir üst limitler şunlardır: ‐ Basma yüksekliği H : 5 m ile 16 m arasında veya limitsiz (MAX), ‐... -
Page 278: Set Points 1-4
TÜRKÇE Koruma etkin olduğunda, aşağıdaki tuşlar dışındaki tuşların tümüne erişim blokedir: ‐ “RUN/STOP” tuşu : Bu tuşa basılarak pompa durdurulabilir. ‐ NOT: Bu tuşa tekrar basıldığında pompa yeniden işletmeye alınamaz çünkü sistem password girilmesini talep eder; ‐ Gezinme ve menülere giriş tuşları (“ENTER” tuşu ve “ok” tuşları) : Menü sayfalarında gezinmek ve çeşitli parametreleri görüntülemek mümkündür, ancak herhangi bir değiştirme denemesinde password girilmesi talep edilir. -
Page 279: Quick Clean
TÜRKÇE Şekil 28 5 ile 8 arası setpoint'ler, tuş takımından görüntülenemez, sadece TIMERS sisteminden etkin kılınabilir ve devreden çıkarılabilir (paragraf 6.2.5). Bu doğrultuda 1-4 arası setpoint'lerden farklı olarak, eşleştirilmiş devam etme süresi bulunmaz, çünkü etkin kılma süresi daima ve sadece TIMERS tarafından belirlenir. 1-4 arası... -
Page 280: Timer Settings (Timer'ların Ayarı)
TÜRKÇE 6.2.5.1 Timer Settings (Timer'ların ayarı) Timer'ların programlanması “tablo” halinde gerçekleştirilir: Ekranda sekiz Timer A – H zamanlayıcının her biri için etkin kılma verilerini gösteren bir tablo belirir. Şekil 31 Beher timer için aşağıdakiler ayarlanır: ‐ Açma saati (“START”), ‐ Durdurma saati (“STOP”), İstenen SET-POINT (“S”... -
Page 281: Girişlerin Konfigürasyonu ("Input")
TÜRKÇE Şekil 33 Fabrika çıkışında bu işlevsellik devre dışıdır ve konfigüre edilmemiştir. Giriş ve çıkışların elektrik özellikleri paragraf 2.3 bağlamında belirtilmiştir. 6.2.6.1 Girişlerin konfigürasyonu (“Input”) Girişlerin konfigürasyonu bu menü sayfasından uygulanır. Şekil 34 Bu kalemden, öncelikle “EXT External Control” modunun genel etkinleştirilmesi uygulanır. Girişler aşağıdakiler kapsar: ‐... -
Page 282: Anti-Freeze (Pompa Içindeki Suyun Donmasına Karşı Koruma)
TÜRKÇE ‐ Böyle olmaması durumunda ise sistem boşalmıştır ve yeniden havasızlandırılmalıdır: Bu doğrultuda pompanın maksimum Priming hızında (“Max Priming Speed”) etkin kılındığı ikinci aşamaya geçilir (pompa havasızlandırılana kadar veya her halükarda “Max Priming Time” parametresinde belirtilen tüm süre boyunca). Burada havasızlandırma başarılı sonuçlanmış olsa da etkin setpoint uyarınca düzenli olarak devam edilir. Havasızlandırmanın başarısız sonuçlanmış... -
Page 283: Anti-Lock (Pompanın Mekanik Kilitlenmesine Karşı Koruma)
TÜRKÇE Şekil 37 Menünün “Antifreeze” kalemi aşağıdakilerin gerçekleştirilmesini sağlar: İşlevin etkinleştirilmesi veya devreden çıkarılması (fabrika değeri: etkin); ‐ ‐ Antifreeze işlevinin müdahalesi sırasında pompanın rotasyon hızının seçilmesi: %20 ile %100 arası; ‐ Antifreeze işlevinin müdahale sıcaklığının seçilmesi, 4°C ile 10°C arası (40°F ile 50°F arası). Fabrika değerleri 8. -
Page 284: Koruma Sistemleri - Kilitlenmeler (Fault)
TÜRKÇE Kaydedilmiş ve görüntülenebilir maksimum fault sayısı 16 olup, bu sayıya ulaşıldığında en eskilerin üzerine yazılmaya başlanır. 7 KORUMA SİSTEMLERİ - KİLİTLENMELER (FAULT) Cihaz; pompayı, motoru, besleme hattını ve inverteri korumayı amaçlayan koruma sistemleri ile donatılmıştır. Bir veya birden fazla koruma sistemi müdahalede bulunduğunda, en yüksek öncelik sahibi olandan başlamak üzere durum derhal ekranda sinyallenir. -
Page 285: Fabrika Ayarları
TÜRKÇE 8 FABRİKA AYARLARI Sistem, tesisin ve kullanıcının gereksinimlerine göre değişebilen önceden ayarlanmış bir dizi parametre ile fabrikadan çıkar. Ayarlardaki her değişiklik otomatik olarak belleğe kaydedilir. Fabrika (veya default) ayarları aşağıdaki tabloda özetlenmiştir. “MEMO” sütununa, şahsa özel kurma için tadil edilmiş değerler not edilebilir. -
Page 286: Fabrika Ayarlarının Geri Yüklenmesi
TÜRKÇE Priming işlev etkinleştirilmiş (Havasızlandırma) Max Priming Speed %100 Max Priming Time 10 dk Anti-Freeze işlev etkinleştirilmiş hız sıcaklık 4 °C 40 °F Anti-Lock işlev etkinleştirilmiş (*)Bazı ülkelerdeki fabrika değeri Tablo 6 – Fabrika Ayarları (default) 8.1 Fabrika ayarlarının geri yüklenmesi Fabrika değerlerini geri yüklemek için cihazı... -
Page 287: Bakım
TÜRKÇE 10 BAKIM Sistem üzerinde herhangi bir müdahaleye başlamadan önce elektrik beslemesini kesiniz. Sistem olağan bakım işlemlerinin yapılmasını gerektirmez. Pompa filtresinin düzenli aralıklarla kontrol edilmesi ve temizlenmesi tavsiye edilir. Uzman personel tarafından en az yılda bir kez bir olağanüstü bakım yaptırılması tavsiye edilir. 11 BERTARAF ETME Bu ürün veya bunun parçaları, yerel kanunlar ve çevre standartlarına uygun olarak bertaraf edilmelidir. - Page 288 Qingdao City, Shandong Province, China Hungary PC: 266500 Tel. +36.93501700 info.china@dwtgroup.com Tel.: +8653286812030-6270 DAB PUMPS DE MÉXICO, S.A. DE C.V. Fax: +8653286812210 Av Gral Álvaro Obregón 270, officina 355 Hipódromo, Cuauhtémoc 06100 México, D.F. Tel. +52 55 6719 0493 DAB PUMPS S.p.A.
Need help?
Do you have a question about the E.SWIM and is the answer not in the manual?
Questions and answers
Tengo dos bombas DAB Easybox de 2 hp que cuando prenden da el error FAULT F19.7 y F18.7 y la otra da F19.9 y F18.9