Table of Contents
Advertisement
Available languages
Available languages
CRONOTERMOSTATO DIGITALE
IT
DISPLAY LUMINOSO E NAVIGAZIONE A MENU
Installazione da parete
DIGITAL
WEEKLY
EN
BACKLIT DISPLAY AND MENU DRIVEN
Wall mounting
PE - DECRNN062
11/15
PROGRAMMABLE THERMOSTAT
Alimentazione a 230V~
Settimanale, Inverno / Estate
3 livelli di temperatura + antigelo
Ingresso per contatto remoto
Power supply 230V~
Weekly, Winter / Summer
3 temperature levels + antifreeze
Input for remote contact
Alimentazione
Power supply
230V~
230V~
Advertisement
Table of Contents

Related Manuals for CALEFFI 738


Summary of Contents for CALEFFI 738
- Page 1 CRONOTERMOSTATO DIGITALE DISPLAY LUMINOSO E NAVIGAZIONE A MENU Installazione da parete DIGITAL WEEKLY PROGRAMMABLE THERMOSTAT BACKLIT DISPLAY AND MENU DRIVEN Wall mounting Alimentazione a 230V~ Settimanale, Inverno / Estate 3 livelli di temperatura + antigelo Ingresso per contatto remoto Power supply 230V~ Weekly, Winter / Summer 3 temperature levels + antifreeze Input for remote contact...
- Page 2 ITALIANO INDICE PRESENTAZIONE DELL’APPARECCHIO pag. 3 pag. 25 AVVERTENZE pag. 4 10.4.1 - Elenco programmi preimpostati pag. 5 10.4.2 - Scelta del programma 1 - DATI TECNICI pag. 26 10.4.3 - Visualizzazione impostazioni del programma scelto pag. 26 2 - IMPOSTAZIONI DI FABBRICA pag.
- Page 3 PRESENTAZIONE Gentile Cliente, La ringraziamo per aver scelto un nostro prodotto. II cronotermostato settimanale, adatto a tutti gli impianti di riscaldamento e/o raffrescamento, è dotato di un chiaro display retroilluminato per tenere sotto controllo tutte le sue funzioni in tempo reale. Il cronotermostato è...
- Page 4 AVVERTENZE! AVVERTENZE! Leggere attentamente il presente manuale prima di utilizzare il prodotto, in quanto fornisce importanti indicazioni riguardanti la sicurezza, l’installazione e l’uso. Conservare con cura il manuale per successive consultazioni. L’installazione ed il collegamento elettrico del cronotermostato devono essere eseguiti da personale qualificato ed in conformità...
- Page 5 1 - DATI TECNICI Alimentazione: 230V~ 50-60 Hz temporizzata 6 sec. / sempre accesa / sempre spenta Retroilluminazione del display e dei tasti Tipo di azione, disconnessione ed apparecchio: 1 / B / U / Elettronico a relè con contatto in scambio COM / NA / NC, Tipo di uscita: libero da potenziale - max 5(3)A/250 V ~ Mantenimento delle impostazioni in caso di black-out 48 ore...
- Page 6 2 - IMPOSTAZIONI DI FABBRICA 2 - IMPOSTAZIONI DI FABBRICA I dati inseriti nel cronotermostato denominati «IMPOSTAZIONI DI FABBRICA» si riferiscono ad un funzionamento definito «Standard». Nei capitoli seguenti verranno descritte tutte le funzioni personalizzabili, al fine di soddisfare ogni esigenza di comfort ambientale.
- Page 7 3 - LEGENDA TASTI CON FUNZIONE MULTICOLOR Display e tasti retroilluminati Alla pressione di un qualsiasi tasto la retroilluminazione si attiva visualizzando le scritte di scelta e navigazione, entro 6 sec. premere il tasto desiderato per variare le impostazioni (ad ogni tocco su un tasto viene riattivato un time-out di 6 sec).
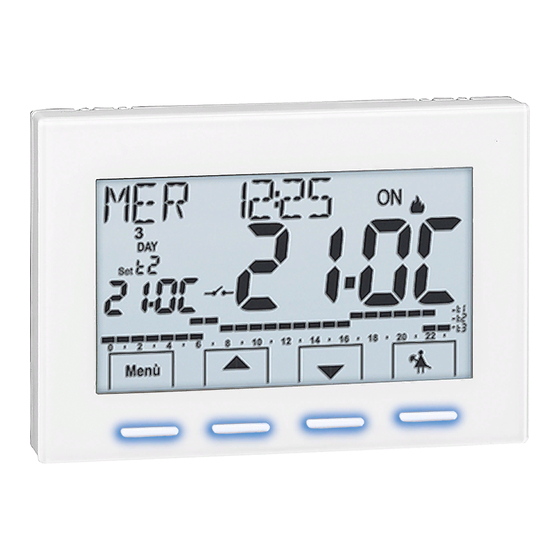
- Page 8 4 - LEGENDA DISPLAY Scala oraria e termica programmata sulle 24 ore: Digit superiore = temperatura t1 Comfort Digit intermedio = temperatura t2 Attività (pre-comfort) Digit inferiore = temperatura t3 Economy (risparmio) mancanza Digit = temperatura Antigelo (in Inverno) o termoregolazione disattivata (in Estate) SetT Menù...
- Page 9 5 - INSTALLAZIONE 5 - INSTALLAZIONE 5.3 - FISSAGGIO DELLA BASE A PARETE 5.1 - DIMENSIONI DI INGOMBRO Disattivare la tensione di rete 230V~ Fissare con le viti in dotazione la base del cronotermostato: a parete, alla scatola da incasso tonda o rettangolare utilizzando le opportune coppie di fori .
- Page 10 5 - INSTALLAZIONE 5.4 - COLLEGAMENTI ELETTRICI Importante: l’installazione ed il collegamento elettrico dei dispositivi ed apparecchiature devono essere eseguiti da personale qualificato ed in conformità alle norme e leggi vigenti. Il costruttore non si assume alcuna responsabilità per quanto concerne l’impiego di prodotti che debbano seguire particolari norme di ambiente e/o installazione.
- Page 11 5 - INSTALLAZIONE Esempi di collegamenti elettrici a dispositivi da comandare CALDAIA Collegamento ad una caldaia 230V~ 230V~ CARICO chiude apre Collegamento ad una valvola motorizzata N.B.: con forti carichi induttivi (pompe ed elettrovalvole) si consiglia di collegare un filtro RC in parallelo al carico. Dopo aver ultimato i collegamenti elettrici, fissare il corpo del cronotermostato alla base a parete, come indicato al paragrafo successivo.
- Page 12 5 - INSTALLAZIONE 5 - INSTALLAZIONE 5.5 - FISSAGGIO O RIMOZIONE DEL CRONOTERMOSTATO DALLA BASE A PARETE Dopo aver eseguito i collegamenti elettrici: Applicare il coperchietto coprimorsetti alla base fissandolo nel gancio . E Rimozione del cronotermostato Per rimuovere il coperchietto utilizzare un piccolo cacciavite facendo leva sul gancio E. dalla base a parete 1°...
- Page 13 6 - ACCENSIONE DEL CRONOTERMOSTATO Al primo inserimento della tensione di rete, il cronotermostato esegue un lamp-test accendendo tutti i segmenti del display visualizzando per qualche secondo la versione del software installato. Terminata questa fase, il cronotermostato richiede la scelta della lingua da utilizzare. Scegliere la lingua desiderata scorrendo tra le lingue disponibili utilizzando i tasti Confermare premendo il tasto Le lingue selezionabili sono:...
- Page 14 Ù 7 - ATTIVAZIONE IMMEDIATA DELLE FUNZIONI D’USO PI UTILIZZATE Dal normale funzionamento del cronotermostato in stand-by, premendo un tasto, si attiva la retroilluminazione (se non esclusa - par. 11.12) e appaiono le scritte di scelta e navigazione, entro 6 sec., alla seconda pressione del tasto desiderato si ottiene una variazione.
- Page 15 8 - STRUTTURA DEI MENU PRINCIPALI (uso e configurazione) Struttura dei Menù disponibili: SET TEMP 5 CONFIG (modifica dei Set di temperatura impostati) (menu installatore o utente esperto) per la modalità inverno LANGUAGE (selezione della lingua dei menù) - t1 (comfort) - STAGIONE (modalità...
- Page 16 9 - ACCESSO AI MENU Menu Dalla condizione di normale funzionamento del cronotermostato premendo il tasto si accede al primo menu disponibile. Oppure, se è stato inserito precedentemente un codice di accesso segreto utente e/o installatore, seguire i passaggi sotto riportati per accedere ai menu utente o installatore.
- Page 17 10 - MENU PER L’UTENTE 10.1 - Menu «SET TEMP» modifica delle temperature di SET impostate Nel caso le temperature di Set prefissate in fabbrica: per estate per inverno Condizionatore in funzione con Caldaia in funzione con temperatura temperatura ambiente superiore a: ambiente inferiore a: 24,0 °C 20,0 °C...
- Page 18 10 - MENU PER L’UTENTE 10.2 - Menu «MODI USO» del cronotermostato 1- Visualizzare il menu principale MODI USO SEt e confermare con OK. Selezionare con i tasti il modo d’uso desiderato fra le voci disponibili: SetT Menù back SetT - MANUALE SEt (forzatura temporanea o permanente) Menù...
- Page 19 10 - MENU PER L’UTENTE digit lampeggianti 4- Con i tasti è possibile inserire il numero di ore di funzionamento manuale temporaneo: da 1h a un massimo di ore che vanno dall’ora di attivazione della forzatura fino attendere 4 secondi alla mezzanotte del giorno corrente (i digit corrispondenti o confermare con il tasto OK alle ore impostate lampeggiano).
- Page 20 10 - MENU PER L’UTENTE 10.2.1.C - Disattivazione del funzionamento manuale permanente Per ritornare al funzionamento automatico da programma, Menu attraverso il percorso: tasto -> MODI USO SEt -> visualizzata la voce MANUALE OFF , confermare premendo Sul display apparirà la scala termica e i relativi Set del giorno SetT SetT Menù...
- Page 21 10 - MENU PER L’UTENTE 10.2.3 - PROGRAMMA FERIE (esempio: assenza per vacanze) Questo programma è utile nel caso in cui ci si debba assentare per più giorni dalla propria abitazione (sospensione della termoregolazione); al termine del periodo impostato con il programma FERIE , sarà...
- Page 22 10 - MENU PER L’UTENTE Impostazione fine ferie «IN » (rientro nell’abitazione) Sul display si visualizza la pagina in cui inserire quando dovrà terminare il conteggio a ritroso del programma e ripartire il funzionamento normale di termoregolazione del cronotermostato (secondo il programma di provenienza). 7- Sul display appare (lampeggiante) il mese precedentemente impostato nella funzione OUT, con i tasti...
- Page 23 10 - MENU PER L’UTENTE Terminato l’inserimento dei dati, sul display possono apparire due differenti visualizzazioni (a seconda dei dati inseriti): A) Data di OUT uguale a quella corrente B) Data di OUT successiva rispetto a quella corrente Il cronotermostato torna al programma in funzione prima dell’inserimento dei dati nel programma FERIE, in attesa di avviare quest’ultimo programma.
- Page 24 10 - MENU PER L’UTENTE 10.3 - Menu OFF (esclusione del cronotermostato) Questa impostazione ha il compito di bloccare le funzioni del cronotermostato quando il riscaldamento o il raffrescamento devono rimanere spenti. Attraverso il percorso tasto Menu -> MODI USO SEt ->, SetT Menù...
- Page 25 10 - MENU PER L’UTENTE 10.4 - Menu PROGRAM (elenco programmi preimpostati, visualizzazione, modifica, copia dei profili orari programmati) 10.4.1 - ELENCO PROGRAMMI PREIMPOSTATI Nel riquadro sono riportati i programmi inseriti in fabbrica con relativi profili orari: P01 e P02 INVERNALI; P03 e P04 ESTIVI. Se nessuno dei programmi predisposti corrispondesse alle Vostre esigenze, sarà...
- Page 26 10 - MENU PER L’UTENTE es. Programma impostazione di fabbrica 10.4.2 - SCELTA DEL PROGRAMMA con i tasti 1- Attraverso il percorso tasto Menu -> selezionare la voce PROGRAM Set -> confermare con il tasto SetT Menù back 2- Con i tasti , è...
- Page 27 10 - MENU PER L’UTENTE 10.4.4 - MODIFICA DEL PROGRAMMA I programmi disponibili sono 4, tutti liberamente programmabili per ogni ora del giorno (con step di mezz’ora) ed in modo diverso per ogni giorno della settimana, su 3 differenti livelli di temperatura: comfort (digit superiori), attività...
- Page 28 10 - MENU PER L’UTENTE esempio copia di lunedì su martedì e giovedì 10.4.5 - COPIA DEL GIORNO MODIFICATO Completata la modifica del profilo termico/orario di un giorno (vedere paragrafo precedente) è possibile copiarlo su uno o più giorni. Premendo , sarà...
- Page 29 10 - MENU PER L’UTENTE 10.5 - Menu PASSWORD UT (utente) 10.5.1 - Inserimento della password utente Nella configurazione di fabbrica non viene impostato nessun codice. Attraverso il percorso tasto Menu -> selezionare la voce PASSWORD Ut SEt -> e confermare con il tasto SetT Menù...
- Page 30 11 - MENU PER LA CONFIGURAZIONE (installatore) 11.1 - Accesso al menù configurazione ATTENZIONE: l’accesso al menù configurazione è consigliato all’installatore o ad utenti esperti in quanto la modifica di alcune impostazioni potrebbe compromettere il corretto funzionamento dell’impianto. Attraverso il percorso tasto Menu ->...
- Page 31 11 - MENU PER LA CONFIGURAZIONE (installatore) 11.4 - INSERIMENTO / MODIFICA : ANNO - MESE - GIORNO - ORA MINUTI (ATTUALI) - CAMBIO AUTOMATICO ORA LEGALE / SOLARE IMPORTANTE: per poter FUNZIONARE CORRETTAMENTE cronotermostato richiede l’inserimento o l’aggiornamento: dell’anno, mese, giorno, ora e minuti correnti , cambio automatico dell’ora...
- Page 32 11 - MENU PER LA CONFIGURAZIONE (installatore) 11.5 - TIPO DI MODALITÀ DI REGOLAZIONE DELLA TEMPERATURA sovratemperatura da inerzia Il cronotermostato funziona (default) in modo DIFFERENZIALE termica del corpo scaldante °C/°F TERMICO ON OFF con valore del differenziale termico (Isteresi) prefissato a 0,3 °C.
- Page 33 11 - MENU PER LA CONFIGURAZIONE (installatore) 11.5.2 - Impostazione dell’isteresi per il differenziale termico ON-OFF •Attraverso il percorso tasto Menu -> CONFIG SEt -> REGOLA SEt -> selezionare On:OF , quindi premere il tasto •Con i tasti inserire il valore di isteresi desiderato (valori impostabili da 0,2 °C a 1,2 °C / da 0,3 °F a 2,1 °F - default 0,3 °C/0,4 °F).
- Page 34 11 - MENU PER LA CONFIGURAZIONE (installatore) 11 - MENU PER LA CONFIGURAZIONE (installatore) 11.7 - CORREZIONE LETTURA DELLA TEMPERATURA AMBIENTE Se per qualsiasi motivo il cronotermostato deve essere installato in una posizione in cui la temperatura ambiente misurata può esserne influenzata (es. il muro perimetrale che in inverno è...
- Page 35 11 - MENU PER LA CONFIGURAZIONE (installatore) •Attraverso il percorso tasto Menu -> CONFIG SEt -> , selezionare la voce BLOCCHI SEt . Premere il tasto per confermare. In modo sequenziale è possibile impostare i blocchi di temperatura massima ( t1 comfort ) e/o minima ( t antigelo...
- Page 36 11 - MENU PER LA CONFIGURAZIONE (installatore) 11 - MENU PER LA CONFIGURAZIONE (installatore) 11.9 - COLLEGAMENTO A CONTATTO ESTERNO PER ACCENSIONE/SPEGNIMENTO DA REMOTO DEL CRONOTERMOSTATO Prima di abilitare una qualsiasi voce del menu «INGRESSO» elencata successivamente assicurarsi di aver collegato un contatto esterno ai morsetti 8 e 9 (AUX). È...
- Page 37 11 - MENU PER LA CONFIGURAZIONE (installatore) Es. Programmatore telefonico 11.9.1a - Esempio di accensione/spegnimento del cronotermostato a distanza, collegato a un programmatore telefonico con contatto NA contatto NA SetT Menù (normalmente aperto). back Chiusura del contatto del programmatore (passaggio di stato): provoca la forzatura nello stato di manuale permanente comfort con la visualizzazione dei simboli/setpoint associati e l'icona “...
- Page 38 11 - MENU PER LA CONFIGURAZIONE (installatore) 11.9.2 - OBBLIGO NA - per contatto normalmente aperto ATTENZIONE: ai morsetti 8 e 9 AUX, collegare solamente interruttori e contatti con isolamento idoneo a lavorare alla tensione di rete 230Vac. Scegliendo questa funzione è possibile collegare un contatto remoto NA che alla sua chiusura dispone il cronotermostato nella modalità OFF (spento) con temperatura t antigelo, se non è...
- Page 39 11 - MENU PER LA CONFIGURAZIONE (installatore) 11.10 - CICLO ANTICALCARE Se la funzione è attivata, il cronotermostato interviene tutti i giorni dell'anno alle ore 12:00, per la durata di 2 minuti primi, attivando il dispositivo comandato (pompa, valvola ecc.) allo scopo di evitare incrostazioni e grippaggi causati da inattività...
- Page 40 11 - MENU PER LA CONFIGURAZIONE (installatore) 11.13 - INSERIMENTO E GESTIONE DELLE PASSWORD Alcune funzioni di questo cronotermostato possono essere protette da una Password utente ( ) e/o installatore ( InSt ), in modo che possano essere modificate solo da chi ne è abilitato. Nella impostazione di fabbrica nessuna password è attiva. 11.13.1 - INSERIMENTO NUOVA PASSWORD SetT Menù...
- Page 41 11 - MENU PER LA CONFIGURAZIONE (installatore) 11.14 - RESTORE (RESET) IMPORTANTE! L’operazione di RESTORE (Reset) è consigliata all’installatore o ad utenti esperti in quanto, con questa operazione, molte impostazioni e programmazioni precedentemente eseguite, anche secondo la tipologia dell’impianto, verranno perse. SetT Menù...
-
Page 42: Table Of Contents
ENGLISH CONTENTS DEVICE PRESENTATION pag. 43 WARNINGS pag. 44 10.4.3 - Display settings of the selected program pag. 66 10.4.4 - Modify program pag. 67 1 - TECHNICAL DATA pag. 45 10.4.5 - Copy the modified day pag. 68 2 - FACTORY SETTINGS pag. - Page 43 PRESENTATION Dear Customer, thank you for choosing our product. The weekly programmable thermostat, suitable for all heating and/or cooling system, is fitted with a clear backlit display to keep all its functions under control in real time. The programmable thermostat is factory programmed. Therefore, after electric power connection, current date and hour setting and confirmation of automatic daylight saving time/standard time change (EURO=Italy and Central Europe UTC+1), it is ready for immediate use, displaying current date and time, with thermal profile/standard time...
- Page 44 WARNINGS Read this manual carefully before using the product as it provides important guidelines regarding safety, installation and use. The manual must be preserved with care for future reference. The installation and electrical connection of the programmable thermostat must be implemented by qualified personnel and in conformity with current laws and regulations.
-
Page 45: Technical Data
1 - TECHNICAL DATA Power supply: 230V~ 50-60 Hz timed 6 sec. / always on / always off Display and key back-lighting: Type of action, disconnection and device: 1 / B / U / Electronic Type of output: voltage free relay with COM / NO / NC changeover contact, max 5(3)A/250 V ~ Keeping memory setting during power failure: Software:... -
Page 46: Factory Settings
2 -FACTORY SETTINGS 2 - IMPOSTAZIONI DI FABBRICA The data entered in the programmable thermostat called «FACTORY SETTINGS» refer to operation defined as «Standard». The following chapters describe all customisable functions, in order to satisfy any ambient comfort need. FACTORY SETTINGS TABLE (default) Restore «reset»... -
Page 47: Multicolour Key Function Legend
3 - MULTICOLOUR KEY FUNCTION LEGEND Display and key back-lighting Touching any key activates back-lighting, displaying the words selection and navigation , press the desired key within 6 sec. to vary the settings (touching any key reactivates a 6 sec time-out). Note: setting the backlight always on (par. - Page 48 4 - DISPLAY FEATURES Time and thermal scale programmed over 24 hours: Upper digit position Comfort temperature Intermediate digit position Working temperature Lower digit position Economy temperature lack of Digits = temperature Antifreeze (in Winter) or disabled temperature control (in Summer) SetT Menù...
-
Page 49: Installation
5 - INSTALLATION 5 - INSTALLAZIONE 5.1 - DIMENSIONS 5.3 - FASTENING THE WALL BASE Switch off mains power 230V~ to device Fasten the base of the programmable thermostat with the screws supplied: to the wall, to the rounded or rectangular recessed box via the relative paired holes . -
Page 50: Electrical Connections
5 - INSTALLATION 5.4 - ELECTRICAL CONNECTIONS Important: the installation and electrical connection of the devices and appliances must be implemented by qualified personnel and in conformity with current laws and regulations. The manufacturer declines all liability in connection with the use of products subject to special environmental and/or installation standards. - Page 51 5 - INSTALLATION Examples of electrical connections to control devices BOILER Connection to a boiler 230V~ 230V~ LOAD closes opens Connection to a motorized valve N.B.: with heavy inductive loads (pumps and solenoid valves), connecting an RC filter parallel to the load is recommendable. After having completed the electrical connections, secure the body of the programmable thermostat to the wall base as instructed in the following paragraph.
- Page 52 5 - INSTALLATION 5 - INSTALLAZIONE 5.5 - PROCEDURE TO FASTEN OR REMOVE THE PROGRAMMABLE THERMOSTAT FROM THE WALL BASE After having made the electrical connections: Apply the terminal cover to the base, securing it to hook . E Removing the programmable To remove the cover, use a small screwdriver on hook for leverage.
- Page 53 START THE PROGRAMMABLE THERMOSTAT The first time mains voltage is engaged, the programmable thermostat performs a lamp-test by switching on all display segments, displaying the installed software version for a few seconds. When this phase is over, the programmable thermostat asks to select the language of use. Select the desired language by scrolling through the available languages using the keys.
-
Page 54: Immediate Activation Of The Most Commonly Used Operating Functions
IMMEDIATE ACTIVATION OF THE MOST COMMONLY USED FUNCTIONS From normal programmable thermostat operation in stand-by, pressing a key, the backlight activates (if not excluded - par. 11.12) and the words selection and navigation appear. Within 6 sec., a variation is made the second time the desired key is pressed. -
Page 55: Structure Of The Main Menus (Use And Configuration)
STRUCTURE OF THE MAIN MENUS (use and configuration) Available Menu structure: SET TEMP 5 CONFIGUR (change Set temperature points) (installer or skilled user menu) for winter mode LANGUAGE (menu language selection) - t1 (comfort) - SEASON (Winter or Summer mode) - t2 (pre-comfort) - TIME... -
Page 56: Access To Menus
ACCESS TO MENUS Menu From the normal programmable thermostat operation press the key to access the first available menu. Or, if a secret user and/or installer access code has been previously entered , follow the steps below to access the user or installer menus with the user and installer password with the user and installer password main screen... -
Page 57: User Menu
USER MENU 10 - 10.1 - «SET TEMP» Menu modification of SET temperatures In the event the factory Set temperatures: for summer for winter Air conditioner operating with Operating boiler with room room temperature higher than: temperature lower than: 24,0 °C 20,0 °C (68.0 °F) (75.2 °F) -
Page 58: Override Operation
USER MENU 10 - 10.2 - Programmable thermostat «PROFILES» menu 1- Display the main menu SEt PROFILE and confirm with OK. 2- Select with keys the desired profile among available options: SetT Menù back - SEt OVERRIDE SetT (temporary or permanent override) Menù... -
Page 59: B - Permanent Override Operation
USER MENU 10 - flashing digits 4- With the keys it is possible to enter the number of hours of temporary override operation: 1h or from override activation time to midnight of the current day at the latest wait 4 sec. or confirm with OK (the digits corresponding to the set hours start flashing). -
Page 60: C - Disabling Permanent Override Operation
USER MENU 10 - 10.2.1.C - Disabling permanent override operation To go back to automatic operation from program, through the path: Menu button -> SEt PROFILE -> display item OVERRIDE OFF, confirm by pressing The temperature scale will be displayed and the relevant Set points of the current day, according to the program in use SetT SetT... -
Page 61: Holiday Program
USER MENU 10 - 10.2.3 - HOLIDAY PROGRAM (e.g.: absence for holidays) This program is useful in the event one should need to leave the house for several days (temperature control pause); your habitual program in use (winter or summer) will be re-enabled at the end of the period set with the HOLIDAY program, so you may find the desired temperature on your return. - Page 62 USER MENU 10 - Setting end of holidays «IN » (coming back home) The display shows the page where to enter when the program countdown must end and normal temperature control of the programmable thermostat should resume (according to the original program). 7- The month previously set in the OUT function flashes on the display, use keys to set the month when you...
- Page 63 USER MENU 10 - Upon completing data entry, two different views may be displayed (depending on the data entered): A) OUT Date the same as the current one B) OUT Date after the current one programmable thermostat goes back to the program running before entering the data in the HOLIDAY program, pending its activation.
-
Page 64: Off Menu (Disabling The Timer Thermostat)
USER MENU 10 - 10.3 - OFF Menu (disabling the programmable thermostat) This setting has the purpose of locking programmable thermostat functions when heating or cooling must remain off. Through the button path Menu -> SEt PROFILE -> , select SetT Menù... -
Page 65: List Of Pre-Set Programs
USER MENU 10 - 10.4 - PROGRAM Menu (list of pre-set programs, display, change, copy programmed time profiles) 10.4.1 - LIST OF PRE-SET PROGRAMS The box shows factory-entered programs with relevant time profiles: P01 and P02 WINTER; P03 and P04 SUMMER. In the event none of the pre-set programs should meet your needs, they may be modified (see next paragraphs). -
Page 66: Program Selection
USER MENU 10 - e.g. Factory set program 10.4.2 - PROGRAM SELECTION 1- Through the path Menu button -> with buttons , select item e confirm with PROGRAM SEt SetT Menù 2- The programs in the memory (P01 , P02 , P03 back SetT Menù... -
Page 67: Modify Program
USER MENU 10 - 10.4.4 - MODIFY PROGRAM There are 4 available programs, all freely programmable for every hour of the day (with half hour steps) and differently for every day of the week, on 3 different temperature levels: comfort (upper digits), activity (intermediate digits), economy (lower digits), plus one level of antifreeze temperature... -
Page 68: Copy The Modified Day Pag
USER MENU 10 - 10.4.5 - COPY OF THE MODIFIED DAY example copy of Monday onto Tuesday and Thursday After completing the modification of the temperature/time profile of one day (see previous paragraph) it is possible to copy it over one or more days. Press confirmation will be asked whether to copy the modification over other days... -
Page 69: User Password Menu
USER MENU 10 - 10.5 - USER PASSWORD Menu 10.5.1 - Entering the user password No code is set in the factory configuration. Through the path Menu ->, select item USER PASSWORD SEt -> and confirm with SetT Menù back 2- Use the keys enter 4 digits (dashes not included) between... -
Page 70: Configuration Menu (Installer)
11 - CONFIGURATION MENU (installer) 11.1 - Access to configuration menu ATTENTION: access to the configuration menu is recommended for the installer or experienced users since the modification of some settings might affect correct system operation. Through the Menu -> path select the CONFIGUR SEt menu and confirm with access the 1st item... - Page 71 11 - CONFIGURATION MENU (installer) 11.4 - INSERTION/MODIFY: YEAR - MONTH - DAY - CURRENT TIME - AUTOMATIC DAYLIGHT SAVING / STANDARD TIME CHANGE IMPORTANT: in order to be able to WORK PROPERLY, the programmable thermostat requires you to enter or update the current year, month, day, hour and minutes, automatic daylight saving/standard time change and...
-
Page 72: Type Of Temperature Adjustment Mode Pag
11 - CONFIGURATION MENU (installer) 11.5 - TYPE TEMPERATURE ADJUSTMENT METHODS thermal inertia over temperature of the heating element °C/°F programmable thermostat is factory set to work in THERMAL DIFFERENTIAL mode ON/OFF with a preset thermal differential value T SET (Hysteresis) of 0,3 °C. -
Page 73: Setting Hysteresis For Thermal Differential On-Off
11 - CONFIGURATION MENU (installer) 11.5.2 - Setting hysteresis for thermal differential ON-OFF •Through the path Menu -> CONFIGUR SEt -> RULE SEt -> select On:OFF then press •With the keys enter the desired hysteresis value (values may be set from 0.2 °C to 1.2 °C / from 0.3 °F to 2.1 °F - default 0.3 °C/0.4 °F). SetT to confirm. -
Page 74: Correction Of Room Temperature Reading
11 - CONFIGURATION MENU (installer) 11 - MENU PER LA CONFIGURAZIONE (installatore) 11.7 - CORRECTION OF ROOM TEMPERATURE READING If for any reason the programmable thermostat must be installed in a position where the measured room temperature might be affected (e.g. perimeter wall which is on average colder in winter and warmer in summer than the rest of the dwelling) the device has 2 separate parameters to adjust the room temperature measured in the SetT... - Page 75 11 - CONFIGURATION MENU (installer) •Through the path Menu -> CONFIG UR E S t -> , select item LOCKS SEt . Press to confirm. In a sequential manner it is possible to set maximum temperature locks (t comfort) and/or minimum t antifreeze ) for the winter mode...
-
Page 76: Pag
11 - CONFIGURATION MENU (installer) 11.9 - CONNECTION TO EXTERNAL CONTACT FOR REMOTE PROGRAMMABLE THERMOSTAT SWITCHING ON/OFF Before enabling any item of the «INPUT» menu listed below ensure you have connected an external contact to terminals 8 and 9 (AUX). A remote device may be connected to the programmable thermostat (e.g. - Page 77 11 - CONFIGURATION MENU (installer) E.g. Telephone programmer 11. .1a - Example of remote programmable thermostat switching on/off, connected to a telephone programmer with «nA» NO contact SetT Menù back contact ( normally open). Programmer contact closure stat change): causes permanent comfort override and displaying associated symbols/setpoints and the icon “...
-
Page 78: Na Duty - For Normally Open Contact Pag
11 - CONFIGURATION MENU (installer) 11. .2 - «nA» Duty - for normally open contact (NO) ATTENTION: to the 8 and 9 AUX terminals only connect switches and contacts with insulation suitable to work at 230Vac mains voltage. By selecting this function it is possible to connect a NO remote contact which upon closing sets the programmable thermostat in the mode with antifreeze temperature t , unless it has been previously disabled. -
Page 79: Pag
11 - CONFIGURATION MENU (installer) 11.1 - DESCALING CYCLE If the function is activated, the programmable thermostat activates every day of the year at 12:00, for 2 minutes. It activates the controlled device (pump, valve etc.) to prevent scaling SetT Menù... -
Page 80: Entering And Managing Password Pag
11 - CONFIGURATION MENU (installer) 11.13 - ENTERING AND MANAGING PASSWORDS Some functions of this programmable thermostat may be protected by a user Password (U ) and/or installer (Inst) , so that they may be only modified by authorised persons. No password is active in factory settings. SetT Menù... -
Page 81: Pag
11 - CONFIGURATION MENU (installer) 11.14 - RESTORE (RESET) IMPORTANT! The RESTORE (Reset) operation is recommended for the installer or expert user. In fact, this operation deletes many previous settings and programs carried out also according to the type of system. SetT Menù...
Need help?
Do you have a question about the 738 and is the answer not in the manual?
Questions and answers