
Related Manuals for Rokit Dr. INVIVO 4D


Summary of Contents for Rokit Dr. INVIVO 4D
- Page 1 Version 2020-01-15 Changing the world by serving patients through personalized regenerative therapeutics...
- Page 2 Table of Contents INV-CHS-20191210 Confidential & Proprietary|© ROKIT Healthcare Inc. 2019. All Rights Reserved...
- Page 3 Healthcare shall not be liable for any direct, indirect, incidental, special, consequential or exemplary damages, including but not limited to, damages for loss of profits, goodwill, use, data or other intangible losses (even if ROKIT Healthcare has been advised of the possibility of such damages), resulting from: (i) the use or the inability to use the product or software;...
-
Page 4: Safety Caution
Incorrect installation may cause an electric shock, fire, malfunction, explosion or injury. Keep eyes and hands away from the door while the UV lamps are on. This may cause eye injury and burn. INV-CHS-20191210 Confidential & Proprietary|© ROKIT Healthcare Inc. 2019. All Rights Reserved... - Page 5 Do not use any damaged power plug, power cord, or a loose outlet. Important: Never disassemble, repair or modify any parts or whole of the equipment without advance notice to the service center. INV-CHS-20191210 Confidential & Proprietary|© ROKIT Healthcare Inc. 2019. All Rights Reserved...
- Page 6 The coolants supplied are a chemical. Please read the instructions carefully and use them correctly. Be sure to also read the instruction manuals of the supplied Air Compressor and air dispenser controller. INV-CHS-20191210 Confidential & Proprietary|© ROKIT Healthcare Inc. 2019. All Rights Reserved...
- Page 7 The recommended replacement cycle of the HEPA filter is 8 months. (※ The replacement cycle varies depending on the environment.) When using the equipment inside a biosafety cabinet, it is okay to turn off the HEPA filter. INV-CHS-20191210 Confidential & Proprietary|© ROKIT Healthcare Inc. 2019. All Rights Reserved...
- Page 8 With every revolutionary and disruptive technology, medicine takes a leap forward to improve patient health and quality of life. For long, 3D bioprinting of cells and tissues has stayed on the research bench, but at ROKIT Healthcare, we’re working to move it into the Operating Theater.
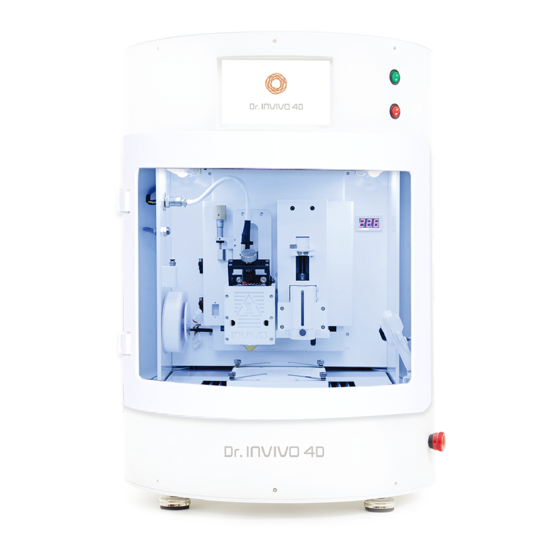
- Page 9 Dr. INVIVO 4D Overview Technical Specifications INV-CHS-20191210 Confidential & Proprietary|© ROKIT Healthcare Inc. 2019. All Rights Reserved...
-
Page 10: Specification
Hot-Melting Pneumatic Dispenser Dispenser (~350℃) Build Volume 100 X 100 X 80mm Printing Speed 3~20mm/sec ※ NOTE : The above specifications may be subject to change without notice to improve performance INV-CHS-20191210 Confidential & Proprietary|© ROKIT Healthcare Inc. 2019. All Rights Reserved... -
Page 11: Basic Components
※ Of the above components, syringes and syringe tips are for in vitro research only and cannot be used on animals or humans. CAUTION ※ The components above are subject to change without notice to improve performance. INV-CHS-20191210 Confidential & Proprietary|© ROKIT Healthcare Inc. 2019. All Rights Reserved... -
Page 12: Accessory Components
Invivo Liquid(Coolant) premium Rubber Hose premium Clamp premium Silicone Cover premium Valve Fitting premium Rubber O-ring premium ※ The components above are subject to change without notice to improve performance. INV-CHS-20191210 Confidential & Proprietary|© ROKIT Healthcare Inc. 2019. All Rights Reserved... -
Page 13: Preparation Before Installation
Invivo Body 690 x 690 x 990 Temperature Controller 520 x 480 x 365 16.5 Air Compressor 820 x 550 x 560 Air Dispenser Controller 480 x 440 x 205 INV-CHS-20191210 Confidential & Proprietary|© ROKIT Healthcare Inc. 2019. All Rights Reserved... - Page 14 Turn off the power. Remember to keep the system turned off during installation and connection of accessory equipments to the body. [Packaging specification 690 x 690 x 990, 48 kg] Power on NewCreatorK on Power off Before removing package After removing package INV-CHS-20191210 Confidential & Proprietary|© ROKIT Healthcare Inc. 2019. All Rights Reserved...
- Page 15 The coolant supplied with Dr. INVIVO is a chemical. Be sure to read the precautions on the container surface and use them correctly. CAUTION Use the original coolant supplied with Dr. INVIVO. The coolant will evaporate over time, so check regularly and refill. INV-CHS-20191210 Confidential & Proprietary|© ROKIT Healthcare Inc. 2019. All Rights Reserved...
- Page 16 Dr. INVIVO 4D Installation [520x480x365, 16.5 kg ] Circulate Power off coolants (3~4 min) WARNING ※ When installing, connecting and disconnecting any parts or equipment, power off the system first. INV-CHS-20191210 Confidential & Proprietary|© ROKIT Healthcare Inc. 2019. All Rights Reserved...
- Page 17 4. Check the drain bucket on the back of the Air Compressor at least once a month and empty it if it is full. 5. Replace the air dryer every 6 months. 6. Check and replace other consumable parts. INV-CHS-20191210 Confidential & Proprietary|© ROKIT Healthcare Inc. 2019. All Rights Reserved...
- Page 18 [Packaging specification 820 x 550 x 560, 49 kg ] [Packaging specification 820 x 550 x 560, 49 kg ] CAUTION ※ When installing, connecting and disconnecting any parts or equipment, power off the system first. INV-CHS-20191210 Confidential & Proprietary|© ROKIT Healthcare Inc. 2019. All Rights Reserved...
- Page 19 12. Make sure the temperature of the Air Dispenser can be adjusted by the Air Dispenser Controller. 13. Check that the vacuum is working. 14. Turn off and end installation. CAUTION 1. Turn off the vacuum valve before use INV-CHS-20191210 Confidential & Proprietary|© ROKIT Healthcare Inc. 2019. All Rights Reserved...
- Page 20 Installation of Air Dispenser Controller (Premium) [Packaging specification 480 x 440 x 205, 7 kg ] CAUTION ※ When installing, connecting and disconnecting any parts or equipment, power off the system first. INV-CHS-20191210 Confidential & Proprietary|© ROKIT Healthcare Inc. 2019. All Rights Reserved...
- Page 21 CAUTION 1. After the installation of the Temperature Controller is complete and the coolant has been circulated sufficiently in the Dr. INVIVO body, turn on the Dr. INVIVO body. INV-CHS-20191210 Confidential & Proprietary|© ROKIT Healthcare Inc. 2019. All Rights Reserved...
- Page 22 Samsung agent or service center. 7. Please refer to the instruction manual of your router for how to install the router. 8. The dongle can support Wi-Fi 2.4 GHz. INV-CHS-20191210 Confidential & Proprietary|© ROKIT Healthcare Inc. 2019. All Rights Reserved...
-
Page 23: Preparation Before Use
3. When filling the barrel or syringe, be careful not to create air bubbles. Bubbles mixed with the material will degrade the output quality. 4. Press the LCD button slowly. Pressing the LCD button repeatedly may cause a malfunction. INV-CHS-20191210 Confidential & Proprietary|© ROKIT Healthcare Inc. 2019. All Rights Reserved... - Page 24 The coolant supplied with Dr. INVIVO is a chemical. Be sure to read the precautions on the container surface and use them correctly. 3. The replacement term of Dr. INVIVO@COOLANT is 1 year. Using genuine coolant is recommended. INV-CHS-20191210 Confidential & Proprietary|© ROKIT Healthcare Inc. 2019. All Rights Reserved...
- Page 25 3. If you are not using the Air Dispenser, lock the ‘Air In’ switch on the back of the control box to reduce air loss in the Air Compressor. INV-CHS-20191210 Confidential & Proprietary|© ROKIT Healthcare Inc. 2019. All Rights Reserved...
- Page 26 1. Loading of the Air Compressor starts at below 9.8 bar, and stops when it reaches 11.3bar. 2. Factory setting of the outlet pressure is 9.5 bar, which can be controlled by the Pressure Regulating Valve. INV-CHS-20191210 Confidential & Proprietary|© ROKIT Healthcare Inc. 2019. All Rights Reserved...
- Page 27 1. The melting state (viscosity) and the extrusion speed of the filament affect the output quality. 2. Press on the LCD screen with ease. Refrain from repeatedly pressing the LCD screen as it may cause malfunction. INV-CHS-20191210 Confidential & Proprietary|© ROKIT Healthcare Inc. 2019. All Rights Reserved...
- Page 28 1. Filling of the material should not exceed the capacity of the dispenser. 2. Please set [Distance] according to the type and viscosity material. It is recommended to set less than more. 3. Use only genuine needles or nozzles. INV-CHS-20191210 Confidential & Proprietary|© ROKIT Healthcare Inc. 2019. All Rights Reserved...
- Page 29 1. Filling of the material should not exceed 1/3 of the capacity of the barrel. Otherwise the material may stick to the adapter and interfere with the air flow. 2. Use only genuine needles or nozzles. 3. Be careful with touching the barrel or tip while it is still hot. INV-CHS-20191210 Confidential & Proprietary|© ROKIT Healthcare Inc. 2019. All Rights Reserved...
- Page 30 8. Check that the final coordinate value has been entered in NewCreatorK at [Settings] > [Printer Setting]. 9. Then, move the right and left nozzle back to their original positions. INV-CHS-20191210 Confidential & Proprietary|© ROKIT Healthcare Inc. 2019. All Rights Reserved...
- Page 31 5. Start the X-Y Position Set only after removing objects such as Petri dishes from the Dr. INVIVO bed. Petri dishes and nozzles (or needles) may get hit and receive damage. INV-CHS-20191210 Confidential & Proprietary|© ROKIT Healthcare Inc. 2019. All Rights Reserved...
- Page 32 2. In order to place a culture dish onto the print bed, please adjust the location of the bed by using arrows on the display. Please follow images below. CAUTION 1. Make sure the nozzle tip or needle doesn’t hit the printing bed (e.g. culture Dish). INV-CHS-20191210 Confidential & Proprietary|© ROKIT Healthcare Inc. 2019. All Rights Reserved...
- Page 33 4. Start the Bed Leveling only after confirming that right and left printheads and nozzles have been installed properly to the system, 5. Avoid touching the print bed with the thickness gauge. Please use the thickness gauge after sterilization. INV-CHS-20191210 Confidential & Proprietary|© ROKIT Healthcare Inc. 2019. All Rights Reserved...
- Page 34 4. Start the bed leveling after confirming that the syringe or barrel containing the printing materials on the right and left sides are correctly installed. 5. Do not press the printing bed with the thickness gauge. Please use the thickness gauge after sterilization. INV-CHS-20191210 Confidential & Proprietary|© ROKIT Healthcare Inc. 2019. All Rights Reserved...
- Page 35 9. Raise the nozzle up for safety. CAUTION 1. Beginning with Firmware v.1.70, there is no “Left Position” button. Use the same process used in dual printing to level the left dispenser. INV-CHS-20191210 Confidential & Proprietary|© ROKIT Healthcare Inc. 2019. All Rights Reserved...
- Page 36 5. With the help of a professional trained technician, familiarize yourself with how to set each and every slicing parameter. 6. The exact slicing parameters may vary for the same material depending on the surrounding environment (temperature, humidity, etc.) and the object size to be printed. INV-CHS-20191210 Confidential & Proprietary|© ROKIT Healthcare Inc. 2019. All Rights Reserved...
- Page 37 7. Click the [Slicing] button at the top to create a G-Code file, and then click the [SAVE] button to save the file. CAUTION 1. The right Dispenser is Dispenser1 and the left Dispenser is Dispenser2. INV-CHS-20191210 Confidential & Proprietary|© ROKIT Healthcare Inc. 2019. All Rights Reserved...
- Page 38 1. Insert an external USB into the USB port on the top right of the Dr. INVIVO body. 2. Select [New Creator K APP]> [File Print]> [USB] on INIVIVO display. 3. Select the file to print. INV-CHS-20191210 Confidential & Proprietary|© ROKIT Healthcare Inc. 2019. All Rights Reserved...
- Page 39 3. Once your computer is connected to Dr. INVIVO, you will see the word “Operational” appear in the status line. Upload your G-code file and click the [Print] icon to begin printing. INV-CHS-20191210 Confidential & Proprietary|© ROKIT Healthcare Inc. 2019. All Rights Reserved...
- Page 40 5. Once your computer is connected to Dr. INVIVO, you will see the word “Operational” appear in the status line. Upload your G-code file and click the [Print] icon to begin printing. INV-CHS-20191210 Confidential & Proprietary|© ROKIT Healthcare Inc. 2019. All Rights Reserved...
- Page 41 4. While holding down the black one-touch button at the top of the nozzle, remove the inserted tube. CAUTION 1. After use, remove the filament with the bobbin and seal it. INV-CHS-20191210 Confidential & Proprietary|© ROKIT Healthcare Inc. 2019. All Rights Reserved...
- Page 42 2. Touch the [UNLOAD] button. 3. Loosen the two screws holding the dispenser and remove the syringe from the dispenser mount. As needed, dispose the used syringe and wipe clean the dispenser mount. INV-CHS-20191210 Confidential & Proprietary|© ROKIT Healthcare Inc. 2019. All Rights Reserved...
- Page 43 2. Select [New Creator K APP] > [Printer View] on Dr. INVIVO display. 3. Set the desired temperature in [TEMPERATURE]. 4. Get ready to pre-heat the syringes at a desired temperature. INV-CHS-20191210 Confidential & Proprietary|© ROKIT Healthcare Inc. 2019. All Rights Reserved...
- Page 44 How do I turn on/off the chamber LED light? 1. LED on/off is available in the Dr. INVIVO LCD settings. 2. LED on/off is also available in the NewCreatorK setting of the PC. INV-CHS-20191210 Confidential & Proprietary|© ROKIT Healthcare Inc. 2019. All Rights Reserved...
- Page 45 2. Click the bed twice and press the arrow button in the desired direction. How do I format NewCreatorK? 1. Click [Program] – [Menu] – [File] – [Settings] – [Factory Reset]. INV-CHS-20191210 Confidential & Proprietary|© ROKIT Healthcare Inc. 2019. All Rights Reserved...
- Page 46 3. Reduce the object size of 70mm, 90mm to a size apt for dual printing. 4. Objects >= 90mm should be printed on a larger culture dish or glass plate (without walls). INV-CHS-20191210 Confidential & Proprietary|© ROKIT Healthcare Inc. 2019. All Rights Reserved...
- Page 47 2. When using the USB memory stick: On INVIVO LCD screen, go to Settings – Printer – Update 3. When using the PC: Connect the PC to the printer – On NewCreator K software, go to Connect – Print Info – Update INV-CHS-20191210 Confidential & Proprietary|© ROKIT Healthcare Inc. 2019. All Rights Reserved...
- Page 48 1. Press the “set” button for longer than 3 seconds > Disp menu > Press set longer than 1 second > g.cel menu > press down arrow once > g1.n > press set button 6 times > bias menu > press the arrows up or down accordingly. INV-CHS-20191210 Confidential & Proprietary|© ROKIT Healthcare Inc. 2019. All Rights Reserved...
- Page 49 1. If daily use, the extruder nozzles should be replaced in 3 months. Under normal circumstances, the period is 6 months. 2. Extruder heads should be replaced entirely, not just the nozzles. INV-CHS-20191210 Confidential & Proprietary|© ROKIT Healthcare Inc. 2019. All Rights Reserved...
- Page 50 8. When the application finds the device, select play button and assign ID and passcode for the device. 9. If the passcode is already set, select “Edit” and reset the passcode. INV-CHS-20191210 Confidential & Proprietary|© ROKIT Healthcare Inc. 2019. All Rights Reserved...
Need help?
Do you have a question about the Dr. INVIVO 4D and is the answer not in the manual?
Questions and answers