Dell EMC VEP4600 Operating System Installation Manual
Hide thumbs
Also See for VEP4600:
- Installation manual (35 pages) ,
- Setup manual (22 pages) ,
- Operating system installation manual (78 pages)
Table of Contents
Advertisement
Advertisement
Table of Contents

Related Manuals for Dell EMC VEP4600


Summary of Contents for Dell EMC VEP4600
- Page 1 VEP4600 Operating System Installation Guide September 2018...
- Page 2 Notes, cautions, and warnings NOTE: A NOTE indicates important information that helps you make better use of your product. CAUTION: A CAUTION indicates either potential damage to hardware or loss of data and tells you how to avoid the problem. WARNING: A WARNING indicates a potential for property damage, personal injury, or death.
-
Page 3: Table Of Contents
Contents 1 VEP4600 overview............................4 2 VEP4600 start up and serial console connection................... 5 3 Prepare bootable USB with ISO image......................7 4 Configure BIOS and install Red Hat 7.4 OS....................9 BIOS access process................................. 9 Configure BIOS to boot from USB..........................10 Install Red Hat 7.4 OS...............................12... -
Page 4: Vep4600 Overview
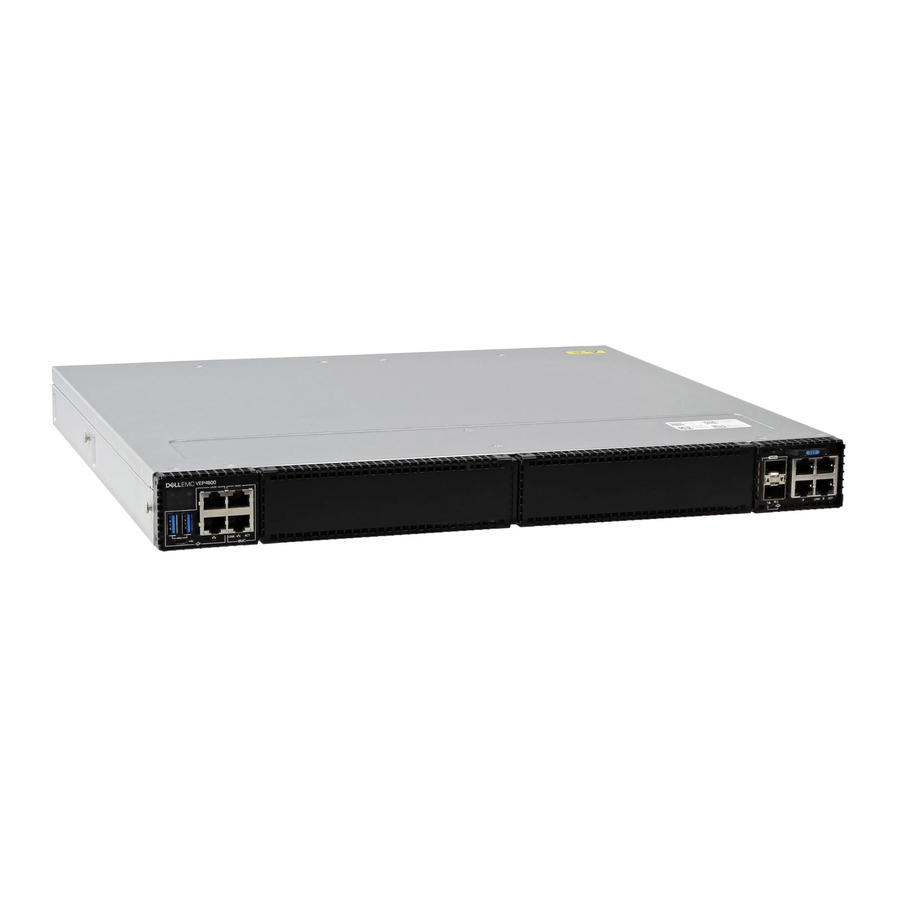
VEP4600 overview The VEP4600 platform is a one rack unit, x86-based networking platform running virtualized universal customer premise equipment (uCPE) functions, and basic switching/routing functions as a top-of-rack device with four, eight, or 16 cores. Figure 1. VEP4600 platform Platform status icon LEDs... -
Page 5: Vep4600 Start Up And Serial Console Connection
Figure 2. PuTTy session options Plug in a power cable to the back of VEP4600. The platform powers up immediately. Watch for the VEP4600 console window. Figure 3. VEP4600 console window After the POST Lower DRAM Memory test text displays, the cursor moves to the upper left corner of the console window. - Page 6 Figure 5. Console window display NOTE: If you miss the setup screen, a boot up screen displays. If this happens, power cycle the VEP4600 and press the Delete button. Repeat the process until you see the setup screen. Figure 6. Setup screen...
-
Page 7: Prepare Bootable Usb With Iso Image
Prepare bootable USB with ISO image For this procedure, you need a bootable USB stick. On a Windows CPU, use Rufus to burn the bootable USB. To download Rufus, go to https://rufus.akeo.ie. Click the cdrom icon to load the ISO image from the Windows disks. Figure 7. - Page 8 Figure 9. Rufus device dialog box NOTE: Use the same process to burn a USB stick with Ubuntu and ESXi ISO images. Prepare bootable USB with ISO image...
-
Page 9: Configure Bios And Install Red Hat 7.4 Os
BIOS access process Plug in a power cable to the back of VEP4600. The platform powers up immediately. Watch for the VEP4600 console window. Figure 10. VEP4600 console window After the POST Lower DRAM Memory test text displays, the cursor moves to the upper left corner of the console window. -
Page 10: Configure Bios To Boot From Usb
Figure 12. Console window display NOTE: If you miss the setup screen, a boot up screen displays. If this happens, power cycle the VEP4600 and press the Delete button. Repeat the process until you see the setup screen. Figure 13. Setup screen Configure BIOS to boot from USB Boot up the VEP4600 and navigate to the BIOS settings. - Page 11 Figure 15. CSM support enabled Select the Boot menu tab. Highlight the UEFI USB Drive BBS Priority option using the left and right arrows and press Enter. Figure 16. Select EUFI USB Drive BBS Priority Select Red Hat OS USB as the first option. Configure BIOS and install Red Hat 7.4 OS...
-
Page 12: Install Red Hat 7.4 Os
Figure 17. Select Red Hat OS USB Select USB using the up and down arrows for Boot Option #1 and press Enter. Figure 18. Select USB Use the left and right arrow keys to highlight Yes after the Save configuration and exit prompt displays, then press Enter. Figure 19. - Page 13 Figure 20. Install Red Hat menu Type e to edit the installation menu entry. Figure 21. Edit installation menu Attach the console=ttyS0,11520 string to the end of the first install line. Press ctrl-x to start the installation. Figure 22. Installation start Configure the disk destination for the installation by entering 5 and c to configure the Installation Destination.
- Page 14 Figure 23. Configure disk destination Enter 1 for SSD disk, then c to continue. Figure 24. Select SSD disk Enter 3 to Use Free Space, then enter c to continue. NOTE: You must select this option. If you do not select this option, the Red Hat OS deletes the DIAG OS. Configure BIOS and install Red Hat 7.4 OS...
- Page 15 Figure 25. Select Use Free Space Enter 1 to select Standard Partition, then enter c to continue. Figure 26. Select Standard Partition Enter 2 to configure the Time settings. Optionally, configure the root password. Configure BIOS and install Red Hat 7.4 OS...
-
Page 16: Start Red Hat 7.4 Os Installation
Figure 27. Select Time settings Start Red Hat 7.4 OS Installation Enter b to start the installation. Figure 28. Start installation The installation process begins. Configure BIOS and install Red Hat 7.4 OS... -
Page 17: Configure Bios To Boot From Ssd
Figure 30. Reboot the system Configure BIOS to boot from SSD Plug in a power cable to the back of VEP4600. The platform powers up immediately. Watch for the VEP4600 console window. Configure BIOS and install Red Hat 7.4 OS... - Page 18 Figure 33. Console window display NOTE: If you miss the setup screen, a boot up screen displays. If this happens, power cycle the VEP4600 and press the Delete button. Repeat the process until you see the setup screen. Configure BIOS and install Red Hat 7.4 OS...
- Page 19 Figure 34. Setup screen Select the Boot menu tab. Boot into the BIOS settings and scroll down to UEFI Hard Disk Drive BBS Priorities using the up and down arrow keys and press Enter. Figure 35. Select UEFI Hard Disk Drive BBS Priorities Select Red Hat Boot Manager as Boot Option #1.
- Page 20 Figure 36. Select Red Hat Boot Manager Configure the fixed boot order priorities, and select Red Hat as the first boot option. Figure 37. Select Red Hat Use the left and right arrow keys to highlight Yes after the Save configuration and exit prompt displays, then press Enter. The system automatically starts to boot up.
-
Page 21: Boot Up Red Hat 7.4 Os From Ssd
Boot up Red Hat 7.4 OS from SSD Figure 39. Red Hat 7.4 boot screen Enter the required credentials from the local login screen as root, then press Enter. Check the disk usage after logging in using the fdisk command. Configure BIOS and install Red Hat 7.4 OS... - Page 22 Figure 40. fdisk Command output Type df -h to display usage. Configure BIOS and install Red Hat 7.4 OS...
-
Page 23: Boot Into Diag Os
Figure 41. df -h Command output Boot into DIAG OS Select the Boot menu tab. Boot to the BIOS settings. Scroll down to Hard Disk Priorities, then press Enter. Figure 42. Select hard Disk Priorities Select DIAG OS from the Hard Disk Priorities screen as the first boot option using the up and down arrow keys, then press Enter. Figure 43. - Page 24 Figure 44. DIAG OS first option confirmation Use the left and right arrow keys to highlight Yes after the Save configuration and exit prompt displays, then press Enter. Figure 45. Save configuration and exit option Boot to DIAG OS. Figure 46. Boot to DIAG OS Type fdisk -l to display the disk usage.
- Page 25 Figure 47. fdisk -l Command output Type df –h to display usage. Figure 48. dh -h Command output Configure BIOS and install Red Hat 7.4 OS...
-
Page 26: Configure Bios And Install Ubuntu 16.04 Os
Figure 51. Console window display NOTE: If you miss the setup screen, a boot up screen displays. If this happens, power cycle the VEP4600 and press the Delete button. Repeat the process until you see the setup screen. Configure BIOS and install Ubuntu 16.04 OS... -
Page 27: Configure Bios To Boot From Usb
Figure 52. Setup screen Topics: • Configure BIOS to boot from USB • Install Ubuntu 16.04 OS • Boot into DIAG OS Configure BIOS to boot from USB Select the Boot menu tab. Boot into the BIOS settings using the up and down arrow keys and configure the boot up options. Figure 53. - Page 28 Figure 54. Select USB Device NOTE: If you do not see the USB boot, select USB Drive BBS Priorities and press Enter. Figure 55. Select USB Drive BBS Priorities Confirm that the required USB is selected. Figure 56. Boot Option #1 confirmation Use the left and right arrow keys to highlight Yes after the Save configuration and exit prompt displays, then press Enter.
-
Page 29: Install Ubuntu 16.04 Os
Install Ubuntu 16.04 OS Boot into the Ubuntu GRUB menu. Figure 58. Ubuntu GRUB menu Type e to check the boot entry. Confirm the console=ttyS0,115200 string is present. Figure 59. Check boot entry Press ctrl-x to start the installation. Confirm the language that is selected from the Select a language screen. Configure BIOS and install Ubuntu 16.04 OS... - Page 30 Figure 60. Select a language screen Make edits as needed or skip for brevity. Select Yes from the Partition disks screen to unmount the partition. Figure 61. Partition disks screen Select Guided – use the largest continuous free space for the Partitioning method. Figure 62.
- Page 31 Figure 63. Confirm write to disks Make edits as needed or skip for brevity. Select the Main menu tab. Boot to the BIOS setting. Figure 64. Boot to BIOS setting Select Ubuntu using the up and down arrow keys as the first boot option from the Fixed Boot Order Priorities screen. Configure BIOS and install Ubuntu 16.04 OS...
- Page 32 Figure 65. Select Ubuntu Use the left and right arrow keys to highlight Yes after the Save configuration and exit prompt displays, then press Enter to start the boot process. Figure 66. Save configuration and exit option Highlight *Ubuntu then press Enter. Figure 67.
- Page 33 Figure 68. Edit option Add the console redirect. Figure 69. Console redirect option Enter control-x to boot. Configure BIOS and install Ubuntu 16.04 OS...
-
Page 34: Boot Into Diag Os
Figure 70. Booting output Type df -h to display usage. Figure 71. df -h Command output Boot into DIAG OS Enter the reboot and df -h commands from the command prompt to reboot the platform. Configure BIOS and install Ubuntu 16.04 OS... - Page 35 Figure 72. Reboot and df -h command output Select the Main menu tab. Boot to the BIOS settings and using the left and right arrow keys, scroll to the BIOS tab. Figure 73. Boot to BIOS settings Select the DIAG OS partition to boot from the BIOS tab. Configure BIOS and install Ubuntu 16.04 OS...
- Page 36 Figure 74. Select DIAG OS partition Press Enter for Boot Option #1. Figure 75. Select Boot Option #1 Confirm that Boot Option #1 is selected. Figure 76. Boot Option #1 confirmation Use the left and right arrow keys to highlight Yes after the Save configuration and exit prompt displays, then press Enter to start boot up the system.
- Page 37 Figure 77. Save configuration and exit option The system boots up. Figure 78. System booting Enter the required credentials from the DIAG OS screen the press Enter. Figure 79. DIAG OS screen Log in to the DIAG OS as root/calvin, as shown. Figure 80.
- Page 38 Figure 81. df -h Command output Configure BIOS and install Ubuntu 16.04 OS...
-
Page 39: Configure Bios And Install Adva Os
Figure 84. Console window display NOTE: NOTE: If you miss the setup screen, a boot up screen displays. If this happens, power cycle the VEP4600 and press the Delete button. Repeat the process until you see the setup screen. Configure BIOS and install ADVA OS... - Page 40 Figure 85. Setup screen Select the Advanced menu tab and boot into the BIOS settings. Select UEFI using the up and down arrow keys and Legacy in CSM. Figure 86. Select UEFI and Legacy in CSM Use the up and down arrow keys to select Hard Drive BBS Priorities then press Enter. Figure 87.
- Page 41 Figure 88. Select sSATA P3: INTEL Select Dell Dell USB PMAP using the up and down arrow keys then press Enter. Figure 89. Select Dell Dell USB PMAP Use the left and right arrow keys to highlight Yes after the Save configuration and exit prompt displays, then press Enter to start boot up the system.
- Page 42 Figure 91. Boot into POST and USB b Select Serial Port Console then press Enter. Figure 92. Select Serial Port Console Select Yes, Proceed to Install with Serial Port Console to start the OS installation. Figure 93. Select Yes, Proceed to Install with Serial Port Console The OS installation starts.
- Page 43 Figure 94. OS installation starts Turn off the system after the installation completes processing. Figure 95. Installation completes processing Start up the system and boot into BIOS settings. Select sSATA P3: INTEL as the first boot option. Configure BIOS and install ADVA OS...
- Page 44 Figure 96. Select sSATA P3: INTEL Use the left and right arrow keys to highlight Yes after the Save configuration and exit prompt displays, then press Enter. to start boot up the system. Figure 97. Save configuration and exit option Boot into the ADVA OS.
- Page 45 Figure 98. ADVA OS output Configure BIOS and install ADVA OS...
-
Page 46: Configure Bios And Install Vmware Esxi Os
BIOS update information and most the current BIOS version. WARNING: Installing ESXi on VEP4600 deletes the DIAG OS. To restore the DIAG OS, delete ESXi and reinstall the DIAG OS. NOTE: To burn the ESXi ISO image on the USB, see the Prepare bootable USB with ISO image section. -
Page 47: Configure Bios To Boot From Usb
Figure 102. Console window display NOTE: If you miss the setup screen, a boot up screen displays. If this happens, power cycle the VEP4600 and press the Delete button. Repeat the process until you see the setup screen. Figure 103. Setup screen Topics: •... - Page 48 Figure 104. Select CSM Configuration Verify that UEFI is selected for the Boot option filter from the Compatibility Support Module Configuration screen. Figure 105. UEFI confirmation Configure the USB stick, UEFI: 1100, Partition 1, as Boot Option #1 from the Boot Configuration screen, then press Enter to save the changes.
- Page 49 Figure 106. Configure the USB Press the F4 key to save and exit the configuration screen. Use the left and right arrow keys to highlight Yes after the Save configuration and exit prompt displays, then press Enter. Figure 107. Save configuration and exit option The ESXI installation starts.
-
Page 50: Install Esxi Os
Figure 108. ESXi installation output Install ESXi OS Select SSD from the VMware ESXi 6.0.0 screen as the Destination Disk. Figure 109. Select SSD Press F11 to confirm when prompted to confirm the installation. WARNING: Pressing F11 confirms the installation and the disk repartitions. Configure BIOS and install VMware ESXi OS... - Page 51 Figure 110. Confirm installation Confirm the disk selection by pressing Enter. Figure 111. Confirm disk selection The ESXi installation status screen displays. Figure 112. ESXi installation output Press Enter to continue after the installation completion screen displays. Figure 113. Installation completion screen Remove the USB stick and press Enter to continue.
- Page 52 The VEP4600 platform reboots. Press the Delete button to enter into BIOS setup mode again. Configure the hard disk as Boot Option #1. Figure 114. Configure Boot Option #1 Press Save and Exit. Reboot the system. Press F2 to configure the static network.
- Page 53 Figure 117. Select Configure network management Select Network Adapters using the up and down arrow keys from the Configure Management Network screen and press Enter. Figure 118. Select Network Adapters Enter the IPv4 Address, Subnet Mask, and Default Gateway configurations in the fields that are provided at the Network Adapters screen then press Enter.
- Page 54 Figure 120. Confirm changes Configure BIOS and install VMware ESXi OS...
-
Page 55: Upgrade Bios
Upgrade BIOS Topics: • Upgrade BIOS through BMC and IPMI • Upgrade BIOS through IPMI • Upgrade BIOS through DIAG OS Upgrade BIOS through BMC and IPMI Go to Dell.com/support to download the BIOS image (bin file) and Yafuflash utility on Linux OS. Configure the BMC/IPMI network interface. - Page 56 Figure 122. Select BMC network configuration Use the up and down arrow keys to navigate to the IPv4 configuration address menu from the BMC network configuration screen and press Enter. NOTE: The cursor is not aligned to menu options. Figure 123. Select IPv4 configuration address By default, this option is Unspecified.
- Page 57 Figure 124. Configure DHCP or Static Select Static and press Enter. Figure 125. Select Static Verify that the Configuration Address source field shows Static from the BMC network configuration screen. Figure 126. Confirm Static setting Use the up and down arrow keys to navigate to each of the fields that are provided to configure the Station IP address, Subnet mask, Station MAC address, Router IP address, and Router MAC address.
- Page 58 Figure 127. Configure settings NOTE: If the configuration address menu item is not being configured, you are not able to configure IP address, netmask, router IP address, and so on. Press Enter to configure the IP address. Figure 128. Configure IP address screen Use ctrl-h to erase the default 0.0.0.0 address and enter a new one.
-
Page 59: Upgrade Bios Through Ipmi
[root@sah VEPBIOS]# ipmitool -I lanplus -H 172.17.108.64 -U admin -P admin power status Chassis Power is on Upgrade the BIOS image using the following command: ./Yafuflash -nw -ip 172.17.108.64 -u admin -p admin -d 2 VEP4600-BIOS-3.41.0.9-8.BIN Upload the image to the VEP4600. Upgrade BIOS... - Page 60 Figure 132. Image upload Install the image. Figure 133. Image installation Verify the image. Figure 134. Image verification Complete the upgrade. Upgrade BIOS...
-
Page 61: Upgrade Bios Through Diag Os
Figure 135. Upgrade completion Reboot the system to verify the new BIOS image. Figure 136. BIOS image verification Upgrade BIOS through DIAG OS Log in to DIAG OS. Confirm that the following directory has all the diagnostic utility files: root@dellemc-diag-os:~# ls /opt/dellemc/diag/bin Yafuflash flashrom temptool bonnie++ gpiotool test cmdline_test i2ctool test.map... - Page 62 /dev/sdb1 /mnt/usb cd /mnt/usb ls *.BIN VEP4600-BIOS-3.41.0.9-8.BIN VEP4600-BIOS-3.41.0.9-8a.BIN updatetool -D BIOS -U -e /mnt/usb/VEP4600-BIOS-3.41.0.9-8.BIN root@dellemc-diag-os:/opt/dellemc/diag/bin# updatetool -D BIOS -U -e /mnt/usb/VEP4600- BIOS-3.41.0.9-8.BIN disable preserve BIOS configration Disable device protect Disable BIOS protect operation success, wait HW reset Write image to BIOS INFO: Yafu INI Configuration File not found...
Need help?
Do you have a question about the VEP4600 and is the answer not in the manual?
Questions and answers