VAXIS ATOM 500 Series Instructions Manual
Wireless video system
Hide thumbs
Also See for ATOM 500 Series:
- Instructions manual (11 pages) ,
- User manual (12 pages) ,
- Instructions manual (11 pages)
Advertisement
Quick Links
Advertisement

Related Manuals for VAXIS ATOM 500 Series


Summary of Contents for VAXIS ATOM 500 Series
- Page 1 VAXIS · ATOM 500 Wireless Video System HN Gmcine Technology Co., Ltd.
- Page 2 VAXIS · ATOM 500 Wireless Video System To Our Vaxis Customers: Thank you for your recent purchase of the Vaxis Atom 500. We created this product with you in mind and hope you will find the Atom 500 useful.
- Page 3 Features ·500 feet transmission system ·Support smart option ·<0.1s latency ·Future Firmware Upgrades via USB ·Enclosed Antenna Design ·Smart fan ·HDMI input and output ·OLED display screen ·Support USB-C voltage input ·Stable & Reliable industrial metal ·iOS & Android App support housing Applications ·Educational videography...
- Page 4 Transmitter Interface Power Switch OLED display HDMI output HDMI input Down Menu/OK USB interface 1/4 20 screw mount...
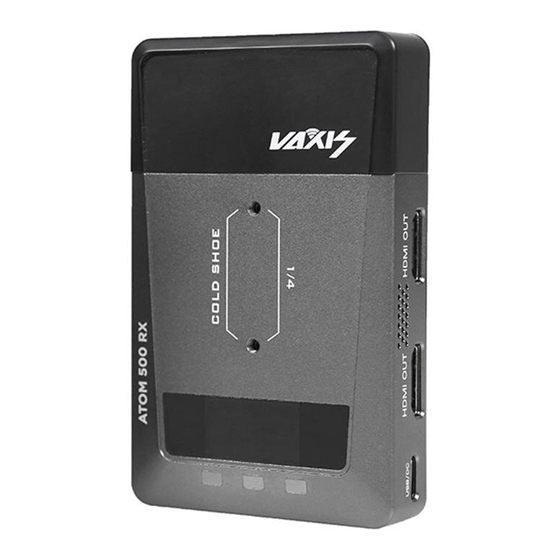
- Page 5 Receiver interface Power Switch OLED display HDMI output HDMI input USB interface Down Menu/OK 1/4 20 screw mount...
- Page 6 OLED Display Transmitter Receiver 1080P60 1080P60 35℃ 35℃ FAN AUTO 6.5v FAN AUTO 6.5v Signal Strength Video Format Signal Strength Video Format Temperature Channel Channel Temperature Battery Voltage Fan Level Battery Voltage Fan Level Operations Guide Transmitter Long press the menu button for approxi- 1080P60 SSID VX_A990001...
- Page 7 Operations Guide Receiver Long press the menu button for appro- PARING ximately 3 seconds to enter the menu windowto access the following features: Function of each option: PARING: It can pair with the TX. TX and RX need to operate simultaneously. OSD: OSD off...
- Page 8 Firmware Upgrade TX Firmware Upgrade 1) Copy the firmware upgrade file to a USB Flash Drive. 2) Power on TX, wait until frequency information appears. 3) Insert the USB flash drive into the OTG adapter and connect it to the TX’s USB Type-C port.
- Page 9 Long press the MENU button to enter the Menu window where you will be able to sel- ect on or off the APP monitoring. APP connection and use 1.The application name is Vaxis Vision and is available in the App store / Play store Download on the App Store Scan the QR code, It will skip to app store automatically.
- Page 10 Specification HDMI Output*2 HDMI input/output Interface USB Type-C input USB Type-C input 5V DC voltage 5V DC 4.5w Power consumption 6.5w 720P@60Hz Input Video Format 1080I@50/60 1080P@24/25/30/50/60 720P@60Hz 1080I@50/60 Output Video Format 1080P@24/25/30/50/60 130g Weight 134g 105*63.5*20mm Dimensions 105*63.5*20mm Frequency 5GHz Transmission Power 17dbm...
-
Page 11: Troubleshooting
Troubleshooting Connection issue 1.Check and make sure the power supply functions well on both the transmitter and the receiver. 2.Check if the battery level is enough, If the battery level is too low, Please change another battery. 3.Change to another channel to troubleshoot 4.Re-paring the device Display issue 1.Please check if the video source is connected to the HDMI IN interface correctly. - Page 12 HN Gmcine Technology Co., Ltd. www.vaxisglobal.com...
Need help?
Do you have a question about the ATOM 500 Series and is the answer not in the manual?
Questions and answers