
Related Manuals for Krüger & Matz V-LED10


Summary of Contents for Krüger & Matz V-LED10
- Page 1 LED PROJECTOR KM0370 V-LED10 BEDIENUNGSANLEITUNG OWNER’S MANUAL INSTRUKCJA OBSŁUGI MANUAL DE UTILIZARE...
- Page 3 Bedienungsanleitung SICHERHEITSANWEISUNGEN Lesen Sie sorgfältig diese Bedienungsanleitung vor der ersten Benutzung des Gerätes und heben diese auf für späteres Nachschlagen. Der Hersteller haftet nicht für Beschädigungen, hervorgerufen durch unsachgemäße Benutzung und Umgang mit dem Gerät. Unsachgemäße Benutzung und Umgang mit dem Gerät führt zu Beschädigungen und verkürzt die Lebensdauer des Gerätes. Das dreieckige Blitzsymbol mit Pfeilkopf weist den Benutzer auf das Vorhandensein von nicht isolierter „gefährlicher Spannung“...
- Page 4 Bedienungsanleitung • Der Hersteller garantiert nicht die Kompatibilität mit jedem externen Gerät. • Der Hersteller übernimmt keine Haftung für Datenverlust, Schäden, die durch unsachgemäße Verwendung und Handhabung oder mechanische Beschädigungen verursacht wurden. • Der Hersteller übernimmt keine Haftung für Schäden, die durch eine vom Benutzer nicht ordnungsgemäße Aktualisierung verursacht wurden.
-
Page 5: Untere Ansicht
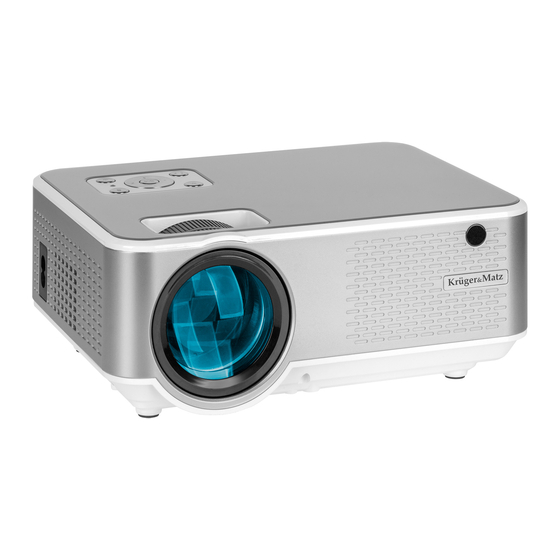
Bedienungsanleitung UNTERE ANSICHT 1. Basisgewinde 2. Stativgewinde 3. Lautsprecher FRONTANSICHT 1. Linsen 2. IR Empfänger SEITLICHE ANSICHTEN 1. Netzkabelanschluss 2. HDMI 1 Eingang 3. HDMI 2 Eingang 4. Kopfhörerausgang 5. AV Eingang 6. USB 1 Steckplatz 7. USB 2 Steckplatz... -
Page 6: Installation Und Montage
Bedienungsanleitung RÜCKSEITIGE ANSICHT 1. VGA Anschluss 2. IR Empfänger 3. Belüftungsöffnungen FERNBEDIENUNG 1. Taste Ein/Aus 2. Rücklauf 3. Richtungstasten (Aufwärts, Abwärts, Links, Rechts, Lautstärkeregler) 4. Quelle Auswahl 5. Lautstärkeregler 6. Ton aus VOL- VOL+ 7. Vorlauf 8. Wiedergabe/Pause 9. Taste OK (Auswählen/Bestätigen/Ausführen) 10. - Page 7 Bedienungsanleitung ACHTUNG: • Vergewissern Sie sich in jedem Fall, dass das Gerät sicher aufgestellt ist. • Halten Sie den richtigen Abstand zwischen dem Gerät und anderen Objekten ein. Belüftungsöffnungen nicht blockieren oder abdecken. • Denken Sie daran, dass der Projektor parallel und senkrecht zur Wand oder Projektionsfläche stehen muss.
- Page 8 Bedienungsanleitung • Projektionsgrößen, die die angegebenen Werte überschreiten, führen zu einer schlechten Bildqualität. • Die Bildqualität hängt stark von der projizierten Oberfläche ab (Projektionsfläche oder eine Wand, die mit einer speziellen Projektionsflächenfarbe bedeckt ist). Montage Der Benutzer kann den Projektor in ein Regal stellen oder einen der beiden Gewinde an der Unterseite des Geräts verwenden.
-
Page 9: Einlegen Der Batterien In Die Fernbedienung
Bedienungsanleitung Verwenden Sie bei Trapezverzerrungen den Trapezkorrekturregler. Das projizierte Bild sollte rechteckig sein. Hinweis: Wenn durch die Trapezkorrektur die Bildform nicht gerichtet werden kann, verringern Sie die vertikale Höhe des Projektors in Bezug auf die Bildschirmmitte. Manueller Fokus Das projizierte Bild ist möglicherweise unscharf oder schwer zu sehen, da der Fokus nicht richtig eingestellt ist. - Page 10 Bedienungsanleitung a. USB Verbindung Verwenden Sie im USB Modus die Tasten der Fernbedienung oder auf dem Bedienfeld, um durch das Menü zu blättern. Wählen Sie den entsprechenden Abschnitt aus. Drücken Sie die Taste OK, zum auswählen / eingeben / anzeigen. b.
- Page 11 Bedienungsanleitung d. AV Verbindung e. Benutzer kann den Projektor mit einen externen Lautsprecher oder Kopfhörer über den Kopfhöreranschluss verbinden. f. VGA Verbindung (Bitte beachten Sie, dass VGA nur Bilder überträgt. Wenn Sie den Ton auch übertragen möchten, müssen Sie zusätzliche Zubehörteile und Kabel verwenden, z.B.
- Page 12 Bedienungsanleitung Einstellungen 1. Um das Menü aufzurufen, drücken Sie die Taste Menü [MENU] auf der Fernbedienung oder die Taste M auf dem Bedienfeld des Projektors. Das Einstellungsfenster wird angezeigt. 2. Benutzen Sie die Richtungstasten um durch das Menü zu blättern und Taste OK um ein Untermenü...
-
Page 13: Reinigung Und Wartung
Bedienungsanleitung c. Tonmenü • Tonmodus: Standard, Benutzer (manuelle Einstellung von Bass und Höhen), Musik, Film, Sport • Balance: manuelle Einstellung der Balance • Automatische Lautstärke: Ein/Aus d. Zeitmenü • Schlaftimer: einstellen der Zeit nachdem der Projektor in den Schlafmodus wechselt Die Software kann ohne vorherige Ankündigung geändert werden. - Page 14 Bedienungsanleitung • Eingebauter Lautsprecher: 3 W; 4 Ohm • Tonkontrolle: Balance • Video: MPEG1, MPEG2, H.263, H.264, AVS, VC1, MJPEG, RV30, RV40, HEVC • Bilder: PNG, JPG, TIFF, BMP • Audio: MPEG1, MPEG2, LPCM, MP3 • USB: Filme, Musik, Fotos, Text •...
-
Page 15: Safety Information
Owner’s manual SAFETY INFORMATION Read the instruction manual carefully before first use and keep it for future reference. Producer does not claim liability for any damage caused by inappropriate use and handling or any mechanical damage. Inappropriate use and handling will result in damage and shortening of the device’s lifespan. -
Page 16: Product Description
Owner’s manual performed by the user. • Use only authorized accessories. • While using with earphones, if the volume is excessively high it may cause hearing damage. Adjust the volume to a moderate level and balance the time of using. Minimize the volume before connecting the headphones in order to avoid hearing damage from sudden exposure to excessive volume. -
Page 17: Bottom View
Owner’s manual BOTTOM VIEW 1. Support base thread 2. Tripod stand thread 3. Speaker FRONT VIEW 1. Lens 2. IR receiver SIDE VIEWS 1. Power cable socket 2. HDMI 1 input 3. HDMI 2 input 4. Headphone output 5. AV input 6. -
Page 18: Rear View
Owner’s manual REAR VIEW 1. VGA port 2. IR receiver 3. Ventilation outlets REMOTE CONTROL 1. Power button 2. Backward 3. Directional buttons (up, down, left, right, volume control) 4. Source selection 5. Volume control 6. Mute VOL- VOL+ 7. Forward 8. - Page 19 Owner’s manual IMPORTANT: • In any case, make sure the device is securely and safely placed. • Keep the appropriate distance between the device and any other object. Do not block or cover ventilation outlets. • Remember the projector needs to be parallel and perpendicularly to the wall or projection screen.
- Page 20 Owner’s manual Mounting User can place the projector at a shelf, or using one of the two threads at the bottom of the device. In any case, user needs to make sure the projector is placed firmly and horizontally, or at a slight angle (front in relation to back).
-
Page 21: Remote Control Battery Installation
Owner’s manual In case of trapezoid distortion, use the Keystone correction knob. The projected image should be rectangular. Note: If the Keystone correction fails to resolve image shape, reduce the vertical height of the projector in relation to the center of the screen. Manual focus The projected image may be blurry or difficult to see, due to lack of focus adjustment. - Page 22 Owner’s manual a. USB connection When in USB mode, use remote or buttons on the control panel to navigate through menu. Select appropriate section. Press OK button to select/enter/display. b. HDMI connection c. MHL function (only for MHL compatible devices, in HDMI 2 source mode)
- Page 23 Owner’s manual d. AV connection e. User can connect the projector to an external speaker or headphones via headphone Jack. f. VGA connection (please note, VGA transfers only image. If you want to transfer the sound too, you need to use an additional attachments and cables e.g. VGA converter. Note: You may need to set up your laptop if not sharing the screen immediately after connecting to projector.
- Page 24 Owner’s manual Settings 1. To enter menu, press MENU button on the remote control or M button on the projector’s control panel. Settings window will be displayed. 2. Use arrow buttons to navigate through menu, and OK button to enter submenu/select option/confirm.
-
Page 25: Cleaning And Maintenance
Owner’s manual • Balance: set balance manually • Auto volume: on/off b. Time menu • Sleep timer: set the time after which the projector will enter sleep mode Software is subject to change without prior notice. Above description is for reference only and may vary from the actual device. -
Page 26: Learn More
Owner’s manual • INPUTS / OUTPUTS: » Headphone output (3, 5 Jack) » 2x HDMI » 2x USB (2.0) » AV input » VGA • Power supply: 220-240 V; 50/60 Hz • Power consumption: 70 W • Power consumption (stand-by): ≤0,5 W •... - Page 27 Instrukcja obsługi KWESTIE BEzPIECzEńSTWA Przed użyciem należy dokładnie zapoznać się z treścią instrukcji obsługi oraz zachować ją w celu późniejszego wykorzystania. Producent nie ponosi odpowiedzialności za uszkodzenie spowodowane niewłaściwym użytkowaniem/konserwacją czy uszkodzeniami mechanicznymi. Niewłaściwe użycie i obsługa będzie skutkowało uszkodzeniem i skróceniem żywotności urządzenia. Symbol błyskawicy zakończonej strzałką...
-
Page 28: Opis Produktu
Instrukcja obsługi • Odłączając urządzenie od źródła zasilania, należy chwycić i pociągnąć za wtyczkę, nigdy za kabel/sznur. • Producent nie gwarantuje kompatybilności urządzenia ze wszystkimi urządzeniami zewnętrznymi. • Producent nie ponosi odpowiedzialności za utratę danych, uszkodzenie spowodowane niewłaściwym użytkowaniem/konserwacją czy uszkodzeniami mechanicznymi. •... - Page 29 Instrukcja obsługi DÓŁ 1. Gwint na śrubę (do regulacji kątu podstawy) 2. Gwint do tripodu 3. Głośnik PRZÓD 1. Soczewka 2. Dioda podczerwieni BOKI 1. Gniazdo przewodu zasilania 2. Wejście HDMI 1 3. Wejście HDMI 2 4. Wyjście słuchawkowe 5. Wejście sygnałowe AV 6.
-
Page 30: Pilot Zdalnego Sterowania
Instrukcja obsługi TYŁ 1. Port VGA 2. Dioda podczerwieni 3. Otwory wentylacyjne PILOT ZDALNEGO STEROWANIA 1. Przycisk zasilania 2. Do tyłu 3. Przyciski kierunkowe (w górę, w dół, w prawo, w lewo, regulacja głośności) 4. Wybór źródła 5. Regulacja głośności VOL- VOL+ 6. - Page 31 Instrukcja obsługi WAŻNE: • Należy ZAWSZE się upewnić, że urządzenie jest bezpiecznie i stabilnie zamontowane. • Należy utrzymać odpowiedni dystans pomiędzy urządzeniem i innymi obiektami. Nie należy zakrywać otworów wentylacyjnych urządzenia! • Należy pamiętać, że projektor powinien się znajdować równolegle i prostopadle do ściany lub ekranu projekcyjnego.
- Page 32 Instrukcja obsługi • Jakość obrazu jest w znacznym stopniu zależna od powierzchni na której jest wyświetlany obraz (ekran projekcyjny lub ściana pokryta farbą projekcyjną). Montaż Użytkownik może umieścić projektor na półce, lub użyć jednego z dwóch gwintów na spodzie urządzenia. Należy ZAWSZE się...
- Page 33 Instrukcja obsługi W przypadku zniekształceń trapezowych, należy skorzystać z pokrętła regulacji Keystone. Wyświetlany obraz powinien być prostokątny. Uwaga: jeśli obraz nadal nie jest prostokątny, pomimo użycia pokrętła regulacji Keystone, należy zmniejszyć pionową wysokość projektora w odniesieniu do środka ekranu. Ręczne ustawienia ostrości Wyświetlany obraz może być...
- Page 34 Instrukcja obsługi a. Tryb USB W trybie USB, należy użyć przycisków kierunkowych aby nawigować pop menu. Należy wybrać odpowiednią sekcję. Nacisnąć przycisk OK, aby wybrać/przejść/wyświetlić. b. Tryb HDMI c. Funkcja MHL (tylko dla urządzeń obsługujących tę funkcję, w trybie HDMI 2)
- Page 35 Instrukcja obsługi d. Tryb AV e. Użytkownik może podłączyć projektor do zewnętrznego głośnika lub słuchawek za pomocą złącza słuchawkowego. f. Tryb VGA (za pomocą tego połączenia można przesyłać tylko obraz. Aby przesyłać również dźwięk, użytkownik powinien zastosować dodatkowe akcesorium i przewody np.
- Page 36 Instrukcja obsługi Ustawienia 1. Aby przejść do menu, należy nacisnąć przycisk MENU na pilocie zdalnego sterowania lub przycisk "M" na panelu sterowania na projektorze. Okno ustawień zostanie wyświetlone. 2. Nawigacja po menu odbywa się za pomocą przycisków kierunkowych. Aby przejść do podmenu/wybrać...
-
Page 37: Czyszczenie I Przechowywanie
Instrukcja obsługi • Automatyczna głośność: wł./wył. d. Czas • Automatyczne wyłączanie: ustawienie czasu po którym projektor automatycznie przejdzie w tryb uśpienia Oprogramowanie może ulec zmianie bez wcześniejszego powiadomienia. Powyższe opisy mają jedynie charakter poglądowy, dostępne opcje w urządzeniu mogą się różnić... - Page 38 Instrukcja obsługi • Format zdjęć: JEPG, PNG, BMP • Format audio: MPEG1, MPEG2, LPCM, MP3 • Odtwarzanie z USB: film, muzyka, zdjęcie, tekst • Gwinty montujące: 1x M4, 1x 1/4” • WEJŚCIA / WYJŚCIA: » Wyjście słuchawkowe (Jack 3,5 mm) »...
-
Page 39: Instrucțiuni Privind Siguranța
Manual de utilizare INSTRUCȚIUNI PRIVIND SIGURANȚA Citiți cu atenție manualul de utilizare înainte de prima utilizare și păstrați-l pentru consultări ulterioare. Producătorul nu își asumă responsabilitatea pentru daunele cauzate de utilizarea și manipularea necorespunzătarea a produsului sau pentru daune mecanice. Utilizarea și manipularea necorespunzătoare poate duce la deteriorarea produsului sau la scurtarea duratei de viață... -
Page 40: Descrierea Produsului
Manual de utilizare date și alte daune cauzate de utilizarea și manipularea necorespunzătoare. • Producătorul nu își asumă responsabilitatea pentru daunele cauzare de actualizările necorespunzătoare efectuate de utilizator. • Utilizați doar accesorii autorizate. • În timp ce utilizați aparatul cu căști, dacă volumul este prea ridicat, acesta poate cauza deteriorarea auzului. - Page 41 Manual de utilizare VIZUALIZARE DE JOS 1. Support base thread 2. Șurub pentru baza suportului pentru videoproiector 3. Tripod stand thread 4. Șurub pentru trepied videoproiector 5. Difuzor VIZUALIZARE DIN FAȚĂ 1. Obiectiv 2. Receptor IR VIZUALIZARE DIN LATERALE 1. Mufă cablu de alimentare 2.
- Page 42 Manual de utilizare VIZUALIZARE DIN SPATE 1. Port VGA 2. Receptor IR 3. Fante de ventilație TELECOMANDĂ 1. Buton alimentare 2. Înapoi 3. Butoane direcționale sus, jos, stânga, dreapta, control volum 4. Selectare sursă 5. Control volum 6. Mute VOL- VOL+ 7.
- Page 43 Manual de utilizare IMPORTANT: • Asigurați-vă întotdeauna că dispozitivul este fixat ferm și în siguranță. • Păstrați distanța adecvată între dispozitiv și alte obiecte. Nu blocați și nu acoperiți fantele de ventilație. • Nu uitați că proiectorul trebuie să fie paralel și perpendicular cu peretele sau ecranul de proiecție.
- Page 44 Manual de utilizare Montarea Utilizatorul poate plasa aparatul pe un raft sau folosind unul din cele două șuruburi din partea inferioară a dispozitivului. În orice caz, utilizatorul trebuie să se asigure că proiectorul este bine fixat și este în poziție orizontală, înclinat sub un unghi mic (partea din față...
- Page 45 Manual de utilizare În cazul unei distorsiuni trapezoidale, utilizați butonul de corectare a distorsiunii trapezoiudale. Imaginea proiectată trebuie șă fie dreptunghiulară. Notă: Dacă corectarea distosiunii trapezoidale nu reușește să rezolve forma imaginii, reduceți înaălțimea verticală a proiectorului în raport cu centrul ecranului. Focalizare manuală...
- Page 46 Manual de utilizare a. Conectarea USB În modul USB, utilizați telecomanda sau butoanele de pe panoul de control pentru a naviga prin meniu. Selectați secțiunea corespunzătoare. Apăsați butonul OK pentru a selecta/introduce/afișa. b. Conectarea HDMI c. Funcția MHL (doar pentru dispozitive compatibile MHL, în modul sursă HDMI 2)
- Page 47 Manual de utilizare d. Conectarea AV e. Utilizatorul poate conecta proiectorul la un difuzor extern sau la căști prin mufa Jack. f. Conectarea VGA (rețineți că, VGA transferă doar imaginea!). Dacă doriți să se transfere și sunetul, trebuie să utilizați accesorii și cabluri suplimentare, ex.: convertor VGA. Notă: Este posibil să...
- Page 48 Manual de utilizare Setări 1. Pentru a accesa meniul, apăsați butonul MENIU de pe telecomandă sau butonul M de pe panoul de control al proiectorului. Va fi afișată fereastra Setări. 2. Utilizați butoanele direcționale pentru a naviga prin meniu și butonul OK pentru a intra în submeniu/selecta opțiunea/confirma.
-
Page 49: Curățare Și Întreținere
Manual de utilizare c. Meniu sunet • Mod sunet: standard, utilizator (setarea manuală a bass-ului și a înaltelor), muzică, film, sport • Balans: setați balansul manual • Volul automat: pornit/oprit d. Meniu timp: • Sleep timer: setați perioada după care proiectorul va intra în modul sleep Software-ul poate fi modificat fără... - Page 50 Manual de utilizare • Video: MPEG1, MPEG2, H.263, H.264, AVS, VC1, MJPEG, RV30, RV40, HEVC • Format imagine: JPEG, PNG, BMP • Format audio: MPEG1, MPEG2, LPCM, MP3 • Redare de pe USB: film, muzică, fotografii, text • Șuruburi de montare: 1x M4, 1x 1/4” •...
- Page 52 www.krugermatz.com is a registered trademark...
Need help?
Do you have a question about the V-LED10 and is the answer not in the manual?
Questions and answers