
Subscribe to Our Youtube Channel
Related Manuals for Lindy 40880


Summary of Contents for Lindy 40880
- Page 1 Single Display Pop Out Video Wall Mount User Manual Eng lis h Benutzerhandbuch Deutsch Manuel Utilisateur Français Manuale Italiano No. 40880 lindy.com © LINDY Group - FIRST EDITION (April 2019)
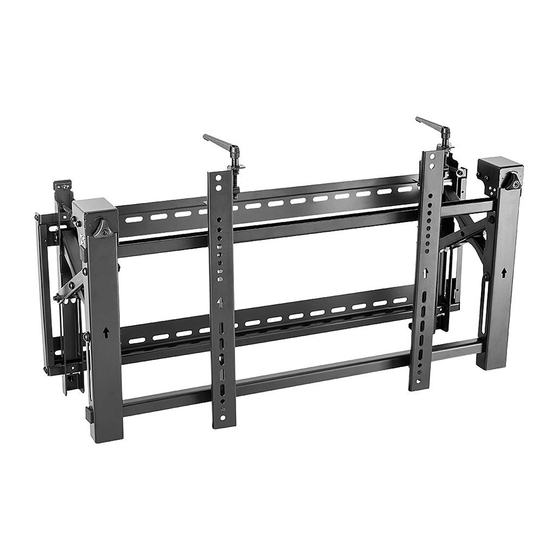
- Page 3 To ensure correct use, please read this manual carefully and retain it for future reference. The Lindy Pop Out Video Wall Mount is a professional, sturdy mounting solution for a single display as a standalone feature or within multi-display video walls. Featuring a simple pop out mechanism, the display can be fitted securely to the wall with no hassle, whilst allowing for easy removal and access to the rear of the screen.
- Page 4 User Manual English Installation within a video wall X: Length of Display Y: Height of Display Installation of the Pop Out Bracket Please remove the caps (see above) before installation of the pop out mount Hang the Pop Out Mount onto the wall plate. Secure by tightening the screws indicated above. Installing the Adapter Brackets Top of Display...
- Page 5 User Manual English Installing the Adapter Brackets for Flat Displays Installing the Adapter Brackets for Recessed on Uneven Back Panel Displays Please note: Please ensure the correct screws, spacers and washers are used according to the display Once adapter brackets are screwed into the display, please tighten taking care not to over tighten Installing the Display onto the Pop Out Mount...
- Page 6 User Manual English Aligning the display Push the display left or right to ensure correct alignment. Mount handles for tilt adjustment – Turn left to tilt backward, right to tilt forward. Mount screws for up and down micro-adjustments – Turn left to adjust upwards, right to adjust downwards, these can also be used for irregular video walls when one side of the screws are turned.
- Page 7 User Manual English Levelling the displays Adjust display to ensure this is level in both vertical and horizontal directions. When installing within a video wall please setup the displays in numerical order as shown Please use the plastic locking piece to measure and ensure a 1.2mm gap between each display Ensure a fixed position of the mount...
- Page 8 Deutsch Einführung Wir freuen uns, dass Ihre Wahl auf ein LINDY-Produkt gefallen ist und danken Ihnen für Ihr Vertrauen. Sie können sich jederzeit auf unsere Produkte und einen guten Service verlassen. Diese Lindy Pop-out- Wandhalterung für einen Monitor unterliegt einer 2-Jahres LINDY Herstellergarantie und lebenslangem kostenlosen technischen Support.
- Page 9 Benutzerhandbuch Deutsch Installation in einer Videowand X: Länge des Displays Y: Höhe des Displays Installation der Pop-out-Halterung Entfernen Sie die Kappen (siehe oben) vor der Installation der Pop-out-Halterung. Hängen Sie die Pop-out-Halterung an die Wandplatte. Sichern Sie diese durch Festziehen der Schrauben (siehe oben).
- Page 10 Benutzerhandbuch Deutsch Installieren der Adapterhalterungen für Flachbildschirme Installieren der Adapterhalterungen an einer vertieften oder unebenen Rückseite des Displays Achten Sie darauf, dass Sie die korrekten Schrauben, Abstandshalter und Unterlegscheiben für das Display verwenden. Schrauben Sie die Adapterhalterungen am Display fest, aber achten Sie darauf, die Schrauben nicht zu stark festzuziehen.
- Page 11 Benutzerhandbuch Deutsch Ausrichten des Displays Schieben Sie das Display nach links oder rechts, um es korrekt auszurichten. Montieren Sie die Griffe zur Einstellung der Neigung – eine Bewegung nach links führt zur Neigung nach hinten, eine Bewegung nach rechts führt zur Neigung nach vorne. Montieren Sie Schrauben für kleine Justierungen nach oben und unten –...
- Page 12 Benutzerhandbuch Deutsch Nivellierung des Displays Waagrechte und senkrechte Ausrichtung des Displays Bei Installation in einer Videowand montieren Sie die Displays bitte in der gezeigten Zahlenfolge. Verwenden Sie die Kunststoff- Verriegelungen, um zwischen den Displays einen 1,2mm großen Abstand einzuhalten. Sicherstellen einer festen Position der Halterung Befestigen Sie die Anti-Rutsch-Pads möglichst nah bei den Adapterhalterungen.
-
Page 13: Manuel Utilisateur
Français Introduction Nous sommes heureux que votre choix se soit porté sur un produit LINDY et vous remercions de votre confiance. Vous pouvez compter à tout moment sur la qualité de nos produits et de notre service. Ce Support mural escamotable pour un écran (Single Display Pop Out Video Wall Mount) est soumis à une durée de garantie LINDY de 2 ans et d’une assistance technique gratuite à... - Page 14 Manuel Utilisateur Français Installation dans un mur d’écrans X: longueur de l’écran (Length of Display) Y: hauteur de l’écran (Height of Display) Installation du système escamotable (Pop Out Bracket) Merci de retirer les capuchons (voir ci-dessus) avant l’installation du système escamotable Accrochez le support Pop Out Mount sur la plaque murale.
- Page 15 Manuel Utilisateur Français Installation des équerres de montage sur l’écran Haut de l’écran Installation des équerres pour un écran plat Installation des équerres pour les écrans encastrés avec des panneaux arrières inégaux Merci de noter: assurez-vous d’utiliser les vis, entretoises et rondelles adéquates par rapport à...
- Page 16 Manuel Utilisateur Français Installation de l’écran sur le système escamotable Merci de noter: avant de monter l‘écran, assurez-vous que tous les boutons (voir à ci-contre à gauche) sont en position déverrouillée. Tournez les boutons en position de verrouillage une fois l’écran accroché sur le support pour le sécuriser.
- Page 17 Manuel Utilisateur Français “Pop Out” de l’écran Poussez l'écran vers l'intérieur et relâchez-le pour le faire sortir. Le support dispose d’une petite béquille de maintien pour un accès facile, pour la gestion et l'entretien des câbles. Mise à niveau des écrans Ajustez l’écran pour assurer la mise à...
- Page 18 Manuel Utilisateur Français Assurer la position du support Utilisez les blocs de fixation à vis et approchez-les au maximum de l’équerre support de chaque côté. Utilisez la clé Allen fournie pour serrer les vis pour empêcher tout mouvement de l’écran. Verrouillage du support Pop Out...
- Page 19 è coperto da 2 anni di garanzia LINDY oltre che da un servizio di supporto tecnico a vita. Per assicurarvi di farne un uso corretto vi invitiamo a leggere attentamente questo manuale e a conservarlo per future consultazioni.
- Page 20 Manuale Italiano Installazione di un video wall X: Lunghezza del display Y: Altezza del display Installazione della staffa Pop Out Vi preghiamo di rimuovere le protezioni (vedi sopra) prima di installare la staffa pop out Agganciare la staffa Pop Out sulla piastra a muro. Assicuratela stringendo le viti indicate sopra. Installare le staffe di ancoraggio al display Top of Display...
- Page 21 Manuale Italiano Installare le staffe di ancoraggio su schermi piani. Installare le staffe di ancoraggio su schermi non piani o con fondo irregolare NOTA BENE: Vi preghiamo di assicurarvi che le viti, dadi e distanziali utilizzati siano adatti allo schermo che state installando. Fissate le staffe di ancoraggio al display avendo cura di non stringere eccessivamente le viti per evitare di creare...
- Page 22 Manuale Italiano Allineamento del display Spingete lateralmente il display per raggiungere un corretto allineamento con il centro del supporto Montate le maniglie per la regolazione dell’inclinazione. Girate verso sinistra per inclinare verso l’alto e a destra per inclinare verso il basso. Montate le viti per le regolazioni fini verso l’alto e verso il basso.
- Page 23 Manuale Italiano Allineamento e livellamento dei display Regolate gli schermi per assicurarvi che siano livellati sia in orizzontale che in verticale. Quando realizzate un Video Wall assicuratevi di installare gli schermi nell’ordine numerico indicato a lato. Vi preghiamo di utilizzare gli spessori in plastica per mantenere una distanza di 1,2mm fra ogni schermo.
- Page 24 CE Statement LINDY Herstellergarantie – Hinweis für Kunden in Deutschland LINDY gewährt für dieses Produkt über die gesetzliche Regelung in Deutschland hinaus eine zweijährige Hersteller- garantie ab Kaufdatum. Die detaillierten Bedingungen dieser Garantie finden Sie auf der LINDY Website aufgelistet bei den AGBs.
Need help?
Do you have a question about the 40880 and is the answer not in the manual?
Questions and answers