
Subscribe to Our Youtube Channel
Related Manuals for biodex ECHO PRO


Summary of Contents for biodex ECHO PRO
- Page 1 ECHO/VASC PRO VASCULAR ULTRASOUND TABLE OPERATION MANUAL 058-702 058-707 IODEX Biodex Medical Systems, Inc. FN: 11-308 Rev C 3/15...
- Page 2 Echo/Vasc Pro Vascular Ultrasound Table This manual covers operation procedures for the following products: 058-702 Table, Vascular Ultrasound, Echo/Vasc Pro™, 115 VAC 058-707 Table, Vascular Ultrasound, Echo/Vasc Pro™, 230 VAC ECHO/VASC PRO VASCULAR ULTRASOUND TABLE...
-
Page 3: Table Of Contents
Articulating Vascular Scanning Armboard…………………………………………………………………..…. 2-6 Side Rails……………………………………………………………………………………………………………..2-7 Headrest Extension………………………………………………………………………………………………..… 2-8 Paper Dispenser……………………………………………………………………………………………………... 2-9 IV Pole…………………………………………………………………………………………………………... 2-10 APPENDIX A – SPECIFICATIONS…………………………………………………………..……………..… A-1 APPENDIX B – CONFORMANCE TO STANDARDS…………………………………......…. B-1 APPENDIX C – PARTS AND ASSEMBLY ILLUSTRATIONS……….....………...……..….. C-1 BIODEX MEDICAL SYSTEMS, INC. © 2015... -
Page 4: Definition Of Symbols
Definition of Symbols The following symbols and their associated definitions are used and implied throughout this manual. Symbol Definition Carefully read these instructions prior to use Caution General Warning General Mandatory Action Dangerous Voltage “On” Power “Off” Power Earth (ground) Alternating Current Fuse USB Connector/Cable... -
Page 5: Before Proceeding
ATTENTION: Avant le fait de déplacer la table avec un patient, assurez-vous que les rails de côté sont dans en haut la position et les courroies de corps dans l'endroit pour protéger le patient. BIODEX MEDICAL SYSTEMS, INC. © 2015... - Page 6 Training This operation manual includes assembly and operating instructions. Operating/assembly questions can be directed to our service department during business hours. User Profile Patient The product (without accessories) shall accommodate patients fitting the following profile: Height: from infant to 74 inches (6ft - 2in). Weight: up to 500 lbs Age: infant to 65 years of age.
-
Page 7: Important Safety Information
This product should be used only as specified in the operation manual. Biodex Ultrasound Tables are designed for use in a patient environment. Les Tables d'Ultrasons de Biodex sont conçues à l'utilisation dans un environnement patient. For product specifications, refer to the Table of Contents. - Page 8 CAUTION: To avoid risk of electric shock, this equipment must only be connected to supply mains with protective earth. ATTENTION: Pour éviter le risque de choc électrique, cet équipement doit uniquement être connecté à un approvisionnement conduites avec la terre protectrice. CAUTION: The plug is considered the method of disconnecting the product from main power.
-
Page 9: Warranty
C. This warranty does not apply if the product, as determined by BIODEX MEDICAL SYSTEMS, INC., is defective due to abuse, misuse, modification or service performed by other than a BIODEX MEDICAL SYSTEMS, INC. - Page 10 Keep yourself and the phone next to the equipment: 1. Biodex Service will ask you for a brief description of the problem. We will ask specific questions about the malfunction that occurred. This diagnostic process may take a few minutes, so call us when you can set aside an uninterrupted block of time.
-
Page 11: Chapter 1: Introduction
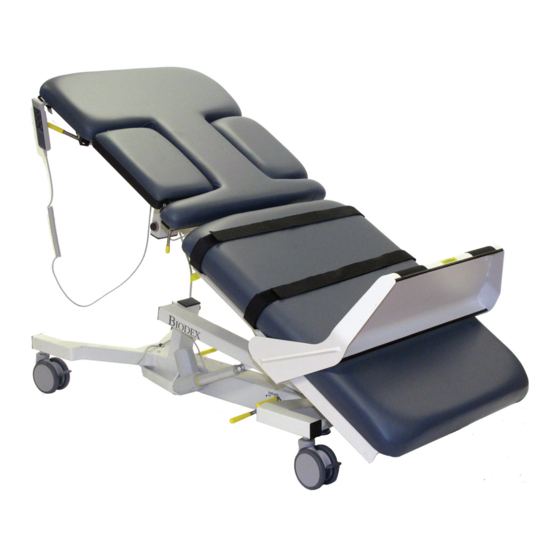
5. Periodically inspect all strap holders. Any holder that feels loose should be removed and reattached after adding a spot of Loctite Threadlocker (Blue #242) to the bolt threads. This ® should ensure that the bolt will not loosen again in the future. BIODEX MEDICAL SYSTEMS, INC. © 2015... - Page 12 Table Parts And Adjustments Figure 1. The Biodex Echo/Vasc Pro Vascular Ultrasound Table parts and adjustment include: Standard Parts and Adjustments: 1. Fowler Back 2. Adjustable Sonographer Cutout Cushion 3. Hand-Held Controller 4. 5" Locking Swivel Casters 5. Central Floor Locking System Lever 6.
-
Page 13: Chapter 2: Assembly And Table Operation
• For Trendelenburg positioning: press and hold down the foot-end up button on the hand-held controller. This will simultaneously raise the foot end and lower the head end of the table. Release the button when the desired angle is achieved. BIODEX MEDICAL SYSTEMS, INC. © 2015... -
Page 14: Fowler Back Adjustment
• For Reverse Trendelenburg positioning: press and hold down the head-end up button on the hand-held controller. This will simultaneously lower the foot end and raise the head end of the table. Release the button when desired angle is achieved. Fowler Back Adjustment The motorized Fowler back is infinitely adjustable to 80°... -
Page 15: Adjustable Foot Support
3. Release the foot support so that it drops into the stop slot. 4. To return the foot support to its furthest point, raise it and move it to the last stop. Figure 3. The Foot Support Platform. BIODEX MEDICAL SYSTEMS, INC. © 2015... - Page 16 Storing The Foot Support Platform Beneath The Tabletop: 1. The foot support must be located in the stop (closest to the foot end of the table). 2. To return the foot support to its furthest point, raise it and move it to the last stop. 3.
-
Page 17: Installing And Using Optional Accessories
Releasing the rocker switch at any time immediately stops the motion. Figure 4. The optional foot controller can be used to adjust tabletop height, Trendelenburg/Reverse Trendelenburg, and Fowler positioning. BIODEX MEDICAL SYSTEMS, INC. © 2015... - Page 18 Articulating Scanning Arm Board (058-736) The optional Articulating Scanning Arm Board is installed by inserting the arm board tube into the receiving tube located on each side of the table below the Fowler back section. The arm board pivot is adjustable at any point along its 130° arc. To adjust, press the yellow button on the arm board and move to the desired location;...
-
Page 19: Side Rails
2. To lower either side rail, pull out the side rail pull pin and, while supporting the side rail, allow it to gently swing down and under the table until the rail locks in place. Figure 9. Installing the side rails. BIODEX MEDICAL SYSTEMS, INC. © 2015... -
Page 20: Headrest Extension
Headrest Extension (058-738) The optional headrest is removable and adjustable. To install the headrest, simply slide it into the receiving tube at the head end of the table until it clicks into place. Figure 10. The optional headrest. Push to adjust angle. Push to release. -
Page 21: Paper Dispenser
Figure 13. Place a roll of paper on the paper dispenser rod and install the rod between the brackets. Press in on either spring-loaded end of the paper dispenser bar in order to slide it into the brackets. BIODEX MEDICAL SYSTEMS, INC. © 2015... -
Page 22: Pole
I.V. Pole (058-737) The optional I.V. pole must be installed on the patient's right side of the table. Installing the I.V. pole: 1. Using a 7/16" wrench, remove the two 1/4-20" hex head screws from the end of the tabletop frame on the side of the table to which the I.V. pole will be installed. 2. -
Page 23: Appendix A - Specifications
Warranty: Two years parts and labor Certifications: ETL and CETL listed to UL60601-1and CAN/CSA C22.2 No. 601.1-M90 and EN60601-1 standards Authorized European Community Representative: Emergo Europe Molenstraat 15 2513 BH, The Hague The Netherlands MADE IN U. S. A. BIODEX MEDICAL SYSTEMS, INC. © 2015... - Page 24 Appendix B - Specifications ECHO/VASC PRO VASCULAR ULTRASOUND TABLE...
- Page 25 BIODEX MEDICAL SYSTEMS, INC. © 2015...
- Page 26 ECHO/VASC PRO VASCULAR ULTRASOUND TABLE...
- Page 27 BIODEX MEDICAL SYSTEMS, INC. © 2015...
-
Page 28: Appendix C - Parts And Assembly Illustrations
APPENDIX C – PARTS AND ASSEMBLY ILLUSTRATIONS ECHO/VASC PRO VASCULAR ULTRASOUND TABLE... - Page 29 BIODEX MEDICAL SYSTEMS, INC. © 2015...
- Page 30 ECHO/VASC PRO VASCULAR ULTRASOUND TABLE...
- Page 31 BIODEX MEDICAL SYSTEMS, INC. © 2015...
- Page 32 ECHO/VASC PRO VASCULAR ULTRASOUND TABLE...
- Page 33 BIODEX MEDICAL SYSTEMS, INC. © 2015...
- Page 34 ECHO/VASC PRO VASCULAR ULTRASOUND TABLE...
- Page 35 BIODEX MEDICAL SYSTEMS, INC. © 2015...
Need help?
Do you have a question about the ECHO PRO and is the answer not in the manual?
Questions and answers