Advertisement
Quick Links
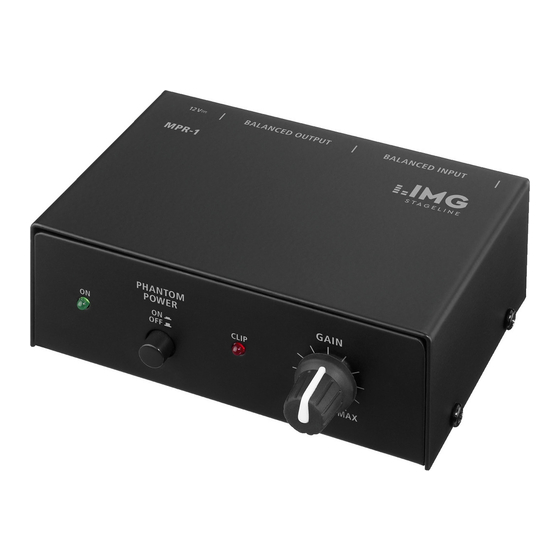
MPR-1
Bestell-Nr. 21.2010
D
A
CH
1-Kanal-Mikrofon-
Vorverstärker
Bitte lesen Sie diese Bedienungsanleitung vor dem Be -
trieb gründlich durch und heben Sie sie für ein späteres
Nachlesen auf.
1 Einsatzmöglichkeiten
Mit dem MPR-1 kann ein Mikrofon an einen Line-Eingang
eines Audiogerätes (Mischpult, Aufnahmegerät etc.) an -
geschlossen werden. Für ein phantomgespeistes Mikro-
fon ist eine Phantomspeisung (30 V ) einschaltbar.
2 Hinweise für den sicheren Gebrauch
Die Geräte (Vorverstärker und Netzgerät) entsprechen
allen relevanten Richtlinien der EU und sind deshalb mit
gekennzeichnet.
ACHTUNG! Das Netzgerät wird mit lebensgefährlicher
Netzspannung versorgt. Nehmen Sie deshalb nie selbst
Eingriffe in diesem Gerät vor. Durch unsachge mäßes Vor-
gehen besteht die Gefahr eines elektrischen Schlages.
G
Verwenden Sie die Geräte nur im Innenbereich. Schüt-
zen Sie sie vor Tropf- und Spritzwasser, hoher Luft-
feuchtigkeit und Hitze (zulässiger Einsatztemperatur-
bereich 0 – 40 °C).
GB
1-Channel Microphone
Preamplifier
Please read these operating instructions carefully prior to
operation and keep them for later reference.
1 Applications
The MPR-1 allows to connect a microphone to a line input
of an audio unit (mixer, recorder, etc.). For a phantom-
powered microphone, a phantom power (30 V ) can be
switched on.
2 Safety Notes
The units (preamplifier and power supply unit) correspond
to all relevant directives of the EU and are therefore
marked with
.
ATTENTION! The power supply unit is supplied with
hazardous mains voltage. Leave servicing to skilled per-
sonnel only. Inexpert handling may cause an electric
shock hazard.
G
The units are suitable for indoor use only. Protect them
against dripping water and splash water, high air
humidity, and heat (admissible ambient temperature
range 0 – 40 °C).
G
For cleaning only use a dry, soft cloth, never use chem-
icals or water.
F
B
CH
Préamplificateur
micro 1 canal
Veuillez lire la présente notice avec attention avant le
fonctionnement et conservez-la pour pouvoir vous y
reporter ultérieurement.
1 Possibilités dʼutilisation
Avec le MPR-1, un microphone peut être relié à une en -
trée ligne dʼun appareil audio (table de mixage, enregis -
treur etc.). Une alimentation fantôme (30 V ) peut être
commutée pour un microphone à alimentation fantôme.
2 Conseils dʼutilisation et de sécurité
Les appareils (préamplificateur et bloc secteur) répon-
dent à toutes les directives nécessaires de lʼUnion euro-
péenne et portent donc le symbole
.
ATTENTION ! Le bloc secteur est alimenté par une ten-
sion dangereuse. Ne touchez jamais lʼintérieur de lʼappa-
reil, vous pourriez subir une décharge électrique.
G
Les appareils ne sont conçus que pour une utilisation en
intérieur. Protégez-les des projections dʼeau et éclabous-
sures, dʼune humidité élevée de lʼair et de la chaleur (plage
de température de fonctionnement autorisée 0 – 40 °C).
G
Pour les nettoyer, utilisez uniquement un chiffon sec et
doux, en aucun cas de produits chimiques ou dʼeau.
G
Verwenden Sie für die Reinigung nur ein trockenes,
weiches Tuch, niemals Chemikalien oder Wasser.
G
Werden die Geräte zweckentfremdet, nicht richtig
angeschlossen, falsch be dient oder nicht fachgerecht
re pa riert, kann keine Haftung für daraus resultierende
Sach- oder Personenschäden und keine Garantie für
die Geräte übernommen werden.
Sollen die Geräte endgültig aus dem Betrieb
genommen werden, übergeben Sie sie zur
umweltgerechten Entsorgung einem örtlichen
Recyclingbetrieb.
3 Inbetriebnahme
1) Das Mikrofon an die Klinkenbuchse INPUT (5) oder an
die XLR-Buchse INPUT (6) an schließen.
2) Die Line-Eingangsbuchse des Audiogerätes an die
Klinkenbuchse OUTPUT (8) oder an die XLR-Buchse
OUTPUT (7) an schließen.
3) Ist ein phantomgespeistes Mikrofon an der XLR-
Buchse (6) angeschlossen, die Phantomspeisung mit
der Taste PHANTOM POWER (2) einschalten.
VORSICHT! Bei einem asymmetrisch beschalteten
Mikrofon darf die Phantomspeisung nicht eingeschal-
tet sein. Das Mikrofon kann beschädigt werden.
G
No guarantee claims for the units and no liability for any
resulting personal damage or material damage will be
accepted if the units are used for other purpos es than
originally intended, if they are not correctly connected or
operated, or not repaired in an expert way.
If the units are to be put out of operation defini-
tively, take them to a local recycling plant for a
disposal which is not harmful to the environ-
ment.
3 Setting into Operation
1) Connect the microphone to the 6.3 mm jack INPUT (5)
or to the XLR jack INPUT (6).
2) Connect the line input jack of the audio unit to the
6.3 mm jack OUTPUT (8) or to the XLR jack OUT-
PUT (7).
3) If a phantom-powered microphone is connected to the
XLR jack (6), switch on the phantom power with the
button PHANTOM POWER (2).
CAUTION! In case of an unbalanced microphone,
the phantom power must not be switched on. The
microphone may be damaged.
4) Connect the low voltage plug of the power supply unit
to the jack "12 V " (9) and the power supply unit to a
G
Nous déclinons toute responsabilité en cas de dom-
mages matériels ou corporels résultants si les appareils
sont utilisés dans un but autre que celui pour lequel ils
ont été conçus, sʼils ne sont pas correctement branchés,
utilisés ou sʼils ne sont pas réparés par une personne
habilitée ; en outre, la garantie deviendrait caduque.
Lorsque les appareils sont définitivement reti-
rés du service, vous devez les déposer dans
une usine de recyclage de proximité pour
contribuer à leur élimination non polluante.
3 Fonctionnement
1) Reliez le microphone à la prise jack INPUT (5) ou à la
prise XLR INPUT (6).
2) Reliez la prise dʼentrée ligne de lʼappareil audio à la
prise jack OUTPUT (8) ou à la prise XLR OUTPUT (7).
3) Si un micro à une alimentation fantôme est relié à la
prise XLR (6), allumez lʼalimentation fantôme avec la
touche PHANTOM POWER (2).
ATTENTION ! Pour un micro asymétrique, lʼalimenta-
tion fantôme ne doit pas être allumée. Le micro peut
être endommagé.
4) Mettez la fiche basse tension du bloc secteur dans la
prise "12 V " (9) et reliez le bloc secteur à une prise
®
MONACOR INTERNATIONAL GmbH & Co. KG • Zum Falsch 36 • 28307 Bremen • Germany
©
Copyright
by MONACOR INTERNATIONAL. All rights reserved.
4) Den Kleinspannungsstecker des Netzgerätes in die
Buchse „12 V " (9) stecken und das Netzgerät in eine
Steckdose (230 V~ / 50 Hz). Der Verstärker ist in Betrieb
und die grüne Betriebsanzeige (1) leuchtet.
5) Mit dem Regler GAIN (4) die Mikrofonlautstärke an das
angeschlossene Audiogerät anpassen. Leuchtet die
rote Übersteuerungsanzeige CLIP (3) auf, den Regler
GAIN entsprechend zurückdrehen.
6) Nach dem Betrieb das Netzgerät aus der Steckdose
ziehen, damit kein Strom unnötig verbraucht wird.
4 Technische Daten
Frequenzbereich: . . . . . . . . . 10 – 30 000 Hz
Eingang XLR: . . . . . . . . . . . . 3,5 mV/ 10 kΩ, sym.
Eingang 6,3-mm-Klinke: . . . . 16 mV/ 10 kΩ, sym.
Ausgangsspannung: . . . . . . . 1 V
max. Verstärkung
bei sym. Anschluss: . . . . . 50 dB
bei asym. Anschluss: . . . . 44 dB
Störabstand: . . . . . . . . . . . . . > 58 dB
Klirrfaktor: . . . . . . . . . . . . . . . < 0,1 %
Stromversorgung: . . . . . . . . . über beiliegendes
Netzgerät
Änderungen vorbehalten.
mains socket (230 V~ / 50 Hz). The amplifier is in oper-
ation and the green power LED (1) lights up.
5) With the control GAIN (4) match the microphone vol-
ume to the connected audio unit. If the red overload
LED CLIP (3) lights up, turn back the control GAIN cor-
respondingly.
6) After operation disconnect the power supply unit from
the mains socket so that no current is unnecessarily
consumed.
4 Specifications
Frequency range: . . . . . . . . . 10 – 30 000 Hz
Input XLR: . . . . . . . . . . . . . . 3.5 mV/ 10 kΩ, bal.
Input 6.3 mm connector: . . . . 16 mV/ 10 kΩ, bal.
Output voltage: . . . . . . . . . . . 1 V
Max. gain
for bal. connection: . . . . . 50 dB
for unbal. connection: . . . 44 dB
S / N ratio: . . . . . . . . . . . . . . . > 58 dB
THD: . . . . . . . . . . . . . . . . . . . < 0.1 %
Power supply: . . . . . . . . . . . . via supplied
power supply unit
Subject to technical modification.
secteur 230 V~ / 50 Hz. Lʼamplificateur est en fonction, la
LED verte (1), témoin de fonctionnement, brille.
5) Avec le réglage GAIN (4), adaptez le volume du micro
à lʼappareil audio relié. Si la LED rouge CLIP (3),
témoin dʼécrêtage, brille, tournez le réglage GAIN en
fonction dans lʼautre sens.
6) Après le fonctionnement, débranchez le bloc secteur
de la prise secteur pour éviter toute consommation
inutile de courant.
4 Caractéristiques techniques
Bande passante : . . . . . . . . . 10 – 30 000 Hz
Entrée XLR : . . . . . . . . . . . . . 3,5 mV/ 10 kΩ, sym.
Entrée jack 6,35 : . . . . . . . . . 16 mV/ 10 kΩ, sym.
Tension de sortie : . . . . . . . . 1 V
Amplification maximale
pour branchement sym. : . 50 dB
pour branchement asym. : 44 dB
Rapport signal sur bruit : . . . > 58 dB
Taux de distorsion : . . . . . . . < 0,1 %
Alimentation : . . . . . . . . . . . . par bloc secteur livré
Tout droit de modification réservé.
A-0284.99.04.03.2014
Advertisement

Related Manuals for IMG STAGELINE MPR-1


Summary of Contents for IMG STAGELINE MPR-1
- Page 1 1 Possibilités dʼutilisation de la prise secteur pour éviter toute consommation rés du service, vous devez les déposer dans Avec le MPR-1, un microphone peut être relié à une en - inutile de courant. une usine de recyclage de proximité pour trée ligne dʼun appareil audio (table de mixage, enregis -...
- Page 2 6) Dopo il funzionamento staccare lʼalimentatore dalla vamente, consegnarli per lo smaltimento ad presa di rete per non consumare inutilmente della cor- Con il MPR-1 è possibile collegare un microfono con lʼin- un'istituzione locale per il riciclaggio. rente. gresso Line di un apparecchio audio (mixer, registratore ecc.).