Table of Contents
Advertisement
Available languages
Available languages
Quick Links
TF 03 Set
D
Funk-Türsprechanlage mit schnurlosem DECT-Telefon
Bedienungs- und Sicherheitshinweise . . . . . . . . . . . . . . . . . . . . . . . . . . Seite 2
Interphone sans-fil avec combiné portable DECT
F
Consignes d'utilisation et de sécurité. . . . . . . . . . . . . . . . . . . . . . . . . . . page 21
GB
Wireless Door Intercom with Wireless DECT Telephone
Operating and safety instructions . . . . . . . . . . . . . . . . . . . . . . . . . . . . . page 39
Advertisement
Chapters
Table of Contents

Related Manuals for PENTATRON TF 03

Summary of Contents for PENTATRON TF 03
- Page 1 TF 03 Set Funk-Türsprechanlage mit schnurlosem DECT-Telefon Bedienungs- und Sicherheitshinweise ......Seite 2 Interphone sans-fil avec combiné portable DECT Consignes d'utilisation et de sécurité.
-
Page 2: Table Of Contents
Die Funk-Türsprechanlage TF 03 Set besteht aus einer Türsprechstelle Die Türsprechstelle ist für die Aufputzmontage geeignet. Sie ist wetterfest TF 03 T , einem Mobilteil TF 03 M mit einer Basis TF 03 B und einem (Schutzart IP 44) und somit zur Montage an einer geschützten Stelle im Netzgerät Typ MN-A002-A080 sowie einem Relaismodul RE 05. - Page 3 61 60 12 V DC 12 V DC (min. 300 mA) (min. 300 mA zzgl. Strombedarf des Türöffners) TF 03 T TF 03 T 12 V DC + 12 V DC + PGND 12 V DC - 12 V DC -...
-
Page 4: Lieferumfang
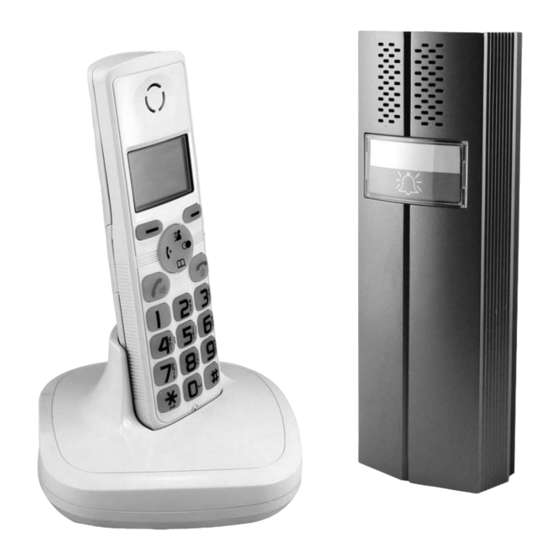
Telefonkabel Deckelschraube TAE-Adapter Bedienungsanleitung Mobilteil TF 03 M (s. Abb.B) Mobiteil 4. Ausstattung Lautsprecher LCD-Display Türsprechstelle TF 03 T (s. Abb. A) Taste Löschen / Stumm Türsprechstelle Taste Rechts/Links/Unten/Oben / Lautsprecher Wahlwiederholung/INT/Telefonbuch/LSD Klingeltaste mit Namensschild Taste Ende Befestigung für Halterung... -
Page 5: Technische Daten
Akku Funk-Modulation GFSK Batteriefachdeckel Betriebstemperatur ± 0° C bis + 40° C Abmessungen Gehäuse 48 x 159 x 29 mm Basis TF 03 B (s. Abb.B) Gewicht ca. 132 g Basis Ladekontakte Basis TF 03 B Lautsprecher Betriebsspannung 7,5 V DC (Netzgerät) -
Page 6: Platzierung Der Geräte
Gefahr! Schützen Sie die Geräte vor starken magnetischen oder elektrischen Lassen Sie Kleinkinder nicht unbeaufsichtigt mit dem Gerät, Feldern! Verpackungsmaterial oder Kleinteilen! Andernfalls droht Lebensgefahr Verwenden Sie die Geräte nur mit den mitgelieferten Originalteilen oder durch Ersticken! Originalzubehör! Beschädigen Sie bei Bohrarbeiten und beim Befestigen keine Leitungen Überprüfen Sie vor dem Zusammenbau und der Inbetriebnahme die für Gas, Strom, Wasser oder Telekommunikation! Andernfalls droht Lieferung auf Beschädigungen und Vollständigkeit! -
Page 7: Montage Und Anschluss
Basis: Montage bei 12 V Betrieb Die maximale Reichweite der Funkübertragung beträgt bis zu 200 m bei Halten Sie die Halterung [15] an die gewünschte Montagestelle und Sichtkontakt zwischen Türsprechstelle und Basis sowie zwischen Basis markieren Sie die zwei Bohrlöcher durch die Montaglöcher [16]. Achten und Mobilteil. -
Page 8: Inbetriebnahme
Zeitspanne, und Ihr Besucher hat die Möglichkeit, innerhalb dieser blinkt das Signalstärke-Symbol und auf dem Display erscheint: Zeitspanne die Tür zu öffnen. ! Schrauben Sie den Deckel wieder auf das Relaismodul. SUCHEN 8.3 Basis / Mobilteil Wenn das Mobilteil die Basis gefunden hat, schaltet es in den Möchten Sie die Telefonfunktion verwenden, so verbinden Sie mit dem Ruhezustand, auf dem Display erscheint der Name des Mobilteils, das Telefonkabel [62] den Telefonkabel-Anschluss [61] an der Basis mit... -
Page 9: Weitere Türsprechstellen An Der Basis Anmelden
Mobilteil. Wenn die eingegebene PIN fehlerhaft ist, ertönt ein Warnton, 15. Türsprechfunktion und das Mobilteil kehrt in den vorherigen Zustand zurück. Wenn die Nach Drücken der Klingeltaste [3] klingelt es sowohl an der Basis nicht gefunden wird, verhält sich das Mobilteil so, als ob es Türsprechstelle als auch an allen angemeldeten Mobilteilen bis zu eine außerhalb der Reichweite wäre. -
Page 10: Grundfunktionen
nach unten/Telefonbuch [66] Akku in Listen und Menüoptionen nach unten blättern; die zeigt den Ladezustand der Akkus an (drei Balken schwarz = Lautstärke des Hörers/Lautsprechers während eines Akkus sind voll, ein Balken schwarz = Akkus sind fast leer) Gespräches verringern; das Telefonbuch öffnen. Empfangsstärke INT-Taste [67] zeigt den Funkkontakt zur Basis an;... - Page 11 Um den Anruf zu beenden, drücken Sie entweder die Taste , oder Wenn die Nummer auf dem Display erscheint, drücken Sie die Taste stellen Sie das Mobilteil wieder in die Basis. Nach dem Auflegen zeigt MENU/R das Display die Dauer des Anrufes an. Wählen Sie mit den Tasten eine der folgenden Option aus:...
-
Page 12: Menü-Navigation
TELEFONBUCH 17.9 Flashsignal NEUER EINTR(AG) Wenn eine Rufnummer besetzt ist, können Sie durch Drücken der Taste ANdERN (ÄNDERN) ein Flashsignal senden. Diese Taste wird in Verbindung mit speziellen MENU/R LOESCHEN Diensten verwendet (z.B. Anklopfen), die möglicherweise von Ihrem Provider ALLES LOESCH(EN) zur Verfügung gestellt werden. -
Page 13: Telefonbuch
19.1 Rufnummern ansehen und wählen 20. TELEFONBUCH Drücken Sie die Taste MENU/R I n dem integrierten Telefonbuch des Mobilteils können Sie häufig Drücken Sie die Taste noch einmal, um ANRUFLISTE auszuwählen. MENU/R verwendete Rufnummern speichern, so dass Sie einen Anruf tätigen können, Die Nummer des letzten Anrufers wird angezeigt. -
Page 14: Einstellungen Zwischen Basis Und Mobilteil (Bs Einstell)
Drücken Sie die Taste 20.2 Telefonbuch-Einträge ändern (ANdERN) MENU/R Wählen Sie mit den Tasten TELEFONBUCH aus. Drücken Sie die Taste MENU/R Drücken Sie die Taste . Es erscheint NEUER EINTR. Wählen Sie mit den Tasten TELEFONBUCH aus. MENU/R Wählen Sie mit den Tasten SPEICH STAT aus. -
Page 15: Einstellungen Am Mobilteil (Mt Einstell(En))
21.3 FLASH ZEIT 2 2 . E i n s t e l l u n g e n a m M o b i l t e i l Diese Einstellung ist nur notwendig, wenn Ihre Telefonanlage dies erfordert, (MT EINSTELL(EN)) siehe Bedienungsanleitung der Telefonanlage. - Page 16 Wählen Sie mit den Tasten LAUTSP LAU (Lautsprecher Wählen Sie mit den Tasten oder AUS oder EIN aus, um die Lautstärke) oder HOERER LAUT (Mobilteil Lautstärke) aus. Funktion aus- oder einzuschalten. Drücken Sie die Taste . Das Display zeigt die aktuelle Einstellung Drücken Sie die Taste MENU/R MENU/R...
-
Page 17: Mobilteil An Einer Basis Anmelden (Anmelden)
Hinweis: 22.9 Eine Basis auswählen (bASIS WAEHLE(N)) Die Nummer des Mobilteils MT N bleibt im Hintergrund erhalten. Wenn Sie Mit dieser Funktion können Sie eine am Mobilteil angemeldete Basis z.B intern ein anderes Mobilteil anrufen, erscheint dort auf dem Display MT N auswählen (maximal können 4 Basisstationen an einem Mobilteil RUFT, und nicht der von Ihnen eingegebene Name. -
Page 18: Anrufe Mit Mehreren Mobilteilen Tätigen
Drücken Sie die Tasten oder wiederholt, um ANMELDEN Drücken Sie die Taste , um den internen Anruf zu beenden. Kurz auszuwählen. darauf klingeln Ihre Telefone bei eingehendem Anruf. Drücken Sie die Taste Nehmen Sie nun den externen Anruf mit der Taste MENU/R Wählen Sie mit den Tasten oder... -
Page 19: Batterie- Und Akkuwechsel
Hiermit erklären wir, INDEXA GmbH, Paul-Böhringer-Str. 3, D - 74229 Entnehmen und entsorgen Sie die alten Batterien. Oedheim, dass sich das Produkt TF 03 Set in Übereinstimmung mit den Legen Sie zwei alkalische LR14 (C), 1,5 V Batterien polrichtig in das grundlegenden Anforderungen und den anderen relevanten Vorschriften der Batteriefach ein. -
Page 20: Fehler Beheben
32. Fehler beheben Fehler Ursache Behebung Das Mobilteil reagiert nicht, bzw. Das Mobilteil ist nicht eingeschaltet Schalten Sie das Mobilteil ein keine Anzeige auf dem Display Akkus des Mobilteils sind falsch eingelegt Legen Sie die Akkus polrichtig ein Die Akkus sind leer, u.U. weil die Basis nicht korrekt mit Schließen Sie das Netzgerät korrekt an den Netzstrom an Strom versorgt wird und laden Sie die Akkus vollständig wieder auf... -
Page 21: Introduction
(Classe de protection IP44) et est donc adaptée à un montage à Le set TF 03 interphone sans-fil comprend une platine de rue TF 03 T, un l'extérieur à un endroit protégé. Le module relais, le combiné ainsi que la combiné... -
Page 22: Contenu De La Livraison
Instructions d'utilisation Combiné TF 03 M (voir illustr. B) Combiné 4. Équipement Haut-parleur Écran LCD Platine de rue TF 03 T (voir illustr. A) Touche Supprimer/Muet Platine de rue Touche droite/gauche/bas/haut/Bis/INT/Répertoire/LSD Haut-parleur Touche fin Sonnette avec plaque pour le nom Touche dièse... -
Page 23: Caractéristiques Techniques
48 x 159 x 29 mm Batteries Poids env. 132 g Couvercle du compartiment à piles Base TF 03 B Base TF 03 B (voir illustr. B) Tension de charge 7,5 V DC (Chargeur) Base Consommation électrique max. 300 mA Prise charge Température de... -
Page 24: Placement De L'appareil
tirez pas de câbles sur des bords saillants et ne les fixez ou ne les écrasez Conseil! Ce système envoie et utilise un signal radio. Si les appareils ne sont pas pas. Sinon danger de blessures ou de mort! installés et utilisés en conformité avec les instructions, ils peuvent Veillez à... -
Page 25: Montage Et Branchement
Veillez à ce qu'il y ait une prise de courant de secteur pour l'alimentation Coulissez la platine de rue sur le support. Vissez la vis Torx [23] avec la clé Torx fournie [24] par le trou [19] dans électrique à portée du câble du chargeur. le trou [12]. -
Page 26: Mise En Marche
9. Mise en service 11. Réglages de base Branchez le chargeur de la base sur l'alimentation électrique. Le Réglage de la langue, voir chapitre 22.5 combiné émet 2 bips. Réglage par défaut : Allemand Réglage de la date et de l'heure, voir chapitre 22.8 La mise en charge des batteries dans le combiné... -
Page 27: Supplémentaires À La Base
Recollez le cache en plastique sur la platine de rue. 16. Description des touches / de l'écran Remarque: 16.1 Fonctions des touches (voir illustr. B) Si vous enregistrez la platine de rue sur une autre base, l'enregistrement Décrocher / Haut-parleur [50] sur la première base s'efface automatiquement. -
Page 28: Fonctions De Base
Chiffres 0-9 / Lettres de A-Z / Signes Vous pouvez taper le numéro de téléphone souhaité également en veille. Affectation des touches : Vous pouvez ainsi effectuer des corrections avant de composer le numéro. Procédez de la façon suivante : Touche Signe dans une séquence indiquée Retirez le combiné... - Page 29 Appuyez sur la touche pour composer le numéro. Pour désactiver le verrouillage des touches, maintenez de nouveau la Votre téléphone enregistre les 10 derniers numéros composés dans une liste touche enfoncée jusqu'à ce que le symbole disparaisse de des numéros Bis. l'écran.
-
Page 30: Navigation Dans Le Menu
SELECT bASE (choisir une base) 18. Navigation dans le menu RAZ COMbINE (rétablir les réglages par défaut du combiné) Pour régler une option de menu: ENREGISTRER (enregistrer le combiné sur une base) Pour afficher les commandes de menu, appuyez sur la touche MENU/R bASE 1 Pour balayer et faire une recherche dans les options de menu, appuyez de... -
Page 31: Répertoire
19.3 Supprimer des numéros de la liste des appels Appuyez sur pour confirmer. L'écran ?affiche "NUMERO ?". MENU/R Indiquez le numéro de téléphone souhaité (max. 20 chiffres). (SUPPRIMER) Appuyez sur la touche MENU/R Appuyez sur la touche Sélectionnez à l'aide des touches la sonnerie que vous Sélectionnez le numéro souhaité... - Page 32 Appuyez sur la touche Voir la notice d'utilisation de l'installation téléphonique. Vous pouvez MENU/R Sélectionnez l'entrée souhaitée à l'aide des touches modifier le mode de numérotation de la façon suivante: Appuyez sur la touche . L'écran affiche CONFIRMER ? Appuyez sur la touche MENU/R MENU/R Appuyez sur la touche...
- Page 33 Remarque: réveil, appuyez sur la touche , mais elle sonne de nouveau le jour Notez impérativement votre nouveau code PIN. Si vous perdez votre code suivant. Pour arrêter complètement la sonnerie de réveil, vous devez PIN, vous ne pouvez plus effectuer de modification nécessitant de taper le sélectionner le réglage OFF conformément à...
- Page 34 modifier le nom d'un combiné de la façon suivante : 22.4 Régler le son des touches (REGL TONA) Appuyez sur la touche Votre combiné peut confirmer chaque pression de touche par un signal MENU/R Sélectionnez REGLAGE COMb à l'aide des touches sonore.
-
Page 35: Enregistrer Le Combiné À Une Base
REGLER dATE Maintenez enfoncée la touche Pager [59] sur le dessous de la base Tapez la date à l'aide des touches numériques 0 à 9. pendant 5 secondes ou plus. Appuyez sur la touche Appuyez sur la touche MENU/R MENU/R REGLER L'HEURE Appuyez de nouveau sur les touches pour sélectionner... -
Page 36: Identification Du Double-Appel
Remarque: Remarque: Si un appel externe sonne pendant une conversation avec la platine de rue ou Si vous avez transféré un appel externe sur un autre combiné, la fonction double-appel ne peut pas être utilisée pour le deuxième combiné. pendant un appel interne, l'écran affiche le numéro de téléphone du correspondant et deux sonneries courtes de double-appel retentissent. -
Page 37: Élimination
Nous, la société INDEXA GmbH, Paul-Böhringer-Str. 3, 74229 Oedheim, port payé ne seront pas acceptés. Les réparations ne peuvent être effectuées Allemagne, déclarons par la présente que le produit TF 03 Set est conforme que si l'appareil est accompagné d'une description détaillée du problème. - Page 38 Anomalie Cause Solution Le combiné ne réagit pas à la sonnette bien La distance entre la platine de rue et la base est trop Modifiez la position de la platine de rue et/ou de la base qu'il y ait contact avec la base et que l'on importante ou les murs empêchent la transmission radio entende le signal sonore de la platine de rue La platine de rue n'a pas été...
-
Page 39: Introduction
This The door intercom TF 03 Set consists of door unit TF 03 T, a handset TF 03 M can be activated by pressing a key on the handset. The base is powered... -
Page 40: Package Contents
Lock - TAE adapter cover User manual cover screw Handset TF 03 M (see fig. B) 4. Description handset Door unit TF 03 T (see fig. A) earpiece door unit LCD display speaker delete/mute bell button with name card right/left/up/down/recall/INT/phone book/LSD... -
Page 41: Technical Data
5. Technical data 6. Safety instructions Door unit TF 03 T The following instructions are provided for your safety and satisfaction during Operating voltage: V DC (min. 300 mA plus power operation of the machine. Note that non-observance of these safety requirement of the door release) instructions results in significant risks of accident. -
Page 42: Location Of The Product
Attention! Place the base on a suitable level and solid surface, ideally 1m above the Do not expose the product to fire or high temperature! floor (for better reception). Protect the product against strong magnetic or electrical fields and Place the base at a central place inside the residence, e.g. in the hall. Ensure against strong mechanical loads and vibrations! that the chime can be heard everywhere inside the residence. -
Page 43: Operation
Connect the wire ends to the terminals of the door unit as described in 9. Operation fig. C and D. Connect the mains adapter of the base to the power supply. The handset Place the rubber cover back onto the door unit, and route the wires will beep twice. -
Page 44: Registration Of Further Handsets
Setting the ring tone (melody and volume) see chapter 22.3 14. Radio range Setting the audio volume of your conversational partner see chapter The range of the radio transmission depends on various parameters. Under 22.2 ideal conditions up to 200 m can be achieved in free space (between door unit and base as well as between base and handset), indoors the range is 12. -
Page 45: Basic Functions
Delete/mute [42] 16.2 Icons on the LCD display (see fig. B) to return to the previous menu; to mute the microphone during New call a call; to delete an incorrect input indicates that you have missed one or more calls Navigation keys/further functions [43] Picked up receiver indicates that the line is engaged... - Page 46 If the caller can be identified, the caller's phone number is displayed. Use the key to choose one of the following options: To answer the call, press the key. If you have activated the Auto ADD TO PB: allows you to add the number to the phone book. Answer function, when the handset is in the base, simply pick it up to Complete storing the entry by starting from step 4 described in chapter answer.
-
Page 47: Menu Navigation
17.10 Paging HS SETTING ALARM You can page all handsets from the base unit making them ring with a special AUDIO SETUP tone. This is useful to locate a lost handset. RING SETUP Press the key [59] on the bottom of the base (less than 5 seconds). All TONE SETUP handsets registered to the base will ring for about 60 seconds. -
Page 48: Phone Book
Press the key. "ADD ENTRY" appears. Press the key and enter the name. MENU/R MENU/R Press the key. The number appears. Press the key again. The LCD shows "NAME ?". MENU/R MENU/R Press the key. Use the key to select the ring tone you Enter the desired name. -
Page 49: Base Settings (Bs Settings)
20.4 Deleting all entries from the phone book key to select the desired dialling mode (TONE or PULSE). (DELETE ALL) Press the key. A confirm beep will be heard. MENU/R Press the key. MENU/R Note: key to select PHONE BOOK. If you are not sure which dialling mode to select, please contact your local Press the key. -
Page 50: Handset Settings (Hs Settings)
Factory default: VOLUME 3 for both Press the key. The LCD shows "PIN?". MENU/R Enter the current PIN code, then press the key. MENU/R 22.3 Ring tone (melody and volume) (RING SETUP) You can choose the ring tone for incoming calls from the telephone network 22. - Page 51 Slovakian, Czech, and Swedish. You can change the language of the display 22.8 Setting date and time (DATE & TIME) texts as follows: Press the key. MENU/R Press the key. key to select HS SETTING. MENU/R key to select HS SETTING. Press the key.
-
Page 52: Registering The Handset To The Base (Register)
The handset user can press the key to answer the internal call. and the settings will remain. After resetting, the handset will return to standby mode. To end your conversation, press the key. Notes: If an external call comes in during an internal call or a conversation with the Registering a handset to a base door unit, the LCD will show the caller's number and two short beeps will be (REGISTER) -
Page 53: Changing Batteries
INDEXA GmbH, Paul-Böhringer-Str. 3, D - 74229 Oedheim, hereby declares Use the supplied torx wrench [24] to remove the torx screw [23] from the that the TF 03 Set is in compliance with the essential requirements and other hole [12]. -
Page 54: Troubleshooting
32. Troubleshooting Symptom Cause Remedy Handset doesn't react/ The handset isn't switched on. Switch the handset on. no message on the Batteries of the handset are not inserted correctly. Insert the batteries correctly, watching for correct polarity. display. Batteries are empty, possibly because the base isn't Connect the mains adapter correctly to the mains power powered correctly.
Need help?
Do you have a question about the TF 03 and is the answer not in the manual?
Questions and answers