Uwatec AIR2 Manual
5th generation octopus/bc inflator
Hide thumbs
Also See for AIR2:
- Troubleshooting manual (3 pages) ,
- Repair manual (12 pages) ,
- Manual (64 pages)
Table of Contents
Advertisement
Quick Links
Advertisement
Table of Contents

Related Manuals for Uwatec AIR2


Summary of Contents for Uwatec AIR2
- Page 1 AIR2 - 5 GENERATION OCTOPUS/BC INFLATOR...
-
Page 3: Table Of Contents
SCUBAPRO AIR2 - 5 GENERATION MANUAL (OCTOPUS / BC INFLATOR) TABLE OF CONTENTS Important warnings ....................4 2. European Certification ...................4 EN 250: 2014 norm regulations and what they mean ........4 2.2 Definition of ‘SCUBA’ according to EN 250: 2014 ..........5 Limitations provided by EN 250: 2014 .............5 2.4 Octopus (auxiliary emergency breathing system) ..........6... -
Page 4: Important Warnings
! WARNING This instruction manual does not replace a diving instruction course! 2. EUROPEAN CERTIFICATION SCUBAPRO AIR2 - 5th Generation (hereafter called AIR2) described in this manual has obtained the European certification issued by RINA according to European rules regulating the conditions for the release on the market and the fundamental safety requirements for third category Personal Protective Equipment (PPE). Certification tests have been conducted according to the EN250 harmonized standard to... -
Page 5: Definition Of 'Scuba' According To En 250: 2014
! WARNING The use of AIR2 as buoyancy control system of the BC, is certified only with SCUBAPRO BCs. Please refer to the SCUBAPRO BCs manual for any additional information ! WARNING In accordance with European standards, AIR2 can only be considered certified where all components are present, as per the original SCUBAPRO configuration, including the low pressure hose supplied. -
Page 6: Octopus (Auxiliary Emergency Breathing System)
SCUBAPRO refuses all responsibility for damages caused by non-compliance with the instructions contained in this manual. These instructions do not extend the warranty or the responsibilities stated by SCUBAPRO terms of sales and delivery. ! WARNING Don’t connect your AIR2 to the upper central LP port in the first stages equipped with turret since the axial-direct High Flow could make your AIR2 not work properly. -
Page 7: Regulator System
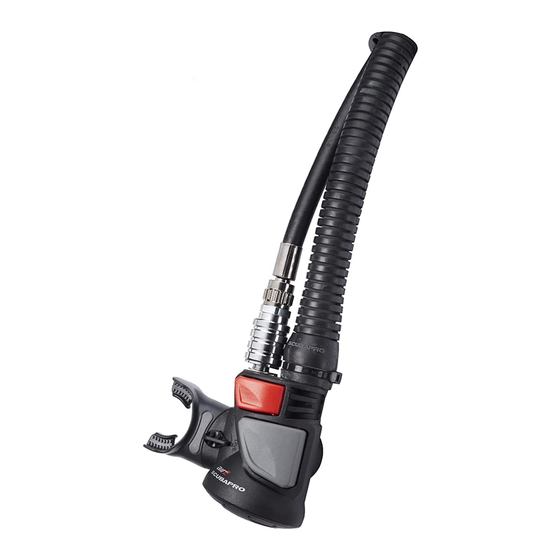
4.2 Second stage This unit is supplied by the intermediate pressure air coming from the first stage through the low pressure hose. It further reduces air pressure to balance with the ambient pressure. The second stage may be balanced or unbalanced and equipped with a Venturi effect control (V.I.V.A.) and/or with an inhalation resistance control. 4.3 Auxiliary emergency second stage (octopus) with integrated BC inflator: AIR2 Also this unit is fed by the intermediate pressure air coming from the first stage via a low pressure hose. The iar pressure is further reduced to reach the breathing pressure. The auxiliary emergency second stage is used by the diver when the main second stage has problems or when the buddy diver is experiencing problems during the dive . This auxiliary emergency second stage can be replaced by AIR2. This unit includes features of both a traditional BC inflator and an auxiliary emergency breathing device. Therefore it can be used for inflating/deflating the BC or to operate as an auxiliary emergency breathing device for themselves so to give the main second stage to the buddy experiencing problems. The AIR2 is simple to use and safe, even in unusual situations. The diver will not waste time to find the emergency second stage since the AIR2 will always be there, where the left hand is used to look for the BC inflator. The AIR2 it is also a BC inflation and deflation device, therefore it has a specific quick connection to the low pressure hose which allows fast connection and disconnection even when the system is already pressurized. The system automatically stops the air flow from the hose once it’s disconnected from the AIR2 using the quick coupling (fig 3-C). -
Page 8: Preparing For Use
5. PREPARING FOR USE Before assembling the SCUBA unit verify that all components comply with local or European standards. • Before connecting the first stage to the cylinder verify that the connection is free from dirt (sand, debris) and that the O-ring is undamaged. • INT connection: place the first stage connector on the cylinder valve after checking that it is also free from dirt or debris. Check that the contact surfaces are in the correct position and then tighten the yoke screw. In order to obtain the maximum comfort, the low pressure hose connecting the first stage to the second stage should be horizontal and directed toward the diver’s right shoulder (Img. 1). • DIN connection: screw the first stage connector on the cylinder valve after checking that this is also free from dirt or debris. Before tightening the hand-wheel and while screwing it in, confirm that the threads on the DIN connection and on the valve correspond correctly and are not crossed. In order to obtain the maximum comfort, the low pressure hose connecting the first stage to the second stage should be horizontal and directed toward the diver’s right shoulder (Img. 2). • Fit the carrying system/jacket (refer to the appropriate user instruction guide). After fitting the carrying system, the cylinder should sit securely. Check to be sure that the cylinder cannot come loose on its own accord. • Conduct a vacuum leak test. With the cylinder valve closed slowly inhale from the second stage. It should be possible to achieve and maintain a minimal negative pressure without air entering the system. This test must be repeated for all regulator second stages connected to the SCUBA unit in use. • Now conduct a high-pressure leak test. Slowly open the cylinder valve, check for any leaks and read the pressure registered on the pressure gauge. 5.1 Set-up/in-use warning ! WARNING While opening the cylinder valve, the pressure gauge face must not be directed towards the user or others, in the event and risk of a pressure gauge malfunction. -
Page 9: Equipment Use
BC manual. Open the cylinder valve, don the equipment en put the second stage in your mouth, breathe deeply a few times to ensure that the system is operating correctly. When the mouthpiece is out of the mouth, simply pressing the purge button may trigger the Venturi effect and cause a regulator free-flow. The free-flow can be stopped by covering the mouthpiece opening with a finger. 6.1 Inflator use of the AIR2 (normal operating mode) When properly installed on the left shoulder of the BC, the AIR2 can be fully operated with the left hand by pushing the buttons for inflation (P) or deflation (O) (see img 3). These two buttons are offset and show different sizes for easy identification. The smaller button (P) is depressed for automatic inflation. The larger button (O) is depressed for deflation. For oral inflation, only the large deflation button is used. To inflate, the diver seals his lips on the mouthpiece, fully depresses the deflation button, then exhales into the mouthpiece and releases the button to capture the exhaled air. -
Page 10: Emergency Breathing With Air2
BC.Your BC may contain gas residue, liquid, or contamination that may result in injury or death if inhaled. The AIR2 is equipped with a Venturi effect adjustment system, this device must be turned to the “PREDIVE” setting while at the surface (Img. 4). When the AIR2 is used in breathing use, adjustment knob must be turned to the “DIVE” position. An accidental free-flow can be stopped by covering the mouthpiece opening with a finger or by submerging the second stage regulator with the mouthpiece turned down, or by placing the mouthpiece in the mouth. -
Page 11: Post Dive
Close the cylinder valve and drain the system by pushing on the purge button of each second stage. Once the system has been depressurized disconnect the first stage regulator from the valve. All inlets of the first stage must be closed with the provided protective caps to avoid the entry of debris, dirt or moisture. If the cylinder valve is equipped with a reserve system the rod should be put in the “open” position (fully lowered) to indicate that the cylinder needs to be filled. 7. CARE AND MAINTENANCE 7.1 Care • After use, especially in chlorinated water, the AIR2 should be set up on a scuba tank, pressurized, and thoroughly rinsed with fresh water. • Should water accidentally enter the low pressure hose, connect the regulator to the cylinder, open the valve and press the second stage purge button down until all water has been expelled. • Dry your regulator completely in a dry ventilated place, away from heat and direct sunlight. ! WARNING Open the cylinder valve only with a regulator connected to the cylinder or slowly turning the cylinder valve knob as to control the air flow. -
Page 12: Maintenance
DO NOT USE silicone grease on the diaphragm and/or the exhaust valve, it may cause damage to the silicone rubber. Max Intermediate Pressure is 1.103 kPa (160 psig). Using the AIR2 with first stages exceeding this intermediate pressure may cause air leakage from the mouthpiece and inflation of the buoyancy vest. AIR2 SPECIFICATIONS... - Page 13 SUBSIDIARIES SCUBAPRO AMERICAS SCUBAPRO ASIA PACIFIC SCUBAPRO AUSTRALIA Johnson Outdoors Diving LLC 608 Block B, M.P.Industrial Centre Unit 21 380 Eastern Valley Way 1166-A Fesler Street 18 Ka Yip Street, Chaiwan Chatswood NSW 2067- El Cajon, CA 92020 - USA Hong Kong Australia SCUBAPRO FRANCE...
- Page 14 Manual and Declarations of Conformity on: Benutzerhandbuch und Konformitätserklärung auf: Manuel et déclarations de conformité sur : Manuale e Dichiarazioni di Conformità su: Manual y declaraciones de conformidad en: Handleiding en Conformiteitsverklaringen op: O Manual e as Declarações de Conformidade estão disponíveis em: Руководство и Декларация Соответствия: Kézikönyv és megfelelőségi nyilatkozatok itt: Instrukcja i deklaracja zgodności z przepisami znajduje się: Příručku a Prohlášení o shodě naleznete na stránkách: Priručnik i izjave o sukladnosti na: Bruksanvisning och Försäkran om överensstämmelse finns på: Manual şi Declaraţii de Conformitate pe: 手册及符合性声明: マニュアルおよび適合宣言書はこちら : scubapro.com DECLARATIONS MANUAL OF CONFORMITY...
Need help?
Do you have a question about the AIR2 and is the answer not in the manual?
Questions and answers