
Related Manuals for PAX E500


Summary of Contents for PAX E500
- Page 1 PAX E500 INSTALLATION MANUAL E500 ™ Installation Manual PAX Technology® 20181002-v0.5 Customer Support support@pax.us (877) 859-0099 www.pax.us...
-
Page 2: Table Of Contents
PAX E500 INSTALLATION MANUAL Table of Contents Revision History ............................3 Introduction ............................4 Box Contents ............................5 Product Description ..........................6 Terminal Ports ............................8 Back Cover Plate ............................9 Remove Back Cover Plate ........................9 Replace Back Cover Plate ........................9 Terminal Location ............................ -
Page 3: Revision History
HDMI, and Audio Jack ports in the Terminal Ports section. Nov. 9, 2017 Add Packaging section that includes information about labels with part numbers and serial numbers for E500 and Q20 on outside of terminal box. Includes information about the availability of another box that may be purchased for returning the unit to PAX for service. -
Page 4: Introduction
PAX E500 INSTALLATION MANUAL Introduction The PAX™ E500 is a next generation electronic cash register solution with an integrated Q20 customer- facing payment module. Its all-in-one housing unit combines a tablet, printer, PED, and ports. The modular design provides a seamless user experience using the PayDroid payment application which is based on Android. -
Page 5: Box Contents
Before you remove the terminal from the box, please note there are labels with the part number and serial number of the E500 and the Q20 on the outside of the box. Note: Part number and serial number labels for the E500 and the Q20 are also affixed to the underside of the unit. -
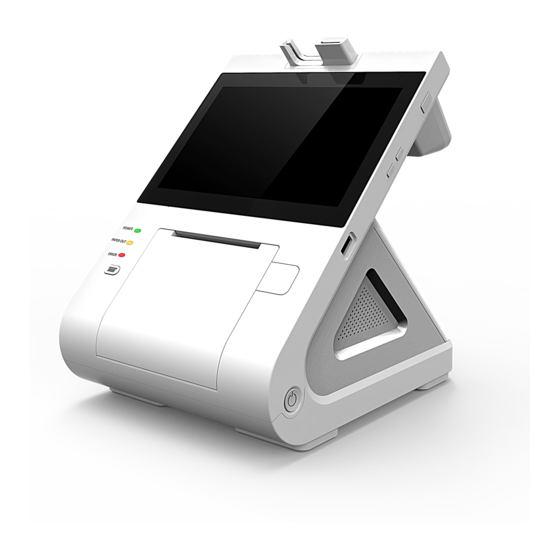
Page 6: Product Description
PAX E500 INSTALLATION MANUAL Product Description Front Printer Buttons Back Left Side PAX Technology® 20181002-v0.5 Customer Support support@pax.us (877) 859-0099 www.pax.us... - Page 7 PAX E500 INSTALLATION MANUAL Underside PAX Technology® 20181002-v0.5 Customer Support support@pax.us (877) 859-0099 www.pax.us...
-
Page 8: Terminal Ports
PAX E500 INSTALLATION MANUAL Terminal Ports At the back of the E500, ports enable the terminal to add peripherals such as PIN pads, check readers, contactless readers, other external devices, to enable local terminal downloads and communications, and to provide power. The ports are labeled and color-coded. -
Page 9: Back Cover Plate
PAX E500 INSTALLATION MANUAL Back Cover Plate Remove Back Cover Plate 1. Grasp the plastic tabs on both sides of the lower edge of the cover plate with your thumbs. 2. Pull up until the cover plate releases. Note: If you cannot remove the cover plate with your hands, use a flat head screwdriver to release the lower edge of the cover plate. -
Page 10: Paper
PAX E500 INSTALLATION MANUAL Paper Load Paper 1. To open the paper holder, press the large button to the right of the paper holder door, as shown below: At the back of the open paper holder, there is a diagram that shows the proper way to insert the paper. - Page 11 PAX E500 INSTALLATION MANUAL 2. Place the paper roll inside the paper holder with the paper feeding from the top of the paper roll. 3. Pull out approximately 5 inches of paper and close the lid. 4. Firmly press the door closed until it snaps in place. The terminal automatically cuts the excess paper.
-
Page 12: Advance Paper
E500 is battery powered. Tear Paper When connected to power, the E500 automatically cuts excess paper when the paper holder is closed. However, if the E500 is running on battery power, you can tear the paper by hand. -
Page 13: Ac Power Connection
PAX E500 INSTALLATION MANUAL AC Power Connection The terminal uses a two-piece AC power supply and cord. It is highly recommended to use surge protection and a UPS backup power supply with battery backup. To apply power: 1. Connect the two-piece power supply and power cable together. -
Page 14: Terminal Communications
PAX E500 INSTALLATION MANUAL Terminal Communications The E500 supports the following types of communication: • Ethernet LAN • Serial Port RS232 • • GSM/GPRS • WDCMA • TD-SCDMA • 4G FDD-LTE & TD-LTE • Wi-Fi 802.11 b/g/n • Bluetooth BLE 4.0 •... -
Page 15: Lan Ports
PAX E500 INSTALLATION MANUAL LAN Ports Using Ethernet communications allows the terminal to send and receive transaction information quickly resulting in fast transaction times. The LAN port is used for Ethernet connections using DSL or Cable. To connect to an internal LAN port: 1. -
Page 16: Dual-Sim Feature
You can set up a priority list, similar to the example below, where the E500 will continue to attempt to use the higher priority communication type until it fails. At that point, the E500 will failover to the next available one on your priority list. -
Page 17: Install Sim Or Micro Sd Card (If Equipped)
PAX E500 INSTALLATION MANUAL Install SIM or Micro SD Card (If Equipped) To install a SIM card or Micro SD card: 1. Using a flat head screwdriver, loosen the captive screw from the SIM cover on the back of the E500. -
Page 18: Hybrid Card Reader
PAX E500 INSTALLATION MANUAL Hybrid Card Reader The Q20 on the consumer-facing side of the E500 includes a reader can be used as an EMV Card Reader and a NFC/Contactless Card Reader. Magnetic Stripe Reader To use the Magnetic Stripe Reader, insert the Magnetic Stripe card into the card reader slot located on the top of the Q20. -
Page 19: Replacing Battery (If Required)
PAX E500 INSTALLATION MANUAL Replacing Battery (If Required) To replace the battery: 1. Carefully position the E500 so you have access to the bottom of the unit. 2. Using a slot head screwdriver, loosen the captive screw. 3. Remove the battery cover. -
Page 20: Cable Lock (If Required)
PAX E500 INSTALLATION MANUAL Note: The white plastic arrow slots on the battery connector, as shown below, must face toward you when you insert it into the battery port. 7. Firmly seat the white battery connector into its socket. 8. Insert the two tabs on the battery cover plate and slide the cover plate into place. -
Page 21: Cleaning The Device
PAX E500 INSTALLATION MANUAL Cleaning the Device WARNING: Do not use industrial strength or abrasive cleaner as it may damage or scratch the screen. • Do not immerse device in water (or liquid). • Do not spray water or cleaner into EMV Card Reader or ports. -
Page 22: Basic Operation Instructions
Note: The ON/OFF button is lit when the power is on. Power OFF Press and hold the ON/OFF button for three seconds. The following E500 screen displays: Select Power off. The screen display goes dark and the terminal turns off. -
Page 23: Pax Customer Support
This document is provided to you for informational purposes only. All features and specifications are subject to change without notice. The PAX name and PAX logo are registered trademarks of PAX Corporation and/or its affiliates. Other names may be trademarks of their respective owners.
Need help?
Do you have a question about the E500 and is the answer not in the manual?
Questions and answers