Beurer EM 59 Heat Instructions For Use Manual
Digital tens/ems unit with heat function
Hide thumbs
Also See for EM 59 Heat:
- Instructions for use manual (164 pages) ,
- Instructions for use manual (156 pages) ,
- Instructions for use manual (132 pages)

Subscribe to Our Youtube Channel
Related Manuals for Beurer EM 59 Heat


Summary of Contents for Beurer EM 59 Heat
- Page 1 EM 59 Heat EN Digital TENS/EMS unit with heat function Instructions for use ........2...
-
Page 2: Table Of Contents
Read these instructions carefully and ENGLISH keep them for later use, be sure to make Table of contents them accessible to other users and observe the information they contain. 1. Getting to know your device.............3 2. Important notes .................5 3. Device description ..............8 Signs and symbols 4. -
Page 3: Getting To Know Your Device
Dispose of packaging in an environmentally friendly temperature, pulse, gentle therapy, massage, beauty, baby and air manner What is EM 59 Heat, and what can it do? Storage / Transport EM 59 Heat falls into the electrostimulation device category. It... - Page 4 (relaxing application). To enable pain to be alleviated even more pleasantly, with the EM 59 Heat you can also switch on a soothing heat function. The activating application involves: • Muscle training to increase endurance and/or TENS, or transcutaneous electrical nerve stimulation, relates •...
-
Page 5: Important Notes
The heat function of the EM 59 Heat can be used parallel or • After an operation, if strong muscle contractions could affect the separately to a stimulation. healing process • The device must never be used close to the heart. - Page 6 • If you have any sensory impairment that reduces the feeling • Do not modify electrodes (e.g. by cutting them), as this increases of pain (e.g. metabolic disorders) the current density, which is potentially hazardous (max. • If you are receiving medical treatment recommended output value for the electrodes is 9 mA/cm², an •...
- Page 7 • This device is not intended for use by children or people with Notes on handling batteries restricted physical, sensory (e.g. reduced sensitivity to pain) or • If your skin or eyes come into contact with fluid from a battery mental skills or a lack of experience and/or lack of knowledge, cell, flush out the affected areas with water and seek medical unless they are supervised by a person who is responsible for...
-
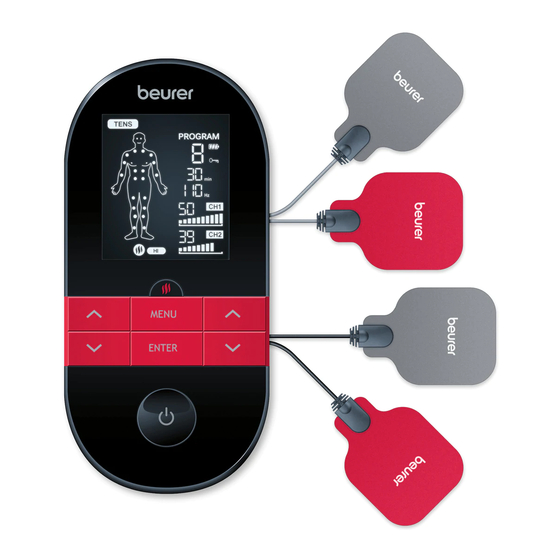
Page 8: Device Description
3. Device description 4. Initial use Before you use the EM 59 Heat for the first time, let it charge for a Buttons: minimum of 4 hours. Proceed as follows. 1 ON/OFF button 1. Connect the USB charging cable to a mains adapter (max. output... -
Page 9: Use
˄/˅ 5. Use Step 6: Use the left and right setting buttons for to select the impulse intensity you want. The indicator for impulse 5.1 Notes on use intensity in the display changes accordingly. If the program is in a •... -
Page 10: Heat
6. Heat 7. Program overview In addition to the TENS/EMS/Massage programs, the EM59 Heat The digital EMS/TENS unit features a total of over 70 programs: also offers two heat levels, which can be activated as required for • 15 TENS programs all programs, see section 5.2 on usage. -
Page 11: Ems Program Table
7.2 EMS program table Progr. Practical areas for application, indications Running Possible time electrode Progr. Practical areas for application, indications Running Possible (min) positions time electrode Tightening the shoulder muscles 1–4 (min) positions Strengthening the lower back muscles 4–11 Warming up 1–27 Maximising the strength of the lower back 4–11... -
Page 12: Massage Program Table
7.3 MASSAGE program table Progr. Practical areas for application, indications Running Possible time (min) electrode positions Tapping massage 1 Tapping massage 2 Tapping massage 3 Kneading massage 1 Kneading massage 2 Pressure massage Relaxing massage 1 Relaxing massage 2 Relaxing massage 3 Relaxing massage 4 1–28 Spa massage 1... -
Page 13: Information Regarding The Positioning Of Electrodes
7.4 Information regarding the positioning of electrodes... -
Page 14: Customisable Programs
It is fundamental to the intended success of electrostimulation As part of pain relief treatment (TENS) using the digital applications that electrodes are sensibly positioned. EMS/TENS unit and its 2 separately adjustable channels We recommend that you consult your doctor to establish the ideal and 2 electrodes each, it is advisable either to position the electrode positions for your intended application area. - Page 15 2. Select the TENS 13 program as described in section "5.2 Starting The impulse width changes automatically during the stimulation use" (step 3 to step 5). treatment. ˄/˅ 3. Use the setting buttons to select the impulse frequency you 1. Place the electrodes on the desired area for treatment (for want and press the ENTER button to confirm your selection.
-
Page 16: Doctor's Function
EMS 34 program 1. Place the electrodes on the desired area for treatment (for EMS 34 is a program that you can also customise. In this program, positioning suggestions see electrode positions in section "7.4 you can set the impulse frequency to between 1 and 150 Hz and Information regarding the positioning of electrodes") and connect the impulse width to between 80 and 450 μs. -
Page 17: Electric Current Parameters
Therapy memory the muscles and quicker fatigue. Higher impulse frequencies are EM 59 Heat records the treatment time. To access the therapy therefore better to use for high-speed strength and maximum power memory, switch the device on using the ON/OFF button and training. -
Page 18: Cleaning And Storage
10.5 Cycled impulse parameter variation • Disconnect the connection cables from the electrodes. • After use, stick the gel pads back onto the carrier foil of the gel In many cases it is necessary to cover the overall tissue structure at pads. -
Page 19: Replacement Parts And Wearing Parts
14. Replacement parts and wearing parts (2) Clean the skin prior to any application; do not use skincare lotions or oils prior to treatment. Shaving may increase the life of You can obtain the following replacement parts directly from electrodes. Customer Services: There is no noticeable stimulation. -
Page 20: Notes On Electromagnetic Compatibility
During the warranty period, should this product prove to be device as well as the other devices must be monitored to ensure incomplete or defective in functionality in accordance with the they are working properly. following provisions, Beurer shall carry out a repair or a replacement... - Page 21 Beurer; - damage that arises during transport between manufacturer and customer, or between service centre and customer;...
- Page 24 HIVOX BIOTEK INC. 5F, N0.123, Shingde Rd. Sanchong District 241, New Taipei City, Taiwan ROC Beurer GmbH • Söflinger Straße 218 • 89077 Ulm, Germany • www.beurer.com www.beurer-gesundheitsratgeber.com • www.beurer-healthguide.com Hivox Biotek B.V. De Run 4428, 5503 LR, Veldhoven, Netherlands...
Need help?
Do you have a question about the EM 59 Heat and is the answer not in the manual?
Questions and answers