Advertisement
P/ N 0 8- 0 59 2, 0 8- 0 59 3 , 0 8- 0 59 4 , 0 8- 0 59 5 a n d 0 8- 0 61 5
Re a d a l l i n s t r u c t i o n s a n d WARNING a t e n d o f i n s t r u c t i o n s
Th e Mo t i o n Pr o Fu e l In j e c t o r Cl e a n e r i s
d e p o s i t s i n s i d e t h e f u e l i n j e c t o r . Be c a u s e
t h e r e a r e m a n y d i f f e r e n t s t y l e s a n d b r a n d s
o f i n j e c t o r s t h e i n s t r u c t i o n s b e l o w
u s e d a s a g u i d e l i n e t o i l l u s t r a t e t h e i n t e n d e d
u s e o f t h i s t o o l .
FLUSHING FUEL INJECTOR
St e p 1 :
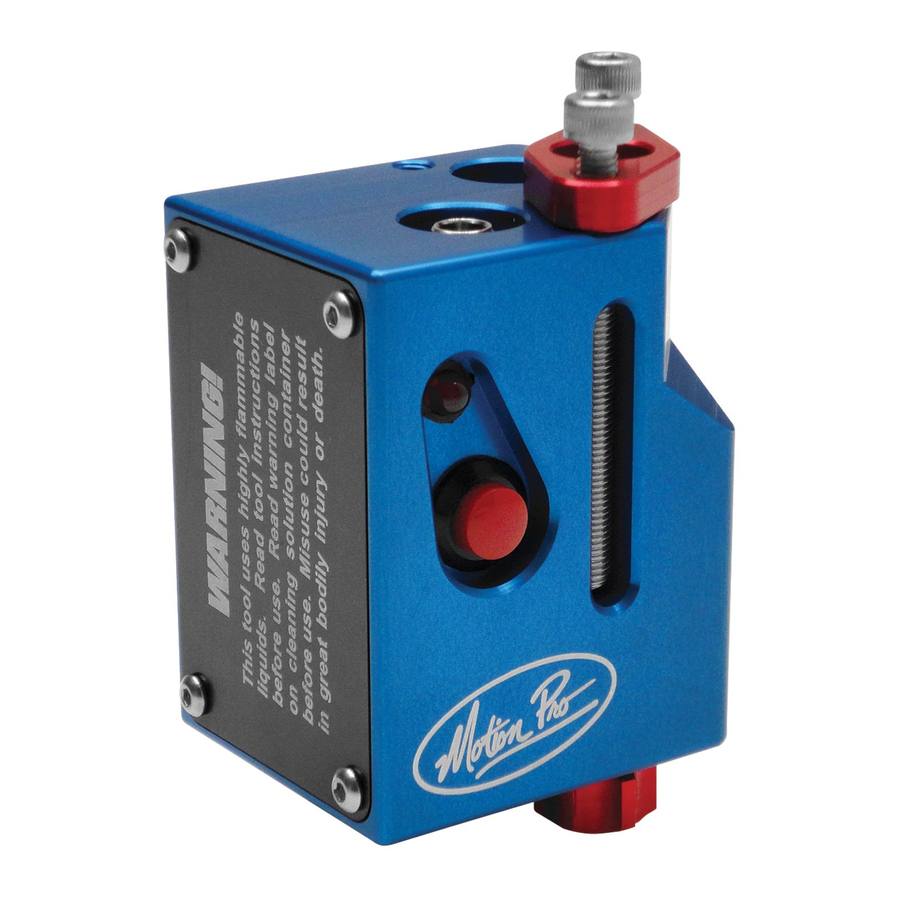
Insert the engine side of the injector into the tool as shown
in Fig 1. For this operation the injector will be inserted into
Port 2, however some style injectors may need to be
placed into Port 1.
Turn the electrical connector on the fuel
injector toward the outside of the tool as shown in Fig 2.
Install the hold-down clamp as shown in Fig 2, being
careful not to damage the O-rings. Carefully tighten
injector. Wa r n i n g : DO NOT OVER TIGHTEN THE
SCREWS o r y o u w i l l d a m a g e t h e i n j e c t o r !
Install the electrical connector to both the injector and
the tool with the appropriate pigtail for your injector
(Fig 3 ). Y ou should hear a click when the red button
is pushed. This will open the solenoid inside the injector
Loosen the red knob opposite the port that the injector
is set in. Insert the tube from the aerosol can of injector
cleaner into the bottom of the tool as shown in Fig. 4 .
Tighten the red knob to lightly seal the tube to the
injector cleaner.
I08-0592
Mo t i o n Pr o Fu e l In j e c t o r Cl e a n i n g K i t
b e f o r e a t t e m p t i n g t o u s e t h i s t o o l !
s h o u l d b e
1 of 2
FIG 1
FIG 2
FIG 4
FIG 3
2
Advertisement
Table of Contents

Related Manuals for Motion Pro 08-0592


Summary of Contents for Motion Pro 08-0592
- Page 1 Mo t i o n Pr o Fu e l In j e c t o r Cl e a n i n g K i t P/ N 0 8- 0 59 2, 0 8- 0 59 3 , 0 8- 0 59 4 , 0 8- 0 59 5 a n d 0 8- 0 61 5 Re a d a l l i n s t r u c t i o n s a n d WARNING a t e n d o f i n s t r u c t i o n s b e f o r e a t t e m p t i n g t o u s e t h i s t o o l ! Th e Mo t i o n Pr o Fu e l In j e c t o r Cl e a n e r i s...
- Page 2 FIG 5 (Fig 5). Note that you will NOT see any spray pattern. This debris that may accumulate in the injector. Remove the injector and proceed to Step 2. CLEANING FUEL INJECTOR STEP 2: Remove the lower compression seal on the injector so that it does not get damaged by the clamp and install the fuel side of the injector into the tool (Fig 6).
Need help?
Do you have a question about the 08-0592 and is the answer not in the manual?
Questions and answers