Advertisement
Quick Links
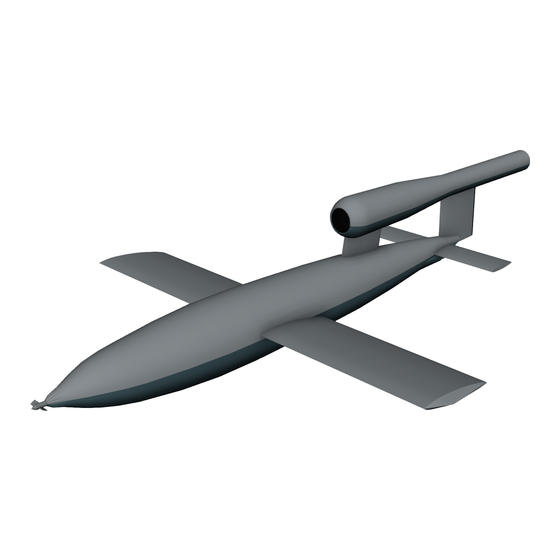
V1 Buzz Bomb Construction Manual
Introduction
In the late stages of World War II, the Germans invented a new and terrible weapon, the
V1 flying bomb. Though not nearly as accurate as today's cruise missiles, it could hit a target
such as a city from several hundred kilometers away.
They were a 4,000 lb, 350 to 400 MPH pilot-less drone, catapulted from a ramp set in the
direction of the city that they were aimed at, stabilized by gyroscopes during flight. It was
powered by a simple pulse jet that shot flame out the back, and made a very loud low frequency
buzzing sound. This led to the bombs being called "buzz-bombs" by the intended victims. A
simple wind-milling propeller mechanism on the front measured the distance of flight, and kicked
in down elevator when the pre-set number of propeller turns had been reached. The engine then
cut out, and the bomb glided down to impact, in relative silence. The people on the ground
quickly learned to take cover when the engines cut.
Though only accurate enough to hit a general area, several thousand people were killed,
and a very large amount of property damage was caused in the target cities
Large numbers of AA guns were set aside for shooting them down, and squadrons of
Spitfire Mk XIV's, and Tempest Mk V's, were assigned to patrol for them. As soon as they
became coordinated well, the fighters were the most effective method of stopping the bombs.
Although other airplanes, such as the P47 and P51 accounted for some V1's, the great low-
altitude speed, and 20 mm cannon of these two British aircraft made them the most effective
against the fast, steel-skinned, low-flying bombs. The Tempests were the most successful, with
over 600 destroyed, with one pilot single-handedly destroying more than 60. This was hazardous
work, as the bombs could blow-up if the warhead was pierced by a shell. This could, and too
often did, take out the attacking fighter along with the V1. You had to get in fairly close, as 50 cal
machine gun bullets would bounce off of the V1, and the 20 mm cannon did not have a great
range as the machine guns. Pilots learned that flying with the wing-tip close to the V1's wing tip
would upset the stability of the V1 and cause it to crash.
As the proximity fuse, and predictive radars (that used analogue computers to calculate
where the target would be when the shell reached it) became available to the AA guns, they
became far more effective against the V1's
This model is a sport-scale version of this famous cruise missile. It is intended
as an accessory for a 1/7-1/12 WWII allied fighter, for flying intercept missions, and re-
enacting this period of history. To make it easier to launch, fly and land, it includes
ailerons, and a slightly over-sized wing. It has a flight envelope that includes steep
turns, rolls and loops, but not spins, snaps and other advanced aerobatics. Because of
its shape, it is forgiving of imperfect landings. The jet-tube is attached strongly, and
could be used for rocket launching the V1, if desired.
This kit requires intermediate building and flying skills.
(Revised by Manzano Laser Works, 8/29/2020.)
V1 Buzz Bomb
1/9 Sport Scale
, and the fighters were reassigned to other tasks.
1
Advertisement

Related Manuals for Manzano Laser Works V1 Buzz Bomb


Summary of Contents for Manzano Laser Works V1 Buzz Bomb
- Page 1 V1 Buzz Bomb Construction Manual V1 Buzz Bomb 1/9 Sport Scale Introduction In the late stages of World War II, the Germans invented a new and terrible weapon, the V1 flying bomb. Though not nearly as accurate as today’s cruise missiles, it could hit a target such as a city from several hundred kilometers away.
- Page 2 V1 Buzz Bomb Construction Manual Construction Wing Wing construction begins with pinning the BOTTOM WING SHEETING to the building board. Protect the plan and the building board with waxed paper. The SPAR is then fitted to the sheeting,, with slots facing up, using the pre-cut tabs and slots to align it properly.
- Page 3 V1 Buzz Bomb Construction Manual Use a straight 1/4 x 1/2 stick for the leading edge. If the stick is warped along the 1/2” axis, used a straight edge to cut one edge completely straight. Ensure that the piece is not less than 3/8 high at any point.
- Page 4 V1 Buzz Bomb Construction Manual Sand the inboard trailing edges so that the last 1/2” of them tapers from 1 mm to a sharp edge. Using a straight edge and a single- edged razor, ensure that one edge of the 1 mm x 6” balsa upper sheeting is completely straight.
- Page 5 V1 Buzz Bomb Construction Manual Place wing with leading edge on table and trailing edge in the air. Run medium CYA forward along the top of the ribs, so that the entire top of the rib is covered with glue. Also run medium...
- Page 6 V1 Buzz Bomb Construction Manual Remove ailerons, and lay wing flat on waxed paper. Glue WT (wing tip pieces) to ends of wing. Trim excess that extends into aileron area Sand leading edge to airfoil profile seen on plans. Wing is now complete. Pin back down to building board, aligned with plans.
- Page 7 V1 Buzz Bomb Construction Manual Protecting plans with waxed paper, wrap a bit of waxed paper around the mid trailing edge of HS. Pin stabilizer to plans. Fill elevator joiner wire holes and grooves with 5 minute epoxy. Assemble EL’s to HS, installing hinges without glue.
- Page 8 V1 Buzz Bomb Construction Manual Jet Engine Measure 15” from one end of tube. This will be the rear of the rear former. Using plans, mark the position of the rear of the front former, as well. Install two 1/8” formers , ER, as well as the 1/2”...
- Page 9 V1 Buzz Bomb Construction Manual Placing the bead of glue on JCS. Use a straight wooden block to hold down the overlap joint while the glue dries. Sand all edges smooth, and add filler, as necessary.
- Page 10 V1 Buzz Bomb Construction Manual Plank entire fuselage with 1/16 x 1/4 balsa strips. Confident builders can sheet tail cone, instead, if they wish. Make top portion of tail block from balsa blocks, attach to back of F9, and carve/sand to continue shape of tail cone.
- Page 11 V1 Buzz Bomb Construction Manual Note 1/16 balsa “tongues” on rear end of hatch. Bottom hatch does not have a latch. It merely rests on 1/16 balsa flanges, and is held in place by the covering, or clear tape. Fill any gaps at the front of the fuselage, and reinforce joint between planking and F2/F1 with glass cloth.
- Page 12 V1 Buzz Bomb Construction Manual Flying Have an assistant hand-launch the V1 for you. It requires a couple of quick steps, followed by a quick, level toss. If it climbs, immediately level the nose to allow speed to build. If it wallows, allow it to sink with wings level until speed builds. Gently climb to circuit height allow speed to build, and then turn into your circuit.
- Page 13 V1 Buzz Bomb Construction Manual times the sped of the V1. It can then fly in behind it and pretend to shoot, arrive beside it, and pretend to tip it, or drop down right in front of it, pretending to use wake turbulence to upset the V1.
- Page 14 V1 Buzz Bomb Construction Manual LASER CUT PARTS FOR V1 FLYING BOMB NAME EXPLANATION LOCATION MOTOR MOUNT PLATE 1/32 PLY BALSA MOTOR MOUNT RING (2 each) 1/4 BALSA UPPER FUSELAGE FORMER 1/8 BALSA UPPER FUSELAGE FORMER 1/8 BALSA UPPER FUSELAGE FORMER...
Need help?
Do you have a question about the V1 Buzz Bomb and is the answer not in the manual?
Questions and answers