AUTOFLAME Mk7 D.T.I. Setup Manual
Hide thumbs
Also See for Mk7 D.T.I.:
- Setup manual (153 pages) ,
- Manual (86 pages) ,
- Setup manual (94 pages)
Table of Contents
Advertisement
Quick Links
Advertisement
Table of Contents

Subscribe to Our Youtube Channel
Related Manuals for AUTOFLAME Mk7 D.T.I.


Summary of Contents for AUTOFLAME Mk7 D.T.I.
- Page 1 M Mk7 D.T.I. Set-Up Guide Mk7 数据传输接口设置指南...
- Page 3 Company 部门 Department This manual and all the information contained herein is copyright of Autoflame Engineering Ltd. It may not be copied in the whole or part without the consent of the Managing Director. Autoflame工程有限公司拥有本手册的所有版权。在未经Autoflame公司常务董事同意的情况 下,本手册内容不得被整体或部分引用。 Autoflame Engineering Ltd’s policy is one of continuous improvement in both design and manufacture.
- Page 4 仅有专业人员才能安装、调试、使用本手册所提及的系统设备和控制原理。他们必须精通 Autoflame 产品所涉及的燃烧、电气和控制等技术学科。 The sale of Autoflame’s systems and equipment referred to in this Manual assume that the dealer, purchaser and installer has the necessary skills at his disposal. i.e. A high degree of combustion engineering experience, and a thorough understanding of the local electrical codes of practice concerning boilers, burners and their ancillary systems and equipment.
-
Page 5: Table Of Contents
Contents 目录 1 MK7 DATA TRANSFER INTERFACE MODULE. Mk7 数据传输接口模块......1 Overview of the Mk7 D.T.I. Mk7 数据传输接口概述........1 Introduction to the Mk7 D.T.I. Mk7 数据传输接口简介..........1 1.1.1 Information Available from Mk7 D.T.I. - Page 6 Information, Errors and Lockouts 信息、错误和锁定........62 Digital Inputs (1x Reference). 数字输入(1x 参考值)..........62 4.5.1 Analogue Inputs (3x References) 模拟输入(3x 参考值)......... 63 4.5.2 Error and Lockout Codes . 错误和锁定代码............64 4.5.3 Water Level .
-
Page 7: Mk7 Data Transfer Interface Module Mk7 数据传输接口模块
至楼宇管理系统或能源管理系统,传输将通过 RS422 链路或以太网利用 Modbus 通信完成数 据传输。典型的远程楼宇管理系统信息和运行设施需要满足特定站点和管理系统的要求。 The Autoflame network operates using a two core screened cable and features dedicated data ports for RS422 and Ethernet connections. The Mk7 D.T.I. poles each item on the network periodically, storing up-to-date information every 2 seconds. The D.T.I. then outputs to defined Modbus addresses, which are then available to third party systems like a B.M.S. - Page 8 1 Mk7 Data Transfer Interfáce Module Mk7 数据传输接口模块 Audit software and via Modbus, the following information is available: Mk7 数据传输接口显示 Mk7 控制模块、Mk8 微型控制模块、Mk8 尾气分析仪和水位控制信 息。燃烧器可以进行远程开启/关闭控制,同时还可以远程调节温度或压力设定值和排列顺序。 通过数据传输接口触摸屏、CEMS Audit 软件和 Modbus 可以显示以下信息: Mk7 D.T.I. Input Values Mk7 数据传输接口输入值 Enable/disable burner 启用/禁用燃烧器...
- Page 9 1 Mk7 Data Transfer Interfáce Module Mk7 数据传输接口模块 Sequence status (on, standby warming, off) 排序状态(开启、待机、警告、关闭) Enabled/disabled status 启用/禁用状态 Total hours run 总运行时间 Number of start-ups per fuel 每次燃油启动次数 Online and commissioned gas/ oil pressure ...
- Page 10 1 Mk7 Data Transfer Interfáce Module Mk7 数据传输接口模块 总尾气重量和体积(O , CO , CO, NO, SO O, N ,总计) Heat input, heat loss and net useful heat 热输入、热损失和净用热 Net efficiency, gross efficiency and delta temperature 净效率、总效率和 delta 温度 ...
- Page 11 1 Mk7 Data Transfer Interfáce Module Mk7 数据传输接口模块 Average water level signal of probes 探头的平均水位信号 Commissioned end of probe position 探头位置的调试端 Commissioned 2 low position 调试的第二低位 Commissioned 1 low position 调试的第一低位 Commissioned 1 low pre-alarm position 各报警位置的调试第一低位 Commissioned control point position 调试控制点位置...
-
Page 12: Fixing Holes And Dimensions 固定孔和尺寸
1 Mk7 Data Transfer Interfáce Module Mk7 数据传输接口模块 Fixing Holes and Dimensions 固定孔和尺寸 .T.I. Set-Up Guide Mk7 数据传输接口设置指南 10.08.2015 Page Mk7 D... -
Page 13: Set-Up And Connections 设置和连接
2 Set-Up and Connections 设置和连接 SET-UP AND CONNECTIONS 设置和连接 Wiring 接线 2.1.1 Mk7 D.T.I. Wiring Diagram MK7 数据传输接口接线图 Figure 2.1.1.i Mk7 D.T.I. Wiring Diagram 图 数据传输接口接线图 2.1.1.iMk7 Electrical Specifications: 电气规范 Max power for the Mk7 D.T.I. power supply is 184W. Mk7 数据传输接口电源的最大功率是... -
Page 14: System Schematic 系统原理图
2 Set-Up and Connections 设置和连接 System Schematic 系统原理图 2.1.2 Mk7 D.T. I. Set-Up GuideMk7 数据传输接口设置指南 10.08.2015 Page 6... -
Page 15: Modules Connection 控制模块的连接
2 Set-Up and Connections 设置和连接 2.1.3 M.M. Modules Connection 控制模块的连接 Mk7 D.T.I. Set-Up Guide Mk7 数据传输接口设置指南 10.08.2015 Page 7... -
Page 16: Mk7 M.m. And Mk8 E.g.a. With Mk7 D.t.i
2 Set-Up and Connections 设置和连接 2.1.4 Mk7 M.M. and Mk8 E.G.A. with Mk7 D.T.I. MK7 控制模块和带 Mk7 数据传输接口的 Mk8 尾气分析仪 Mk7 D.T.I. Set-Up Guide Mk7 数据传输接口设置指南 Page 8 10.08.2015... -
Page 17: Mk7 D.t.i. Set-Up Mk7 数据传输接口的设置
2 Set-Up and Connections 设置和连接 Mk7 D.T.I. Set-Up Mk7 数据传输接口的设置 2.2.1 Mk7 M.M. Options and Parameters Mk7 控制模块选项和参数 To get the Mk7 D.T.I. to communicate with the Mk7 M.M., the right communication settings need to be set on the Mk7 M.M. The following options and parameters need to be set. 要使... - Page 18 2 Set-Up and Connections 设置和连接 DTI Comms Mode 数据传输接口命令模式 Mk6 DTI - 9600bps Mk6 数据传输接口- 9600bps Mk7 DTI - 19200bps Mk7 数据传输接口- - 19200bps Lead/Lag (IBS) and DTI: A lead boiler can be selected by connecting a line voltage to terminal 88 on the appropriate MM.
- Page 19 2 Set-Up and Connections 设置和连接 0 - 10 Sequencing: Highest MM ID. This parameter speeds up communications between MM's when sequening. 排序:最大控制模块 ID。排序时本参数将加快控制模块间的通信 Shuffle sequencing: 改变排序 Disabled 禁用 Sequence order changed from DTI. 排序顺序从数据传输接口改变 Mk7 D.T.I. Set-Up Guide Mk7 数据传输接口设置指南 10.08.2015 Page 11...
-
Page 20: Mini Mk8 M.m. Options And Parametersmk8 微型控制模块选项和参数
2 Set-Up and Connections 设置和连接 2.2.2 Mini Mk8 M.M. Options and Parameters Mk8 微型控制模块选项和参数 To get the Mk7 D.T.I. to communicate with the Mini Mk8 M.M., the right communication settings need to be set on the Mini Mk8 M.M. The following options and parameters need to be set. 传输接口与... - Page 21 2 Set-Up and Connections 设置和连接 Sequencing and D.T.I Enable: A lead boiler can be selected by press Lead Boiler in the IBS screen or via the D.T.I. if optioned. Only 1 M.M. may be selected as lead boiler at a time, or the sequencing will not operate.The Lead Boiler button on the M.M.
- Page 22 2 Set-Up and Connections 设置和连接 Sequencing - Highest M.M. ID: This sets the number of M.M.s in that sequencing loop for improved comms. 排序-最大控制模块 ID: 用于设置排序循环中的控制模块数量。 1 - 10 Shuffle Sequencing: This allows the sequence order to be changed remotely through the D.T.I. or Modbus. 改变排序:允许通过数据传输接口或...
-
Page 23: Configuring The Boiler Room 配置锅炉房
2 Set-Up and Connections 设置和连接 2.2.3 Configuring the Boiler Room 配置锅炉房 The Mk7 D.T.I. is a gateway for communicating with the Autoflame range of products. Through the D.T.I. touchscreen, you can configure the boiler room with the following features: Mk7 数据传输接口是 Autoflame 产品间的通信网关。通过数据传输接口触摸屏您可以配置锅炉... - Page 24 2 Set-Up and Connections 设置和连接 Once the options and parameters have been set and the screened cable wired between the M.M.s and the D.T.I., the D.T.I. can be powered on for the first time. You will be presented with a boiler room which is not yet configured.
- Page 25 2 Set-Up and Connections 设置和连接 Figure 2.2.3.ii Password Screen 图 密码输入屏幕 2.2.3.ii You will be presented with a password screen. The same password that is used on the D.T.I. is used to connect to that D.T.I. through the CEMS Audit Software. Once the password is entered you can now configure the boilers, D.T.I.
- Page 26 2 Set-Up and Connections 设置和连接 Figure 2.2.3.iii 图 2.2.3.iii From the Boiler Configuration, boilers can be added or deleted; up to 10 boilers can be configured for communication with the Mk7 D.T.I. 在锅炉配置屏幕上可以添加或删除锅炉,可以设置 10 个锅炉与 Mk7 数据传输接口进行通信。 To add a boiler, press 添加锅炉时请按...
- Page 27 2 Set-Up and Connections 设置和连接 Figure 2.2.3.iv Add Boiler 图 添加锅炉 2.2.3.iv Select an empty boiler position to add a boiler, and then press 选择一个空锅炉位置添加锅炉,然后按下 按钮。 Mk7 D.T.I. Set-Up GuideMk7 数据传输接口设置指南 Page 18 10.08.2015...
- Page 28 2 Set-Up and Connections 设置和连接 Figure 2.2.3.v Boiler Setup 图 锅炉设置 2.2.3v In the Boiler Setup screen, the type of burner can be configured, whether it is a standalone D.T.I. or with the M.M., and also if it taking data from the E.G.A. 在锅炉设置屏幕上可以设置燃烧器类型,无论燃烧器是否是独立的数据传输接口或控制模...
- Page 29 2 Set-Up and Connections 设置和连接 Figure 2.2.3.vi Boiler I/O Configuration 图 锅炉输入输出配置 2.2.3.vi Once the Boiler Setup has been saved, press to add an analogue or digital I/O module for that boiler. 保持锅炉设置后,按下 按钮或 按钮为该锅炉添加一个模 拟或数字输入输出模块。 Mk7 D.T.I. Set-Up GuideMk7 数据传输接口设置指南 Page 20 10.08.2015...
- Page 30 2 Set-Up and Connections 设置和连接 Figure 2.2.3.vii Add IO Unit 图 添加输入输出设备 2.2.3vii Select the ID number required for the analogue or digital I/O module and press . Once the I/O modules have been added, please see section 3 for full configuration. 选择模拟或数字输出输出模块所需的...
-
Page 31: Setup 数据传输接口的设置
2 Set-Up and Connections 设置和连接 2.2.4 D.T.I. Setup 数据传输接口的设置 Figure 2.2.4.i D.T.I. Setup Screen 1 图 数据传输接口设置屏幕 2.2.4.i To set up the D.T.I., press the button in the Boiler Configuration screen. On the first screen you are able to change the date, time and time formats, as well as the D.T.I. password and display name. - Page 32 2 Set-Up and Connections 设置和连接 Figure 2.2.4.ii D.T.I Setup Screen 2 图 数据传输接口设置屏幕 2.2.4.ii Pressing the button on the screen in figure 2.2.4.i will take you to the next screen to set up the D.T.I. shown in figure 2.2.4.ii. 按下图 2.2.4.i 屏幕上的按钮后将进入下一个屏幕,可以对图 2.2.4.ii 显示的数据传输接口进行 设置。...
- Page 33 2 Set-Up and Connections 设置和连接 Figure 2.2.4.iii Home Screen 图 主屏幕 2.2.4.iii Once the D.T.I. has been set up press . To enter the D.T.I. setup screen once the D.T.I. has been fully configured, press on the Home screen. 设置数据传输接口后按下 按钮。数据传输接口全部配置完成后要进入数据传输...
-
Page 34: Deleting Boilers And I/O Modules 删除锅炉和输入输出模块
2 Set-Up and Connections 设置和连接 2.2.5 Deleting Boilers and I/O Modules 删除锅炉和输入输出模块 Figure 2.2.5.i Edit/Delete Boiler 图 编辑 删除锅炉 2.2.5.i To edit or delete a boiler, press on the Home screen and then as required. 编辑或删除锅炉时请在主屏幕上按下 按钮,然后按下 按钮或 按钮。 Mk7 D.T.I. Set-Up GuideMk7 数据传输接口设置指南 10.08.2015 Page 25... - Page 35 2 Set-Up and Connections 设置和连接 Figure 2.2.5.ii Delete Boiler 图 删除锅炉 2.2.5.ii Select the boiler to delete, and then press 选择要删除的锅炉,然后按下 按钮。 Mk7 D.T.I. Set-Up GuideMk7 数据传输接口设置指南 Page 26 10.08.2015...
- Page 36 2 Set-Up and Connections 设置和连接 Figure 2.2.5.iii Delete Boiler 图 删除锅炉 2.2.5.ii The next screen will display an option to delete or keep the stored logged data for that boiler. Once the required selection has been made, press 下一个屏幕将显示删除锅炉或保留锅炉存储日志数据选项,确定所需选项后按下 按 钮。...
- Page 37 2 Set-Up and Connections 设置和连接 Figure 2.2.5.iv Delete Boiler 图 删除锅炉 2.2.5.iv Press Yes or No to confirm whether or not to delete that boiler, and press . Once the boiler (and its data) has been deleted, the D.T.I. will go back to the Boiler Configuration screen. 按下‘是’或‘否’按钮确定是否删除该锅炉,然后按下...
- Page 38 2 Set-Up and Connections 设置和连接 Figure 2.2.5.v Delete I/O Module 1 图 2.2.5.v 删除输入输出模块 1 To delete an analogue or digital I/O module once it has been added, go to the Boiler I/O Configuration screen in Figure 2.2.5.i press Press either as required.
-
Page 39: Network Set-Up
2 Set-Up and Connections 设置和连接 2.2.6 Network Set-Up 网络设置 The Mk7 D.T.I. is a gateway for communications between the Autoflame system and PC or Building Management System. Enter the Network setup screen by pressing ‘Configure’ on the DTI home screen, and then ‘Network Setup.’... - Page 40 2 Set-Up and Connections 设置和连接 DHCP OFF DHCP ON IP Address An available IP address can be manually assigned to the DTI. This Obtained from the IP 地址 IP address should not be used by any other devices on the server or DHCP network.
- Page 41 Domain Name Server (DNS) that may be configured in this Network Setup screen. [For example, if the DNS name is set to ‘demo,’ and is connected to the Autoflame network, a connection to the DTI may be established by connecting to ‘demo.autoflame.com.’] ...
-
Page 42: Mk7 D.t.i. Connections
PC Connection PC 连接 The DTI can be connected directly to a PC through the Ethernet. The Autoflame CEMS Audit software displays information on all the boilers in the boiler room, just as on the Mk7 D.T.I. This monitoring and control software can be customised with uploaded boiler images, electrical and mechanical drawings, and site names. - Page 43 2 Set-Up and Connections 设置和连接 2. Check that communications can be established by verifying that the green and orange LEDs are flashing/ illuminated. 通过闪烁或亮起的绿色和橙色 LED 可以检查是否已建立通信。 3. Go into the Configuration screens on the Mk7 D.T.I., go to ‘Network Setup.’ 进入...
-
Page 44: N E T W O R K C O N N E C T I O N
20. If you using Plant Manager version of the PC DTI software, to activate the software, go to the ‘Help’ tab on the taskbar and select ‘Licence…’ Then contact Autoflame Sales on + 44 (0) 845 872 2000, with the licence code and we will you send you an activation key to be typed into this dialogue box. - Page 45 2 Set-Up and Connections 设置和连接 IP Address Choose an IP Address for the Mk7 D.T.I. 为 Mk7 数据传输接口选择一个 IP 地址。 IP 地址 Subnet Mask Choose a useable range for IP Addresses 子网掩码 选择一个可用的 IP 地址范围。 Default Choose address of router in range of subnet mask 在子网掩码范围内选择一个路由器地址。...
-
Page 46: Pinging The D.t.i
2 Set-Up and Connections 设置和连接 2.3.3 Pinging the D.T.I. Pinging 数据传输接口 To determine the cause of communication failure, pinging the D.T.I. checks that a connection has definitely been established between the computer and the D.T.I. 要确定通信失败的原因时,请 ping 数据传输接口,检查计算机和数据传输接口间是否已建立连接。 1. Go to the ‘Start Menu’ on the computer. 进入计算机上的‘开始菜单’。... -
Page 47: Rs422 Connection
Once this has been set on the BMS, communications will be established with the D.T.I. If this doesn’t connect, please request Modscan 32 software from Autoflame Technical Support, to check that the comms from the D.T.I. For a full list of Modbus addresses, please Section 4. -
Page 48: Analogue And Digital Inputs/Outputs 模拟和数字输入输出
10 Mk7 I/O modules. The data gathered by the Autoflame Mk7 D.T.I. for the Mk7 I/O modules is logged for 2 years, and can be viewed using the CEMS Audit Software. -
Page 49: W I R I N G A N D D I M E N S I O N S
3 Analogue and Digital Inputs/Outputs 模拟和数字输入输出 3.1.2 Wiring and Dimensions 接线和尺寸 Figure 3.1.2.i Wiring 图 3.1.2.i 接线 Mk7 D.T.I. Set-Up Guide Mk7 数据传输接口设置指南 10.08.2015 Page 37... - Page 50 3 Analogue and Digital Inputs/Outputs 模拟和数字输入输出 Mk7 Universal I/O Module Dimensions Mk7 通用输入输出模块尺寸 Figure 3.1.2.ii Dimensions 图 3.1.2.ii 尺寸 Mk7 D.T.I. Set-Up Guide Mk7 数据传输接口设置指南 Page 38 10.08.2015...
-
Page 51: Set-Up I/O Modules On Mk7 D.t.i
3 Analogue and Digital Inputs/Outputs 模拟和数字输入输出 3.1.3 Set-Up I/O Modules on Mk7 D.T.I. 设置 Mk7DTI 上的输入输出模块 The Mk7 D.T.I. is capable of communications with up to 10 analogue and 10 digital, or 10 Universal input/ output (IO) modules. Once the I/O modules have been configured through the I/O Board Configurator for the Mk7 Universal I/O module (please refer to the PC Software Guide). - Page 52 3 Analogue and Digital Inputs/Outputs 模拟和数字输入输出 Note: If the I/O is greyed out, it may be setup via a boiler, go to the relevant boiler via the Home screen (see section 5.1) to view it. 注:如果输入输出呈灰色,则可以通过锅炉进行设置,可以通过主屏幕(见 5.1 节)进入相应 的锅炉进行查看。 Note: A universal I/O module with ID 1 will assign that ID number to both the digital and analogue sides of the board.
- Page 53 3 Analogue and Digital Inputs/Outputs 模拟和数字输入输出 Figure 3.1.3.ii Digital I/O Screen 图 数字输入输出屏幕 3.1.3.ii The digital I/O screens display both inputs and outputs as instantaneous values. The Mk7 D.T.I. can have up to 16 digital inputs. 数字输入输出屏幕显示输入输出瞬时值。Mk7 数据传输接口可以有 16 个数字输入。 Mk7 D.T.I.
- Page 54 3 Analogue and Digital Inputs/Outputs 模拟和数字输入输出 Figure 3.1.3.iii Digital I/O Label 图 数字输入输出标签 3.1.3.iii To rename a digital input or output, press ‘Please enter a label,’ or the label text if it is already setup. 要重新命名数字输入或输出,按下‘Please enter a label 请输入一个标签’按钮,如果已经 设置则按下标签文本。...
- Page 55 3 Analogue and Digital Inputs/Outputs 模拟和数字输入输出 Figure 3.1.3.iv Digital I/O Screen – Alarms 图 3.1.3.iv 数字输入输出屏幕-警报 Each I/O input can be set to monitor/ alarm. To enable the I/O module alarms, press the digital I/O screen. 每个输入/输出都可以设为监视器/警报。要启用输入输出模块警报,请按下数字输入输出屏幕 上的 按钮。 From this screen, you can set the I/O module to either Alarm, or display a fault when a digital input is gained or lost.
- Page 56 3 Analogue and Digital Inputs/Outputs 模拟和数字输入输出 Figure 3.1.3.v Digital I/O Log Screen 图 数字输入输出日志屏幕 3.1.3.v The data for digital input and output is stored on the D.T.I. To view this information, press on the press on each of the inputs at the top of the D.T.I. screen. 数字输入输出数据储存在数据传输接口上,要查看该信息,请按下...
- Page 57 3 Analogue and Digital Inputs/Outputs 模拟和数字输入输出 Figure 3.1.3.vi Analogue I/O Screen 图 3.1.3.vi 模拟输入输出屏幕 If an analogue I/O module has been selected, the screen in Figure 3.1.3.vi will appear. 如果选择模拟输入输出模块,则出现图 3.1.3.vi 所示的屏幕。 The analogue I/O screen displays both inputs and outputs as instantaneous values. The Mk7 D.T.I. can have up to 6 4-20mA signals.
- Page 58 3 Analogue and Digital Inputs/Outputs 模拟和数字输入输出 Figure 3.1.3.vii Analogue I/O Label 图 模拟输入输出标签 3.1.3.vii To edit the label that is seen on the screen, press ‘Please enter a label,’ or the label text if already setup. 编辑屏幕上的标签时请按下‘Please enter a label 请输入一个标签’,如果已经设置则按下标签 文本。...
- Page 59 3 Analogue and Digital Inputs/Outputs 模拟和数字输入输出 Figure 3.1.3.viii Analogue I/O Screen – Alarms 图 3.1.3.viii 模拟输入输出屏幕-警报 Each I/O input can be set to monitor/alarm. To enable the I/O module alarms, press on the button. From this screen, you can set the I/O module to either Alarm, or display a fault when an analogue signal drops below or rises above a set value.
- Page 60 3 Analogue and Digital Inputs/Outputs 模拟和数字输入输出 Dosing Pump Figure 3.1.3.ix Analogue I/O Log 图 3.1.3.iv 模拟输入输出日志 The data from each input and output is stored on the D.T.I. and logged for 2 years, and can be viewed by pressing the button, and then pressing on each of the inputs at the top of the D.T.I.
-
Page 61: Modbus
4 Modbus MODBUS Through the Modbus protocol, the Mk7 D.T.I. data can be read from the boiler room information. The D.T.I. accepts Read and Read/Write commands. The 0x and 4x addresses are the Read/Write commands, and the 1x and the 3x addresses are the Read commands. The Read/Write commands are those which allow you to control certain aspect of the burners remotely. - Page 62 4 Modbus EGA Optioned 10217 10297 10377 10457 10537 10617 10697 10777 10857 10937 可选尾气分析 仪 Actual up to 10218 10298 10378 10458 10538 10618 10698 10778 10858 10938 Trim Threshold 实际调整阈值 Cooler Ready 10219 10299 10379 10459 10539 10619 10699 10779 10859...
- Page 63 4 Modbus M.M. ID 1x Read 控制模 ID 1x 读取 Low Flame 10234 10314 10394 10474 10554 10634 10714 10794 10874 10954 Hold 低火焰保持 MM Comms 10239 10319 10399 10479 10559 10639 10719 10799 10879 10959 Bus Driver 控制模块命令 总线驱动 Input 88 10240 10320...
- Page 64 4 Modbus FO1: Normal 12007 12207 12407 12607 12807 13007 13207 13407 13607 13807 (0), Fail (1) FO1:正常 (0),故障 (1) FO2: Normal 12008 12208 12408 12608 12808 13008 13208 13408 13608 13808 (0), Fail (1) FO2:正常 (0),故障 (1) FO3: Normal 12009 12209 12409...
- Page 65 4 Modbus FO12: Normal 12018 12218 12418 12618 12818 13018 13218 13418 13618 13818 (0), Fail (1) FO12:正常(0 ),故障(1 ) FO13: Normal 12019 12219 12419 12619 12819 13019 13219 13419 13619 13819 (0), Fail (1) FO13:正常(0 ),故障(1 ) FO14: Normal 12020 12220 12420...
- Page 66 4 Modbus The 3x addresses are analogue inputs ready only addresses, which will give a number from a range. Refer to section 4.5.2 for relevance of these addresses. 3x 地址是模拟输入就绪地址,该地址将给出范围的一个数字。关于该地址的相关信息请参考 4.5.2 节。 For example, if Modbus address 30160 outputs 42.1, this means that the channel 2 servomotor is at 42.1 例如:如果...
- Page 67 4 Modbus 30115 30165 30215 30265 30315 30365 30415 30465 30515 30565 Run O2 运行 O2 30116 30166 30216 30266 30316 30366 30416 30466 30516 30566 Run CO2 运行 CO2 30117 30167 30217 30267 30317 30367 30417 30467 30517 30567 Run CO 运行...
- Page 68 4 Modbus M.M. ID 3x Read 控制模 ID 3x 读取 Comm. 30125 30175 30225 30275 30325 30375 30425 30475 30525 30575 Exhaust Temp. 调试排气温度 Comm. 30126 30176 30226 30276 30326 30376 30426 30476 30526 30576 Efficiency 调试效率 Comm. NO 30127 30177 30227 30277...
- Page 69 4 Modbus Fuel 2 Flow 30139 30189 30239 30289 30339 30389 30439 30489 30539 30589 Millions 燃油 2 总流量 (百万) Fuel 3 Flow 30140 30190 30240 30290 30340 30390 30440 30490 30540 30590 Units 燃油 3 流量 单位 Fuel 3 Flow 30141 30191 30241...
- Page 70 4 Modbus M.M. ID 3x Read 控制模块 ID 3x 读取 Ch6 Input 0- 30807 30857 30907 30957 31007 31057 31107 31157 31207 31257 255 通道 6 输 入 0-255 Option 1 30808 30858 30908 30958 31008 31058 31108 31158 31208 31258 选项...
- Page 71 4 Modbus Option 107 30827 30877 30927 30977 31027 30177 31127 31177 31227 31277 选项 107 Option 108 30828 30878 30928 30978 31028 30178 31128 31178 31228 31278 选项 108 Option 109 30829 30879 30929 30979 31029 30179 31129 31179 31229 31279 选项...
- Page 72 4 Modbus M.M. ID 3x Read 控制模 ID 3x 读取 Option 62 fuel 30836 30886 30936 30986 31036 30186 31136 31186 31236 31286 2 flow units 选项 62 燃料 2 流量单位 Option 63 fuel 30837 30887 30937 30987 31037 30187 31137 31187 31237...
- Page 73 4 Modbus Gas pressure 30850 30890 30950 31000 31050 30200 31150 31200 31250 31300 coding 燃气 压力编码 MM Error (via 31301 31302 31303 31304 31305 31306 31307 31308 31309 31310 D.T.I.) 控制模 块故障(通过 DTI) Lockout (via 31311 31312 31313 31314 31315 31316 31317...
- Page 74 4 Modbus M.M. ID 3x Read 控制模 ID 3x 读取 Feedwater 32015 32115 32215 32315 32415 32515 32615 32715 32815 32915 Temp Deg.C 给水温度 (摄氏度) Steam rate 32016 32116 32216 32316 32416 32516 32616 32716 32816 32916 lb/hr 蒸汽速率 lb/hr Heat to steam 32017 32117...
- Page 75 4 Modbus Total steam 32030 32130 32230 32330 32430 32530 32630 32730 32830 32930 kgs (ms word) 总蒸汽 kgs (ms 用语) Probe 1 Temp 32031 32131 32231 32331 32431 32531 32631 32731 32831 32931 Deg.C 探头 1 温度( 摄氏度) Probe 2 Temp 32032 32132 32232...
- Page 76 4 Modbus M.M. ID 3x Read 控制模 ID 3x 读取 Draft Servo 32045 32145 32245 32345 32445 32545 32645 32745 32945 32945 Angle 通风伺服角 Draft Actual* 32046 32146 32246 32346 32446 32546 32646 32746 32946 32946 Pressure 通风实际*压力 Draft Com* 32047 32147 32247...
-
Page 77: Read Addresses 尾气分析仪读取地址
4 Modbus E.G.A. Read Addresses 尾气分析仪读取地址 The Modbus addresses in this section are used when a standalone E.G.A. communicates a D.T.I. 当独立尾气分析仪与一个数据传输接口通信时使用本章节的 Modbus 地址。 The 1x E.G.A. Read addresses give digital inputs. Refer to section 4.5.1 for relevance of these addresses. - Page 78 4 Modbus Voltage Input 11007 11023 11039 11055 11071 11087 11103 11119 11135 11151 Optioned 选择 的电压输入 Online/ 11809 11810 11811 11812 11813 11814 11815 11816 11817 11818 Offline Status 在线/离线状态 Mk7 D.T.I. Set-Up Guide Mk7 数据传输接口设置指南 Page 56 10.08.2015...
- Page 79 4 Modbus The 2x Read addresses give analogue inputs. Refer to section 4.5.2 for relevance of these addresses. For example if Modbus address 30602 outputs reads as 2.0 then E.G.A. ID 1 has online O value of 2x 读取地址给出模拟输入。关于该类地址请参考 4.5.2 章节。例如:如果 Modbus 地址 30602 输出读取为...
-
Page 80: Input/ Output Modules Read Addresses 输入输出模块读取地址
4 Modbus Input/ Output Modules Read Addresses 输入输出模块读取地址 The 1x Read addresses are digital inputs. 1x 读取地址是数字输入。 Digital I/O Module ID 数字输入输出模块 ID Input 1 输入 1 10001 10017 10033 10049 10065 10081 10097 10113 10129 10145 Input 2 输入 2 10002 10018 10034... - Page 81 4 Modbus Input 2 输入 2 30018 30026 30034 30042 30050 30058 30066 30074 30082 30090 Input 3 输入 3 30019 30027 30035 30043 30051 30059 30067 30075 30083 30091 Input 4 输入 4 30020 30028 30036 30044 30052 30060 30068 30076 30084...
- Page 82 4 Modbus Byte 字节 31394 31398 31402 31406 31410 31414 Byte 字节 31393 31397 31401 31405 31409 31413 Byte 字节 31420 31424 31428 31432 31436 31440 Byte 字节 31419 31423 31427 31431 31435 31439 Byte 字节 31418 31422 31426 31430 31434 31438 Byte 字节...
- Page 83 4 Modbus Channel ID 通道 ID Analogue I/O Module ID 模拟输入输 出模块 ID Byte 字节 31468 31472 31476 31480 31484 31488 Byte 字节 31467 31471 31475 31479 31483 31487 Byte 字节 31466 31470 31474 31478 31482 31486 Byte 字节 31465 31469 31473 31477...
-
Page 84: Read/Write Addresses 读取/写入地址
4 Modbus Read/Write Addresses 读取/写入地址 4.4.1 M.M. Read/Write Addresses 控制模块读取/写入地址 These Modbus addresses can be used to remotely control the M.M.s 这些 Modbus 地址可以用于远程 控制控制模块。 M.M. ID 控制模块 ID Enable/ 00001 00002 00003 00004 00005 00006 00007 00008 00009 00010 Disable 启用/禁用... - Page 85 4 Modbus Output 4 00020 00028 00036 00044 00052 00060 00068 00076 00084 00092 输出 4 Output 5 00021 00029 00037 00045 00053 00061 00069 00077 00085 00093 输出 5 Output 6 00022 00030 00038 00046 00054 00062 00070 00078 00086 00094 输出...
-
Page 86: Information, Errors And Lockouts 信息、错误和锁定
4 Modbus Information, Errors and Lockouts 信息、错误和锁定 Each M.M./ E.G.A. can provide the following information and updates the D.T.I. approximately once every 5-10 seconds. 每个控制模块和尾气分析仪都可以提供以下信息并每隔 5 至 10 秒更新一 次数据传输接口。 4.5.1 Digital Inputs (1x Reference) 数字输入(1x 参考值) Off 关闭 On 启动 CR1 Relay Status Boiler Temperature/ Pressure 锅炉温度/压力... -
Page 87: Analogue Inputs (3X References) 模拟输入(3X 参考值
4 Modbus 4.5.2 Analogue Inputs (3x References) 模拟输入(3x 参考值) 0 – 100 Firing Rate %燃烧率% 0 – 250 Burner Rating 燃烧器额定值 0 – 999 Actual Value Deg C/ Deg F/ PSI 实际值 摄氏度/华氏度/PSI 0.0 – 99.9 0 – 999 Required Value Deg C/ Deg F/ PSI 所需值... - Page 88 4 Modbus 运行 SO2 ppm 0.0 – 25.5 Comm. O2 % 调试 O2% 0.0 – 25.5 Comm. CO2 % 调试 CO2% 0 – 999 Comm. CO ppm 调试 CO ppm 0 – 999 Comm. Exhaust Temp 调试尾气温度 0.0 – 99.9 Comm.
- Page 89 4 Modbus 燃料 4 总流量单元 0 – 999 Fuel 4 Flow Total 1000s 燃料 4 总流量 1000s 0 – 999 Fuel 4 Flow Total Millions 燃料 4 总流量(百万) Mk7 D.T.I. Set-Up Guide Mk7 数据传输接口设置指南 10.08.2015 Page 63...
-
Page 90: Error And Lockout Codes 错误和锁定代码
4 Modbus 4.5.3 Error and Lockout Codes 错误和锁定代码 Firing Status 燃烧状态 The following table lists the start-up/firing status for the below Modbus addresses: 下表列举了以下 Modbus 地址的启动/燃烧状态 MM ID 控制模块 ID Start-up/ 30102 30152 30202 30252 30302 30352 30402 30452 30502 30552 Firing Status 启动/燃烧状... - Page 91 4 Modbus The table below shows the MM error codes, please refer to the Installation and Commissioning or the End User Guides for the Mk7 M.M. or Mini Mk8 M.M.s to see a full description of the error. 下表显示了控制模块错误代码,请参考 Mk7 控制模块或 Mk8 微型控制模块安装和调试或终端用 户指南了解错误的完整描述...
- Page 92 4 Modbus Code Mk7 M.M. Mini Mk8 M.M. 代码 Mk7 控制模块 Mk8 微型控制模块 Commission data fault Ch2 gain error 调试数据故障 通道 2 增益错误 RAM memory fault Ch4 gain error RAM 内存故障 通道 4 增益错误 Ch3 positioning error 通道 3 定位错误 Ch4 positioning error Ch1 movement error 通道...
- Page 93 4 Modbus Mains input detection error 电源输入检测误差 Load sensor error 加载传感器错误 VSD error VSD 错误 VSD no commission feedback VSD 无调试反馈 Missing commissioning data 丢失的调试数据 FAR execution speed FAR 执行速度 Software error 软件错误 Software error 软件错误 Software error 软件错误 Software error 软件错误...
- Page 94 4 Modbus Ch4 gain error 通道 4 增益错误 A/D convertor A/D 转换器 Ch5 error 通道 5 错误 Ch6 error 通道 6 错误 Air pressure outside limits 空气压力外部限值 Ch5 feedback signal error 通道 5 反馈信号错误 Ch6 feedback signal error 通道 6 反馈信号错误 Twin burner comms failed 双燃烧器通信失败...
- Page 95 4 Modbus Lockout Codes 锁定代码 The following table lists the lockout codes for the below Modbus addresses: 下表列举了以下 Modbus 地址的锁定代码 MM ID 控制模块 ID Lockou 锁定 Direct 30830 30880 30930 30980 31030 31080 31130 31180 31230 31280 直接 31311 31312 31313 31314 31315...
- Page 96 4 Modbus Gas pressure too low Gas pressure low 燃气压力过低 燃气压力低 Gas pressure too high Gas pressure high 燃气压力过高 燃气压力过高 RAM test failed RAM test failed 内存测试失败 内存测试失败 PROM test failed PROM test failed PROM 测试失败 PROM 测试失败 Watchdog fault 1a FSR test 1A 看门狗故障...
- Page 97 4 Modbus Lockout Mk7 M.M. Mini Mk8 M.M. 锁定 Mk7 控制模块 Mk8 微型控制模块 Freeze timeout Freeze timeout 冻结超时 冻结超时 Purge air pressure low 吹扫空气压力低 Option 141 incorrect 选项 141 不正确 Terminal 86 inverse 终端 86 反向 Terminal 85-86 fault 终端 85-86 故障 Prove cct fail 校验...
- Page 98 4 Modbus Air sensor supply voltage UV SP1 comms failure 空气传感器电源电压 UV SP1 通讯故障 Signal dev. air sensor Air pressure sensor timeout 信号设备-空气传感器 空气压力传感器超时 Counts low – air sensor Wrong air pressure sensor type 计数低-空气传感器 错误空气压力传感器类型 Counts high – air sensor Air pressure bad value 计数高-空气传感器...
-
Page 99: Water Level 水位
4 Modbus 4.5.4 Water Level 水位 The following lists show the various codes for the water level Modbus addresses: 下表列举了关于水位 Modbus 地址的各种代码: WL control type 0 – Modulating Standard 调节标准 水位控制类型 1 – On/Off 启动/关闭 2 – Modulating High High 调节高 3 –... -
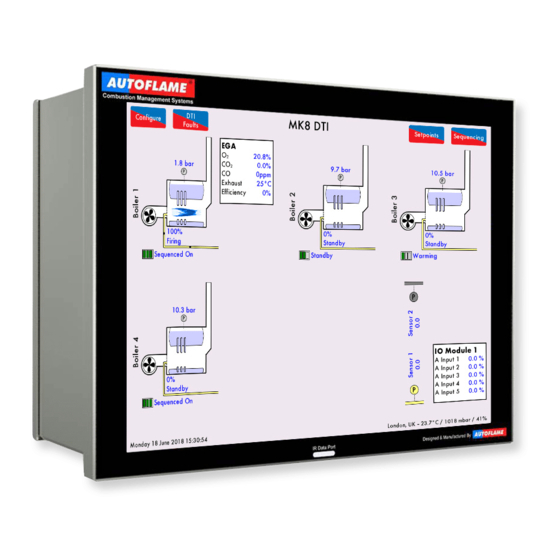
Page 100: Interacting With The Mk7 D.t.i
Once the D.T.I. has been successfully configured, it is possible to view the information on each of the M.M.s, E.G.A.s, Analogue and Digital Input/ Output Modules connected in the Autoflame system. By pressing on the boiler images, it is possible to display information on the M.M. units and the associated E.G.As. - Page 101 5 Interacting with the Mk7 D.T.I. 与 Mk7 数据传输接口的相互作用 Figure 5.1.ii Select M.M. Screen 图 选择控制模块屏幕 5.1.ii Pressing on the Digital I/O or the Analogue I/O will show the input and output information of the I/O associated with that boiler only. Pressing on the Mechanical Data Logs, Electrical Data Logs, or Technical Specifications will go to the screens showing all the additional bitmap files that were uploaded to the D.T.I via the CEMS PC Software (see PC Software Guide).
-
Page 102: Display Screen 控制模块显示屏幕
5 Interacting with the Mk7 D.T.I. 与 Mk7 数据传输接口的相互作用 M.M. Display Screen 控制模块显示屏幕 Figure 5.2.i M.M. Home Screen 图 控制模块主屏幕 5.2.i Pressing on the M.Ms on the D.T.I. will bring up an emulation of the M.M. home screen. This home screen provides access to view information on the information logged just as on the M.M. - Page 103 5 Interacting with the Mk7 D.T.I. 与 Mk7 数据传输接口的相互作用 Figure 5.2.ii M.M. Setpoint Screen 图 控制模块设定值屏幕 5.2.ii Pressing on the flame will display the Setpoint screen, providing the following information: 按下火焰图标将显示设定值屏幕,提供以下信息: 1. Burner rating 燃烧器额定值 2. Fuel selected 选择的燃料 3. Firing rate 燃烧率 4.
- Page 104 5 Interacting with the Mk7 D.T.I. 与 Mk7 数据传输接口的相互作用 Figure 5.2.iii Global Setpoint Screen 图 全局设定值屏幕 5.2.iii To change the global setpoint i.e. on all the M.M.s in that sequence loop, the ‘Global Setpoint’ must button must be selected on each of the M.M.s. then go to the home screen and press on Global Setpoint to change it as you require.
-
Page 105: Fault Logs 故障日志
5 Interacting with the Mk7 D.T.I. 与 Mk7 数据传输接口的相互作用 Fault Logs 故障日志 Figure 5.3.i Errors Screen 图 故障屏幕 5.3.i Pressing on the ‘Fault Logs’ button will display the lockouts and errors as recorded by the D.T.I. from the M.M. There is a maximum of 100 that will be recorded for each of the burner lockouts, M.M. errors and expansion errors, while connected to the D.T.I. -
Page 106: Screen 控制模块 Ibs 屏幕
5 Interacting with the Mk7 D.T.I. 与 Mk7 数据传输接口的相互作用 M.M. I.B.S Screen 控制模块 IBS 屏幕 Figure 5.4.i Boiler Sequencing Screen 图 锅炉排序屏幕 5.4.i Pressing on the IBS box will emulate the sequencing screen shown on the M.M., showing which burner is in lead, and which ones are in lag, and their respective firing rates and status. -
Page 107: Display Logs 显示日志
5 Interacting with the Mk7 D.T.I. 与 Mk7 数据传输接口的相互作用 Display Logs 显示日志 By pressing the Display Logs button, this will give access to the logged M.M. data such as the setpoint history and the servomotor position history. 按下显示日志按钮将进入记录的控制模块数据如设定值历史和伺服电机位置历史。 Figure 5.5.i Setpoint Log Screen 图... - Page 108 5 Interacting with the Mk7 D.T.I. 与 Mk7 数据传输接口的相互作用 按下 按钮将显示两年的燃料流量信息。 按下 按钮将显示两年的燃料压力信息。 按下 按钮将显示两年的紫外线信息历史信息。 Mk7 D.T.I. Set-Up Guide Mk7 数据传输接口设置指南 Page 76 10.08.2015...
- Page 109 水位日志屏幕 5.5.ii If an expansion board is used together with the M.M. for Autoflame water level control, in addition to the display log buttons in Figure 5.5.i, these water level control screens will be shown. 如果扩展板与控制模块共同使用用于 Autoflame 水位控制,除图 5.5.i 的显示日志按钮外还将...
-
Page 110: Display Screen 尾气分析仪显示屏幕
5 Interacting with the Mk7 D.T.I. 与 Mk7 数据传输接口的相互作用 E.G.A. Display Screen 尾气分析仪显示屏幕 Figure 5.6.i E.G.A. Display Screen 图 尾气分析仪显示屏幕 5.6.i Once you have selected the M.M. on the D.T.I. home screen, if there is an E.G.A. in the system, you can access the E.G.A. -
Page 111: Information Ibs 信息
5 Interacting with the Mk7 D.T.I. 与 Mk7 数据传输接口的相互作用 I.B.S Information IBS 信息 If the D.T.I. has been setup so that some actions through the M.M. can be remotely controlled by the D.T.I., the sequencing order can be changed. 如果已经设置数据传接口,则控制模块某些动作可以通过数据传输接口远程控制,同时更改排 序顺序。... - Page 112 5 Interacting with the Mk7 D.T.I. 与 Mk7 数据传输接口的相互作用 Figure 5.7.ii Lag Boiler Sequence Screen 图 从锅炉排序屏幕 5.7.ii The lag boiler order can be changed by pressing on the Lag Boiler Sequence button on the D.T.I. home screen. Select two lag boilers to swap them around in the lag sequence order. 按下...
- Page 114 Notes 备注...
- Page 116 Autoflame Engineering Ltd Autoflame 工程有限公司 Unit1-2 Concorde Business Centre Airport Industrial Estate, Wireless Road Biggin Hill, Kent TN16 3YN United Kingdom +44 (0) 845 872 2000 www.autoflame.com...
Need help?
Do you have a question about the Mk7 D.T.I. and is the answer not in the manual?
Questions and answers