Table of Contents
Advertisement
Quick Links
Advertisement
Table of Contents

Related Manuals for Red Digital Cinema DSMC Canon Mount

Summary of Contents for Red Digital Cinema DSMC Canon Mount
- Page 2 THIS PAGE INTENTIONALLY BLANK...
-
Page 3: Table Of Contents
Copyright Notice ..........................2 Trademark Disclaimer ........................... 2 BEFORE YOU START ..........................3 Read First............................. 3 DSMC Canon Mount Components ....................... 3 Tools Required ............................. 3 INSTALLING DSMC Canon MOUNT ......................4 Removing DSMC Ti PL Mount ......................4 Installing DSMC Canon Mount ......................5 REMOVING / INSTALLING BODY CAP ..................... -
Page 4: Disclaimer
DISCLAIMER RED® has made every effort to provide clear and accurate information in these Installation Instructions, which are provided solely for the user’s information. While thought to be accurate, the information in this document is provided strictly “as is” and RED will not be held responsible for issues arising from typo- graphical errors or user’s interpretation of the language used herein that is different from that intended by RED. -
Page 5: Before You Start
Please understand that any damage that occurs to your camera or mount while installing your DSMC Canon Mount IS NOT covered under RED warranty. If you want RED to perform the installation of the DSMC Canon Mount for you, RED will do so free of charge. Please contact your Bomb Squad rep for complete details. -
Page 6: Installing Dsmc Canon Mount
2. Place the camera brain on a suitable working surface with the front of the camera facing upwards. 3. Using the included T-20 Torx, remove the four (4) M4x0.7 Button Screws attaching the DSMC Ti PL mount to the camera brain. These screws will NOT be re-used to install the DSMC Canon Mount. © 2011 RED.COM INC. -
Page 7: Installing Dsmc Canon Mount
5. Removal of the DSMC Ti PL mount is complete. INSTALLING DSMC CANON MOUNT 1. Orient the DSMC Canon Mount with the i-Pins in the camera body lined up with the i-Pins on the DSMC Canon Mount. 2. Place the DSMC Canon Mount on the camera brain. Ensure the mount sits flush in the mount recess on the camera brain. - Page 8 SECONDARY MENUS > SETTINGS MENU > MAINTENANCE > REDISCOVER and perform the Rediscover procedure. This will require a reboot of the camera and the mount will be rec- ognized. 10. The DSMC Canon Mount installation is complete. © 2011 RED.COM INC. DECEMBER 18, 2011...
-
Page 9: Removing / Installing Body Cap
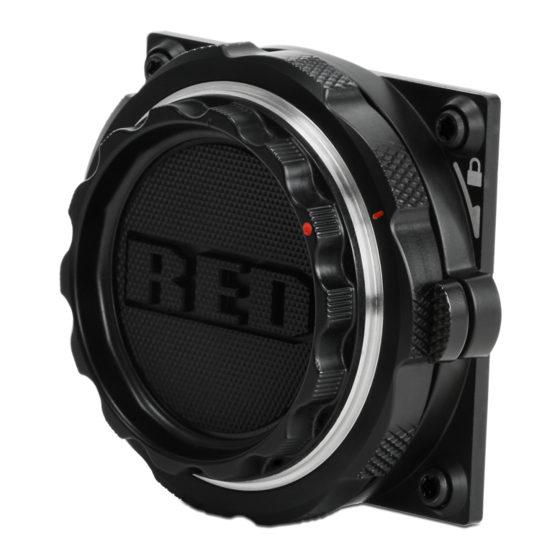
REMOVING / INSTALLING BODY CAP The DSMC Canon Mount includes a new body cap. Alignment Marks Lock Pin Release Lock Ring Button REMOVAL 1. Rotate the lock ring in the extreme counter-clockwise (unlocked) direction until the Red line on the lock ring is in the 12 o’clock position. -
Page 10: Installation
INSTALLATION 1. Rotate the lock ring in the extreme counter-clockwise (unlocked) direction until the Red line on the lock ring lines up with the Red dot on the mount face. 2. Place the body cap on the mount ensuring the Red dot on the body cap lines up with the Red dot on the mount. -
Page 11: Attaching Lenses
ATTACHING LENSES The DSMC Canon Mount allows you to install Canon lenses. The Lens interface allows the camera and Canon EF or EF-S lenses to communicate, providing live aperture, focus and zoom data. Alignment Marks Lens Interface Lock Pin Release...
Need help?
Do you have a question about the DSMC Canon Mount and is the answer not in the manual?
Questions and answers