Table of Contents
Advertisement
Available languages
Available languages
BM 44
D
Blutdruckmessgerät
Gebrauchsanweisung .......................................................... 2 – 14
G
Blood pressure monitor
Instructions for use ............................................................ 15 – 25
F
Tensiométre
Mode d'emploi .................................................................... 26 – 37
E
Tensiómetro
Instrucciones de uso .......................................................... 38 – 49
I
Misuratore di pressione
Istruzioni per l'uso .............................................................. 50 – 61
T
Bilgisayarli tansiyon ölçer
Kullanım kılavuzu ................................................................62– 72
r
Прибор для измерения кровяного давления
в плечевой артерии
Инструкция по применению ........................................... 73 – 86
Q
Ciśnieniomierz
Instrukcja obsługi ............................................................... 87 – 98
E
lectromagnetic Compatibility Information
........................ 99 – 102
0483
Advertisement
Chapters
Table of Contents

Subscribe to Our Youtube Channel
Related Manuals for Beurer medical BM 44


Summary of Contents for Beurer medical BM 44
- Page 1 BM 44 Blutdruckmessgerät Gebrauchsanweisung ............2 – 14 Blood pressure monitor Instructions for use ............15 – 25 Tensiométre Mode d’emploi ..............26 – 37 Tensiómetro Instrucciones de uso ............38 – 49 Misuratore di pressione Istruzioni per l’uso .............. 50 – 61 Bilgisayarli tansiyon ölçer...
-
Page 2: Table Of Contents
DEUTSCH Inhalt 1. Kennenlernen ............... 2 7. Reinigung und Pflege ..........12 2. Wichtige Hinweise ............3 8. Technische Angaben ..........12 4. Messung vorbereiten ............ 7 9. Netzteil ................ 13 5. Blutdruck messen............8 10. Garantie ..............14 6. Fehlermeldung / Fehlerbehebung ........ 11 1. -
Page 3: Wichtige Hinweise
2. Wichtige Hinweise Zulässige Lagerungstemperatur und luft Storage 55°C feuchtigkeit Zeichenerklärung -20°C RH ≤90% In der Gebrauchsanweisung, auf der Verpackung und auf Zulässige Betriebstemperatur und luft Operating dem Typschild des Geräts und des Zubehörs werden fol 40°C feuchtigkeit gende Symbole verwendet: 10°C RH ≤90% Vor Nässe schützen... - Page 4 • Die von Ihnen selbst ermittelten Messwerte können nur zu • Verhindern Sie einen anhaltenden Druck in der Manschet Ihrer Information dienen – sie ersetzen keine ärztliche Un te sowie häufige Messungen. Eine dadurch resultierende tersuchung! Besprechen Sie Ihre Messwerte mit dem Arzt, Beeinträchtigung des Blutflusses kann zu Verletzungen begründen Sie daraus auf keinen Fall eigene medizinische führen.
- Page 5 • Wenn eine Batterie ausgelaufen ist, Schutzhandschuhe Hinweise zur Aufbewahrung und Pflege anziehen und das Batteriefach mit einem trockenen Tuch • Das Blutdruckmessgerät besteht aus Präzisions und reinigen. ElektronikBauteilen. Die Genauigkeit der Messwerte und • Schützen Sie Batterien vor übermäßiger Wärme. Lebensdauer des Gerätes hängt ab vom sorgfältigen Um...
- Page 6 3. Gerätebeschreibung / Anzeigen auf dem vor jeder Reklamation zuerst die Batterien und tauschen Sie diese gegebenenfalls aus. Display • Im Interesse des Umweltschutzes darf das Gerät am Ende seiner Lebensdauer nicht mit dem Haus müll entfernt werden. Die Entsorgung kann über entsprechende Sammelstellen in Ihrem Land erfolgen.
-
Page 7: Messung Vorbereiten
4. Messung vorbereiten Batterie einlegen • Entfernen Sie den Deckel des Batteriefaches auf der mmHg Rückseite des Gerätes. • Legen Sie vier Batterien vom Typ 1,5 V AA (Alkaline mmHg Type LR 06) ein. /min Achten Sie unbedingt darauf, dass die Batterien entspre chend der Kennzeichnung mit korrekter Polung eingelegt werden. -
Page 8: Blutdruck Messen
5. Blutdruck messen • Diese Zeichen finden Sie auf schadstoffhaltigen Batterien: Bitte bringen Sie das Gerät vor der Messung auf Raum Pb = Batterie enthält Blei, temperatur. Cd = Batterie enthält Cadmium, Manschette anlegen Hg = Batterie enthält Quecksilber Legen Sie die Manschette am entblößten linken Oberarm an. - Page 9 Fixieren Sie die Manschette mit • Um das Messergebnis nicht zu verfälschen ist es wichtig, dem Klettverschluss so, dass sich sich während der Messung ruhig zu verhalten und nicht zu das obere Ende der Anzeige sprechen. ca. 1 cm unterhalb Ihres Blutdruckmessung durchführen Handballens befindet.
- Page 10 auszuschalten, schaltet sich das Gerät nach ca. 1 Minute Einstufung der Messergebnisse: automatisch ab. Die Messergebnisse lassen sich gemäß nachfolgender Tabelle einstufen und beurteilen. Warten Sie vor einer erneuten Messung mindestens 5 Minu ten! Diese Standardwerte dienen jedoch lediglich als allgemeine Ergebnisse beurteilen Richtlinie, da der individuelle Blutdruck bei verschiede...
-
Page 11: Fehlermeldung / Fehlerbehebung
• das Aufpumpen länger als 160 Sekunden dauert ( er Bereich der Systole Diastole Maßnahme scheint im Display), Blutdruckwerte (in mmHg) (in mmHg) • ein System oder Gerätefehler vorliegt ( Stufe 3: starke ≥ 180 ≥ 110 einen Arzt aufsuchen oder erscheint im Display), Hypertonie... -
Page 12: Reinigung Und Pflege
800 –1050 hPa Umgebungsdruck • Stellen Sie keine schweren Gegenstände auf das Gerät. 8. Technische Angaben Stromversorgung 4 x 1,5 V AA Batterien ModellNr. BM 44 BatterieLebens Für ca. 600 Messungen, je nach Höhe Messmethode Oszillometrisch, nicht invasive Blutdruck dauer des Blutdrucks bzw. -
Page 13: Netzteil
• Das Gerät entspricht der EURichtlinie für Medizinpro Schutz Das Gerät ist doppelt schutzisoliert und dukte 93/42/EEC, dem Medizinproduktegesetz und den verfügt über eine primärseitige Tempera Normen EN10601 (nicht invasive Blutdruckmessgerä tursicherung, die das Gerät im Fehlerfall te Teil 1: Allgemeine Anforderungen), EN10603 (nicht vom Netz trennt. -
Page 14: Garantie
10. Garantie Fordern wir Sie zur Übersendung des defekten Produk- tes auf, ist das Produkt an folgende Adresse zu senden: Wir leisten 3 Jahre Garantie ab Kaufdatum für Material und Beurer GmbH Fabrikationsfehler des Produktes. Die Garantie gilt nicht: Servicecenter •... -
Page 15: Getting To Know Your Instrument
ENGLISH Contents 1. Getting to know your instrument ........ 15 6. Error messages / troubleshooting ......23 2. Important information ..........16 7. Cleaning and care ............24 3. Unit description / Icons in the display ......19 8. Technical details ............24 4. -
Page 16: Important Information
2. Important information Permissible storage temperature and hu Storage 55°C midity Signs and symbols -20°C RH ≤90% The following symbols are used in these instructions for Permissible operating temperature and Operating use, on the packaging and on the type plate for the device 40°C humidity and accessories:... - Page 17 • The measurements taken by you are for your information • Do not allow sustained pressure in the cuff or frequent only – they are not a substitute for a medical examination! measurements. The resulting restriction of the blood flow Discuss the measurements with your doctor, and never may cause injury.
- Page 18 – You should protect the device from impact, moisture, • If the device is not to be used for a long period, take the dirt, major temperature fluctuations and direct exposure batteries out of the battery compartment. to the sun’s rays. •...
-
Page 19: Unit Description / Icons In The Display
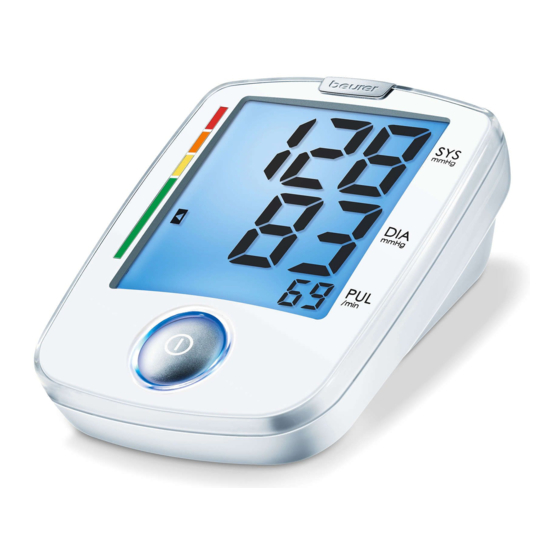
3. Unit description / Icons in the display mmHg mmHg /min 1. Mains part port 2. Systolic pressure 3. Diastolic pressure 4. Pulse 5. Pulse symbol 1. Cuff tube 6. Battery compartment 2. Cuff 7. Start/stopbutton 3. Cuff connector 8. Battery replacement symbol 9. -
Page 20: Prepare Measurement
4. Prepare measurement Operation with the mains part You can also operate this device with a mains part. Inserting battery When doing so, there must not be any batteries in the bat • Remove the battery cover tery compartment. The mains part can be obtained from from the back of the moni... -
Page 21: Measuring Blood Pressure
Positioning cuff Important: The instrument should only be operated with the original cuff. The cuff is suitable for an arm circumference of Fit the cuff round your bare left 22 to 30 cm. upper arm. Blood circulation in the A larger cuff for upper arm circumferences from 30 to 42 cm arm should not be restricted by is available from retailers or the service address under order tight clothing or other objects. - Page 22 Measuring blood pressure Evaluating results • Switch on the blood pressure monitor with the start/stop Cardiac arrhythmia: button This instrument can identify possible cardiac arrhythmia dis • Before the measurement, the last saved test result is brief orders during measurement and if necessary indicates the ly displayed.
-
Page 23: Error Messages / Trouble-Shooting
6. Error messages / trouble-shooting It is important to consult your doctor regularly for advice. Your doctor will tell you your individual values for normal In case of faults, the _ message appears in the display. blood pressure as well as the value above which your blood Error messages may appear if: pressure is classified as dangerous. -
Page 24: Cleaning And Care
800 –1050 hPa ambient pressure 8. Technical details Power supply 4 x 1,5 V AA batteries Model no. BM 44 Battery life For approx. 600 measurements, depend Measurement Oscillometric, noninvasive blood pres ing on the blood pressure level and/or... -
Page 25: Mains Part
9. Mains part Technical information is subject to change without notifica tion to allow for updates. Model no. FW 7575M/EU/6/06 Input 100 – 240 V, 50 – 60 Hz • This unit is in line with European Standard EN 6060112 and is subject to particular precautions with regard to Output 6 V DC, 600 mA, in connection with Beurer... -
Page 26: Premières Expériences
FRANÇAIS Sommaire 1. Premières expériences ..........26 6. Message d’erreur / suppression des erreurs ....35 2. Remarques importantes ..........27 7. Nettoyage et entretien ..........36 3. Description de l´appareil / Affichages à l´écran .... 30 8. Données techniques ........... 36 4. -
Page 27: Remarques Importantes
2. Remarques importantes Température et taux d'humidité de stoc Storage 55°C kage admissibles Symboles utilisés -20°C RH ≤90% Les symboles suivants sont utilisés dans le mode d’emploi, Température et taux d'humidité d'utilisa Operating sur l’emballage et sur la plaque signalétique de l’appareil et 40°C tion admissibles des accessoires :... - Page 28 • Les mesures que vous avez établies servent juste à vous • Évitez de presser, d’aplatir ou de plier le tuyau du bras tenir informé de votre état elles ne remplacent pas un sard en le manipulant. examen médical ! Parlezen avec votre médecin, vous •...
- Page 29 • Respectez les signes de polarité plus (+) et moins (). Remarques relatives à la conservation et à l’entretien • Si la pile a coulé, enfilez des gants de protection et net toyez le compartiment à piles avec un chiffon sec. •...
-
Page 30: Description De L´appareil / Affichages À L´écran
3. Description de l´appareil / Affichages à dant avant de faire une réclamation, contrôlez d’abord les piles et changezles, le cas échéant. l´écran • Para proteger el medio ambiente no se debe desechar el aparato al final de su vida útil junto con la basura doméstica. -
Page 31: Préparation À La Mesure
4. Préparation à la mesure Mise en place des piles • Otez le couvercle du com partiment des piles situé à mmHg l’arrière de’lappareil. • Insérez quatre piles de type 1,5 V AA (type alcaline mmHg LR 06). Respectez impérati /min vement la polarité... -
Page 32: Mesure De La Tension Artérielle
5. Mesure de la tension artérielle • Estos símbolos se encuentran en pilas que contienen sustancias tóxicas: Veuillez amener l’appareil à température ambiante avant la Pb = la pila contiene plomo, mesure. Cd = la pila contiene cadmio, Mise en place du brassard Hg = la pila contiene mercurio. - Page 33 Fermez la manchette avec la bien appuyés sur le dossier et les accoudoirs. Ne croisez fermeture autoagrippante de pas les jambes. Posez les pieds bien à plat sur le sol. manière à ce que le bord supérieur • Pour ne pas fausser le résultat de la mesure, il est impor de l’appareil se trouve à...
- Page 34 oubliez d’éteindre l’appareil, il s’arrête automatiquement dangereux. Respectez impérativement les indications de au bout d’1 minute environ. votre médecin. Attendez au moins 5 minutes avant de faire une nouvelle Classement des résultats de mesure : mesure. Les résultats de mesure sont classés et évalués selon le tableau suivant.
-
Page 35: Message D'erreur / Suppression Des Erreurs
• la pression de gonflage est supérieure à 300 mmHg ( Plage des valeurs Systole Diastole Mesures apparaît à l'écran) ; de tension (en mmHg) (en mmHg) • le gonflage dure plus de 160 secondes ( apparaît à Niveau 3 : consulter un méde ≥... -
Page 36: Nettoyage Et Entretien
8. Données techniques Alimentation 4 x 1,5 V piles AA N° du modèle BM 44 électrique Mode de mesure Mesure de la tension artérielle au bras, Durée de vie des Environ 600 mesures, selon le niveau de oscillométrique et non invasive piles tension artérielle ainsi que la pression... -
Page 37: Adaptateur
9. Adaptateur Veuillez noter que les dispositifs de communication HF portables et mobiles sont susceptibles d’influer sur cet N° du modèle FW 7575M/EU/6/06 appareil. Pour plus de détails, veuillez contacter le service Entrée 100 – 240 V, 50 – 60 Hz aprèsvente à... -
Page 38: Introducción
ESPAÑOL Índice 1. Introducción ............... 38 6. Mensajes de error / Solución de problemas ....46 2. Indicaciones importantes ........... 38 7. Limpieza y cuidado ............ 47 3. Descripción del aparato / indicaciones en la pantalla . 42 8. Datos técnicos ............47 4. - Page 39 Precaución Proteger de la humedad Número de serie Nota Indicación de información importante El sello CE certifica que este aparato cumple con los requisitos establecidos Observe las instrucciones de uso en la directiva 93/42/EEC relativa a los 0483 productos sanitarios. Pieza de aplicación tipo BF Indicaciones de utilización •...
- Page 40 embarazo, es recomendable que consulte previamente a • No coloque el brazalete a personas a las que se les haya su médico. practicado una mastectomía. • Las enfermedades cadiovasculares pueden producir • No coloque el brazalete sobre heridas, ya que pueden producirse más lesiones.
- Page 41 – No utilice el aparato en las inmediaciones de campos • Utilice únicamente el mismo tipo de pila o un tipo equivalente. electromagnéticos de gran intensidad y manténgalo • Cambie siempre todas las pilas a la vez. alejado de instalaciones de radio y de teléfonos móviles. •...
-
Page 42: Descripción Del Aparato / Indicaciones En La Pantalla
3. Descripción del aparato / indicaciones en la pantalla mmHg mmHg /min 1. Toma para la fuente de alimentación 2. Presión sistólica 3. Presión diastólica 4. Pulso 5. Símbolo de pulso 6. Compartimento de las pilas 7. Botón de inicio/parada 1. -
Page 43: Preparación De La Medición
4. Preparación de la medición • Estos símbolos se encuentran en pilas que contienen sustancias tóxicas: Colocación de las pilas Pb = la pila contiene plomo, • Retire la tapa del Cd = la pila contiene cadmio, compartimento de las pilas Hg = la pila contiene mercurio. -
Page 44: Medición De La Presión Sanguínea
5. Medición de la presión sanguínea Fije el brazalete con el cierre autoadherente de forma que el Asegúrese de que el aparato está a temperatura ambiente borde superior de la pantalla se antes de realizar la medición. encuentre aprox. 1 cm por debajo Colocación del brazalete de la palma de la mano. - Page 45 • Para no falsear el resultado de la medición es importante ¡Espere al menos 5 minutos para hacer una nueva medición! no moverse ni hablar durante la misma. Evaluación de los resultados Medición de la presión sanguínea Alteraciones del ritmo cardiaco: •...
-
Page 46: Mensajes De Error / Solución De Problemas
Estos valores estándar sirven únicamente como referencia, Rango de los valores Sístole Diástole Medida dado que la presión arterial individual varía según la per de la presión arterial (en mmHg) (en mmHg) sona y el grupo de edad. Sométase Es importante que consulte periódicamente a su médico, a revisiones que le informará... -
Page 47: Limpieza Y Cuidado
En estos casos, repita la medición. Procure no moverse ni 8. Datos técnicos hablar durante la misma. Nº de modelo BM 44 En caso necesario, vuelva a colocar las pilas o sustitúyalas. Método de Oscilométrico, medición no invasiva de la Alarma técnica –... - Page 48 en el funcionamiento de este aparato. Puede solicitar Diámetro del 22 a 30 cm información más precisa al servicio de atención al cliente brazalete en la dirección indicada en este documento o leer el final Condiciones de + 10 °C a + 40 °C, ≤ 90 % humedad relativa de las instrucciones de uso.
-
Page 49: Fuente De Alimentación
9. Fuente de alimentación Carcasa y cubierta La carcasa de la fuente de alimentación de protección actúa como protección frente a las Nº de modelo FW 7575M/EU/6/06 partes sometidas, o que pueden verse Entrada 100 – 240 V, 50 – 60 Hz sometidas, a la corriente (dedo, agujas, gancho de seguridad). -
Page 50: Note Introduttive
ITALIANO Índice 1. Note introduttive ............50 6. Messaggi di errore / Eliminazione dei guasti ....58 2. Avvertenze importanti ..........51 7. Pulizia e cura .............. 59 3. Descrizione dell´apparecchio / Indicazioni sul display 54 8. Dati tecnici ..............59 4. -
Page 51: Avvertenze Importanti
2. Avvertenze importanti Temperatura e umidità di stoccaggio con Storage 55°C sentite Spiegazione dei simboli -20°C RH ≤90% I seguenti simboli sono utilizzati nelle istruzioni per l’uso, Temperatura e umidità di esercizio con Operating sull’imballo e sulla targhetta dell’apparecchio e degli accessori: 40°C sentite 10°C... - Page 52 terapie mediche definite autonomamente (ad es. impiego • Accertarsi che il manicotto non venga applicato su braccia di farmaci e relativi dosaggi). con arterie o vene sottoposte a trattamenti medici, quali • Non utilizzare il misuratore di pressione su neonati e pa dispositivo di accesso o terapia intravascolare o shunt ar...
- Page 53 – Non far cadere l’apparecchio. • Qualora l’apparecchio non dovesse essere utilizzato per un – Non utilizzare l’apparecchio in vicinanza di forti campi periodo prolungato, rimuovere le batteria dal vano batterie. elettromagnetici e tenerlo lontano da impianti radiofonici • Utilizzare solo tipologie di batterie uguali o equivalenti. o telefoni cellulari.
-
Page 54: Descrizione Dell´apparecchio / Indicazioni Sul Display
3. Descrizione dell´apparecchio / Indicazioni sul display mmHg mmHg /min 1. Connessione per adattatore di rete d’alimentazione 2. Pressione sistolica 3. Pressione diastolica 4. Battito cardiaco 5. Icona del battito cardiaco 6. Vano batterie 7. Pulsante Start/Stop 8. Icona di sostituzione delle batterie 9. -
Page 55: Preparazione Della Misurazione
4. Preparazione della misurazione Funzionamento con l'alimentatore di rete L'apparecchio può essere utilizzato anche con un alimen Inserimento delle batterie tatore di rete. • Togliere il coperchio lato A tale scopo il vano batterie non deve contenere batterie. posteriore dell’apparecchio. L'alimentatore è... - Page 56 Applicare il bracciale Attenzione: l’apparecchio deve essere utilizzato unicamen te con il bracciale originale. Il bracciale è adatto per una Applicare il bracciale al braccio circonferenza braccio tra 22 e 30 cm. libero da indumenti. La circolazione Con il numero di ordinazione 162.795 è possibile ordinare sanguigna del braccio non dovrà...
- Page 57 Eseguire la misurazione della pressione sanguigna Valutare i risultati • Accendere lo sfigmomanometro con il pulsante Start/Stop Aritmie cardiache: questo apparecchio è in grado di identificare disfunzioni • Prima della misurazione, viene visualizzato brevemente ritmiche del battito cardiaco durante la misurazione ed, l’ultimo valore memorizzato.
-
Page 58: Messaggi Di Errore / Eliminazione Dei Guasti
6. Messaggi di errore / Eliminazione dei Tali valori standard costituiscono tuttavia solo un riferimento generale in quanto la pressione individuale presenta diffe guasti renze a seconda della persona e dell‘età. In caso di anomalie, il display visualizza il messaggio È... -
Page 59: Pulizia E Cura
(senza condensa) ammesse 8. Dati tecnici Condizioni di 20 °C – + 55 °C, ≤90 % di umidità Codice BM 44 stoccaggio relativa, 800 –1050 hPa di pressione Metodo di Oscillometrico, misurazione non inva ammesse ambiente misurazione... -
Page 60: Adattatore
• La precisione di questo misuratore di pressione è stata Classificazione Alimentazione interna, IPX0, non fa accuratamente testata ed è stata sviluppata per una lunga parte della categoria AP/APG, funzio durata di vita utile. Se l’apparecchio viene utilizzato a sco namento continuo, parte applicativa po professionale, è... - Page 61 Polarità del collegamento di tensione continua Involucro e coper L’involucro dell’adattatore protegge dal ture protettive contatto con parti che potrebbero esse re messe sotto tensione (dita, aghi, gan ci di controllo). L’utente non deve tocca re contemporaneamente il paziente e il connettore di uscita dell’adattatore DC.
-
Page 62: Tanıtım
TÜRKÇE İçindekiler 1. Tanıtım ................ 62 6. Hata mesajı / Hata giderilmesi ........70 2. Önemli bilgiler ............. 63 7. Temizlik ve Bakım ............71 3. Cihazın tarifi / Ekrandaki görüntüler......66 8. Teknik bilgiler ............. 71 4. Pil takılması..............67 9. -
Page 63: Önemli Bilgiler
2. Önemli bilgiler İzin verilen depolama sıcaklığı ve nem Storage 55°C İşaretlerin açıklaması -20°C RH ≤90% Cihazın ve aksesuarların kullanım kılavuzunda, ambalajında İzin verilen çalışma sıcaklığı ve nem Operating ve model etiketinde aşağıdaki semboller kullanılır: 40°C 10°C RH ≤90% Dikkat Nemden koruyunuz Seri numarası... - Page 64 nin yerini tutamaz! Ölçüm değerlerinizi doktorunuza bildirin • Manşeti, atardamarları veya toplardamarları tıbbi tedavi ve hiçbir zaman ölçüm sonuçlarından yola çıkarak kendi gören bir kola takmamaya dikkat edin, örn. intravasküler tıbbi kararlarınızı vermeyin (örneğin ilaçlar ve dozları)! giriş, intravasküler tedavi veya arteriovenöz (AV) bypass. •...
- Page 65 – Cihazı yere düşürmeyiniz. • Şarj edilebilir pil kullanmayın! – Cihazı güçlü elektromanyetik alanların yakınında kullan • Pilleri parçalarına ayırmayın, açmayın veya parçalamayın. mayınız, telsiz tesislerinden ve mobil telefonlardan uzak Onarım ve giderme bilgileri tutunuz. • Manşet takılıncaya kadar Başlat/Durdur düğmesine •...
-
Page 66: Cihazın Tarifi / Ekrandaki Görüntüler
3. Cihazın tarifi / Ekrandaki görüntüler mmHg mmHg /min 1. Elektrik şebekesi adaptörü için bağlantı 2. Sistolik basınç 3. Diyastolik basınç 4. Nabız 5. Nabız sembolü 1. Manset hortumu 6. Pil bölmesi 2. Manset 7. Başlat/Durdur düğmesi 3. Manset fisi 8. -
Page 67: Pil Takılması
4. Pil takılması Elektrik adaptörü ile çalıştırma Bu cihazı bir elektrik adaptörüyle de çalıştırabilirsiniz. Pillerin Yerleştirilmesi Bunun için pil yuvasında pil olmamalıdır. Adaptörü, 071.19 • Aletin arka kısmındaki pil sipariş numarası ile yetkili bir satıcıdan veya servis adresin yuvasının kapağını çıkarınız. den temin edebilirsiniz. - Page 68 Manşeti üst kolunuza öyle takınız ki, Doğru konuma geçilmesi alt kesimi kol ekleminden 2 – 3 cm kadar uzakta durabilsin ve atar damarın da üzerinde bulunsun. Hortum elin içine doğru bir konumda olmalıdır. Manşeti fazla sıkı olmamasına dikkat ederek kolunuza takın ve cırt •...
- Page 69 veya hızlı nabız) sebepleri, başka sebeplerin yanı sıra, kalp yükseltilir. Nabız tespit edilir edilmez, nabız sembolü hastalıkları, yaş, bedensel özellikler, aşırı beslenme, stres gösterilir. veya az uyuma olabilir. Aritmi hastalığı ancak doktorunuzun • Sistolik basınç, diyastolik basınç ve nabız ölçüm sonuçları yapacağı...
-
Page 70: Hata Mesajı / Hata Giderilmesi
dağılım her zaman daha yüksek olan aralığı gösterir; verilen • sistolik veya diyastolik tansiyon ölçüm aralığı dışında oldu ğunda (ekranda "Hi" veya "Lo" gösterilir), örnekte “Yüksek normal” aralığı. • manşet çok sıkı veya çok gevşek takıldığında (ekranda ya da gösterilir), Tansiyon Sistol Diyastol... -
Page 71: Temizlik Ve Bakım
şişirme basıncına göre 8. Teknik bilgiler Aksesuarlar Kullanım kılavuzu, 4 x 1,5 V AA pil, Saklama çantası Model no. BM 44 Sınıflandırma Dahili besleme, IPX0, AP veya APG yok, Ölçüm yöntemi Üst koldan, osilometrik, invazif olmayan devamlı kullanım, uygulama parçası... -
Page 72: Adaptör
edebilir veya kullanım kılavuzunun son kısmında bulabilir Koruma Cihazın çift koruyucu izolasyonu vardır siniz. ve bir hata durumunda cihazın elektrik • Bu cihaz, tıbbi ürünler için AB Standardı 93/42/EEC, tıbbi şebekesine bağlantısını kesen, birincil ürün kanunu ve EN10601 normları (invazif olmayan tan tarafta mevcut bir ısınmaya karşı... -
Page 73: Ознакомление
РУССКИЙ Оглавление 1. Ознакомление ............73 7. Очистка и уход ............83 2. Важные указания ............74 8. Технические данные ..........84 3. Описание прибора / Индикация на дисплее .... 77 9. Блок питания ............. 85 4. Подготовка к измерению ......... 78 10. -
Page 74: Важные Указания
2. Важные указания Допустимая температура хранения и Storage 55°C влажность воздуха Пояснения к символам -20°C RH ≤90% В инструкции по применению, на упаковке и на типовой Допустимая рабочая температура и влаж Operating табличке прибора и принадлежностей используются 40°C ность воздуха 10°C следующие... - Page 75 • При наличии сомнений относительно полученных ре • Обратите внимание на то, что во время накачивания зультатов повторите измерение. может быть нарушена подвижность соответствующей • Полученные Вами самостоятельно результаты изме части тела. рений носят исключительно информативный характер • Во время измерения кровяного давления не допуска и...
- Page 76 • В целях экономии энергии прибор для измерения ар Обращение с элементами питания териального давления отключается автоматически, • При попадании жидкости из аккумулятора на кожу или если в течение 1 минут не была нажата ни одна кноп ка. в глаза необходимо промыть соответствующий уча •...
-
Page 77: Описание Прибора / Индикация На Дисплее
3. Описание прибора / Индикация на • Не разбирайте, не открывайте и не разбивайте бата рейки. дисплее Указания по ремонту и утилизации • Батарейки запрещается выбрасывать в бытовой му сор. Утилизируйте использованные батарейки через соответствующий пункт сбора отходов. • Не открывайте прибор. Несоблюдение ведет к потере гарантии. -
Page 78: Подготовка К Измерению
4. Подготовка к измерению Установка батареек • Снимите крышку с бата рейного отсека на задней mmHg стенке аппарата. • Вставьте четыре батарей ки 1,5 В AA (алкалино mmHg вые, тип LR 06). Следите /min за тем, чтобы батарейки были вставлены с со блюдением... -
Page 79: Измерение Кровяного Давления
• Следующие знаки предупреждают о из розетки, а затем отсоедините его от прибора. При обесточивании блока питания настройки даты и наличии в батарейках токсичных времени на приборе для измерения артериального веществ: давления удаляются. Однако сохраненные результаты Pb = свинец, измерения остаются в памяти прибора. Cd = кадмий, Hg = ртуть. - Page 80 Плотно, но не слишком туго Принять правильное положение оберните манжету вокруг руки и застегните ее с помощью застежкилипучки. Манжета наложена достаточно плотно, если между ней и рукой проходят два пальца. Пропустите шланг в соответствующее крепление на манжете. • Перед каждым измерением расслабляйтесь в течение Зафиксируйте...
- Page 81 • Манжета накачивается автоматически. Затем давле Оценка результатов ние воздуха в манжете медленно стравливается. Нарушения сердечного ритма: При уже распознанной тенденции к высокому кровя Данный аппарат может во время измерения идентифи ному давлению производится повторное накачивание цировать возможные нарушения сердечного цикла и в и...
- Page 82 Оценка результатов измерений: Диапазон Систолическое Диастолическое Рекомендуемые Оценку результатов измерений можно провести значений давление давление меры кровяного (в мм рт. ст.) (в мм рт. ст.) с помощью таблицы, представленной ниже. давления Однако эти стандартные значения служат только Степень 3: общим ориентиром, так как индивидуальные значения обращение тяжелая ≥ 180 ≥...
-
Page 83: Сообщения О Неисправностях / Устранение Неисправностей
6. Сообщения о неисправностях / Сигнал тревоги при несоблюдении технических данных — описание Устранение неисправностей Если измеренное значение артериального давления При неисправностях на дисплее появляется сообщение (систолического или диастолического) находится за пределами границ, указанных в разделе «Технические Сообщения об ошибках появляются, если данные», на... -
Page 84: Технические Данные
8. Технические данные Доп. условия от 20 °C до + 55 °C, ≤90 % при хранения относительной влажности воздуха, Модель № BM 44 800 –1050 гПа давления окружающей Метод Осциллометрическое, неинвазивное среды измерения измерение кровяного давления на Электропитание 4 x 1,5 В... -
Page 85: Блок Питания
9. Блок питания ные можно запросить по указанному адресу сервисной службы или найти в конце инструкции по применению. № модели FW 7575M/EU/6/06 • Прибор соответствует требованиям директивы ЕС Вход 100 – 240 В, 50 – 60 Гц 93/42/EEC о медицинском оборудовании, закона о медицинском... -
Page 86: Гарантия
10. Гарантия Штамп магазина___________________________________ Мы предоставляем гарантию на дефекты материалов и Подпись покупателя_______________________________ изготовления этого прибора на срок 36 месяцев со дня продажи через розничную сеть. Гарантия не распространяется: – на случаи ущерба, вызванного неправильным исполь зованием, – на быстроизнашивающиеся части (батарейки, манжета), –... -
Page 87: Zapoznanie
POLSKI Оглавление 1. Zapoznanie ..............87 7. Czyszczenie i konserwacja ......... 96 2. Ważne wskazówki ............88 8. Dane techniczne ............96 4. Przygotowanie pomiaru ..........92 9. Adapter ............... 97 5. Pomiar ciśnienia krwi ..........93 6. Komunikaty o błędach / Usuwanie błędów ....95 1. -
Page 88: Ważne Wskazówki
2. Ważne wskazówki Dopuszczalna temperatura i wilgotność Storage 55°C powietrza w miejscu przechowywania Objaśnienie symboli -20°C RH ≤90% W instrukcji obsługi, na opakowaniu i tabliczce znamiono Dopuszczalna temperatura i wilgotność Operating wej urządzenia oraz akcesoriów znajdują się następujące 40°C powietrza podczas pracy symbole: 10°C RH ≤90%... - Page 89 skiej. Na podstawie pomiaru w żadnym wypadku nie wol • Nie zakładać mankietu osobom po amputacji piersi. no podejmować decyzji medycznych na własną rękę (np. • Nie zakładać mankietu na rany, ponieważ może dojść do dotyczących stosowania leków i ich dawkowania)! dalszych obrażeń.
- Page 90 • Nie wciskaj przycisku Start/Stop przed założeniem • Nie należy używać akumulatorów! mankietu. • Nie wolno rozmontowywać, otwierać ani rozdrabniać baterii. • Jeśli urządzenie nie będzie używane przez dłuższy czas, należy wyjąć z niego baterie. Wskazówki do napraw i utylizacji •...
- Page 91 3. Opis urządzenia / Wskazania na wyświe- tlaczu mmHg mmHg /min 1. Gniazdo do adaptera sieciowego 2. Ciśnienie skurczowe 3. Ciśnienie rozkurczoweе 4. Tętno 5. Symbol tętnaс 6. Miejsce na baterie 1. Wężyk opaski 7. Przycisk Start/Stop 2. Opaska 8. Symbol wymiany baterii 3.
-
Page 92: Przygotowanie Pomiaru
4. Przygotowanie pomiaru • Na bateriach zawierających szkodliwe związki znajdują się następujące oznacze Zakładanie baterii nia: • Zdjąć pokrywę baterii na Pb = bateria zawiera ołów, tylnej stronie urządzenia. Cd = bateria zawiera kadm, • Włóż cztery baterie typu Hg = bateria zawiera rtęć. 1,5 V AA (alkaliczne, typ LR 06). -
Page 93: Pomiar Ciśnienia Krwi
5. Pomiar ciśnienia krwi Zamocować mankiet za pomocą zapięcia na rzep, tak aby górny Przed rozpoczęciem pomiaru należy doprowadzić urządze koniec wyświetlacza znajdował się nie do temperatury pokojowej. ok. 1 cm poniżej kłębu kciuka. Nałożyć opaskę Mankiet należy ułożyć na Uwaga: Urządzenie może być użytkowane tylko z oryginal odsłoniętym lewym przedramieniu. - Page 94 • Aby nie zafałszować wyniku pomiaru jest ważne, aby pod zapomnisz wyłączyć urządzenie, wyłączy się ono automa czas pomiaru zachowywac się spokojnie i nie mówić. tycznie po jednej minucie. Przeprowadzanie pomiaru Przed ponownym pomiarem odczekaj przynajmniej 5 minut! • Pomiar ciśnienia krwi uruchamia się przyciskiem Start/ Ocena wyników Stop Zaburzenia rytmu serca:...
-
Page 95: Komunikaty O Błędach / Usuwanie Błędów
Klasyfikacja wg Światowej Organizacji Zdrowia: Zakres Ciśnienie Ciśnienie Rozwiązanie Zgodnie z wytycznymi/definicjami Światowej Organiza wartości skurczowe rozkur- cji Zdrowia oraz aktualnym stanem wiedzy wyniki pomiaru ciśnienia (w mmHg) czowe (w mmHg) można sklasyfikować i zinterpretować wg następującej tabeli. Poziom 3: Udać... -
Page 96: Czyszczenie I Konserwacja
• Baterie są prawie wyczerpane 8. Dane techniczne W takich przypadkach pomiar należy powtórzyć. Należy Nr modelu BM 44 pamiętać o tym, aby podczas pomiaru nie ruszać się i nie Metoda pomiaru Oscylometryczny, nieinwazyjny pomiar rozmawiać. W razie potrzeby włożyć ponownie baterie lub ciśnienia na ramieniu... - Page 97 • Urządzenie spełnia europejską normę EN6060112 i Odchylenia maks. dopuszczalne odchylenie od wymaga zachowania szczególnych środków ostrożności pomiaru standardu wg badań klinicznych: w zakresie kompatybilności elektromagnetycznej. Należy ciśnienie skurczowe 8 mmHg / pamiętać, że przenośne urządzenia komunikacyjne pra ciśnienie rozkurczowe 8 mmHg cujące na wysokich częstotliwościach mogą...
-
Page 98: Adapter
9. Adapter Nr modelu FW 7575M/EU/6/06 Wejście 100 – 240 V, 50 – 60 Hz Wyjście 6 V DC, 600 mA, sadece Beurer tansiy on ölçme cihazı ile birlikte kullanılır Producent Friwo Gerätebau GmbH Ochrona Urządzenie posiada podwójną izolację ochronną oraz wbudowane zabezpi eczenie termiczne, które odłącza je od sieci w przypadku awarii. - Page 99 Guidance and manufacture’s declaration – electromagnetic emissions The BM 44 is intended for use in the electromagnetic environment specified below. The customer or the user of the BM 44 should assure that it is used in such an environment. Emissions test Compliance Electromagnetic environment –...
- Page 100 For all ME EQUIPMENT and ME SYSTEMS Guidance and manufacturer’s declaration – electromagnetic immunity The BM 44 is intended for use in the electromagnetic environment specified below. The customer or the user of the BM 44 should assure that it is used in such an environment.
- Page 101 For ME EQUIPMENT and ME SYSTEMS that are not LIFE-SUPPORTING Guidance and manufacturer’s declaration – electromagnetic immunity The BM 44 is intended for use in the electromagnetic environment specified below. The customer or the user of the BM 44 should assure that it is used in such an environment.
- Page 102 Recommended separation distances between portable and mobile RF communications equipment and the BM 44 The BM 44 is intended for use in an electromagnetic environment in which radiated RF disturbances are controlled. The customer or the user of the BM 44 can help prevent electromagnetic interference by maintaining a minimum distance between portable and mobile RF communications equipment (transmitters) and the BM 44 as recommended below, according to the maximum output power of the communications equipment.
Need help?
Do you have a question about the BM 44 and is the answer not in the manual?
Questions and answers