
Related Manuals for Vaultek LifePod Series


Summary of Contents for Vaultek LifePod Series
- Page 1 ™ Visit www.vaulteksafe.com/lifepod-support for online tutorials, quick setup help, and FAQs.
- Page 2 STEP ONE: Battery Installation To get started, undo both side compression latches to open your LifePod™. Locate the battery cover on the front wall and remove by pressing on the outer tab (Fig A). Carefully pull out the 9v battery snap inside the battery compartment, and connect an Alkaline 9V battery to the connector.
- Page 3 STEP TWO: Basic Operation STEP THREE: Master Code Programming With the battery installed, you can now lock and unlock your First time users should change the default code as soon as LifePod™. Unique to LifePod™ is a capacitive keypad. There are possible to prevent unauthorized access when using the lock.
- Page 4 LifePod™ as soon as you receive it. Registration Box Contents provides many benefits including technical support and ordering replacement keys should you Warnings VLP 1.0 LifePod™ misplace them. Your Vaultek LifePod™ has a unique product number on the inside of the battery ® Basic Operation Tether Lanyard door and a 4-digit ID number engraved on the keys.
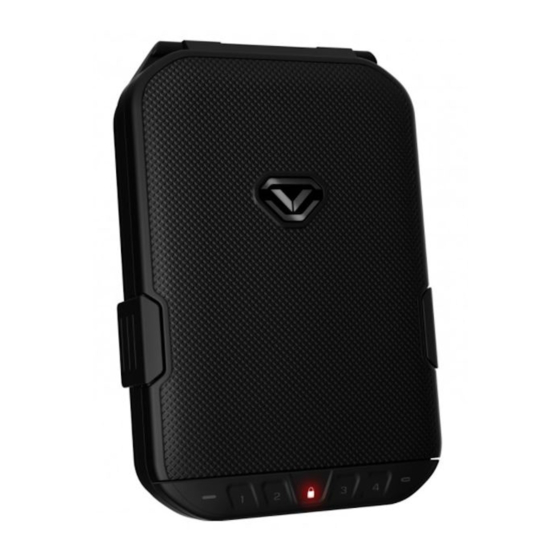
- Page 5 It’s high impact polymer and portable design makes it ideal to transport and protect valuables and personal items. Powered by an Alkaline 9V battery (not included), LifePod™ combines security with convenient access. Secure Access: How to open your Vaultek LifePod™. ®...
-
Page 6: Basic Operation
Neither seller nor manufacturer shall be liable for any injury, loss or damage, direct or consequential, arising First tap the lock pad to wake Enter the master code. (The Undo both side compression out of the use of, or the inability to use, the Vaultek LifePod™. ® the unit up (Fig A). When the... -
Page 7: Battery Installation
90 degrees (Fig F). IMPORTANT! Always make sure the front protective cover is closed tightly to ensure the unit is sealed correctly for protection from the elements. 05 Vaultek ® 06 Vaultek ®... - Page 8 (Fig L) until ALL keys button a third time for 3 seconds (Fig L). The status LED (Fig M) (1-4) turn solid RED. will flash GREEN and LifePod™ will beep to confirm the code change is successful. 07 Vaultek ® 08 Vaultek ®...
-
Page 9: Product Registration
Registration lock, you can disable the exterior lock from functioning. provides many benefits including technical support and ordering replacement keys should you misplace them. Your Vaultek LifePod™ has a unique product number on the inside of the battery ®... -
Page 10: Led Indicators
This means the internal lock is engaged and should not be opened. separately if preferred. Enter the master code to unlock the unit, as indicated by the lock icon light going OFF. It is now safe to undo the side latches and open the unit. 11 Vaultek ® 12 Vaultek ®... -
Page 11: Customer Support / Warranty
More online at vaulteksafe.com under Support Q: How long will my battery last? Q: What do I do when my keypad is unresponsive? If you have a problem with your Vaultek ® LifePod™ that is not answered in the FAQ section of this manual, A: A new 9v Alkaline battery will last up to one A: Your battery is likely dead. - Page 12 (1) This device may not cause harmful interference, and (2) this device must accept any interference received, including interference that may cause undesired operation. STOP! Do not return to retailer. If you have any questions about your Vaultek ®...
- Page 13 REV 011220...
Need help?
Do you have a question about the LifePod Series and is the answer not in the manual?
Questions and answers