
Related Manuals for Charnwood W020

Summary of Contents for Charnwood W020
- Page 1 ROUTER TABLE OWNERS MANUAL MODEL: W020 Charnwood, Cedar Court, Walker Road, Hilltop Industrial Estate, Bardon Hill, Leicestershire, LE67 1TU Tel. 01530 516 926 Fax. 01530 516 929 email: sales@charnwood.net website: www.charnwood.net...
-
Page 2: General Safety Rules
GENERAL SAFETY RULES WARNING: Do not attempt to operate the machine until you have read thoroughly and understood completely all instructions, rules, etc. contained in this manual. Failure to comply may result in accidents involving fire, electric shock, or serious personal injury. Keep this owner's manual and review frequently for continuous safe operation. - Page 3 15. Disconnect the machine from power source before servicing and when changing accessories or (if using a fixed base router) when mounting or remounting the motor. 16. To avoid accidental starting, make sure the switch is in the OFF position before plugging in the mains cable.
-
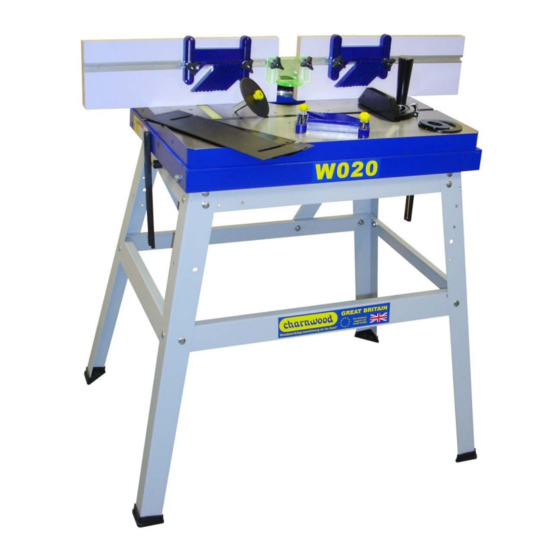
Page 4: Specification
Specification Table Surface 680mm x 510mm Table apertures 92, 60 & 30 Table Height 860mm Dust Hood Outlet dia. 56/63/68mm internal & 63/68/75mm external Net Weight 53kg Rating Trade Overview of the Router Table Left Fence Fence Shims Vertical Feather boards Cutter Guard Right Fence Router Centring Jig... - Page 5 Unpacking All parts are packed in one carton. Unpack the parts carefully and check that everything is present as in the following photographs. If anything is missing contact your retailer immediately. The cast iron table is protected with oil which should be removed with a suitable degreaser, such as WD40.
-
Page 6: Assembling The Floor Stand
Assembling the Floor Stand Upper Side Brace Lower Rear Brace Front Upper Brace Reinforcing Leg Rubber Foot Lower Front Brace Lower Side Brace Stand Leg Important: All nuts and bolts should be fastened only finger tight until assembly is complete. Lay the two upper side braces and front upper brace on a suitable flat surface, ensuring that the table fixing holes are positioned exactly as in... - Page 7 Attach the tops of the four legs to the upper braces Fit the two reinforcing legs and rear lower brace to the stand rear legs. Please note the rear lower brace is the one with the required mounting holes for the reinforcing braces Attach the front and side lower braces to the legs Fit a rubber foot to the end of each leg...
- Page 8 Attaching the table to the stand Remove the two rubber bumpers and two bolts from the table side brackets. Mounting Bolts Rubber Bumpers With assistance, lift the table onto the stand, so that the holes in supporting brackets align with those in the upper side braces.
- Page 9 Assembling the Fence and Cutter Guard Place the aluminium angle fence carrier on the cast iron table, aligning the two long slots with a pair of tapped holes as illustrated. Clamp the fence carrier using the two long handles with M8 studs. There are a series of holes which allow the fence to be adjusted according to the size/type of router cutter being employed and type of...
- Page 10 Locate the hinge pin in the underside of the mitre fence into the hole in the runner. Secure the mitre fence to the runner with the handle bolt and washer. Slide the runner into the table slot from the end. There are adjustable preset stops for setting the mitre fence at 90 degrees and 45 degrees left &...
- Page 11 Offer the router up to the underside of the table with the shaft passing through the cutter aperture. Holding the router in position, place the centring disc over the threaded shaft and then use the thumb screw to secure it. Ensuring that the centring disc is correctly seated in the aperture, release the router plunge lock and the router will then be held in place...
- Page 12 Slide both bolt heads into a slot in the underside of the table and position the mounting clamp on a convenient part of the router baseplate. The clamps should be spaced as equally as possible in order to provide maximum support to the router.
-
Page 13: Optional Accessories
Optional Accessories CE12 Collet Extension A collet extension is available to extend the plunge depth of your router. It can be used with 1/2” shank router bits and extends the collet by 65mm. 100/63RC 100mm Diameter Extraction Adapter This connector can be used to convert the extraction outlet for use with a 100mm diameter hose. - Page 14 Basic Operating Instructions 1) EDGING AND PROFILING One of the most common operations undertaken using a router is Edging or Profiling, i.e. running a shaped cutter along the edge of the work piece. In many instance this is for decorative purposes but it can also be to make a joint or fitting such as a raised panel. Using a router table for this type of work vastly reduces the setting up time required and does away with many awkward clamping devices.
- Page 15 2) GROOVING Grooving and Trenching operations are often carried out to form joints such as slot dovetails or to make fittings such as draw runner grooves. SET THE FENCE:- The table is set up in the same manner except the fence will be set further back away from the cutter.
- Page 16 Charnwood W020 Parts Drawing...
- Page 17 Charnwood W020 Parts List Description Description Flat Washer Mitre Gauge Handle Hex Nut Pozi Screw Mitre Gauge Body Sliding Block Screw Guide Bar Locating Plate Pointer Set Screw Roll Pin Table Top Table Frame Hex Bolt Lock Washer Flat Washer...
- Page 18 Charnwood W020 Fence Parts Drawing Description Aluminium Fence Support Black, Castellated Knobs Captive Bolt Pozi Head Screw Optional - Dust Port Black, Tri-wing Knob T-track Hex-head Bolt Countersunk Screw Fence Cutter Guard Black Castellated Knob Washer Feather board assembly Yellow Plastic Knob...
- Page 20 Charnwood, Cedar Court, Walker Road, Hilltop Industrial Estate, Bardon Hill, Leicestershire, LE67 1TU Tel. 01530 516 926 Fax. 01530 516 929 email: sales@charnwood.net website: www.charnwood.net...
Need help?
Do you have a question about the W020 and is the answer not in the manual?
Questions and answers