
Related Manuals for Union Community UBio-X Pro Lite


Summary of Contents for Union Community UBio-X Pro Lite
- Page 1 UBio-X Pro Lite User Guide Version Eng-1.07 Copyright 2000 By Union Community Co., LTD.
- Page 2 UBio-X Pro Lite User Guide <Revison History> Version Date Description Firmware Version 1.00 2018-12-27 Initial Release 1.01 2019-02-07 Modification for issues from RQA 1.02 2019-03-07 Change the screen shot for Terminal Info 1.03 2019-03-15 Remove the enrollment auto sensitivity Change the screen shots for Meal Management 1.04...
- Page 3 UBio-X Pro Lite User Guide < Glossary> Admin, Administrator - A user who can enter into the terminal menu mode, he/she can register/modify/delete terminal users and change the operating environment by changing settings. - If there is no administrator for a terminal, anyone can change the settings. In this regard, it is recommended to register at least one administrator.
-
Page 4: Table Of Contents
UBio-X Pro Lite User Guide Contents <Revison History> ....................2 < Glossary> ......................3 Contents ........................4 1. Before use ......................6 1.1. Safety Precautions ....................6 1.2. Specific names of the terminal ................7 1.3. Windows after operation ..................8 1.3.1. - Page 5 UBio-X Pro Lite User Guide 3.6.4. Auth ......................51 3.6.5. Date/Time ..................... 52 3.6.6. Database ...................... 53 3.6.6.1. Delete all the users ................53 3.6.6.2. Delete setting ..................54 3.6.6.3. Delete Log ..................... 54 3.6.6.4. Delete image log ................... 55 3.6.6.5.
-
Page 6: Before Use
- If the above cautions are ignored, it may result in property loss or human injury. ※ Under no circumstances will UNION COMMUNITY be responsible for accidents or damages caused by inappropriate use of the product without referring to the user manual. -
Page 7: Specific Names Of The Terminal
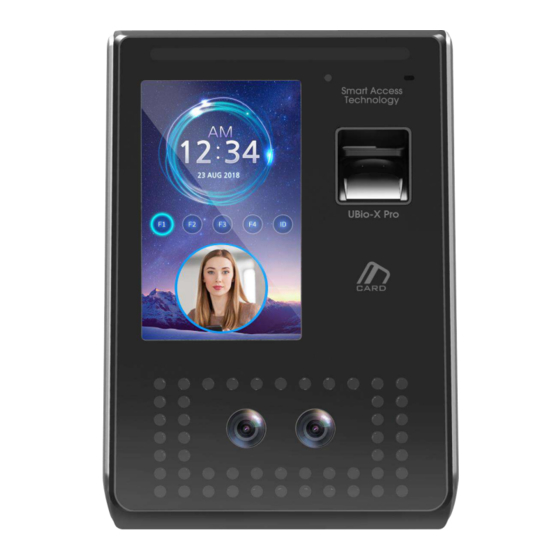
UBio-X Pro Lite User Guide 1.2. Specific names of the terminal IR LED Microphone Illumination sensor Touch LCD Fingerprint sensor Card Sensing Area IR LED Dual Camera SD card input Speaker UNIONCOMMUNITY Co., Ltd. Addr : 12F, Munjeong Daemyeong Valeon bldg, 127 Beobwon-ro Songpa-gu,... -
Page 8: Windows After Operation
UBio-X Pro Lite User Guide 1.3. Windows after operation ① Icon for WiFi status ② Icon for motion detection ③ Icon for illumination status ④ Warning icon for Fire alarm ⑤ Warning icon for tamper switch ⑥ Icon for door status ⑦... -
Page 9: Message
UBio-X Pro Lite User Guide Switch : Tamper switch is activated (Terminal is disassembled) : Door status is not sensed : Door is closed ⑥ Door Status : Door is opened : Door is opened abnormally : There is not connected LAN cable ⑦... - Page 10 UBio-X Pro Lite User Guide - When authorization is failed Failed! - When unregistered user ID is entered Unregistered! - When unregistered card is entered Unregistered Card! - Passback error when using anti-passback function Passback error! - When a user tried the authorization more than twice in...
- Page 11 UBio-X Pro Lite User Guide - When the server does not respond during the authorization attempt to the server - When the network is disconnected during the authorization attempt to the server Network Error! - Registration without authorization right or authorization...
- Page 12 UBio-X Pro Lite User Guide - The state waiting for the input of the user ID - The state waiting for the input of password - The state waiting for the input of fingerprint Place finger on sensor UNIONCOMMUNITY Co., Ltd.
-
Page 13: Voice Sounds In Operation
UBio-X Pro Lite User Guide - The state waiting for the input of the card Verify Card Place your card - When the terminal program is being upgraded Upgrading... (In this state, you should not turn off the terminal) Do not power off ! 1.4. -
Page 14: Proper Fingerprint Registration And Input Methods
UBio-X Pro Lite User Guide Face authorization method You can select two modes as the face authorization method. - Normal mode: When the user gets close within 1.5m, the tilting function of the camera is operated by recognizing the face of user. When the user is within 50~70cm, the face authorization is fulfilled. - Page 15 UBio-X Pro Lite User Guide Check if your fingerprint is unclear or damaged. It is tricky to recognize fingerprints on dry, wet, unclear, or injured fingers. Use another finger in this case Be aware of certain fingerprint conditions ...
-
Page 16: Product Introduction
UBio-X Pro Lite User Guide 2. Product introduction 2.1. Product characteristics Multi-Modal product with which the user can use both face and fingerprint authorization functions together. Superior ability for the face recognition under external light condition (30,000 lux) ... - Page 17 UBio-X Pro Lite User Guide Fingerprint Fingerprint, password registration password Password authorization when fingerprint authorization was failed Fingerprint& Fingerprint, password registration Password Password authorization after fingerprint authorization Card or face Card, face registration Card or face authorization Card & face...
-
Page 18: Product Components
UBio-X Pro Lite User Guide 2.2. Product components 2.2.1. Standalone use (Access) DC15V Adapter Electric lock (Lock+, Lock-, Monitor) 2.2.2. Connected with Server (Access, Attendance, Meal management) TCP/IP TCP/IP Fingerprint authorization server (static IP) UDB server TCP/IP database (MDB or MSSQL) -
Page 19: Product Specification
UBio-X Pro Lite User Guide 2.3. Product specification Types SPEC REMARK 1GHz Quad Core CPU 5.0 inch Touch LCD(480*800) 16G Bytes Flash MEMORY 2GBytes RAM External SD Card Backup data / Upgrade firmware support Camera Dual Camera (Color & IR) 500,000 User / 500,000 Card 500,000 Finger (1:N1:100,000) -
Page 20: Environment Setting
UBio-X Pro Lite User Guide 3. Environment setting 3.1. Checks before setting the environment 3.1.1. Entering the menu If you click the [ ] icon at the basic window, you can enter the main menu window as follows. You can enter the subdivision menu by clicking each button. -
Page 21: How To Enter The Menu Without Administrator Authorization
UBio-X Pro Lite User Guide ▶ Administrator authorization Admin ID If you enter the administrator ID, the administrator authorization is fulfilled along with the authorization method of the administrator such as card, fingerprint, Input Admin ID face, or password. The administrator authorization only appears when... -
Page 22: How To Save The Set Values
UBio-X Pro Lite User Guide 3.1.4. How to save the set values If you click the [Complete] button at each menu to save the changed value after the change of settings, the set value of the window is saved and the following message box appears. -
Page 23: Menu Composition
UBio-X Pro Lite User Guide 3.2. Menu composition 1.User 1. Add 2. Modify 3. Delete 4. Delete All 5. View 2.Network Terminal IP address Static IP / DHCP ▶IP address ▶Subnet Mask ▶Gateway ▶DNS server 1 ▶DNS server 2 Server IP address ▶Server IP... -
Page 24: Date/Time
UBio-X Pro Lite User Guide □ Password □ Name Number of Fingers [1~10] 2. Finger ▶1:N Level [3~9] ▶1:1 Level [1~9] ▶Fake Finger Detection ▶FP template format □ Check similar FP □ Multi FP □ Enable 1:N 3. Face ▶Matching Level [1~4] ▶Face Recognition... -
Page 25: External Device
UBio-X Pro Lite User Guide 5. External Device ▶RS232 ▶RS485 ▶Wiegand Site Code Wiegand Output Wiegand Input 6. Display 1. Theme ▶Background 2. Camera ▶Display Option ▶Save Option □ Save success log □ Save failed log 3. Language ▶Language 4. Option ▶Power saving mode... - Page 26 UBio-X Pro Lite User Guide 2. F/W Upgrade 3.3. User Management When you select the [User] at the main menu, the following window appears. The number of all the users is shown at the top of screen including administrator. Click [Add] button to add the new user, [Modify] button...
- Page 27 UBio-X Pro Lite User Guide Input the user ID to be registered and click [OK] button. In this case, the ID which can be registered is shown on the screen automatically, so you can register conveniently. If you want to change ID, delete the...
- Page 28 UBio-X Pro Lite User Guide ※ Only user who is registered as administrator can change the operating method of the terminal and can register/modify/delete the information of all the saved users, so be careful to register the administrator 3.3.1.1. Photo registration...
- Page 29 UBio-X Pro Lite User Guide 3.3.1.3. Fingerprint registration ① Register by clicking [Fingerprint] button at the [Add User] screen. Click [ ] button to cancel the registration and return. Choose the finger to be registered when the left screen appears.
- Page 30 UBio-X Pro Lite User Guide ② Enter the fingerprint with referring ‘1.7 Proper fingerprint registration and input methods’. Enter the fingerprint twice according to the screen instruction as follows. When the light is turned on at the fingerprint sensor with the message ‘Register FP’, put your finger on the input...
- Page 31 UBio-X Pro Lite User Guide If it is similar with the fingerprint already registered, the message “Already registered finger!” appears like the left side, and you can start again from the procedure of ② if you click the [Retry] button.
- Page 32 UBio-X Pro Lite User Guide 3.3.1.4. Face registration Register with referring ‘1.6. How to register and authorize the face properly‘. ① Press the [Start] button to register the face. Locate your face to be fitted to the face lines like the left picture, and look directly at the screen according to the guidance of the screen.
- Page 33 UBio-X Pro Lite User Guide ③ When the registration is ended, the message [Completed!] is appeared like the left screen, and if you click the [OK] button, the face registration is completed and the screen is moved to the previous screen.
- Page 34 UBio-X Pro Lite User Guide 3.3.1.5. Password registration If you enter the password in 1~8 characters into the password input window and click [OK] button, the input focus is moved to the ‘password confirm’ window at below. Enter the same password again and click [OK] button.
- Page 35 UBio-X Pro Lite User Guide 3.3.1.7. Options for authorization ▶’FP Level’ (basic setting:’0’) It decides the fingerprint authorization level of each user, and the registered users can have different authorization level by modifying this value. If you set ‘0’, the authorization uses the level of fingerprint authorization.
- Page 36 UBio-X Pro Lite User Guide changed automatically. 3.3.1.9. Save Click the [Save] button to save when all the registration procedure is finished. At this point, if you click [Cancel] or [Back] button to return, the user is not saved. Next is the LCD messages which can appear at the registration procedure.
- Page 37 UBio-X Pro Lite User Guide In [Register FP], the case you input the different fingerprint at the fingerprint registration. In [Register FP], the case you tried to registered the fingerprint already registered. (But, you can input the same fingerprint with the same user ID).
- Page 38 UBio-X Pro Lite User Guide Input the user ID to be deleted and click [OK] button. Click [Back] button to cancel and return. If you input the unregistered ID, the failure message “Unregistered user” appears, and if you input the registered ID, success message “Deleted”...
- Page 39 UBio-X Pro Lite User Guide Input the user ID to be modified and click [OK] button. Click [Back] button to cancel and return. The failure message appears if you input the unregistered ID, and if you input the registered ID, the information of registered user is represented as follows The icons at the left side means as follows.
- Page 40 UBio-X Pro Lite User Guide If you want to delete all the users, click [YES], and if you want to cancel, click [NO]. ※If you click [YES], the users and admin are deleted, and the restoration is impossible once they are deleted, so be careful.
- Page 41 UBio-X Pro Lite User Guide ▶If you input the User ID by clicking [ID] button, the user is searched like in the left picture. If you click [Back] button in this window, you can move to the ‘3.3. User management’ menu.
- Page 42 UBio-X Pro Lite User Guide 3.4. Network setting If you select [Network] in the main menu, the following window appears. ▶Basic setting : Same with the window at the left side. Select the method [Static IP] if the static IP is...
- Page 43 UBio-X Pro Lite User Guide ▶[WiFi] When the WiFi dongle is connected to the USB port on backward of the UBio-X Pro device, this icon ] will be come up automatically on the Network screen as same as left picture.
- Page 44 UBio-X Pro Lite User Guide 3.5. Application mode 3.5.1. Application If you select the [Application] in the main menu, the following window appears. In the application mode, you can select the [Access / TnA / Meal] according to the purpose.
- Page 45 UBio-X Pro Lite User Guide ▶Schedule (00:00~23:59) : You can set the time for each authorization mode and if you do not need the function, set ’00:00-00:00’. During the set time, the set mode is always shown unless clicking another function button,...
- Page 46 UBio-X Pro Lite User Guide 3.5.2. Function key The following window appears if you select the [Application] [Function key] in the main menu. ▶Basic setting : Same with the window at the left side. ▶Fn key It means the [F1] ~ [F4], Access button used to...
-
Page 47: System
UBio-X Pro Lite User Guide 3.6. System 3.6.1. System The following window appears if you select the [System] [System] in the main menu ▶Basic setting : Same with the window at the left side ▶User ID Length It sets the length of the user ID, and it can be 2~9 characters and should be the same with the length of the registered ID of the server program. - Page 48 UBio-X Pro Lite User Guide The following screen appears if you select the [System] -> [Finger] in the main menu. ▶Basic setting : Same with the window at the left side ▶1:N Level (3~9) It is the authorization level used in the 1:N Fingerprint authorization.
- Page 49 UBio-X Pro Lite User Guide If you click the [OK] button, the new format is applied, and if you click the [Cancel] button, the format value before the change is maintained. ※ Notes If you change the fingerprint template format, all the registered fingerprints are deleted, so be cautions.
- Page 50 UBio-X Pro Lite User Guide 3.6.3. Face ▶ Basic setting : Same with the window at the left side ▶Matching level It is the level used in face authorization, and it can be set 1~4 levels according to the accordance degree with the registered face.
- Page 51 UBio-X Pro Lite User Guide 3.6.4. Auth If you select the [System] [Auth] in the main menu, the following window appears. ▶Basic setting : Same with the window at the left side ▶Auth Type: Select the authorization method of the terminal.
- Page 52 UBio-X Pro Lite User Guide ▶FP Template card If this option is checked ( ), the option enables the authorization only with the user information in the card and the fingerprint without downloading the user in the terminal. To run this option, the SC card reader must be equipped, and the fingerprint card layout should be set in the server and applied to the terminal.
- Page 53 UBio-X Pro Lite User Guide 3.6.6. Database If you select the [System] [Database] in the main menu, the following window appears. If you want to delete all the users, click [Delete all users] button. If you want to initialize the settings, click [Delete setting] button.
- Page 54 UBio-X Pro Lite User Guide <Fig. 3-5> In this case, both the users and administrator are deleted, and the restoration is impossible once the data is deleted. 3.6.6.2. Delete setting If you select the [System] [Database] [Delete setting] in the main menu, the following screen appears.
- Page 55 UBio-X Pro Lite User Guide If it is deleted successfully by clicking [YES], the success message in [Fig. 3-5] is displayed. All the authorization log is deleted including image log, and the restoration after the deletion is impossible. 3.6.6.4. Delete image log If you select the [System] ...
-
Page 56: Terminal
UBio-X Pro Lite User Guide 3.7. Terminal 3.7.1. Sound If you select the [Terminal] [Sound] in the main menu, the following window appears. ▶ Basic setting: Same with the window at the left side. ▶ Voice volume Scroll from side to side in 0~15 degrees to set the voice volume. - Page 57 UBio-X Pro Lite User Guide ▶ Basic setting : Same with the window at the left side. ▶ Read Card number: If the user put the card on the screen, the card number is displayed on the LCD. You can change the [Card format] to check the card number according to the set value.
- Page 58 UBio-X Pro Lite User Guide 3.7.3. Input If you select the [Terminal] [Input] in the main menu, the following window appears. ▶ Basic setting : Same with the window at the left side. ▶M0: It is set when connecting the external access point to the DM0 (When using motor lock, set [Door open NO] or [Door open NC].)
- Page 59 UBio-X Pro Lite User Guide ▶IO: Set when connecting the external access point to the Exit pin. - None: When nothing is connected - Inside Open NO or Inside Open NC: When the exit button was connected - Fire detection NO or Fire detection NC: When the fire detection sensor is connected.
- Page 60 UBio-X Pro Lite User Guide ▶ Basic setting : Same with the window at the left side. ▶Lock 1 Option - None: When it is not used - Strike/Auto/OK: When the warning light is connected to indicate the strike type, auto door, or authorization success/failure on Lock1.
- Page 61 UBio-X Pro Lite User Guide 3.7.5. External Device If you select the [Terminal] [External device] in the main menu, the following window appears. ▶ Basic setting : Same with the window at the left side ▶RS232: It sets the device connected to RS232 port...
- Page 62 UBio-X Pro Lite User Guide None General case. It does not use Wiegand out port. 26bit Because it sends “Site code [1byte] + User ID [2 byte]”, set the user ID less or equal than 4 digits. Send example) In case of SiteCode:045(2Dh), UID:6543(198Fh) ...
- Page 63 UBio-X Pro Lite User Guide 3.8. Display 3.8.1. Theme If you select [Display] [Theme] in the main menu, the following window appears. ▶ Basic setting : Same with the window at the left side. ▶Background It sets the background of the basic window. You can inquire the next image by clicking [ ] button.
- Page 64 UBio-X Pro Lite User Guide ▶ Basic setting : Same with the window at the left side. ▶ Display Option Choose the image displayed in the message window of authorization success - None - Registered user’s picture. - AuthType: Image stands for each AuthType ▶...
- Page 65 UBio-X Pro Lite User Guide 3.8.4. Option If you select [Display] [Option] in the main menu, the following window appears. ▶ Basic setting : Same with the window at the left side. ▶Power saving mode (5sec ~ 10min) If there is no input for set duration, the LCD screen is turned off automatically.
- Page 66 UBio-X Pro Lite User Guide ▶ Basic setting : Same with the window at the left side. ▶Message Display (ms) It sets the time for which the authorization result window to be displayed. 0~5000 is available for the value, and the authorization result window appeared and disappear for the duration.
-
Page 67: Network
UBio-X Pro Lite User Guide Click [Back] button to finish the inquiry and move to the upper menu. Click the menu on the left side to inquire additional item. 3.9.2. Terminal If you click the [Terminal info] [Terminal] in the main menu, the following window appears. -
Page 68: User
UBio-X Pro Lite User Guide ▶ Network info It shows the network setting value of the terminal. If you want to finish the inquiry and move to the upper menu, click [CLOSE] or [Back] button. 3.9.4. User If you select the [Terminal info]->[User] in the main menu, the following window appears. -
Page 69: Log
UBio-X Pro Lite User Guide 3.9.5. Log If you select the [Terminal info] [Log] in the main menu, the following window appears. ▶Log Log: The number of logs saved in the terminal Image Log: The number of image logs saved in the terminal. -
Page 70: About
UBio-X Pro Lite User Guide ▶View Log Log search result shows the information such as the date, time, ID and access result (success or failure). Click [BACK] or [NEXT] button to see the search information. If you want to finish the inquiry and move to the upper menu, click [Close] or [BACK] button. -
Page 71: Sd Card
UBio-X Pro Lite User Guide 3.10. SD Card If you select the [SD Card] at the main menu, the following screen appears. When the SD Card When the SD Card When the SD Card < < < was inserted was not inserted was locked >... - Page 72 UBio-X Pro Lite User Guide It is the function used for data backup of the terminal by [Export], and you can copy the backup data from the [Export] into the terminal again. ▶ Export It copies the data from the terminal to the external SD Card.
-
Page 73: User's File Download
UBio-X Pro Lite User Guide - Picture: The image log data is saved in the folder ‘UbioXpro / Terminal ID (8digit) / log / pictures’ on the SD Card as jpg file. - Export all: It can export all things User Data, Event Log, System Option, Picture to the SD Card. - Page 74 UBio-X Pro Lite User Guide selecting the sound file (.wav or mp3), the terminal selecting window appears. If you select the terminal in the terminal list window and click the ‘Send’ button again, the file is sent and the result of download appears.
-
Page 75: How To Use Terminal
UBio-X Pro Lite User Guide 4. How to use terminal The background image and composition of the basic window can be changed according to the administrator’s setting. In addition, if the administrator set the screen saver time, the LCD screen is turned off automatically if there is no action for set time, and when the user accessed to the terminal, tried the authorization with fingerprint/card, or touched the main screen, the LCD screen is turned on automatically. -
Page 76: How To Input User Id
UBio-X Pro Lite User Guide 4.2. How to input user ID If you click the button [ID] on the basic window, following the window “Input User ID” as below. Enter the user ID to be certified and click [OK] button,... -
Page 77: Fingerprint Authorization
UBio-X Pro Lite User Guide 4.3.2. Fingerprint authorization ▶1:N Authorization (Identification) If you put your fingerprint on the fingerprint sensor at the basic window, the fingerprint is entered with the light on the sensor with beeping. Do not take off your finger until the light of the sensor turns off completely. -
Page 78: Card Authorization
UBio-X Pro Lite User Guide 4.3.3. Card authorization Put the card on the card picture in <Fig. 4-1> 4.3.4. Password authorization Input your ID by clicking [ID input] button as follows and input password when the password input window appears. -
Page 79: Multi-Mode Authorization
UBio-X Pro Lite User Guide 4.3.5. Multi-mode authorization For user who needs to authenticate via more than 2 methods such as –card & fingerprint OR card & fingerprint & face, The preferential precedence of the authentication after the ID is typed is as follows: cardfingerprintfacepassword...
Need help?
Do you have a question about the UBio-X Pro Lite and is the answer not in the manual?
Questions and answers