
Subscribe to Our Youtube Channel
Related Manuals for schmersal PROTECT-PSC


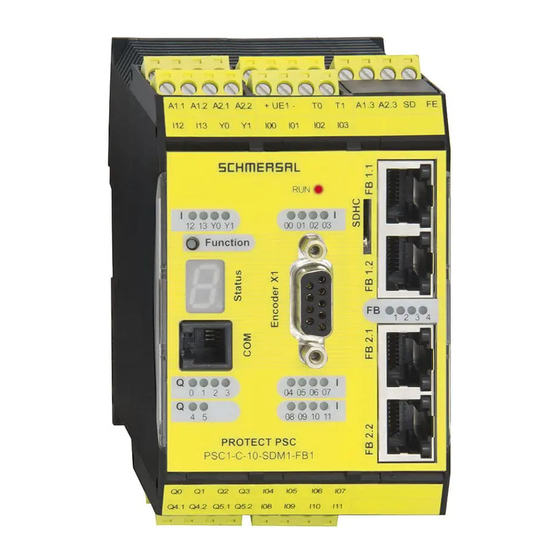
Summary of Contents for schmersal PROTECT-PSC
- Page 1 Programmable Safety Controller Version V 2.6R01 / 04.19 -- Translation of the original Instruction Manual -- K.A. Schmersal GmbH & Co. KG Instruction Manual PROTECT-PSC V 2.6R01 / 04.19...
- Page 2 (photocopy, microfilm or a different procedure), also not for purposes of teaching, without the written consent of K.A. Schmersal GmbH & Co. KG. Instruction Manual PROTECT-PSC...
- Page 3 Preface Thank you for deciding in favour of our Programmable Safety Controller.. This instruction manual contains the description of PROTECT-PSC modules, POWER modules, as well as the program description of the programming software PROTECT-PSCsw. Descriptions, control technical correlations, details on external control units, instal- lation and operating information or similar have been provided to the best of our knowledge.
-
Page 5: Table Of Contents
Information on basic handling 2–11 3 System description 3–1 Overview 3–3 Channel overview 3–5 ID code of the modules / Module Version 3–6 PROTECT-PSC operating modes 3–21 Power supply 3–23 PSC-Base 3–26 PSC-CPU-MON / PSC-CPU-OP-MON 3–27 Input modules 3–41 Output modules 3–45... - Page 6 1.26 M7 Fehler! Textmarke nicht definiert. 1.27 M8 Fehler! Textmarke nicht definiert. 5 Operating mode 3 5–1 Overview 5–2 Project planning 5–2 6 Programming / parameter assignment Overview Functionality System requirements Installation Password protection Instruction Manual PROTECT-PSC V 2.6R01 / 04.19...
- Page 7 6.19 CPU initialisation 6-116 6.20 Engineering Tool Version Maintenance (updating) 6-116 7 Operation and maintenance Delivery status Start-up Disturbances/error messages Maintenance Service 8 Annex Technical data Considered standards EC Type-Examination certificate Declarations of conformity Index Instruction Manual PROTECT-PSC V 2.6R01 / 04.19...
-
Page 9: Overview
Overview Overview This chapter describes the structure of the instruction manual, the basic mode of operation and the structure of the PROTECT-PSC Sicherheits-Kleinsteuerung. Preface 1–2 Definition of terms 1–2 Structure of the document 1–3 1.3.1 Page lay-out 1–3 1.3.2 Explanation of symbols 1–4... -
Page 10: Preface
Before reading this instruction manual thoroughly, please read through chapter 2 carefully. Understanding the information and procedures described in this chapter is essential for the correct use of the PROTECT-PSC Sicherheits-Kleinsteuerung described in the following. Please always remember that faulty installation or pro- gramming can lead to serious injuries / damage to man and machine. -
Page 11: Structure Of The Document
Texts / Pictures / Tables Texts, pictures and tables are named within a chapter with the chapter number and an additional index and, if necessary, a brief accompanying text. Instruction Manual PROTECT-PSC 1–3 V 2.6R01 / 04.19... -
Page 12: Product Description
15 modules. (In case of only consists of safety in- put/output module, 14 modules maximum) The PROTECT-PSC is intended for use in control circuits to IEC 60204 for a rated voltage of 24 VDC. The appropriate shock-hazard protection requirements must be met for the applications. - Page 13 Overview 1.4.1 Overview of the modules The PROTECT-PSC system essentially consists of the following modules: POWER Modul, produces 3.3VDC from 24VDC and provides to CPU and In- put/Output modules (PSC-Power, PSC-Booster). CPU module, responsible for processing the user program and controlling the input/output modules (PSC-CPU-OP-MON, PSC-CPU-MON ).
-
Page 14: Mode Of Operation
Category 4 to ISO 13849-1 or the Safety Integrity Level 3 (SIL) to IEC 61508 in which the safe state is the deenergized state. The PROTECT-PSC is intended for use in control circuits to IEC 60204 for a rated voltage for 24 VDC. The appropriate shock-hazard protection requirements are to be met in the applications. -
Page 15: Safety Function
Overview Safety function The safety functions realised by the PROTECT-PSC are defined as follows. 1. A two channel safety input is read. The PS program running in the CPU module controls the state of the outputs depending on the input information. On request, this leads to a two channel shut-down. - Page 16 In order to determine the PL for the entire system, the PL for each individual element of the functional chain (sensor PROTECT-PSC actuator) must be known. The PL of the entire system can then be determined from the individual performance levels using the algorithms described below.
- Page 17 > 2 ≤ 2 > 3 ≤ 3 > 3 ≤ 3 The values used for calculation are based on reliable values for the center of each Instruction Manual PROTECT-PSC 1–9 V 2.6R01 / 04.19...
-
Page 18: Safety Integrity Level
Demand rate Failure probability high/continuous PFH = 4.8 * 10 The PROTECT-PSC is suitable for SIL 3 safety functions due to the restrictions of the hardware’s safety integrity: • SFF = 99.0% • Hardware error tolerance = 1, •... - Page 19 SIL In order to determine the SIL, the PFH or PFD factors of the chain (sensor PROTECT-PSC actuator) must be added together depending on the operating mode. The resultant SIL can be determined using the following tables.
-
Page 20: Calculation Example
+ PFD + PFD sensor PROTECT-PSC actuator = 4.1 * 10 + 3.0 * 10 + 1.9 * 10 = 4.6 * 10 Result according to Table 1-3 : SIL = 2 Instruction Manual PROTECT-PSC 1–12 V 2.6R01 / 04.19... -
Page 21: Important Information
Important information Important information This chapter contains important warnings and information for the safe and correct use of the PROTECT-PSC. Safety warnings 2–2 2.1.1 Definitions 2–2 2.1.2 Danger through misuse 2–2 2.1.3 Dangers from modification and retrofitting 2–2 2.1.4 Authorized persons 2–2... -
Page 22: Safety Warnings
It is not therefore permitted to make modifications or to retrofit the equipment. This may affect the correct operation of the PROTECT-PSC system with the consequence of personal injury, property or environmental damage and loss of any liability. - Page 23 (modification, creation of the user program). 4 standard passwords are generated after initial installation. The programmer must overwrite all 4 standard passwords during initial use. Instruction Manual PROTECT-PSC 2–3 V 2.6R01 / 04.19...
- Page 24 8.4 / 8-6 2.1.9 Shock-hazard protection The PROTECT-PSC system is intended for use in control circuits to IEC 60204 for a rated voltage of 24 VDC. The appropriate requirements placed on shock-hazard protection must be satisfied for the applications. For reasons of shock-hazard protection all connections must have the appropriate mating connectors.
- Page 25 The contents of the following instruction manual are subject to technical modification, which may arise particularly due to constant further development of the products form Schmersal. Schmersal assumes no liability for any printing errors or any other inaccuracies which may be contained in this instruction manual unless these are serious faults which Schmersal demonstrably already knew about.
-
Page 26: Correct Use
Design, implementation and operating errors may affect the correct operation of the PROTECT-PSC system, resulting in injury or damage to property or to the environment. This is why only sufficiently qualified persons may operate the PRO- TECT-PSC system. - Page 27 Safety). By way of information: The above prototype test confirms a degree of safety for the PROTECT-PSC system comparable with PLe, Category. 4 to ISO 13849-1, also for emergency actions within the meaning of IEC 60204-1 point 9.2.5.4. Refer also to chapter 2.2.5 „Emergency actions“.
- Page 28 The PROTECT-PSC system is therefore only a part or a member of a chain of safety-related parts of controllers in addition to the transducers (protective devices), the main control level and the drive part of the machine. The degree of safety actually achieved will therefore depend on the overall structure of this chain.
- Page 29 The following tables together with the explanations provide an overview of the possibilities of using the PROTECT-PSC system to IEC 60204-1. Control functions to Stop category to ISO 13849-1 Category(Cat.)
- Page 30 Stop category 2: A controlled stop in which the power supply to the machine drives remains intact. In the case of error the PROTECT-PSC performs a stop of category 0 for all the outputs. The planner/programmer must check whether a desired STOP1/STOP2 shut-down can be realised under these aspects without endangering man and machine.
-
Page 31: Information On Basic Handling
Assembly and wiring of the PROTECT-PSC stations. Step 5: Checking of correct cabling. Step 6: Parameter assignment of the PROTECT-PSC system. Refer to chapter 6 in this respect. Step 7: Reverse analysis of parameter assignment. Refer to chapter 6.13.2 in this respect. - Page 32 Important information Step 10: Documentation of steps 1 to 9 pursuant to EC Machine Directive. In project documentation special reference must be made to which outputs can be used for safety functions. Instruction Manual PROTECT-PSC 2–12 V 2.6R01 / 04.19...
-
Page 33: System Description
System description System description This chapter describes the individual components of the PROTECT-PSC. Overview 3–3 3.1.1 Product range 3–3 3.1.2 Basic module structure 3–4 Channel overview 3–5 ID code of the modules / Module Version 3–6 3.3.1 ID code of the modules 3–6... - Page 34 3.16 Operational output 3–73 3.16.1 General description 3–73 3.17 Operational input module 3–74 3.17.1 General description 3–74 3.17.2 PSC-NS-IN 3–74 3.18 Operational output module 3–77 3.18.1 General description 3–77 3.18.2 PSC-NS-OUT+ 3–77 Instruction Manual PROTECT-PSC 3–2 V 2.6R01 / 04.19...
-
Page 35: Overview
Sentinel-25P processing. Hardware dongle (USB) for library pro- Dongle Sentinel-USB cessing. Programming PROTECT- Software for PROTECT-PSC (CD-ROM Software PSCsw version) connec- Connection between PC and PROTECT- tion cable Information on the individual modules can be found in the following chapters. - Page 36 • Status of the inputs/outputs • Error messages • Communication Connection area for: • Sensors, actuators • Power supply • Possible additional operating units Module width • 30mm • 45mm Instruction Manual PROTECT-PSC 3–4 V 2.6R01 / 04.19...
-
Page 37: Channel Overview
PSC-S-IN-E PSC-S-IN-LC PSC-S-OUT PSC-NS-IN PSC-NS-OUT+ PSC-Power PSC-Booster The specification of 1-channel / 2-channel is to be understood as OR, i.e. the CPU MON module has either 8x 1-channel OR 4x 2-channel inputs. Instruction Manual PROTECT-PSC 3–5 V 2.6R01 / 04.19... -
Page 38: Id Code Of The Modules / Module Version
PSC-SUB-MON 1.00 H.10 PSC-S-STP-E 1.00 H.10 PSC-S-STP-LC 1.00 H.10 PSC-S-STP-ELC 1.00 H.10 PSC-S-Relais 1.00 H.10 PSC-S-IN-E 1.00 H.10 PSC-S-IN-LC 1.00 H.10 PSC-S-OUT 1.00 H.10 PSC-NS-IN 1.00 H.10 PSC-NS-OUT+ 1.00 H.10 PROTECT-PSCsw 1.602 Instruction Manual PROTECT-PSC 3–6 V 2.6R01 / 04.19... - Page 39 System description 3.3.3 Module Version Confirmation 3.3.3.1 POWER Module ① ①Hardware Version Instruction Manual PROTECT-PSC 3–7 V 2.6R01 / 04.19...
- Page 40 System description 3.3.3.2 BOOSTER Module ① ①Hardware Version Figure 3-3 BOOSTER Module Instruction Manual PROTECT-PSC 3–8 V 2.6R01 / 04.19...
- Page 41 System description 3.3.3.3 CPU-MON Module ① ② ①Software Version ②Hardware Version Figure 3-4 CPU-MON Module Instruction Manual PROTECT-PSC 3–9 V 2.6R01 / 04.19...
- Page 42 System description 3.3.3.4 CPU-OP-MON Module ① ② ①Software Version ②Hardware Version Figure 3-5 CPU-OP-MON Module Instruction Manual PROTECT-PSC 3–10 V 2.6R01 / 04.19...
- Page 43 System description 3.3.3.5 SUB-MON Module ② ① ①Software Version ②Hardware Version Figure 3-6 SUB-MON Module Instruction Manual PROTECT-PSC 3–11 V 2.6R01 / 04.19...
- Page 44 System description 3.3.3.6 S-STP-E Module ② ① ①Software Version ②Hardware Version Figure 3-7 S-STP-E Module Instruction Manual PROTECT-PSC 3–12 V 2.6R01 / 04.19...
- Page 45 System description 3.3.3.7 S-STP-LC Module ② ① ①Software Version ②Hardware Version Figure 3-8 S-STP-LC Module Instruction Manual PROTECT-PSC 3–13 V 2.6R01 / 04.19...
- Page 46 System description 3.3.3.8 S-STP-ELC Module ② ① ①Software Version ②Hardware Version Figure 3-9 S-STP-ELC Module Instruction Manual PROTECT-PSC 3–14 V 2.6R01 / 04.19...
- Page 47 System description 3.3.3.9 RELAY Module ② ① ①Software Version ②Hardware Version Figure 3-10 RELAY Module Instruction Manual PROTECT-PSC 3–15 V 2.6R01 / 04.19...
- Page 48 System description 3.3.3.10 S-IN-E Module ② ① ① ①Software Version ②Hardware Version Figure 3-11 S-IN-E Module Instruction Manual PROTECT-PSC 3–16 V 2.6R01 / 04.19...
- Page 49 System description 3.3.3.11 S-IN-LC Module ② ① ① ①Software Version ②Hardware Version Figure 3-12 S-IN-LC Module Instruction Manual PROTECT-PSC 3–17 V 2.6R01 / 04.19...
- Page 50 System description 3.3.3.12 S-OUT Module ② ① ① ①Software Version ②Hardware Version Figure 3-13 S-OUT Module Instruction Manual PROTECT-PSC 3–18 V 2.6R01 / 04.19...
- Page 51 System description 3.3.3.13 NS-IN Module ② ① ① ①Software Version ②Hardware Version Figure 3-14 NS-IN Module Instruction Manual PROTECT-PSC 3–19 V 2.6R01 / 04.19...
- Page 52 System description 3.3.3.14 NS-OUT+ Module ② ① ① ①Software Version ②Hardware Version Figure 3-15 NS-OUT+ Module Instruction Manual PROTECT-PSC 3–20 V 2.6R01 / 04.19...
-
Page 53: Protect-Psc Operating Modes
System description PROTECT-PSC operating modes 3.4.1 Overview 3.4.2 Operating mode 0 Devices are in the delivered state and are not ready for operation. All outputs are in safe state. 3.4.3 Operating mode 1 Operation mode 1 cannot be used from firmware version 2.00 or later of CPU(MON) and CPU OP(MON). - Page 54 Entry of the PIN code by PROTECT-PSCsw PIN Code = "5678" User program Mode0 Firmware PS/PN empty User program created by PROTECT-PSCsw User program Mode 3 PS/PN by Firmware user Overwrite New initialisation by user Instruction Manual PROTECT-PSC 3–22 V 2.6R01 / 04.19...
-
Page 55: Power Supply
Power supply 3.5.1 General description The supply voltage for the PROTECT-PSC is 24 volt DC. The safe/operational I/O modules can be supplied with power from the power supply unit for the pow- er/booster module or from their own power supply unit. - Page 56 The SN-I/F is used for connection to external gateways. Gateways are currently available for connection to • Profibus • CC-Link • DeviceNet 4.2.3 / 4–9 Further details are to be found in Chapter 4.2.3. Polyfuse, 1.0A Connection 24 VDC Instruction Manual PROTECT-PSC 3–24 V 2.6R01 / 04.19...
- Page 57 3.3 volt DC ± 10 %, max. 15W Fusing Internal polymer fuse 1.0A Dimensions / weight 30×100×80 (W/H/D) / 155g Housing description Power LED’s Green: power OK Polyfuse 1.0A Connection 24 VDC Instruction Manual PROTECT-PSC 3–25 V 2.6R01 / 04.19...
-
Page 58: Psc-Base
If 10 or more modules (including CPU) are used, a booster module must be posi- tioned between slot 8 and slot 9. … … Slot Instruction Manual PROTECT-PSC 3–26 V 2.6R01 / 04.19... -
Page 59: Psc-Cpu-Mon / Psc-Cpu-Op-Mon
(e.g. error protocol, data of the PN program, ….) to be maintained also if the power is switched off (see Chapter 3.7.4 / 3–35). Operating mode 3 If the PROTECT-PSC is in mode 3, the CPU module acts like a module with 4x2 inputs and 3x2 outputs. Technical data... - Page 60 The pin no. 1 and 3 or 2 and 4 of the I-P or O-P connections are internally bridged in order to facilitate the connection of the power supply to the neighbouring mod- ule. Instruction Manual PROTECT-PSC 3–28 V 2.6R01 / 04.19...
- Page 61 OUT_COM- 2 by the cor- Semi-conductor output responding OUT_COM- 4 semi- conductor output OUT_COM- 2 Semi-conductor output OUT_COM- 4 IN_P+ Power supply IN_P- inputs OUT_P+ 1/3 outputs OUT_P- Terminal block pin number mapping Instruction Manual PROTECT-PSC 3–29 V 2.6R01 / 04.19...
- Page 62 Off: Operation SN-I/F communication LEDs The SN-I/F LEDs show the states of the serial reading/writing line of an optionally connected gateway. The PROTECT-PSC interrogates this line cyclically. During operation these LEDs therefore flash constantly. GateWay PROTECT- Programmer I/F communication LEDs The programmer I/F LEDs show the states of the serial reading/writing line of an optionally connected PSC with PROTECT-PSCsw.
- Page 63 RUN/W.E. switch is similarly set to RUN. R.S. (RESTART) switch The operating mode can be altered using the RUN/W.E switch and the R.S. switch. The relationship is described in Table 3-12. Instruction Manual PROTECT-PSC 3–31 V 2.6R01 / 04.19...
- Page 64 PIN code). Ready to transmit the user program (wait Switch without function. for entry of the PIN code). “P - - -“ is shown. P - - - W.E. (after R.S.) Instruction Manual PROTECT-PSC 3–32 V 2.6R01 / 04.19...
- Page 65 INC button changes to the next menu subentry. Without actuation, the display (if it contains errors or warnings) switches between the mode and the error code in a second rhythm. Instruction Manual PROTECT-PSC 3–33 V 2.6R01 / 04.19...
- Page 66 MODE & INC button pressed for longer than 2s MODE button pressed briefly (shorter than 2s) Automatic switch-over INC button pressed briefly (shorter than 2s) Other transition MODE button pressed for longer than 2s) ’ ’ Instruction Manual PROTECT-PSC 3–34 V 2.6R01 / 04.19...
- Page 67 5 years. Approximately 4 hours’ operation per day are required to achieve an adequate charged state. Data is then for secure for over 1 year (at 25°C) if the PROTECT-PSC is in a de-energised state. The battery voltage is monitored by the CPU module. If the voltage drops below a minimum level, a battery alarm is given (error code 022).
- Page 68 PWR - LED ≤ ≤ A brief drop in voltage (up to 10 ms) is buffered by the internal buffer circuit and has no influence on the operation of the PROTECT-PSC. 3. Drop in voltage (> 10 ms) External voltage Internal voltage...
- Page 69 External voltage Lower than 18 volts Internal voltage PWR - LED The internal supply of the PROTECT-PSC is not released if the external voltage is below 18 volts. 5. Voltage greater than 36 volts External voltage Greater than 36 volts...
- Page 70 I/Q100 to I/Q3FF, X/Y400 to X/Y7FF can be used for internal outputs (software flag). Since the address assignment for inputs/outputs is provided from the same memory area, assignments of the same addresses to inputs/outputs such as I000/Q000, are not possible. Instruction Manual PROTECT-PSC 3–38 V 2.6R01 / 04.19...
- Page 71 Are used in the PN program of the PROTECT-PSC for non-volatile storage of states with an installed back-up-battery. This function does not exist in the PS pro- grams of PROTECT-PSC. They can be set analogously to the flags. The hold flags are set to 0 when initialising the program.
- Page 72 (LSB) D0000-0 (LSB) D0000-1 D0000-2 D0000-3 D0000L LOW BYTE D0000-4 D0000-5 D0000-6 WORD- D0000-7 (MSB) address D0000 D0000-8 (LSB) area D0000-9 D0000-A D0000-B D0000H HIGH BYTE D0000-C D0000-D D0000-E D0000-F (MSB) (MSB) Instruction Manual PROTECT-PSC 3–40 V 2.6R01 / 04.19...
-
Page 73: Input Modules
A general statement about the category at- tained or the performance level is not possible in this case. Instruction Manual PROTECT-PSC 3–41 V 2.6R01 / 04.19... - Page 74 0 channel 0 processor A COM+ processor B COM- channel 1 processor B input 1 processor A PWR+(24 VDC) PWR-(0 VDC) F1 = internal fuse (3,2A) Instruction Manual PROTECT-PSC 3–42 V 2.6R01 / 04.19...
- Page 75 0 channel 0 processor A processor B input 1 channel 1 processor B processor A PWR+(24 VDC) PWR-(0 VDC) F1 = internal fuse (4,0A) Instruction Manual PROTECT-PSC 3–43 V 2.6R01 / 04.19...
- Page 76 Supply voltage for the sensors too low or non- Supply sensors A/B 043-14 existent Test pulses A/B 043-21 Test pulses not detected Channel monitor- Discrepancy of the input channels (in the A/B 043-22 case of 2-channel control) Instruction Manual PROTECT-PSC 3–44 V 2.6R01 / 04.19...
-
Page 77: Output Modules
Channel 0 processor A output 0 processor B Channel 1 processor B output 1 processor A processor A PWR+(24 VDC) PWR-(0 VDC) processor B higher ranking relay level F1 = internal fuse (3.2A) Instruction Manual PROTECT-PSC 3–45 V 2.6R01 / 04.19... - Page 78 The relay outputs must be fused by means of an appropriately dimensioned fuse (max. 4A slow blowing). Instruction Manual PROTECT-PSC 3–46 V 2.6R01 / 04.19...
- Page 79 Error in the internal shut-down relay (24VDC Test pulse A/B 043-31 Test pulses not detected Channel A/B 043-32 Discrepancy in reading back the output level monitoring Relay contact A/B 043-33 Error in output relay Instruction Manual PROTECT-PSC 3–47 V 2.6R01 / 04.19...
-
Page 80: Psc-Sub-Mon
System description 3.10 PSC-SUB-MON 3.10.1 General description Mode 3 If the PROTECT-PSC is in mode 3, then the SUB-Master module acts like a mod- ule with 4x2 inputs and 3x2 outputs. Technical data Position Description Name PSC-SUB-MON Operating voltage/current 24VDC+/-10% / 70 mA... - Page 81 The pins no. 1 and 3 or 2 and 4 of the I-P or O-P connections are internally bridged in order to facilitate the connection of the power supply to the neighbouring mod- ules. Instruction Manual PROTECT-PSC 3–49 V 2.6R01 / 04.19...
- Page 82 OUT_COM- Semi-conductor output conductor OUT_COM- 4 output are read back here OUT_COM- 2 Semi-conductor output OUT_COM- 4 IN_P+ Power supply IN_P- inputs OUT_P+ outputs OUT_P- Terminal block pin number mapping Instruction Manual PROTECT-PSC 3–50 V 2.6R01 / 04.19...
-
Page 83: Combined Modules
• PSC-S-STP-LC inputs for non-floating sensors • PSC-S-STP-ELC inputs for floating/non-floating sensors If the PROTECT-PSC is in mode 3, the combined modules act like a module with 3x2 inputs and 2x2 outputs. 3.11.2 PSC-S-STP-E Technical data... - Page 84 The pins no. 1 and 3 or 2 and 4 of the I-P or O-P connections are internally bridged in order to facilitate the connection of the power supply to the neighbouring mod- ules. Instruction Manual PROTECT-PSC 3–52 V 2.6R01 / 04.19...
- Page 85 Semi-conductor output conductor OUT_COM- 4 output are read back here. OUT_COM- 2 Semi-conductor output OUT_COM- 4 IN_P+ Power supply IN_P- inputs OUT_P+ 1/3 outputs OUT_P- Terminal block pin number mapping Instruction Manual PROTECT-PSC 3–53 V 2.6R01 / 04.19...
- Page 86 Display I/O 00h - 09h = Status der I/O Terminal 00h - 0Fh = connection sensor / actuator I+, O+ = power supply ( 24VDC) I-, O- = power supply (0VDC) Instruction Manual PROTECT-PSC 3–54 V 2.6R01 / 04.19...
- Page 87 The pins no. 1 and 3 or 2 and 4 of the I-P or O-P connections are internally bridged in order to facilitate the connection of the power supply to the neighbouring mod- ules. Instruction Manual PROTECT-PSC 3–55 V 2.6R01 / 04.19...
- Page 88 OUT_COM- 4 ply of the inputs must have the IN_P+ Power supply same potential IN_P- inputs as the power OUT_P+ 1/3 outputs supply of the OUT_P- AOPDs. Terminal block pin number mapping Instruction Manual PROTECT-PSC 3–56 V 2.6R01 / 04.19...
- Page 89 Display I/O 00h - 09h = status of I/O Terminal 00h - 0Fh = connection sensor / actuator I+, O+ = power supply ( 24VDC) I-, O- = power supply (0VDC) Instruction Manual PROTECT-PSC 3–57 V 2.6R01 / 04.19...
- Page 90 The pins no. 1 and 3 or 2 and 4 of the I-P or O-P connections are internally bridged in order to facilitate the connection of the power supply to the neighbouring mod- ules. Instruction Manual PROTECT-PSC 3–58 V 2.6R01 / 04.19...
- Page 91 IN_P+ IN_P+ Power supply Power supply AOPDs. AOPDs. IN_P- IN_P- inputs inputs OUT_P+ 1/3 OUT_P+ 1/3 outputs outputs OUT_P- OUT_P- Terminal block pin number mapping Instruction Manual PROTECT-PSC 3–59 V 2.6R01 / 04.19...
-
Page 92: Input Modules
Of the input modules the following 2 types are available • PSC-S-IN-E inputs for floating sensors • PSC-S-IN-LC inputs for non-floating sensors If the PROTECT-PSC is in mode 3, than the input modules act like modules with 8x2 inputs. 3.12.2 PSC-S-IN-E Technical data... - Page 93 The pins no. 1 and 3 or 2 and 4 of the I-P connections are internally bridged in or- der to facilitate the connection of the power supply to the neighbouring module. Instruction Manual PROTECT-PSC 3–61 V 2.6R01 / 04.19...
- Page 94 S-Stop-5B S-Stop-6A IN-COM+ S-STOP input 6 IN-COM- S-Stop-6B S-Stop-7A IN-COM+ S-STOP input 7 IN-COM- S-Stop-7B S-Stop-8A IN-COM+ S-STOP input 8 IN-COM- S-Stop-8B Power supply IN_P+ inputs IN_P- Terminal block pin number mapping Instruction Manual PROTECT-PSC 3–62 V 2.6R01 / 04.19...
- Page 95 = Always off Status LED 00h - 0Fh = status of I/O Terminal 00h - 0Fh = connection sensor / actuator = power supply ( 24VDC) = power supply (0VDC) Instruction Manual PROTECT-PSC 3–63 V 2.6R01 / 04.19...
- Page 96 The pins no. 1 and 3 or 2 and 4 of the I-P connections are internally bridged in or- der to facilitate the connection of the power supply to the neighbouring module. Instruction Manual PROTECT-PSC 3–64 V 2.6R01 / 04.19...
- Page 97 AOPD 3 AOPD-3B AOPD-4A AOPD 4 AOPD-4B AOPD-5A AOPD 5 AOPD-5B AOPD-6A AOPD 6 AOPD-6B AOPD-7A AOPD 7 AOPD-7B AOPD-8A AOPD 8 AOPD-8B Power supply IN_P+ inputs IN_P- Terminal block pin number mapping Instruction Manual PROTECT-PSC 3–65 V 2.6R01 / 04.19...
-
Page 98: Relay Module
Relay module 3.13.1 1.13.1 General description If the PROTECT-PSC is in mode 3, then the output module acts like a module with 2x2 relay outputs. The relay outputs must be opened at least once per year. This can be done manu- ally by actuating the protective device on the input side or automatically in the user program. - Page 99 00h - 03h = connection actuator Print Terminal Address name name 0/1-1 RELAY OUT 1 0/1-2 0/1-3 RELAY OUT 2 0/1-4 2/3-1 RELAY OUT 3 2/3-2 2/3-3 RELAY OUT 4 2/3-4 Instruction Manual PROTECT-PSC 3–67 V 2.6R01 / 04.19...
- Page 100 I/O circuit 0/1-1 MS2(Enable relay) pro- 0/1-3 B’ 0/1-4 A’ MS3(Enable relay) 2/3-1 2/3-2 MS4(Enable relay) 2/3-3 B’ 2/3-4 A’ Terminal block pin number mapping 0/1-1 0/1-2 0/1-3 0/1-4 2/3-1 2/3-2 2/3-3 2/3-4 Instruction Manual PROTECT-PSC 3–68 V 2.6R01 / 04.19...
-
Page 101: Semi-Conductor Output Module
System description 3.14 Semi-conductor output module 3.14.1 General description If the PROTECT-PSC is in mode 3, than the input module acts like a module with 8x2 inputs. 3.14.2 PSC-S-OUT Technical data Position Description Name PSC-S-OUT Operating voltage/current 24VDC +/-10% / 74mA... - Page 102 The pins no. 1 and 3 or 2 and 4 of the O-P connections are internally bridged in or- der to facilitate the connection of the power supply to the neighbouring module. Instruction Manual PROTECT-PSC 3–70 V 2.6R01 / 04.19...
- Page 103 OUT_COM- 4 MS13 MS13 OUT_COM- 2 Semi-conductor MS14 output MS14 OUT_COM- 4 MS15 MS15 OUT_COM- 2 Semi-conductor MS16 output MS16 OUT_COM- 4 Power supply OUT_P+ 1/3 OUT_P- outputs Terminal block pin number mapping Instruction Manual PROTECT-PSC 3–71 V 2.6R01 / 04.19...
-
Page 104: Operational Input
Basic circuit diagram of operational input The chart shows the basic structure of an operational input. The grey shaded part of the circuit multiply exists. processor A input 0 0VDC or 24VDC processor A input 1 Instruction Manual PROTECT-PSC 3–72 V 2.6R01 / 04.19... -
Page 105: Operational Output
Basic circuit diagram of operational output The chart shows the basic structure of an operational output. The grey shaded part of the circuit multiply exists. processor A output 0 24VDC processor A output 1 Instruction Manual PROTECT-PSC 3–73 V 2.6R01 / 04.19... -
Page 106: Operational Input Module
System description 3.17 Operational input module 3.17.1 General description If the PROTECT-PSC is in mode 3, then the operational input module acts as a module with 16 inputs. 3.17.2 PSC-NS-IN Technical data Position Description Name PSC-NS-IN Operating voltage/current 24VDC+/-10% / 25mA... - Page 107 IN_P2 COM2 IN_P2 The pins no. 2 and 4 of the C1 or C2 connections are internally bridged in order to facilitate the connection of the power supply to the neighbouring module. Instruction Manual PROTECT-PSC 3–75 V 2.6R01 / 04.19...
- Page 108 System description PSC-NS-IN terminal diagram pin No. input-0 input-1 input-2 input-3 input-4 input-5 input-6 input-7 input-8 input-9 input-A input-B 24VDC input-C input-D input-E input-F 24VDC Terminal block pin number mapping Instruction Manual PROTECT-PSC 3–76 V 2.6R01 / 04.19...
-
Page 109: Operational Output Module
System description 3.18 Operational output module 3.18.1 General description If the PROTECT-PSC is in mode 3, then the operational output module acts as a module with 16 inputs. 3.18.2 PSC-NS-OUT+ Technical data Position Description Name PSC-NS-OUT+ Operating voltage/current 24VDC +/-10% / mA Fusing Internal fuse4 X 3.2A... - Page 110 The pins no. 1 and 3 or 2 and 4 of the O+ or O- connections are internally bridged in order to facilitate the connection of the power supply to the neighbouring mod- ule. Instruction Manual PROTECT-PSC 3–78 V 2.6R01 / 04.19...
- Page 111 -5 output -6 output -7 output -8 output -9 output -A output -B output -C output -D output -E 24VDC output -F COM1 COM2 COM1 24VDC COM2 Terminal block pin number mapping Instruction Manual PROTECT-PSC 3–79 V 2.6R01 / 04.19...
-
Page 113: Installation / Project Planning
EMERGENCY-OFF (EMERGENCY-STOP) circuitry 4–13 4.3.3 Guard monitoring 4–14 4.3.4 Guard monitoring with locking 4–15 4.3.5 Safety solenoid-operated switch 4–16 4.3.6 Current-sourcing semiconductor 4–17 4.3.7 Circuitry of the actuator level 4–18 4.3.8 Checking 4–19 Instruction Manual PROTECT-PSC 4–1 V 2.6R01 / 04.19... -
Page 114: Assembly
Installation / project planning Assembly 4.1.1 Ambient conditions The following ambient conditions must be observed for the perfect operation of the 8.1 / 8-2 PROTECT-PSC. Complete information is contained in Chapter 8.1. Position Description Temperature range 0 to 55°C Air humidity... - Page 115 2. Then carefully press the module against the top hat rail until a click is heard. If a further module is to be connected next to it, it must be ensured that the back plane bus is first installed. Instruction Manual PROTECT-PSC 4–3 V 2.6R01 / 04.19...
- Page 116 3. Check that the module is fitted correctly and push the interlocks back where necessary. 4. After assembling all modules the system must be secured on both sides us- ing fixing clips or comparable measures. Demontage Pull the two interlocks before removing the module. Instruction Manual PROTECT-PSC 4–4 V 2.6R01 / 04.19...
-
Page 117: Wiring
Wiring 4.2.1 General information on wiring This chapter contains important information on the wiring of the PROTECT-PSC, which must be followed for safe and trouble-free operation. The electrical equipment must be wired in conpliance with IEC 60439-1, 7.8.3. The maximum admissible length of free hanging cable is 30 cm. - Page 118 F2 = Optional pre-fusing (value depends on number of modules) 24V MAIN+ Power modules 24V MAIN- F1 = recommended pre-fusing T2.0A The maximum cable lengths between the power supply unit and the PROTECT- PSC may not exceed 15 m. Instruction Manual PROTECT-PSC 4–6 V 2.6R01 / 04.19...
- Page 119 Lay the input and output cables inside and outside the switch cabinet in separate cable ducts or similar. If cable ducts or pipes made of metal are used, they must be earthed. Shielded cables Instruction Manual PROTECT-PSC 4–7 V 2.6R01 / 04.19...
- Page 120 Installation / project planning If input cables and output cables need to be laid together with power cables, use shielded cables and earth the shield. Instruction Manual PROTECT-PSC 4–8 V 2.6R01 / 04.19...
- Page 121 Art. No. 101209631 When connecting, pay attention to the correct polarity of the terminals L+ and L-. The shielding must be put on both sides (PROTECT-PSC and PSC-U-G series) 4.2.2 / 4–9 onto the terminal 0V. See also the PSC-U-G operating instructions.
- Page 122 17. Insert plug . 18. Assemble the battery holder . 19. Mark the enclosed sticker with the current date and attach it to the CPU module. 20. Switch on the power again. Instruction Manual PROTECT-PSC 4–10 V 2.6R01 / 04.19...
- Page 123 The tripping current for the fuse will depend on the number and type of modules supplied. Example to calculate the tripping current Assuming the PROTECT-PSC has the following modules: 2 x input module PSC-S-IN-E => 2 x 16 inputs á...
-
Page 124: Circuitry Examples
In this case the resetting is caused by the shut-down system itself. START A START command starts or restarts the operation of a machine or system moni- 6.11.2 / 6-54 tored by the protective device. Instruction Manual PROTECT-PSC 4–12 V 2.6R01 / 04.19... - Page 125 Start-up occurs only after the release of the start button (monitored start) with the negative edge. Enables S-Stop-1A OUT_COM- IN_COM+ EMERG ENCY- IN_COM- STOP S-Stop-1B OUT_COM- S-Stop-2A START OUT_COM- IN_COM+ OUT-P+ I-P IN-P+ OUT-P- I-P IN-P- PSC-S-IN-E PSC-S-OUT Instruction Manual PROTECT-PSC 4–13 V 2.6R01 / 04.19...
- Page 126 Enables S-Stop-1A Close OUT_COM- IN_COM+ IN_COM- S-Stop-1B OUT_COM- S-Stop-2A OUT_COM- IN_COM+ S-Stop-3A Controller Enable OUT_COM- IN_COM+ IN_COM- S-Stop-3B O-P OUT-P+ IN-P+ O-P OUT-P- IN-P- PSC-S-OUT PSC-S-IN-E = Actuated closer shown Instruction Manual PROTECT-PSC 4–14 V 2.6R01 / 04.19...
- Page 127 S-Stop-1B OUT_COM- S-Stop-2A OUT_COM- IN_COM+ S-Stop-3A Door opener IN_COM+ OUT-P+ 24 V DC 24 V DC IN-P+ 0 V DC 0 V DC OUT-P- IN-P- = Actuated opener shown PSC-S-IN-E PSC-S-OUT Instruction Manual PROTECT-PSC 4–15 V 2.6R01 / 04.19...
- Page 128 Please observe the C standard with respect to the admissibility of an individual switch or consult the manufacturer! Enables S-Stop-1A OUT_COM- IN_COM+ IN_COM- S-Stop-1B OUT_COM- S-Stop-2A OUT_COM- IN_COM+ Controller S-Stop-3A Enable IN_COM+ OUT_COM- IN_COM- S-Stop-3B OUT-P+ IN-P+ OUT-P- IN-P- PSC-S-OUT PSC-S-IN-E Instruction Manual PROTECT-PSC 4–16 V 2.6R01 / 04.19...
- Page 129 ) and the corresponding user program is to be used analogously to 4.3.3 / 4–14 the example 4.3.3 Guard monitoring. Enables OUT_COM- Light-curtain-1A OUT_COM- Light-curtain-1B Light-curtain-2A OUT_COM- Operational IN-P+ Controller OUT-P+ IN-P- OUT-P- PSC-S-OUT PSC-S-IN-LC Instruction Manual PROTECT-PSC 4–17 V 2.6R01 / 04.19...
- Page 130 The second shut-down path is not shown in the example for Cat. 2 / PL b. Relay output 0/1-1 0/1-2 0/1-3 0/1-4 PSC-S-Relais If the actuator does not have its own fuse, a fuse must be incorporated in the sup- ply line for the actuators. Instruction Manual PROTECT-PSC 4–18 V 2.6R01 / 04.19...
- Page 131 Has a shielded cable been used if a minimum distance of 100 mm could not be ob- served? Wiring Do all connection lines have wire-end ferrules? Are all connections correctly wired and poled? Do all input/output modules have a 24 volt DC supply? Instruction Manual PROTECT-PSC 4–19 V 2.6R01 / 04.19...
-
Page 133: Operating Mode
Operating mode 3 Operating mode 3 This chapter describes operation of the PROTECT-PSC in operating mode 3. Overview 5–2 Project planning 5–2 Instruction Manual PROTECT-PSC 5–1 V 2.6R01 / 04.19... -
Page 134: Overview
6.10 / 6-31 2. Saving / logical checking of the user program 6.13 / 6-81 3. Transfer to the PROTECT-PSC. Confirmation of the PIN code is necessary. 6.7 / 6-11 4. Confirmation of the error-free transfer. 5. Checking of the program in the application. -
Page 135: Programming / Parameter Assignment
Changing the password 6.5.3 Release to edit 6.5.4 Program lock 6.5.5 Setting the protection (program password) PIN Code 6-10 Program/data transfer 6-11 6.7.1 Connecting to PROTECT-PSC 6-11 6.7.2 Setting time and date 6-11 6.7.3 Communication settings 6-12 6.7.4 Program transfer 6-13 6.7.5... - Page 136 6.16.2 Memory area 6-106 6.17 Documenting 6-108 6.17.1 Setting format 6-108 6.17.2 Selecting printer 6-109 6.17.3 Ladder diagram 6-109 6.17.4 Comment 6-109 6.17.5 Contact table 6-110 6.17.6 Use status 6-110 6.17.7 Parameters 6-111 Instruction Manual PROTECT-PSC V 2.6R01 / 04.19...
- Page 137 6.18 Program options 6-111 6.18.1 Presentation 6-111 6.18.2 Configuration 6-113 6.19 CPU initialisation 6-116 6.20 Engineering Tool Version Maintenance (updating) 6-116 6.20.1 Present PROTECT-PSCsw Version Confirmation method 6-116 6.20.2 The newest version confirmation method 6-117 Instruction Manual PROTECT-PSC V 2.6R01 / 04.19...
-
Page 138: Overview
Overview PROTECT-PSCsw will provide assistance in the creation of safe/operational pro- grams for the PROTECT-PSC. Using the PROTECT-PSCsw programming software the programmer creates the user program in the form of a ladder diagram (to IEC 61131). For the purposes of verification the ladder diagram is converted to a statement list in the PS program. -
Page 139: Functionality
: Pentium 200MHz (preferably 500MHz or higher) Memory : at least 128MB (preferably 256MB or higher) Graphics : VGA Graphics with at least 800x600 pixels Hard disk : at least 80 MB free memory Instruction Manual PROTECT-PSC V 2.6R01 / 04.19... -
Page 140: Installation
Password protection The creation of new programs, the modification of existing projects and their trans- fer to PROTECT-PSC for existing projects is protected by a password query. This ensures that unauthorized persons are refused active access. After the first time the program is started, a window indicates that no password has yet been entered and that standard passwords are generated. - Page 141 After starting the program every time, a valid password must be entered in order to release a project for editing. This can either be done under the menu option [Edit] [Start Edit Mode] or the tool button Instruction Manual PROTECT-PSC V 2.6R01 / 04.19...
- Page 142 This option automatically locks the program after an adjustable time of inactivity (no mouse or keyboard action). The time period is activated and set in password dialogue [Setup] – [Password]. The waiting time is freely adjustable between 1 and 120 minutes. Instruction Manual PROTECT-PSC V 2.6R01 / 04.19...
- Page 143 Available options are the protection of • “PS+Parameter(PS)” or • “PS+PN+Parameter”. It is possible to cancel the protection of a program by entering the password. Use the menu option [Option]–[Reset protection] for this purpose. Instruction Manual PROTECT-PSC V 2.6R01 / 04.19...
-
Page 144: Pin Code
PIN code is desired. The PIN code is displayed as ‘*’. PIN code confirmation The new PIN code must be entered again for confirmation. It is again displayed as ‘*’. Instruction Manual PROTECT-PSC 6-10 V 2.6R01 / 04.19... -
Page 145: Program/Data Transfer
The connection to PROTECT-PSC is made via a standard USB printer cable. USB cable It is only possible to connect the PROTECT-PSC with a different device via a USB cable for parameter assignment or for short-term trouble shooting. A permanent connection is not permitted. - Page 146 • First select a communication target (currently only CPU module) and then enter a description (comment. • Open the dialogue [Communication modul setup] by clicking the ‘Condition’ button and select the interface. Instruction Manual PROTECT-PSC 6-12 V 2.6R01 / 04.19...
- Page 147 Programming / parameter assignment 6.7.4 Program transfer Before a program can be transferred to the PROTECT-PSC, you must first release 3.7.3 / 3–31 the writing process (see Chapter 3.7.3). After program creation, logical check and storing of the project, the program can then be transferred to the PROTECT-PSC The menu entry [CPU]-[Write Data] of- fers several options as to which data should be transferred to PROTECT-PSC.
- Page 148 The PSV can also be read out directly on the CPU modul by PROTECT-PSCsw: PROTECT-PSCsw automatically inserts the PSV into the cover sheet of the docu- 6.17.1 / 6-108 mentation. 6.7.6 CPU Status The menu entry [CPU]-[Status] shows the current status of the CPU. Instruction Manual PROTECT-PSC 6-14 V 2.6R01 / 04.19...
-
Page 149: Program Description
This is where the project window, the ladder diagram and the parameter window 6.8.4 / 6-21 are displayed. Both windows can be freely arranged. Status bar Shows additional information on the active menus/buttons and status information. Instruction Manual PROTECT-PSC 6-15 V 2.6R01 / 04.19... - Page 150 ➔Inserts a new line ➔Edits comments ➔Checks the program (ladder diagram) ➔Changes the type of contact ➔Renumbers the edge address (P) ➔Compares two programs block for block ➔Enters the password for the edit mode Instruction Manual PROTECT-PSC 6-16 V 2.6R01 / 04.19...
- Page 151 ➔Changes password (Chapter 6.5.2). Options ➔Modifies the presentation of the program user interface (Chapter 6.18.1). ➔Modifies program settings (Chapter 6.18.2). PROTECT- ➔Locks programs for editing (Chapter 6.5.4). PSCsw ➔Sets program protection (Chapter 6.5.5). Instruction Manual PROTECT-PSC 6-17 V 2.6R01 / 04.19...
- Page 152 Edit Menu entry [View]-[U-mark search] [View]-[Search...] [Edit]-[Redo] [Edit]-[Undo] [Help]-[About...] [File]-[Print] [Edit]-[Paste] [Edit]-[Copy] [Edit]-[Cut] [File]-[Save] [File]-[Open] [File]-[New] Ladder diagram Menu entry [Edit]-[New Line insert] [Edit]-[New Block insert] Instruction Manual PROTECT-PSC 6-18 V 2.6R01 / 04.19...
- Page 153 [View]-[Book Mark]-[Goto Prev Mark] [View]-[Book Mark]-[Mark Set/Reset] PS/PN Menu entry PN Program PS Program Comments Menu entry Display window with contact comment [View]-[Display 2nd Comment] [View]-[Display 1st Comment] Xchange Menu entry [Xchange]-[LD Edited Blocks] Instruction Manual PROTECT-PSC 6-19 V 2.6R01 / 04.19...
- Page 154 Programming / parameter assignment Communication Menu entry [Setup]-[Setup Communication Port] Password Menu entry [Edit]-[Start Edit Mode] [Option]-[Lock PROTECT-PSCsw] [Setup]-[Password] Instruction Manual PROTECT-PSC 6-20 V 2.6R01 / 04.19...
- Page 155 If the program is protected, the ‘lock’ symbol for the protected elements is dis- played. See Figure 6-18. Fehler! Es ist nicht möglich, durch die Bearbeitung von Feldfunktionen Ob- jekte zu erstellen. Instruction Manual PROTECT-PSC 6-21 V 2.6R01 / 04.19...
- Page 156 The display of the ladder diagram differs as follows for the PS and PN program: • PS program : background WHITE • PN program : background GREEN Instruction Manual PROTECT-PSC 6-22 V 2.6R01 / 04.19...
-
Page 157: Parameter Assignment
3.3.2 / 3–6 More detailed information on the operating modes is provided in Chapter 3.3.2. The current operating mode of the PROTECT-PSC is displayed in the status bar of PROTECT-PSCsw. Fehler! Es ist nicht möglich, durch die Bearbeitung von Feldfunktionen Ob- PROTECT-PSCsw jekte zu erstellen. - Page 158 The operational outputs are ‘frozen’. It is only possible to leave the state via R.ST. or Power ON/OFF. The error code 71 is shown on the CPU. Instruction Manual PROTECT-PSC 6-24 V 2.6R01 / 04.19...
- Page 159 Display of the corresponding group Master : group controlled by the CPU module : group controlled by the SUB-MON module NonSafe : group of the operational I/O Slot no. Display of the slot Instruction Manual PROTECT-PSC 6-25 V 2.6R01 / 04.19...
- Page 160 A new module may be added by selecting [Add]. The required module is to be selected and the selection confirmed with [OK]. Refresh points Number of the physically existing channels of the module. Instruction Manual PROTECT-PSC 6-26 V 2.6R01 / 04.19...
- Page 161 The sum of the channels used and the reserved points. Module code ID code of the module Module kind Selection of the module type. Module type Specification of the module type. Module name Name of the module to be selected. Instruction Manual PROTECT-PSC 6-27 V 2.6R01 / 04.19...
- Page 162 Address of the channel within the system Type of module belonging to the channel Shows whether the channel is used in the program The channel difference time set Comment Instruction Manual PROTECT-PSC 6-28 V 2.6R01 / 04.19...
- Page 163 9.9 seconds. The default of the ‘channel difference time’ is 1.0 seconds. Only change this default if it can be seen that the sensor used will not be able to observe this time. Instruction Manual PROTECT-PSC 6-29 V 2.6R01 / 04.19...
- Page 164 The program name is entered in the project window under the entry [Program name]. Using this dialogue, a name can be assigned for the system, the PS and the PN program. The assigned name for the system (project) is displayed in the project window. Instruction Manual PROTECT-PSC 6-30 V 2.6R01 / 04.19...
-
Page 165: Programming
The programs are created exclusively graphically in the form of a ladder diagram. Since the PROTECT-PSCsw programming software is primarily intended for the creation of user programs for the safety-orientated use of the PROTECT-PSC only those instructions and functions of IEC 61131 are available which can be checked in terms of safety using simple means. - Page 166 For debug purposes it is possible under menu entry [Setup]-[I/O Compulsion 3.7.6 / 3–38 ON/OFF] to set the following specifiers (see Chapter 3.7.6) insofar as these have not been set in the PN program. • M flag • K flag Instruction Manual PROTECT-PSC 6-32 V 2.6R01 / 04.19...
- Page 167 Parallel connection of blocks Coil output Edge detection, rising edge Edge detection, trailing edge Start of branching double coil Branching of double coil End of branching double coil Unconditional output Inversion Connection Instruction Manual PROTECT-PSC 6-33 V 2.6R01 / 04.19...
- Page 168 Description Markings As the PROTECT-PSC can also be used for control tasks that are not safety- oriented, all ladder diagram symbols in the PS program (contact, coil, timer … ) have a marking to show the programmer which symbols may be used for safety functions.
- Page 169 The right connection is only TRUE if the left contact state has a trailing (negative) edge. Otherwise right is always FALSE. Coils (outputs) Coils Passes the left state on to the address allocated to the coil. Instruction Manual PROTECT-PSC 6-35 V 2.6R01 / 04.19...
- Page 170 This register serves the timer as counting register and permits the current counter reading to be read out. Depending on the capacity stage of the PROTECT-PSC there are different toler- ance ranges for the timer.
- Page 171 The output is HIGH if the counter value reaches the value 0. As soon as the RESET input is HIGH, the inter- nal counter value is set to the default value of the output to LOW. Instruction Manual PROTECT-PSC 6-37 V 2.6R01 / 04.19...
- Page 172 This function has only been implemented for reasons of compatibility with other control types and is without significance to the programming of the PROTECT- PSC. Instruction Manual PROTECT-PSC 6-38 V 2.6R01 / 04.19...
- Page 173 <=H Comparison of a register with a W<=H constant or of two registers. If the condition ‘<=’ is satisfied, then the <=N result is HIGH. W<=N Agenda : register, : hexadecimal constant Instruction Manual PROTECT-PSC 6-39 V 2.6R01 / 04.19...
- Page 174 In case of reading a Counter Value with one of the Data Transfers commands in a 3.7.6/ 3–38 Function block, the Variable of the Counter Value must be preceded by an “&”. Instruction Manual PROTECT-PSC 6-40 V 2.6R01 / 04.19...
- Page 175 The data are treated as BCD values Agenda : register 1,2,3 Examples Multiply the content of the flag K002 with the content of the flag K000 and write the result to flag K003. Instruction Manual PROTECT-PSC 6-41 V 2.6R01 / 04.19...
- Page 176 An exception is provided by the ‘ER’ (ERROR) flag. It is set if the PROTECT-PSC recognises an invalid operation. When an ER flag is set, the controller moves immediately to safe state (all outputs shut down) and transmits an appropriate error message.
- Page 177 The EL400-EL7FF address area is freely available to the programmer and can be used, for example, for markers which are not safe. The delay time of the PROTECT-PSC for the transmission of the EL data area is 47.8 ms. Communication between PS and PN The EM (000..7FF) memory area is available for the operational communication...
- Page 178 Set if program error recognised V0CA Memory error Set if writing error internal flash ROM recognised Error after failure of the backup battery not reset with the V0CB Battery error reset PROTECT-PSCsw. ‘ ’ ‘ ’ Instruction Manual PROTECT-PSC 6-44 V 2.6R01 / 04.19...
- Page 179 Set if the voltage for the backup battery too low Real time clock er- V0F5 Set if error in real time clock detected ‘ ’ ‘ ’ Any special flag address that is not listed has the value of 0. Instruction Manual PROTECT-PSC 6-45 V 2.6R01 / 04.19...
- Page 180 Identification number of the CPU S2D1 CPU version Version number of the CPU S2D2 Version date Month and day of the version S2D3 Version date Year of the version ‘ ‘ ’ ’ Instruction Manual PROTECT-PSC 6-46 V 2.6R01 / 04.19...
- Page 181 In order to display comments of different language, it is necessary to install the related language fonts beforehand. Please refer to the Windows instructions man- ual for fonts import Instruction Manual PROTECT-PSC 6-47 V 2.6R01 / 04.19...
- Page 182 3. Stipulation of the hardware configuration (parameter assignment). 6.9.4 / 6-25 4. Creation of the program (see below). 5. Saving / logical check of the program. 6. Transfer to PROTECT-PSC. 6.7.4 / 6-13 7. Confirmation of faultless transmission. 8. Checking of programming in the plant.
- Page 183 In the case of addresses from the word memory area (D, N, S) the corresponding bit position is selected within the address with a suf- fixed ‘-*’, whereby the ‘*’ stands for the corresponding BIT within the WORD. Instruction Manual PROTECT-PSC 6-49 V 2.6R01 / 04.19...
- Page 184 Entry field for comment (max. 100 characters). Entry fields for identifier and label (equipment label). Simultaneous insertion of an OR operation and of a timer. Entry field for time value. Instruction Manual PROTECT-PSC 6-50 V 2.6R01 / 04.19...
- Page 185 Display of the function number. Selection of the function type via the function name. Operand Entry field for comment (max. 100 characters). Simultaneous entry of an OR operation and of a counter. Instruction Manual PROTECT-PSC 6-51 V 2.6R01 / 04.19...
- Page 186 Determination of a hexadecimal constant / variable (will depend on②) Selection of constant or variable. An element of the memory area must be stated in the case of a variable. Entry field for comment (max. 100 characters). Instruction Manual PROTECT-PSC 6-52 V 2.6R01 / 04.19...
-
Page 187: Program Examples
Manual resetting • must be done through a separate input at the PROTECT-PSC. • may not trigger any dangerous movement itself. For this purpose, it is nec- essary to provide the information on the manual resetting of the operational control. - Page 188 The start is typically managed by the operational control. However, it is also possi- ble to have the START signal managed by the PROTECT-PSC. • The start or restart may only be possible if all safety devices are active and, if necessary, the manual resetting has been put into effect.
- Page 189 (Q00A to Q00D) are deactivated. This state remains in exist- ence until the EMERGENCY-OFF (EMERGENCY-STOP) circuit is closed again and the start button is correctly confirmed. The above described process starts again from the beginning . Instruction Manual PROTECT-PSC 6-55 V 2.6R01 / 04.19...
- Page 190 Programming / parameter assignment 6.11.4 Guard monitoring Ladder diagram 4.3.3 / 4–14 I006 Q00A Q00B Q00C Q00D Q010 Q011 I007 Q00A Q00B Q00C Q00D Q00A Q00B Q00C Q00D Instruction Manual PROTECT-PSC 6-56 V 2.6R01 / 04.19...
- Page 191 B (as long as the guard is closed). If the guard is opened, the enables (Q00A to Q00D) are de-activated. This state remains in existence until the guard and the feedback circuit are closed again. The process described above starts again from the beginning. Instruction Manual PROTECT-PSC 6-57 V 2.6R01 / 04.19...
- Page 192 This type of self-hold must be used for all coils/timers set permanently with dynam- ic input signal because for safety reasons the ladder diagram symbol ‘coil self- holding’ (Flip-Flop) is not implemented. Instruction Manual PROTECT-PSC 6-58 V 2.6R01 / 04.19...
- Page 193 (contact I011 = true(1)). If this is not the case, T001 becomes true(1) and thus also flag M001 which then goes into self-holding. The self-hold of M001 can be can- celled by flag M002. Instruction Manual PROTECT-PSC 6-59 V 2.6R01 / 04.19...
- Page 194 The ladder diagram and the description are similarly provided in Chapter 6.11.4 6.11.4 / 6-56 (but without start and reset circuit). Only the addresses for sensor and feedback circuit need to be adjusted. Instruction Manual PROTECT-PSC 6-60 V 2.6R01 / 04.19...
- Page 195 M002 set as start condition (block 00003). Flag M010 must be set. After the successful start-up (not shown here) flag M010 and thus the self-hold of M000 is deleted. Instruction Manual PROTECT-PSC 6-61 V 2.6R01 / 04.19...
-
Page 196: Library / Function Block
An FB must possess at least one input and one output. An FB is created by means of the ladder diagram programming language in the same way as the user program. Instruction Manual PROTECT-PSC 6-62 V 2.6R01 / 04.19... - Page 197 This FB can only be integrated in the PS program if the corresponding module appears at least once in the configuration. See Chapter 6.12.4 / 6-66 6.12.4. The symbolic illustration in the project window is made with the colour blue. Instruction Manual PROTECT-PSC 6-63 V 2.6R01 / 04.19...
- Page 198 Name of the library (maximum 50 alphanumeric characters incl. ‘_’). Version number (0.00…99.99). Date of creation (yyyy.mm.dd). Description (maximum 100 characters). Description See Chapter 6.12.9. Description See Chapter 6.12.9. Instruction Manual PROTECT-PSC 6-64 V 2.6R01 / 04.19...
- Page 199 Inserting a function block from the interim memory Deleting a folder or a function block Changing the name of a folder Editing the properties of a library or a function block Instruction Manual PROTECT-PSC 6-65 V 2.6R01 / 04.19...
- Page 200 FB. See Chapter 6.12.2. FB protection status is displayed Setting for FB Protection function. The total number of inputs and outputs of a function block must be greater than two. Instruction Manual PROTECT-PSC 6-66 V 2.6R01 / 04.19...
- Page 201 Creating a module-related FB 1. Selecting [Select] in the property dialogue of the function block causes a window to appear with detailed settings(see Figure 7-54) 22. Selection of the module Instruction Manual PROTECT-PSC 6-67 V 2.6R01 / 04.19...
- Page 202 23. Actuating [OK] selects the module without it being possible to use the FB. Selecting [Reset] cancels the assignment. Setting for FB Protection 1. Selecting [Setting for FB Protection] in the property dialogue of the function block causes a window to appear with detailed settings Instruction Manual PROTECT-PSC 6-68 V 2.6R01 / 04.19...
- Page 203 Programming / parameter assignment 24. FB protection setting person's name is inputted. 25. FB protection password is inputted.. 26. FB protection status is displayed.. Instruction Manual PROTECT-PSC 6-69 V 2.6R01 / 04.19...
- Page 204 Setting for Invisible FB 1. Selecting [Setting for FB Protection] in the property dialogue of the function block causes a window to appear with detailed settings Instruction Manual PROTECT-PSC 6-70 V 2.6R01 / 04.19...
- Page 205 Programming / parameter assignment 28. Invisible FB setting person's name+%UNV is inputted. Ex) If person’s name is JTEKT, please input “JTEKT%UNV” 29. FB protection password is inputted. 30. FB protection status is displayed. Instruction Manual PROTECT-PSC 6-71 V 2.6R01 / 04.19...
- Page 206 31. FB icon under Invisible FB is displayed.. Releasing for Invisible FB 1. Selecting [Releasing FB Protection] in the property dialogue of the function block causes a window to appear with detailed settings Instruction Manual PROTECT-PSC 6-72 V 2.6R01 / 04.19...
- Page 207 WORD is not possible. PN library: the data types BOOL, WORD and BYTE are available here Address The address is automatically filled in with the exception of the ‘EXTERN’ attribute. Instruction Manual PROTECT-PSC 6-73 V 2.6R01 / 04.19...
- Page 208 When using FBs, the timers 000 to 00F in the user program are not available. They are reserved for use in FBs. If an FB is used multiply with timers, the PROTECT- PSC ensures that there is no mutual influence. Instruction Manual PROTECT-PSC 6-74 V 2.6R01 / 04.19...
- Page 209 Logical Check (PS Library only) A logical check of a function block is requested, as in the user program, before saving the library. Further details can be found in Chapter 6.13.2. 6.13.2 / 6-86 Instruction Manual PROTECT-PSC 6-75 V 2.6R01 / 04.19...
- Page 210 54) will then open. PROTECT-PSCsw does not have any automatic version management. The pro- grammer must decide himself if the alterations he has made necessitate an updat- ing of the version number. Instruction Manual PROTECT-PSC 6-76 V 2.6R01 / 04.19...
- Page 211 [Edit]-[Block Compare Program] in the editing mode from the main menu. Details 6.15.3 / 6- can be found in Chapter 6.15.3. Additionally, you can compare a library with the one saved in the PROTECT-PSC. To do so, select [Library]-[Compare with the CPU]-[PS Library] or [Library]- [Compare with the CPU]-[PN Library].
- Page 212 Tag window Ladder diagram The ladder diagram corresponds in its functioning to that from Chapter 6.10. The 6.10 / 6-31 inputs/outputs are now implemented here as variables by means of tag names. Instruction Manual PROTECT-PSC 6-78 V 2.6R01 / 04.19...
- Page 213 Set library PN path (see Chapter 6.18.2). 6.18.2 / 6-113 Name of the integrated PN library. Selection of a PN library. Separate integrated PN library from the project. Instruction Manual PROTECT-PSC 6-79 V 2.6R01 / 04.19...
- Page 214 Remaining free memory for the use of function blocks within a user program. This number is reduced after every insertion (use) of a function block by its memory capacity. Status of FB protection A screen is changed to the FB-Inside monitor Instruction Manual PROTECT-PSC 6-80 V 2.6R01 / 04.19...
- Page 215 Hardware dongle (Sentinel25P) TXY-6066 for the parallel interface. Hardware dongle (Sentinel USB) TXY-6067 for the USB interface. The locked library can be edited only by the user key (sentinel) used for the lock. PROTECT-PSCsw PROTECT-PSCsw PROTECT-PSC Instruction Manual PROTECT-PSC 6-81 V 2.6R01 / 04.19...
- Page 216 In the above example, library 1 is available as a file on the fixed disk and library 2 in the PROTECT-PSC. Both libraries were created by user A and protected by user key (locked). User A has full access to both libraries if he has installed his hard- ware dongle.
- Page 217 Shows whether or not the library can be ed- ited. Shows whether or not the library is locked. PROTECT-PSCsw alerts you when you open a locked library that this library is locked by another hardware dongle and cannot be edited. Instruction Manual PROTECT-PSC 6-83 V 2.6R01 / 04.19...
-
Page 218: Checking
Error code Description False address area for contact for edge detection. Double use of a ‘P’ address Error in the conversion of ‘single’ to ‘double’ contact/coil Undefined command in program – – Instruction Manual PROTECT-PSC 6-84 V 2.6R01 / 04.19... - Page 219 END statement multiply present START statement present without END statement END statement present without START statement No START statement present No END statement present Neither START nor END statement present – – Instruction Manual PROTECT-PSC 6-85 V 2.6R01 / 04.19...
- Page 220 (if modifi- cations have been made) to the PROTECT-PSC is absolutely essential. It serves to verify the ladder diagram by a different mode of presentation. For this purpose the ladder diagram is translated into a statement list.
- Page 221 7.10.4 can be specified as an instruction sequence for this virtual machine. Timer, functions and edge detecting contacts are viewed as function call. Working Interim memory (stack) register S5…S18 S0 S1 S2 S3 S4 S19 S20 S21 S22 S23 Instruction Manual PROTECT-PSC 6-87 V 2.6R01 / 04.19...
- Page 222 AND NOT v nand(v) OR v or(v) OR NOT v nor(v) AND STR andpop OR STR orpop OUT v out(v) PTS v pts(v) NTS v nts(v) push read load(1) no operation Instruction Manual PROTECT-PSC 6-88 V 2.6R01 / 04.19...
- Page 223 The registers (A, S0…S3) show states after execution of the instruction in the ‘vir- tual’ column. Step virtual push STR I000 load(I000) I000 AND I001 and(I001) push STR I004 load(I004) I004 AND I005 and(I005) OR STR orpop > > Instruction Manual PROTECT-PSC 6-89 V 2.6R01 / 04.19...
- Page 224 TMRH T001 T001 = 1, wenn Eingang 1,0 Sekunden 1 K=001.0 read AND T001 and(T001) OUT Q018 out(Q018) OUT Q019 out(Q019) OUT M000 out(M000) > > Instruction Manual PROTECT-PSC 6-90 V 2.6R01 / 04.19...
- Page 225 FB : fb1 After the call up, the output of the function block OUT1 is read out and edited further. STR OUT1 ; reading back from the function OUT Q002 ; block OUT Q003 Instruction Manual PROTECT-PSC 6-91 V 2.6R01 / 04.19...
- Page 226 The PN program may only have a max. size (31488 bytes) and a run time (1.2ms). You can perform a check by selecting [Xchange]-[Program Size Check] in the main menu. The check is performed automatically in the background before transfer to PROTECT-PSC. Instruction Manual PROTECT-PSC 6-92 V 2.6R01 / 04.19...
-
Page 227: User Program Change Procedure
Changing of the Safety program is protected by the PIN code.Change of an user program is implemented by the worker (worker whoknows the PIN code) with the competence of the change program. 1. Connect a PC which is installed PROTECT-PSCsw, with PROTECT-PSC through a USB cable. 2. Start PROTECT-PSCsw (Engineering Tool). - Page 228 Programming / parameter assignment 6. Click the “LD“ and the program is displayed as follows. 7. Enter the “Edit“ Mode. 8. Click “Edit“ tag and then click “Start Edit Mode“. Instruction Manual PROTECT-PSC 6-94 V 2.6R01 / 04.19...
- Page 229 (Changing the program name etc) is implemented at the user’s responsibility. When changing a file name, select “Save As…”. When not changing a file name, select “Save”. Figure 6-92 Screen 6 Instruction Manual PROTECT-PSC 6-95 V 2.6R01 / 04.19...
- Page 230 15. Execute the logic check of the program. Figure 6-94 Screen 8 After the completion of logic check of program,the following screeen is displayed . 16. Click the “OK” button. Figure 6-95 Screen 9 Instruction Manual PROTECT-PSC 6-96 V 2.6R01 / 04.19...
- Page 231 17. When the .translation is completed properly, the following screen is displayed. Click the “OK” button. Figure 6-96 Screen 10 18. When the file is saved properly, the following screen is displayed. Click the “OK” button. Figure 6-97 Screen 11 Instruction Manual PROTECT-PSC 6-97 V 2.6R01 / 04.19...
- Page 232 Figure 6-98 Screen 12 20. When file name is changed, the folowing screeen is displayed “Confirm the old project name and new project name” and then Click the “Continue” button. Figure 6-99 Screen 13 Instruction Manual PROTECT-PSC 6-98 V 2.6R01 / 04.19...
- Page 233 Input the old and new PIN code. (The old and new PIN code can be the same PIN code.) Figure 6-101 Screen 15 After Inputting the PIN code, click the “OK” button. Instruction Manual PROTECT-PSC 6-99 V 2.6R01 / 04.19...
-
Page 234: Changing / Revising
And the program written in CPU becomes valid. Figure 6-103 Screen 17 26. Make the CPU into Reset/Run Mode and start the PROTECT-PSC 6.15 Changing / revising You have the possibility of performing different changes for the entire user program within the framework of the editing options. - Page 235 ‘#BEGIN_FUNCOP’ and ended with ‘#END’. In between are the function operands to be modified and the new function operands separated by a comma ‘D0000L, D0001L’. A comment on the documentation can be attached similarly separated by a comma. Instruction Manual PROTECT-PSC 6-101 V 2.6R01 / 04.19...
- Page 236 Start of the new address ar- ea (bit address). [Remove] Removes the selected entry from the change list. [Execute] Performs the changes for all selected entries of the change list. [Close] Closes the dialogue. Instruction Manual PROTECT-PSC 6-102 V 2.6R01 / 04.19...
- Page 237 You can change an NC contact into an NO contact by entering a bit address with area specifier and vice versa. This function can only be used for individual contacts. Entry of the bit address Application to all or only selected contacts with the selected address. Instruction Manual PROTECT-PSC 6-103 V 2.6R01 / 04.19...
- Page 238 Double clicking on an entry or pressing the ‘Block display’ button moves you directly to the respective block in the ladder diagram. Blocks are the same. Blocks are diffe- rent. Block has been added. Block has been deleted. Instruction Manual PROTECT-PSC 6-104 V 2.6R01 / 04.19...
-
Page 239: Monitoring
Depending on requirements the interrogation/updating time of the monitoring can be set in the dialogue [Configuration] (which can be reached by the main menu [Options]-[Configuration]) under the instructions rider in a range of 100ms to 5000ms. Instruction Manual PROTECT-PSC 6-105 V 2.6R01 / 04.19... - Page 240 Common = Common area of the PS/PN memory Selection of the memory type Selection of the address area within the memory type Start of monitoring List of the addresses to be monitored Instruction Manual PROTECT-PSC 6-106 V 2.6R01 / 04.19...
- Page 241 will be added automatically starting from the entered address. The number of WORD blocks which can be automatically added is restricted to a maximum of 16 and is displayed in Instruction Manual PROTECT-PSC 6-107 V 2.6R01 / 04.19...
-
Page 242: Documenting
‘RE- TURN/ENTER’ key while simultaneously pressing the ‘SHIFT’ key . The date is entered as fol- lows: YYYY/MM/DD whereby: DD = day MM = month YYYY = year Instruction Manual PROTECT-PSC 6-108 V 2.6R01 / 04.19... - Page 243 Selects the program to be print- Selects whether a document is to be printed out with or without cover sheet. Selects the desired memory areas. Selects/deselects all memory areas at once. Stipulates the start of page numbering. Instruction Manual PROTECT-PSC 6-109 V 2.6R01 / 04.19...
- Page 244 Selects whether a document is to be printed out with or without cover sheet. Selects the desired memory areas Selects/deselects all memory areas at once Stipulates the start of page numbering. Instruction Manual PROTECT-PSC 6-110 V 2.6R01 / 04.19...
-
Page 245: Program Options
Set font and size of the check window here. Activate these options if you do not want a line break in the comment (the text is cut off at the end of the line). Instruction Manual PROTECT-PSC 6-111 V 2.6R01 / 04.19... - Page 246 Press this button to reach the colour selection dialogue for foreground and background colour. View Shows the ‘edit’ tool bar. Shows the status bar. Shows the ‘contacts’ tool bar. Instruction Manual PROTECT-PSC 6-112 V 2.6R01 / 04.19...
- Page 247 The dialogue is not automatically opened when a contact from the ‘contacts’ in the tool bar is assigned. Activated: The property dialogue is automatically closed after assignment. Deactivated: The property dialogue remains open until it is manually closed. Instruction Manual PROTECT-PSC 6-113 V 2.6R01 / 04.19...
- Page 248 Defining short-cut keys This button opens the dialogue to define a key combination for an in- struction. This button deletes a key combination assigned to an instruction. Select the instruction from this window. Instruction Manual PROTECT-PSC 6-114 V 2.6R01 / 04.19...
- Page 249 Activate this option to have PROTECT-PSCsw perform a check on the program when library is linked. Activate the hardware dongle enquiry (without function). *1: can not be set under the same directly Instruction Manual PROTECT-PSC 6-115 V 2.6R01 / 04.19...
-
Page 250: Cpu Initialisation
6.20 Engineering Tool Version Maintenance (updating) 6.20.1 Present PROTECT-PSCsw Version Confirmation method Please choose [version information] from a main menu of [Help] Installed version number ****************************** ****************************** ****************************** “ “ ” ” Instruction Manual PROTECT-PSC 6-116 V 2.6R01 / 04.19... - Page 251 Programming / parameter assignment 6.20.2 The newest version confirmation method For an update, please visit https://www.schmersal.com or contact technical.sales@schmersal.com. Instruction Manual PROTECT-PSC 6-117 V 2.6R01 / 04.19...
-
Page 253: Operation And Maintenance
This chapter explains first start-up, maintenance and troubleshooting of the PRO- TECT-PSC. Delivery status Start-up Disturbances/error messages 7.3.1 Error categories 7.3.2 Error memory 7.3.3 Error messages/codes Maintenance 7.4.1 Changing the battery 7.4.2 Defective fuses 7.4.3 Failure as a result of common cause Service Instruction Manual PROTECT-PSC V 2.6R01 / 04.19... -
Page 254: Delivery Status
POWER Module Power OFF -1ms<T <20s >5s 0FF/ON Power ON BOOSTER Module If such timing is not observed, an error may be produced during system Power OFF initialization and USB communication may become difficult. Instruction Manual PROTECT-PSC V 2.6R01 / 04.19... -
Page 255: Disturbances/Error Messages
(e.g. cable break or short circuit to ground). The PROTECT-PSC moves to the safe state (all safe outputs are shut down). The user program continues to be executed (interrogation of the inputs, monitoring by PROTECT-PSCsw) without the possibil- ity to enable the Outputs. - Page 256 00000000 00000011 00 03 => day of the week = 3 = Wednesday On Wednesday 10.10.2003, at 12:36 and 4 seconds, processor A in Slot 1 detect- ed an error in the input comparison at Address 0. Instruction Manual PROTECT-PSC V 2.6R01 / 04.19...
- Page 257 A/B 0B5 V0C3 V001 Error back plane BUS. A/B 0FE Error 24VDC supply Although the error signal from an I/O module was detected, A/B 0FF the I/O module which becomes error does not exist. Instruction Manual PROTECT-PSC V 2.6R01 / 04.19...
- Page 258 A/B 023 A/B 031 The maximum execution time of the user program has been exceeded. A/B 035 A serious error has occurred in the PROTECT-PSC CPU Error Hardware error or program error Error in time slice or event processing. Error in data comparison between MP-A and MP-B...
- Page 259 A module has produced an error message A/B 0FE Error in the 24VDC supply Although the error signal from an I/O module was detected, the I/O module A/B 0FF which becomes error does not exist. Instruction Manual PROTECT-PSC V 2.6R01 / 04.19...
-
Page 260: Maintenance
PROTECT-PSC and thus may lead to a system failure. The channel separation must be maintained during all work to and with the PROTECT-PSC. Service In the case of defective modules or other problems please consult one of the... -
Page 261: Annex
Annex Technical data 8.1.1 General data (valid for all modules) 8.1.2 Electromagnetic compatibility (valid for all modules) 8.1.3 PROTECT-PSC CPU 8.1.4 PROTECT-PSC reaction time Considered standards EC Type-Examination certificate Declarations of conformity Index Instruction Manual PROTECT-PSC V 2.6R01 / 04.19... -
Page 262: Technical Data
Function ground : ±1kV Signal connections : ±1kV Surge voltages IEC6100-4-5 Direct current inputs : ±1kV Signal connections Direct current inputs : High frequency IEC6100-4-6 Function ground 0.15 ... 80MHz / 10 V Instruction Manual PROTECT-PSC V 2.6R01 / 04.19... - Page 263 Special register PS:2048 Bytes PN:2048 Bytes Comment memory 64K Bytes Communication(PC3) SN-I/F Display 4 digit 7 segment display 8.1.4 PROTECT-PSC reaction time Output PROTECT-PSC System reaction time Mode 3 Semi-conductor 22.6ms Relay 37.6ms Transmission of EL data 47,8ms Instruction Manual PROTECT-PSC...
-
Page 264: Considered Standards
Part 2: Validation (ISO 13849-2:2003); German version EN ISO 13849-2:2004 Safety of machines – electrical equipment of machines IEC 60204-1:2016 Part 1: General requirements (IEC 60204- 1:2005,modified); German version EN 60204-1:2006 IEC 61000-2-5:1995 Electromagnetic compatibility Instruction Manual PROTECT-PSC V 2.6R01 / 04.19... -
Page 265: Ec Type-Examination Certificate
Annex EC Type-Examination certificate Instruction Manual PROTECT-PSC V 2.6R01 / 04.19... -
Page 266: Declarations Of Conformity
Annex Declarations of conformity Instruction Manual PROTECT-PSC V 2.6R01 / 04.19... -
Page 267: Index
Annex Index Instruction Manual PROTECT-PSC V 2.6R01 / 04.19...
Need help?
Do you have a question about the PROTECT-PSC and is the answer not in the manual?
Questions and answers