
Related Manuals for Gecko Compact

Summary of Contents for Gecko Compact
- Page 1 Gecko Seismographs, Accelerographs Recorders, Vibration Monitors For all models: Compact, Rugged, Blast, Tremor, Prism, SMA & SMA-HR 141 Palmer Street, Richmond VIC 3121 Australia T:+61 3 8420 8940 sales@src.com.au...
- Page 2 In the Gecko, we have simplified the modern digital seismograph. The low cost of flash memory means you can save weeks, months, even years of continuous data on a single memory card.
-
Page 3: Table Of Contents
Table of Contents Getting Started ................1 Setting up your recorder ..................1 The User Interface ..................... 2 Menu Map ......................3 The Home Screen ................4 Status Screen Loop – Right Button ..............4 Realtime Data Loop – Up Button ................. 5 Vector Sum ....................... - Page 4 Ports & Wiring ................24 Power connector ....................24 Alarm & Communications port ................25 4D Sensor port (2018 Compact & Rugged) ............25 1D Sensor port (mid-2019 Blast & SMA) ............25 Technical Specifications ..............26 Register your Gecko ............... 29 Warranty ..................
-
Page 5: Getting Started
GPS socket until finger-tight. The Gecko Compact and Rugged is supplied with a sensor plug which you can attach to your sensor cable. You can find the wiring diagram at the end of this manual. Align the keyed plug with the socket and push it on, locking it in place with the bayonet-style collar. -
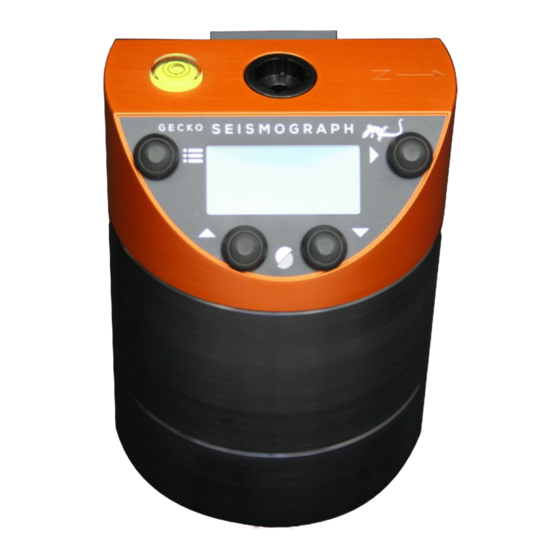
Page 6: The User Interface
The User Interface The Gecko does not require a computer to control it. All recorder settings are accessible through the LCD and are modified using the four control buttons. Gecko Compact (above) S E I S M O G R A P H... -
Page 7: Menu Map
Depending on the model of Gecko and your current configuration, some menu items may be hidden from view. For example, if you have a Gecko with an internal 3D sensor, the 3D sensor menu will not be accessible as users should not change the sensor configuration. Older model 3-channel Gecko recorders will not show the 1D sensor menu, and if your chosen sensor does not have a calibration duration, the Start Calibration option is hidden. -
Page 8: The Home Screen
“O” is the 4 channel on some Gecko models, and “+” is the vector sum of channels ENZ. The “Storing” word animates using q down arrows to indicate packets of data are being written to the SD card. The “Sending” word animates using p up arrows to indicate packets of data are being streamed to a remote computer. -
Page 9: Realtime Data Loop - Up Button
PEIS: its peak (max) value is also held. If you have a 3-channel recorder with an accelerometer connected (or have a Gecko SMA variant) this screen will display an estimate of the Modified Mercalli Intensity (MMI) and Philippine Earthquake Intensity Scale (PEIS) value based on the maximum displayed acceleration. -
Page 10: The Main Menu
The Main Menu Pressing the Menu button from the home screen will show you a list of actions and settings for managing your recorder. The main menu includes some or all of the following items: Main Menu Unmount SD card >... -
Page 11: Data Storage
SD cards can be used in the Gecko if they are pre-formatted as FAT (not exFAT). To remove the card from a Gecko Compact 3ch (above, left) slide open the SD card cover and press in the SD card to eject it. The SD card faces up, and it cannot be inserted upside- down. -
Page 12: Station Code
This station code (default is GECKO) can be up to 5 characters long and can only contain uppercase letters and numbers. If you wish to use less than 5 characters, end the code with blank space character. -
Page 13: Sample Rate
Band Code, the second letter indicates the Instrument Code, and the third letter is the Orientation Code. Detailed information on this standard can be found here: https://ds.iris.edu/ds/nodes/dmc/data/formats/seed-channel-naming/ The Gecko will set the first letter of the channel name based on the sample rate: • B: 50 sps •... -
Page 14: Channels To Store
Channels to Store You can turn off any unused channels to save storage space. Storing the vector sum is a waste of space if you are already storing ENZ. Toggle the channels on or off as required. Save Continuous Data Channel E: On >... -
Page 15: Sensor Setup
Sensor Setup This section of the user manual applies to Gecko Compact, Rugged, Blast and SMA models only. For all other models, skip ahead to the Input Amplifier section. 3D Sensor > Select a Sensor Sensor Serial No. Mass Lock... - Page 16 Sensitivity can be set per channel, which indicates how Cal Enable many Volts-per-unit your sensor outputs, e.g. 750V/m/s for Cal Type a Nanometrics Trillium Compact velocity sensor. Note that Cal Duration Acceleration units will be saved as V/m/s in accordance with...
- Page 17 +2.5V to +12V DC. As the sensor moves, the voltage output moves up or down from this DC offset by up half of the sensor’s range. The Gecko can remove a number of counts from the signal after digitisation, but half of the -20V to +20V input range of the Gecko is wasted.
-
Page 18: 1D Sensor
1D Sensor If you have a 4-channel Gecko Compact, Rugged, Blast or SMA, you can set up your 1D sensor in a similar way to the 3D sensor. Select a sensor from the list and optionally re- enter the menu to customise its name, units and sensitivity. -
Page 19: Trigger & Alarm
System Alerts The Gecko logs the trigger time to a text file that can be used to help you find the data in the continuous archive. This “trig.txt” file is located in the top level folder of the SD card. -
Page 20: Level Triggering
Level Triggering By default each Level trigger process is OFF, but simply toggle this using the Right button. The Gecko can trigger on the vector sum of the 3D sensor Level Triggering channels, or from the 1D sensor channel. The percentage... -
Page 21: Alarm Outputs
Alarm #1 is activated, and to pin 5 for Alarm #2, for the alarm duration. By default the Gecko’s positive power is hard-wired to pin 6, but on request we can modify the hardware to make pin 6 a user input line that switches to the Alarm outputs. If this modification is done, the switching circuit is rated to 0.13A at 50VAC or 50VDC, but we can... -
Page 22: On-Screen Alerts
(e.g. voltage returns to normal) and then becomes true again. The Gecko uses a data ring buffer, which means it will overwrite old data with new data when the memory card has only 5% storage remaining. A Low Memory alert will be raised when less than 4% of storage remains to indicate an issue with the memory card. -
Page 23: Mode
The data reception software (Streams or eqServer) can request additional pre-trigger data in 1-minute blocks. When telemetry mode is set to Off the Gecko will not attempt to start a serial connection. Device This setting defines the type of communication device connected to the Gecko’s communication port. -
Page 24: Settings File
Settings File You can save the configuration of your Gecko to a text file. Simply enter the “Settings File” menu located at the bottom of the main menu. Configuration File > Load Settings Save Settings Use the Right button to select the action. When saved, a file called “user-settings.dat” is written to the top level folder of the SD card. -
Page 25: Data Storage And Formats
Data Storage and Formats The Gecko stores continuous data to the SD card in a logical file hierarchy to make it easy to find the data you’re looking for, but it also stores some additional files that you may find useful. -
Page 26: The Root Directory
• settings.ss: also a text file, containing all of the current configuration settings of the Gecko. It is updated each time the user changes a setting. • user-settings.dat: the current configuration of the Gecko as written by the Load/Save Settings function described earlier •... -
Page 27: The Histogram Folder
(both 3D and 2D) can be calculated accurately using Waves analysis software. MiniSEED files Continuous data files in the Gecko are in MiniSEED format, which is a widely adopted international standard format for seismic data. You can find out more about this data format at the IRIS website: http://ds.iris.edu/ds/nodes/dmc/data/formats/miniseed/... -
Page 28: Upgrading The Gecko Firmware
After the upgrade the Rasbora.bin file remains in the root folder of the SD card so that the card can be used to upgrade other Gecko recorders, but it can be deleted from the folder at any time with no adverse effect on the Gecko. -
Page 29: Alarm & Communications Port
4D Sensor port (2018 Compact & Rugged) At left is a diagram of the pin connections of the Gecko sensor port. Looking at the wire- connection side of the supplied cable plug shows the same pin configuration. The function of each pin is listed in the table below the drawing. -
Page 30: Technical Specifications
Frequency Response: Flat from DC to ~40% of sampling frequency *Nominal ‡See our website to download the Gecko Data Sheet for full technical specifications for each model Sampling and Linear Phase Filter Stages & Coefficients – v6.0 Previous Gecko firmware used more complicated up-sampling, decimation and a longer string of FIR filter coefficients. - Page 31 293,598 61,387 0.00001095059115991730000 -987,253 -7,546 0.00001495153056602200000 -2,635,779 -94,192 0.00001554058162443490000 -3,860,322 -50,629 0.00001081891042865500000 -3,572,512 101,135 -0.00000000000000000004001 -822,573 134,826 -0.00001580512492376050000 4,669,054 -56,626 -0.00003319363390704570000 12,153,698 -220,104 -0.00004677045374321930000 19,911,100 -56,082 -0.00005029559253232650000 25,779,390 263,758 -0.00003857339773325600000 27,966,862 231,231 -0.00000966761663961678000 25,779,390 -215,231 0.00003323611331701340000 19,911,100 -430,178 0.00008110107793338530000 12,153,698 34,715 0.00012007920150710400000 4,669,054...
- Page 32 -56,082 -0.03274886500402540000000 -220,104 -0.02926059068925200000000 -56,626 -0.01615265169801810000000 134,826 0.00647707854304404000000 101,135 0.03674466224589480000000 -50,629 0.07117017594324820000000 -94,192 0.10520264160947700000000 -7,546 0.13398842403341400000000 61,387 0.15323542846129300000000 33,460 0.16000000000000000000000 -25,549 0.15323542846129300000000 -34,123 0.13398842403341400000000 0.10520264160947700000000 22,008 0.07117017594324820000000 10,620 0.03674466224589480000000 -8,280 0.00647707854304404000000 -10,663 -0.01615265169801810000000 -266 -0.02926059068925200000000 7,419 -0.03274886500402540000000 6,692 -0.02814320041177570000000 2,481 -0.01813436383850230000000 -0.00593811284091275000000 -432...
-
Page 33: Register Your Gecko
0.00000015049773405261000 0.00000003927395595069500 -0.00000000603039587567231 Register your Gecko We highly recommend registering your Gecko with us so that we can add you to our product update notification list. Simply email sales@src.com.au with your Gecko serial number and we will notify you when Gecko firmware updates and Waves or Streams software updates are available –... -
Page 34: Warranty
Warranty Seismic equipment manufactured by ESS Earth Sciences is warranted to the original purchaser only, to be free of defects in material and workmanship at the time of shipment and for a period of one year from the delivery date. This warranty applies to equipment purchased from ESS Earth Sciences that has been properly installed and operated, but not to equipment which has been subject to neglect, accident, improper installation, misuse, misapplication, abuse or alteration. -
Page 35: Installing The Gecko Blast Or Sma
Appendix A Installing the Gecko Blast or SMA The Gecko Blast and SMA are designed to measure large vibrations. You can simply sit them on a surface to measure ground motion, but we recommend you bolt the sensors down. To install the Blast in soft soil, screw the three included spikes into the holes in the base, which may require you to unscrew the standard adjustable feet. -
Page 36: Gains, Range And Clip Levels
Loosen the upper locking nuts on the adjustable feet and screw the feet in or out until the bubble on top of the Gecko is centred indicating that the chassis is level. Screw the locking nuts up to the base of the Gecko so that the feet can no longer be adjusted. -
Page 37: Installing The Gecko Pro-Bodied Sensors
Installing the Gecko Pro-bodied sensors To secure install a Gecko SMA-HR, Tremor or Prism you’ll need a hammer drill, a hammer, and the included installation kit. Using the supplied 10mm masonry bit and your hammer drill, make a vertical hole for the drop-in anchor. - Page 38 Loosen the upper locking nuts on the two adjustable feet and screw the feet in or out until the bubble on top of the Gecko is centred indicating that the chassis is level. Screw the locking nuts up to the base of the Gecko so that the feet can no longer be adjusted.
-
Page 39: Calibrating A Gecko Sma-Hr
Calibrating a Gecko SMA-HR The Gecko SMA-HR has an in-built calibration procedure whereby the processor sends a 5Hz sine wave of 1V amplitude to excite the sensor components. By comparing the sensor response over time you can check that your sensor is still within specification. -
Page 40: Checking Prism Operation
Checking Prism Operation After powering up your Prism, from the Home Screen it is recommended that you press the Up button twice to view the signal values to check that the sensor starts up correctly. About 20 seconds after power is applied, the Prism sensor will start up, one channel at a time: East, North, then Up. -
Page 41: Internal Battery
Low Voltage Disconnect (LVD) circuit is enabled to cut power to the Gecko if the battery voltage drops too low. The battery pack is expected to run Gecko sensor models for several hours, with backup time depending on Gecko model and the state of battery charge when AC power is disconnected. -
Page 42: Charge Regulator
Charge Regulator Rechargeable Nickel Metal Hydride (NiMH) batteries require a particular power delivery cycle for optimum charging and battery life. An unregulated power supply can provide a NiMH battery pack with charge, but without proper regulation the battery can become damaged from over-charging or over-heating. -
Page 43: Usr-W610 Ethernet & Wifi Adaptor
Live Stream application or to our cloud-based eqServer data management system. To do this you will need serial-to-Ethernet/WiFi adaptor. This adaptor is simple to configure and is included in the optional Gecko accessory that provide Power, Alarm & Communications in wall mountable box. - Page 44 Do not change Ethernet port function (2F) as you should have it enabled and acting as a LAN port connection. Do not change the serial port setup (3F) as the device is preconfigured to match the Gecko serial port settings. If you reset the W610 to factory defaults, you will need to change the...
-
Page 45: Troubleshooting
The most common issue related to data telemetry is caused by firewalls blocking the port used by the Gecko for data telemetry. This can be resolved by setting a rule that allows port 58772 through your firewall, or by turning off your firewall. Please consult your IT Administrator for assistance with firwall configuration if needed. -
Page 46: Ntc 221 4G Modem & Ethernet Router
Live Stream or eqServer, followed by a colon and the default Gecko port connection number, e.g. hub.kelunji.net:58772 If you wish to change the IP address of the NTC or use the additional networking and security features, the menu names should be recognisable to those familiar with network settings. - Page 47 GECKO SEISMOGRAPHS & ACCELEROGRAPHS Digitisers To Record Any Brand Of Sensor COMPACT RUGGED Low Cost Portable Velocity and Acceleration Vibration Monitors BLAST & SMA Professional Earthquake Seismographs Accelerographs src.com.au SMA-HR, TREMOR & PRISM...
Need help?
Do you have a question about the Compact and is the answer not in the manual?
Questions and answers