Table of Contents
Advertisement
Advertisement
Table of Contents

Related Manuals for Sandstrom SDABXCR13


Summary of Contents for Sandstrom SDABXCR13
- Page 1 Instruction Manual DAB Clock Radio SDABXCR13...
-
Page 2: Table Of Contents
Contents Safety Warnings ................4 Introduction ................. 7 Unpacking ..................8 Controls and Connections ............9 Front View .........................9 Rear View ....................... 10 Getting Started ................11 ....................11 Aerial Cable Mains Power ......................12 Switching on for the First Time ..........13 Switching On ...................... - Page 3 Contents ..............Organising the Station Order FM Reception ................28 Tuning an FM Station ..................28 Manual and Auto Tuning.................. 28 Scan Option All (DX) or Strong (Local) Stations ......29 Stereo and Mono ....................30 Choosing and Recalling a Preset Station ............ 30 FM Options in the Menu ............
-
Page 4: Safety Warnings
Safety Warnings • Read all the instructions carefully before using the unit and keep them for future reference. • Retain the manual. If you pass the unit onto a third party make sure to include this manual. • Check that the voltage marked on the rating label matches your mains voltage. - Page 5 Safety Warnings Ventilation • To prevent the risk of electric shock or fire hazard due to overheating, ensure that curtains and other materials do not obstruct the ventilation vents. • Do not install or place this unit in a bookcase, built-in cabinet or in another confined space.
- Page 6 Safety Warnings CAUTION RISK OF ELECTRIC SHOCK DO NOT OPEN The lightning flash with arrowhead symbol, within an equilateral triangle, is intended to alert the user to the presence of uninsulated “dangerous voltage” within the unit’s enclosure that may be of sufficient magnitude to constitute a risk of electric shock.
-
Page 7: Introduction
Introduction Features • Your radio features both DAB and DAB+ reception and an FM band for areas that may not have DAB broadcasts. • Two alarms with independent settings are available. • The display brightness can be altered or even switched off to suit your personal taste. -
Page 8: Unpacking
Unpacking • Remove all packaging from the unit. • Retain the packaging. If you dispose of it please do so according to local regulations. • These items are included: • DAB/FM Clock Radio • AC Adaptor DAB/FM Clock Radio AC Adaptor Page 8... -
Page 9: Controls And Connections
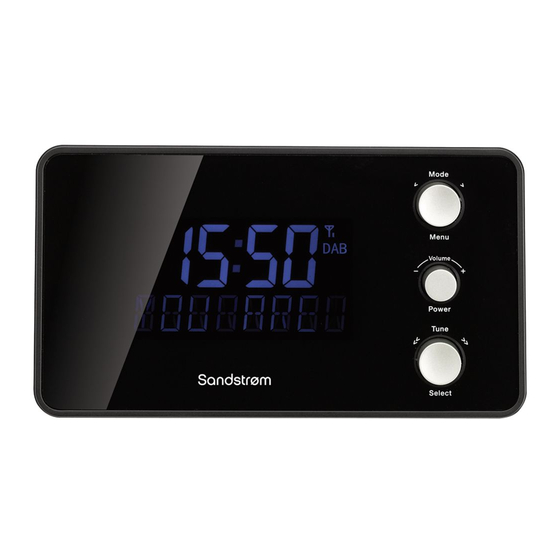
Controls and Connections - Front View STANDBY 1. MODE/MENU Control Rotate to select DAB/FM mode. Press to display the menu. 2. VOLUME/STANDBY Control Rotate to alter the volume. Press to switch the radio on and off. 3. DISPLAY SCREEN 4. TUNE/SELECT Control Rotate to tune a station/select a menu item. -
Page 10: Rear View
Controls and Connections - Rear View 5. SNOOZE/DIMMER Button When the alarm comes on: Press to delay the alarm (SNOOZE mode). When the radio is playing or in Standby: Press to alter screen brightness (high/low) 6. 6V DC Power input 7. -
Page 11: Getting Started
Getting Started Aerial Cable Unwrap and fully extend the aerial cable to its full length. When you first tune the radio you may need to change the aerial’s position to get the best results. After tuning, if you wish you can fix the aerial’s position by securing the loop at the end of the cable with a suitable fixing. -
Page 12: Mains Power
Getting Started Mains Power This unit is designed only to operate with the supplied AC adapter. Connecting the radio to any other power source may damage it. • Unwind the AC adapter cable to its full length. • Connect the plug at the end of the cable to the DC: 6V socket on the back of the radio. -
Page 13: Switching On For The First Time
Switching on for the First Time Switching On • Press VOLUME/STANDBY control to activate the radio. • Press again to switch the radio off and put it into Standby mode. STANDBY STANDBY WARNING- SNOOZE/DIMMER BUTTON If you accidentally press the SNOOZE/ DIMMER button before you first activate the radio (or immediately after a Factory Reset), you will see this... -
Page 14: Initial Scan
Switching On For The First Time Initial Scan When your radio is switched on from Standby for the first time it will scan the DAB band, searching for usable stations. These will be stored alpha-numerically. The initial scan will take a few minutes. During the scan the scan progress will be shown on a bargraph and the number of stations found will be displayed. -
Page 15: Altering The Screen Brightness
Altering the Screen Brightness • Press the SNOOZE/DIMMER button to scroll the screen brightness HIGH/LOW. • You can alter the screen brightness whether the radio is operational or in standby mode. Page 15... -
Page 16: Basic Operation
Basic Operation Mode Select • Turning the MODE/MENU control switches the radio between DAB and FM modes. 1. Switch the radio to DAB mode. The radio will tune to the last station played. The station name will be briefly displayed followed by the station information. STANDBY The volume level will display briefly at the bottom of the screen. -
Page 17: Secondary Services
Basic Operation Secondary Services An X symbol after a station name indicates secondary services are available. These secondary services are related to the primary station and are inserted directly after the primary station in the station list. Turn the TUNE/SELECT dial until you find the service you want, then press the dial to select it. -
Page 18: Presetting And Recalling A Station
Presetting and Recalling a Station You can store up to 10 of your favourite stations as presets. • Presetting a Station Tune to the station you want to save. Press MODE/MENU. • The display will show “RECALL” Rotate TUNE/SELECT one turn to the right to display “STORE”. STANDBY STANDBY Press TUNE/SELECT to confirm. -
Page 19: Recalling A Preset
Presetting and Recalling a Station Press TUNE/SELECT to store the station in the preset location. STANDBY You can store a station in any preset location. If a station is stored in a preset location, selecting this location and pressing TUNE/SELECT will over-write the location with the new station. Recalling a Preset 1. -
Page 20: Displaying A Station Name
Displaying a Station Name The default operating mode shows only station information in a scrolling line below the time display. Nowhere does the station name display. To display the Station Name: (also see Page 26) • Rotate TUNE/SELECT one stop to the right. The station will briefly show before the display reverts to the previous state. -
Page 21: Dab Options In The Menu
DAB Options in the Menu This menu tree shows your options when playing a DAB station. The left column shows the main menu options, the boxes to the right of each main option show the choices available. Some menus require a procedure to execute the choice. RECALL Recall a preset STORE... -
Page 22: Menu Navigation
Menu Navigation PROCEDURE 1. Press the MODE/MENU control to enter the main menu. 2. Rotate the TUNE/SELECT control to select a main menu option (these are the boxes on the left). 3. Press the TUNE/SELECT control to confirm and enter the menu option. -
Page 23: Full Scan
DAB Mode Menu Functions These functions are only available in DAB mode. Full scan You can perform a full scan at any time to scan for new DAB stations. The stations will be added to your station list. • Press MODE/MENU. The display will show “RECALL” • Rotate TUNE/SELECT until the word “FULL SCAN”... -
Page 24: Prune
DAB Mode Menu Functions Prune The Prune function enables you to delete all unavailable stations from the Station List. This may be necessary if you move to another area and some stations in the Station List are no longer available. To Prune The Station List: 1. -
Page 25: Altering The Display Mode
DAB Mode Menu Functions Altering the Display Mode This function alters what is displayed on the bottom line of the screen. Some display modes depend on what the station broadcasts — different stations display different information. 1. Press MODE/MENU. The display will show “RECALL” 2. - Page 26 DAB Mode Menu Functions ENSEMBLE: Every DAB radio station is part of an ensemble or cluster of stations. The BBC has its own ensemble, there are commercial radio ensembles and so on. This option tells you what ensemble the tuned station is part of. FREQUENCY: This option displays the frequency of the station.
-
Page 27: Organising The Station Order
DAB Mode Menu Functions Organising the Station Order This function alters the order in which the stations display. The default display order is Alphanumeric. An alternative method is to order the stations by ensemble. This keeps together all the stations in one ensemble or cluster regardless of the station name. -
Page 28: Fm Reception
FM Reception Tuning an FM Station • Turn MODE/MENU to switch the radio to FM mode. The radio will tune to the last station played. The station details will briefly appear and then scrolling information text will be displayed if available. Manual and Auto Tuning • Manual Tuning: Turn the TUNE/SELECT control to tune the radio in steps of 50kHz. -
Page 29: Scan Option All (Dx) Or Strong (Local) Stations
FM Reception Scan Option All (DX) or Strong (Local) Stations You can set your unit so it searches for all of the radio stations or just the strongest stations. 1. Press MODE/MENU. The display will show “RECALL” 2. Rotate TUNE/SELECT until the word “SCAN” displays. 3. -
Page 30: Stereo And Mono
FM Reception Stereo and Mono By default FM reception is set to Stereo. In this mode some stations may be noisy. To improve the noise level, select ‘Mono’ . 1. Press MODE/MENU. The display will show “RECALL” 2. Rotate TUNE/SELECT until the word “AUDIO” displays. 3. -
Page 31: Fm Options In The Menu
FM Options in the Menu This menu tree shows your options when playing FM stations. The left column shows the main menu options, the boxes to the right of each main option show the choices available. Some menus require a procedure to execute the choice. RECALL Recall a preset STORE... -
Page 32: Altering The Display Mode
Displaying a Station Name Altering the Display Mode This function alters what is displayed on the bottom line of the screen. Some display modes depend on what the station broadcasts — different stations display different information. • Press MODE/MENU. The display will show “RECALL” • Rotate TUNE/SELECT until the word “DISPLAY”... -
Page 33: Product Settings
Product Settings This menu tree shows your options when configuring the radio. These menus are available in both DAB and FM modes. • Setting procedures are described on the next pages. SLEEP min. min. min. min. min. Set Sleep Time ALARM Set Alarm 1 Set Alarm 2... -
Page 34: Sleep Mode
Sleep Mode Sleep This function allows you to programme the unit to switch to standby mode by itself after a set time. • Select the ‘Sleep’ option from the menu. • Press TUNE/SELECT to confirm. The sleep time display will open. Turn the TUNE/SELECT dial to select the Sleep time you want. -
Page 35: Setting The Alarm
Setting the Alarm Your radio includes dual alarms. You can set either or both to wake you at set times. Alarm settings cannot be changed when the unit is in Standby. Setting the Alarm: • Select the ‘Alarm’ option from the menu. • Press TUNE/SELECT to confirm. - Page 36 Setting the Alarm The Alarm Source screen will display. • Turn the TUNE/SELECT dial to set the source. You can choose between “Buzzer”, “DAB” or “FM” • Press the TUNE/SELECT dial to confirm. If you select ‘Buzzer’ the ‘Alarm Repeat’ screen displays.
- Page 37 Setting the Alarm Selecting the Alarm Source- DAB or FM Selecting DAB or FM as the alarm source deploys the Preset screen. • Turn the TUNE/SELECT dial to set the preset station that will play when the alarm sounds. Choose any saved preset or select ‘Last’ to play the last station you were playing.
-
Page 38: Activating The Alarm
Activating and Disabling the Alarm Activating the Alarm • Press VOLUME/STANDBY (or use the Sleep STANDBY function) before you go to sleep. If the radio is on when the alarm operates, it will override your radio programme. When the alarm sounds you can: 1. -
Page 39: Setting The Time And Date
Setting the Time and Date The Time function enables you to change the time and date settings for your radio. • Select the ‘Time’ option from the menu. • Select one of the four sub-options - 1. Set 12/24 hour clock. 2. - Page 40 Setting the Time and Date STANDBY Set Update: • Select UPDATE. • Press TUNE/SELECT to enter the menu. • Select DAB/FM/AUTO CLK to enable updates of time/date from radio stations. • Select NONE to disable all updates. The internal clock of the radio will now control the time/date.
-
Page 41: Other Menu Options
Other Menu Options Language This setting changes the language used for the display menus. • Select the ‘Language’ option from the menu. • Choose one of the languages available. • Press TUNE/SELECT to confirm. Factory Reset The Factory Reset function will delete all station lists, radio presets and alarm settings. -
Page 42: Earphone Listening
Earphone Listening • Turn down the volume before connecting your earphones. • Connect your earphones to the socket on the back panel. • To listen, slowly raise the volume with the earphones on. When earphones are connected, the speaker is automatically muted. Long-term exposure to loud music may cause hearing damage. -
Page 43: Maintenance
Maintenance Cleaning the radio • To clean the unit, wipe the case with a slightly moist, lint-free cloth. • Do not use any cleaning fluids containing alcohol, ammonia or abrasives. • Do not spray an aerosol at or near the unit. Ensure the unit is fully unplugged from the mains socket before cleaning. -
Page 44: Specifications
Specifications Main Unit Model SDABXCR13 Power consumption FM: 87.5-108 MHz Radio frequency range DAB: 174.928 – 239.200 MHz Weight 0.4 kg Dimensions 172mm W x 67mm D x 95mm H Mains Adapter Model GPE003W-060050-3 Manufacturer Golden Profit Electronics Ltd. Input: 100-240V~50/60Hz 0.1A Power Supply Output: 6.0V... - Page 48 Calls charged at National authority, or where you purchased Rate. your product. All trademarks are the property of their respective owners and all rights are acknowledged. DSG Retail Ltd. (co. no. 504877) 1 Portal Way, London, W3 6RS, UK IB-SDABXCR13-160929-V4...
Need help?
Do you have a question about the SDABXCR13 and is the answer not in the manual?
Questions and answers