Table of Contents
Advertisement
Quick Links
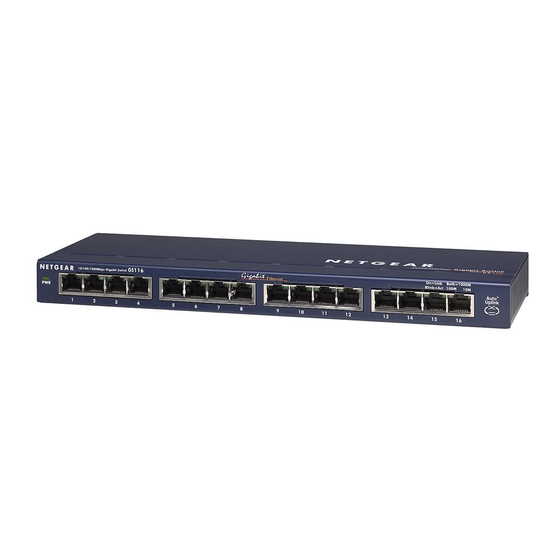
NETGEAR 16-port Gigabit Switch Model GS116v2
Start Here
Estimated Installation Time: 5–10 minutes
Unpack the Box and Verify the Contents
When you open the box, verify that you received everything. The package includes:
•
NETGEAR 16-port Gigabit Switch Model GS116v2
•
AC power adapter
•
Wall-mounting screws
•
GS116v2 Installation Guide (this document)
•
Warranty/support information card
If you do not have everything listed above, see the support information card for contact
information. If you are missing the support information card, get contact information at
http://www.NETGEAR.com in the Technical Support section.
Prepare to Install the Switch
Decide where you want to place the switch. Find a flat horizontal surface such as a table,
desk or shelf. The switch comes with wall-mounting screws. You can use the screws if you
want to hang the switch in an open space on a wall. Make sure the selected location is:
•
Not in direct sunlight or near a heater or heating vent.
•
Not cluttered or crowded. There should be at least 2 inches (5 cm) of clear space on
all sides of the switch.
•
Well ventilated (especially if it is in a closet).
Also, you will need one Category 5e (Cat 5e) Ethernet cable with RJ-45 connectors for
each device you want to connect to the switch. Each Ethernet cable must be less than 328
feet (100 meters).
Install the Switch and Connect the
Other Devices
1.
Place the switch on a flat surface or hook onto the screws.
2.
For each device, insert one end of an Ethernet cable into the port in the device and
insert the other end into one of the Ethernet ports on the switch.
3.
Connect the power adapter cord into the back of the switch and then plug the adapter
into a power source (such as a wall socket or power strip).
The Power light should light up.
Power
4.
Check the LEDs to confirm that all connections are correct.
LED
Activity
Power
• On: 16-port Gigabit Switch has power.
• Off: No power.
RJ-45 ports
• Right LED on: 10 Mbps connection to a powered device.
• Left LED on: 100 Mbps connection to a powered device.
• Both LEDs on: 1000 Mbps connection to a powered device.
• Blink: Activity on this port.
5.
Technical Specifications
Standards compatibility IEEE 802.3i 10BASE-T Ethernet, IEEE 802.3u 100BASE-TX
Fast Ethernet, IEEE 802.3ab 1000BASE-T Gigabit Ethernet,
IEEE 802.3x Flow Control, IEEE 802.1p and TOS priority, WRR
queuing with four queues
Network interface
RJ-45 connector for 10BASE-T, 100BASE-TX, or
1000BASE-T Ethernet interface
Power Adapter
18W max and 12V @ 1.5A DC input
Power Consumption
9.6W max
Weight
1.08 Kg (2.38 lbs)
Dimensions
285 mm x 103 mm x 27 mm
(W x D x H)
11.22 in x 4.06 in x 1.06 in
Operating temperature 0 to 50° C (32 to 122° F)
Operating humidity
10% t0 90% relative humidity, non-condensing
Electromagnetic
CE Class A, included EN55022 (CISPR 22) and EN55024,
compliance
FCC part 15 Class A, VCCI Class A, C-Tick Class A
Power adapter safety
CE mark, Commercial UL listed (UL 60950-1), C-Tick
agency approvals
6. 7.
Performance Specifications
Frame filter rate
14,880 frames/sec max for 10M port; 148,800 frames/sec max
for 100M port; 1,488,000 frames/sec max for 1000M port
Frame forward rate
14,880 frames/sec max for 10M port; 148,800 frames/sec max
for 100M port; 1,488,000 frames/sec max for 1000M port
Network latency
100 Mbps to 100 Mbps: 10 µs max
(using 64-byte packets)
1000 Mbps to 1000 Mbps: 5 µs max
Address database size up to 8K MAC addresses
MAC Address Learning Automatically updated
Queue buffer
512 KB
Jumbo frame support
up to 16KB
NETGEAR Green
• Auto power-down mode saves energy when ports are unused
features
• Power-saving per port if the cable length is less than 32.8 feet
(10 meters)
Advertisement
Table of Contents

Related Manuals for NETGEAR GS116v2


Summary of Contents for NETGEAR GS116v2
- Page 1 Technical Specifications Other Devices Standards compatibility IEEE 802.3i 10BASE-T Ethernet, IEEE 802.3u 100BASE-TX NETGEAR 16-port Gigabit Switch Model GS116v2 Fast Ethernet, IEEE 802.3ab 1000BASE-T Gigabit Ethernet, Place the switch on a flat surface or hook onto the screws. IEEE 802.3x Flow Control, IEEE 802.1p and TOS priority, WRR...
- Page 2 © 2009 by NETGEAR, Inc. All rights reserved. NETGEAR and the NETGEAR logo are registered trademarks • Consult the dealer or an experienced radio/TV technician for help. of NETGEAR, Inc. in the United States and/or other countries. Other brand and product names are trademarks or EN 55 022 Declaration of Conformance registered trademarks of their respective holders.
Need help?
Do you have a question about the GS116v2 and is the answer not in the manual?
Questions and answers