Advertisement
Le invitamos a leer cuidadosamente este instructivo
antes de usar su aparato.
Read before use.
Lire avant l'utilisation.
Lea antes de usar.
For questions and other information:
hamiltonbeach.com
hamiltonbeach.ca
hamiltonbeach.com.mx
USA: 1.800.851.8900
Canada: 1.800.267.2826
México: 01 800 71 16 100
IMPORTANT SAFETY INSTRUCTIONS
When using electrical appliances, basic safety precautions
should always be followed to reduce the risk of fire, electric
shock, and/or injury to persons, including the following:
1. Read all instructions.
2. This appliance is not intended for use by persons
(including children) with reduced physical, sensory,
or mental capabilities, or lack of experience and
knowledge, unless they are closely supervised and
instructed concerning use of the appliance by a person
responsible for their safety.
3. Close supervision is necessary when any appliance is
used by or near children. Children should be supervised
to ensure that they do not play with the appliance.
4. Only use an iron for its intended use.
5. To avoid the risk of electric shock, do not immerse the
iron in water or other liquids.
6. Always turn the iron to OFF (O) before plugging or
unplugging the iron from the electrical outlet. Never pull
on the cord to disconnect the iron from the electrical
outlet; instead, grasp the plug and pull on the plug to
disconnect the iron.
7. Do not let the cord touch hot surfaces. Let the iron cool
completely before putting the iron away.
8. Always disconnect the iron from the electrical outlet
before filling the iron with water, emptying the water
from the iron, and when the iron is not in use.
9. Do not operate the iron with a damaged cord or in the
event the iron has been dropped or damaged or there
are visible signs of damage or it is leaking. To avoid the
risk of electric shock, do not disassemble the iron. Take
it to a qualified serviceman for examination and repair.
Incorrect assembly might result in a risk of electric shock
when the iron is used after reassembly.
10. The iron must be used and rested on a stable surface.
11. When placing the iron on its stand, ensure that the
surface on which the stand is placed is stable.
12. Do not leave the iron unattended while the iron is
connected or on an ironing board.
13. Burns can occur from touching hot metal parts, hot
water, or steam. Use caution when you turn a steam iron
upside down—there might be hot water in the reservoir.
14. To avoid a circuit overload, do not operate an iron on the
same circuit with another high-wattage appliance.
15. If an extension cord is absolutely necessary, a cord with
an ampere rating equal to or greater than the maximum
rating of the iron shall be used. A cord rated for less
amperage can result in a risk of fire or electric shock
due to overheating. Care shall be taken to arrange the
cord so that it cannot be pulled or be tripped over.
SAVE THESE INSTRUCTIONS
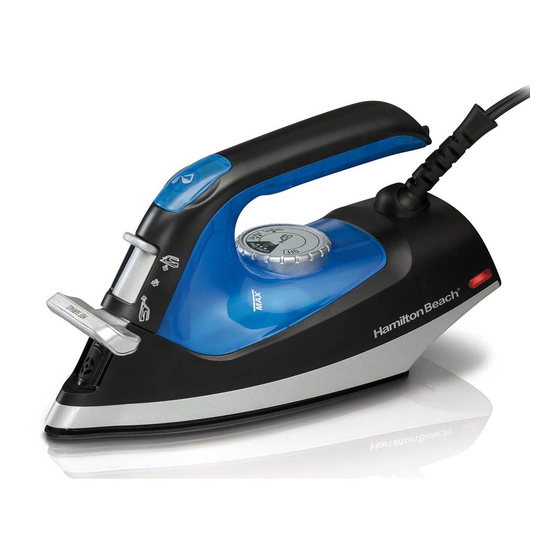
Parts and features
840237200
1. Steamer Nozzle
2. Steam Lever Control
(Steamer, Dry Iron,
or Steam Iron)
3. Water Fill Door
4. Swivel Power Cord
How to dry iron
1. Move steam lever to DRY IRON.
2. Turn Temperature Control Dial to desired
temperature. Allow 2 minutes to reach
temperature.
How to steam iron or garment steam
1. Start with iron unplugged. Open Water Fill Door; fill
water tank to MAX fill line. Plug into outlet.
2. To avoid water dripping from soleplate during STEAM
IRON, turn Temperature Control Dial to desired
temperature. Allow 2 minutes to reach temperature.
3. Select Steamer or Steam Iron by moving the Steam
Lever up or down.
4. To garment steam: Always use MAX temperature
for steaming. Move Steamer Lever to STEAMER.
Hang garment in a location that is not susceptible to
damage from heat or moisture. Do not hang in front of
wallpaper, a window, or mirror. Slowly move steamer
vertically from top to bottom of garment.
w CAUTION
Burn Hazard: Steam is hot. Always
point nozzle away from yourself and others. Never
steam clothes while they are being worn.
5. Move steam lever back to DRY IRON and wait until
steam stops.
6. Turn Temperature Control Dial to OFF (O). Unplug.
7. Empty water from iron. See "Care and cleaning."
WATER: Use ordinary tap water. If using extremely hard
water, alternate between tap water and distilled water.
Care and cleaning
1. Turn Temperature Control Dial to OFF (O). Unplug
and cool.
2. Empty water from iron; over sink, turn iron upside
down with water fill door open until all water runs out.
3. Store iron in upright position to avoid damaging
soleplate.
NOTICE: To avoid damage to soleplate:
• Never iron over zippers, pins, metal rivets, or snaps.
• Wipe with a soapy cloth to clean occasional buildup
on soleplate. Never use abrasive cleansers or metal
scouring pads, as they may scratch the surface.
• Always rotate cord to left or right for iron to store on
heel rest.
Limited warranty
This warranty applies to products purchased and used in the
U.S. and Canada. This is the only express warranty for this
product and is in lieu of any other warranty or condition.
This product is warranted to be free of defects in material
and workmanship for a period of five (5) years from the date
of original purchase in Canada and one (1) year from the
date of original purchase in the U.S. During this period, your
exclusive remedy is repair or replacement of this product or
any component found to be defective, at our option; however,
you are responsible for all costs associated with returning
the product to us and our returning a product or component
under this warranty to you. If the product or component is no
longer available, we will replace with a similar one of equal or
greater value.
This warranty does not cover glass, filters, wear from normal
use, use not in conformity with the printed directions, or
damage to the product resulting from accident, alteration,
abuse, or misuse. This warranty extends only to the original
consumer purchaser or gift recipient. Keep the original sales
receipt, as proof of purchase is required to make a warranty
claim. This warranty is void if the product is used for other
than single-family household use or subjected to any voltage
and waveform other than as specified on the rating label (e.g.,
120V ~ 60 Hz).
We exclude all claims for special, incidental, and consequential
damages caused by breach of express or implied warranty.
All liability is limited to the amount of the purchase price.
Every implied warranty, including any statutory warranty
or condition of merchantability or fitness for a particular
purpose, is disclaimed except to the extent prohibited by
law, in which case such warranty or condition is limited
to the duration of this written warranty. This warranty
gives you specific legal rights. You may have other legal
rights that vary depending on where you live. Some states or
provinces do not allow limitations on implied warranties or
special, incidental, or consequential damages, so the foregoing
limitations may not apply to you.
To make a warranty claim, do not return this appliance
to the store. Please call 1.800.851.8900 in the U.S. or
1.800.267.2826 in Canada or visit hamiltonbeach.com in the
U.S. or hamiltonbeach.ca in Canada. For faster service, locate
the model, type, and series numbers on your appliance.
12/15
MESURES DE SÉCURITÉ IMPORTANTES
5. Heel Rest
6. Power On Light
7. Temperature
Control Dial
Pour utiliser un appareil électroménager, vous devez toujours
8. Nonstick Soleplate
prendre des mesures élémentaires de sécurité pour réduire le
risque d'incendie, d'électrocution et/ou de blessure corporelle, en
particulier les mesures suivantes :
1. Lire toutes les instructions.
2. Cet appareil n'est pas destiné à être utilisé par des
personnes (y compris les enfants) dont les capacités
physiques, sensorielles ou mentales sont réduites, ou
manquant d'expérience et de connaissance, sauf si elles
sont étroitement surveillées et instruites sur l'utilisation de
l'appareil par une personne responsable de leur sécurité.
3. Une surveillance étroite est requise pour tout appareil utilisé
par ou près des enfants. Surveiller que les enfants ne jouent
pas avec l'appareil.
4. Utiliser le fer seulement pour sa fonction déterminée.
5. Pour protéger contre le risque de choc électrique, ne pas
submerger le fer dans l'eau ou autres liquides.
6. Le fer doit toujours être éteint (réglé à OFF/O) avant d'être
branché à une prise de courant ou débranché. Ne jamais
tirer le cordon pour le débrancher de la prise de courant;
saisir plutôt la fiche et la tirer pour la débrancher.
7. Ne pas laisser le cordon toucher les surfaces chaudes.
Laisser refroidir le fer complètement avant de le remiser.
8. Toujours débrancher le fer d'une prise de courant électrique
lorsqu'on le remplit d'eau ou lorsqu'on le vide, ou si
l'appareil n'est pas utilisé.
9. Ne pas faire fonctionner le fer avec un cordon endommagé
ou si le fer a été échappé ou endommagé. Pour éviter
le risque de choc électrique, ne pas démonter le fer. Le
faire examiner et réparer par un dépanneur qualifié. Un
réassemblage incorrect peut causer un risque de choc
électrique lorsque le fer est utilisé.
10. Le fer doit être utilisé et reposé sur une surface stable.
11. En plaçant le fer sur son support, assurez-vous que la
surface sur laquelle le support est placé est stable.
12. Ne pas laisser le fer sans surveillance pendant qu'il est
branché ou pendant qu'il est sur une planche à repasser.
13. Des brûlures peuvent survenir lorsqu'on touche des pièces
chaudes en métal, de l'eau chaude ou de la vapeur. Adopter
des précautions lorsqu'on tourne un fer à vapeur à l'envers,
car il peut rester de l'eau chaude dans le réservoir.
14. Pour éviter de surcharger un circuit, ne pas faire fonctionner
un autre appareil à haute tension sur le même circuit.
15. Si une rallonge électrique est absolument nécessaire, un
cordon d'intensité nominale égale ou supérieure à l'intensité
nominale maximale du fer doit être utilisé. Un cordon
d'une intensité nominale moindre peut entraîner un risque
d'incendie ou de choc électrique en raison d'une surchauffe.
Il faut prendre soin de placer le cordon de rallonge pour qu'il
ne puisse pas être tiré par des enfants ou faire trébucher.
CONSERVEZ CES INSTRUCTIONS
Pièces et caractéristiques
1. Buse du
vaporisateur
2. Levier de réglage
de la vapeur
(vaporisation,
repassage à sec
ou repassage à la
vapeur)
3. Accès pour
remplissage du
réservoir
Repassage à sec
1. Déplacer le levier de réglage sur DRY IRON (repassage à sec).
2. Tourner le cadran de commande de température au degré
désiré. Laisser chauffer pendant 2 minutes pour qu'il atteigne
la température.
Repassage à la vapeur et vaporisation des vêtements
1. Ne pas brancher le fer pour commencer. Ouvrir l'accès
au réservoir, remplir le réservoir d'eau jusqu'à la ligne de
remplissage MAX. Brancher le fer dans une prise murale.
2. Pour prévenir l'égouttement par la semelle pendant le repassage
à la vapeur (STEAM IRON), régler le cadran de commande de
température au degré désiré. Allouer 2 minutes pour atteindre la
température réglée.
3. Sélectionner Steamer (vaporisateur) ou Steam Iron (repassage à
la vapeur) en déplaçant le levier vers le haut ou le bas.
4. Pour la vaporisation des vêtements : Toujours utiliser la
température maximale (MAX) pour la vaporisation. Déplacer le
levier sur STEAMER (vaporisation). Suspendre le vêtement là où
la chaleur ou l'humidité n'endommageront rien aux alentours.
Ne pas suspendre le vêtement à proximité de papier peint, d'une
fenêtre ou d'un miroir. Déplacer lentement le jet de vaporisation
verticalement de haut en bas du vêtement.
w MISE EN GARDE
est très chaude. Veiller à toujours diriger la buse à l'écart de votre
personne et des autres. Ne jamais vaporiser des vêtements sur vous.
5. Replacer le levier sur DRY IRON (repassage à sec) et attendre que
la vapeur cesse de se produire.
4. Cordon
d'alimentation
pivotant
5. Talon d'appui
6. Témoin
d'alimentation
7. Cadran de
commande
de température
8. Semelle
antiadhésive
Risque de brûlure : La vapeur
Advertisement
Table of Contents

Related Manuals for Hamilton Beach 14525


Summary of Contents for Hamilton Beach 14525
- Page 1 MESURES DE SÉCURITÉ IMPORTANTES 1. Steamer Nozzle 5. Heel Rest 2. Steam Lever Control 6. Power On Light (Steamer, Dry Iron, 7. Temperature or Steam Iron) Control Dial Pour utiliser un appareil électroménager, vous devez toujours 3. Water Fill Door 8.
- Page 2 Tipo: Características Eléctricas: toda el agua. 7. Siempre gire la plancha a OFF (O/APAGADO) antes 14525 I101 120 V ~ 60 Hz 1200 W 3. Guarde la plancha en posición vertical y evite dañar la base de la misma. de enchufarla o desenchufarla del tomacorriente.
Need help?
Do you have a question about the 14525 and is the answer not in the manual?
Questions and answers