
Related Manuals for Kleinn Air Horns TJXTREME


Summary of Contents for Kleinn Air Horns TJXTREME
- Page 1 TJXTREME INSTALLATION MANUAL REV: A (5/8/2020) © Kleinn Air Horns 2020, All rights reserved. PO Box 91278 Tucson, AZ 85752 Phone: (520) 579-1531 Web: www.Kleinn.com...
- Page 2 TJXTREME Installation and Operation Manual This digital PDF is interactive. Please save ink and paper… Open interactive manual using Adobe Reader ® PC, MAC, and all smart devices Go to Table of Contents PG 2/36 REV: A (5/8/2020)
-
Page 3: Table Of Contents
TJXTREME Installation and Operation Manual Table of Contents LIST OF FIGURES .................................. 5 How to Use this Manual ..............................6 2.1. Interactive Manual using Adobe Reader ........................6 2.2. Your Kit SKU Number and this Manual........................6 2.3. Illustration/Photo Details and Orientation......................... 6 Safety First .................................. - Page 4 TJXTREME Installation and Operation Manual 9.1. Replace Driver Seat Rear Mounting Bolts ........................ 23 9.2. Drill Holes through Rear Passenger Floor ......................... 24 9.3. Install Ribbed Neck Carriage Bolts through Floor..................... 25 9.4. Install Air Tank Bracket (TJ-201) ..........................26 9.5.
-
Page 5: List Of Figures
Figure 2 – Driver View Showing Kit Location – Behind Frame/Body (2004 Sport Shown)............9 Figure 3 – Under Vehicle of Actual Kit Installed (1999 Sport with Aftermarket Exhaust & TJXTREME Shown) ......10 Figure 4 – Air Fittings installed on Air Tank (Top Exploded view, as shown resting on bench) ..........19 Figure 5 –... -
Page 6: How To Use This Manual
This manual covers installation, testing, and operation of following SKU part numbers 2.2.1. TJXTREME (i.e., 220 Train Horn with On-Board Air System) NOTE: Illustrations and pictures contained herein may represent only one kit part number. Where critical differences exist between kits (i.e., different parts, orientation, mounting points, etc.), additional text, or necessary graphics are provided to minimize confusion. -
Page 7: Safety First
TJXTREME Installation and Operation Manual 3. Safety First Read manual thoroughly before starting installation of this kit. Verify you have all parts listed and that you clearly understand this installation procedure. Contact Kleinn technical support for any questions. Installation of this kit requires moderate mechanical aptitude; seek professional help if you’re not competent using hand tools in tight uncomfortable spaces, and around possibly rusted and sharp vehicle parts. -
Page 8: Application Chart
4. Application Chart 4.1. Bolt-On Vehicle List TJXTREME is a partial bolt-on aftermarket product for Jeep vehicles listed in below chart; every effort has been made to verify correct fitment on these vehicles in their factory, non-modified conditions. MODEL YR... -
Page 9: Installation Overview
TJXTREME Installation and Operation Manual 5. Installation Overview 5.1. Kit Layout and System Location(s) TJXTREME consists of following components, located on vehicle, as follows: ITEM DESCRIPTION VEHICLE LOCATION MOUNTING APPROX. METHOD INSTALL TIME 6450RC Air Compressor Underbody, Driver Side Bracket bolts through... - Page 10 TJXTREME Installation and Operation Manual FRONT Figure 3 – Under Vehicle of Actual Kit Installed (1999 Sport with Aftermarket Exhaust & TJXTREME Shown) Go to Table of Contents PG 10/36 REV: A (5/8/2020)
-
Page 11: Install Process Outline
TJXTREME Installation and Operation Manual 5.2. Install Process Outline For person(s) with prior experience installing TJXTREME, a reminder of install steps are listed below: UNPACKAGE KIT (SECTION 1. Layout and organize all parts on bench BENCH ASSEMBLY (SECTION 2. Assemble Air Fittings to Air Tank 3. -
Page 12: List Of Tools And Supplies
TJXTREME Installation and Operation Manual 6. List of Tools and Supplies 6.1. Standard Tool List (Required) 6.1.1. Basic mechanic’s 3/8” drive socket sets with extensions • Inch Size Sockets (1/4” – 1” Hex) • Metric Size Sockets (6mm – 20mm Hex) 6.1.2. -
Page 13: Parts List
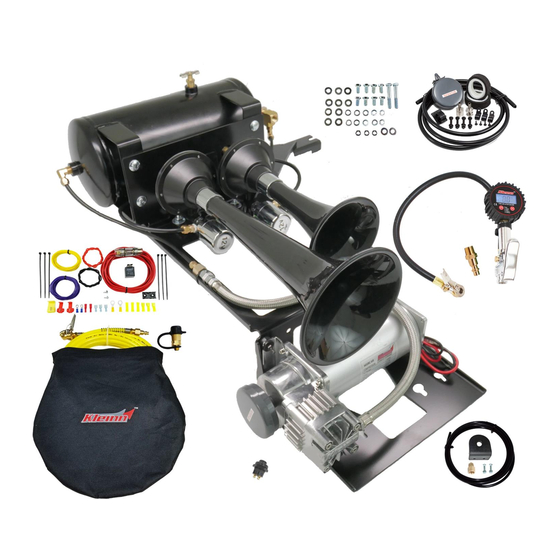
TJXTREME Installation and Operation Manual 7. Parts List 7.1. Before Starting, Review Parts List Unpackage and organize Kit across a large work area and verify all parts are included, as listed below. Contact Kleinn support if any questions arise. 7.1.1. Review pre-packaged Kit items (i.e., K1, K2, etc.) 7.1.2. -
Page 14: Air Fittings And Related Items
TJXTREME Installation and Operation Manual 7.3. Air Fittings and Related Items ITEM PART NUMBER DESCRIPTION PICTURE 2151 1/4" NPT PRESSURE SWITCH, 110- (view location on Air 150 PSI Tank) 52175 1/4" NPT, 175 PSI SAFETY VALVE (view location on Air... -
Page 15: Electrical Small Components And Related Items
TJXTREME Installation and Operation Manual ITEM PART NUMBER DESCRIPTION PICTURE 51414F 1/4" NPT X 1/4" TUBE FITTING, FEMALE STRAIGHT 25014-1 1/4" AIR TUBING, 12 FT. LONG KLEINN AIR HORN THREAD SEALENT FOR NPT JUICE FITTINGS 7.4. Electrical Small Components and Related Items... -
Page 16: Bolt-On Mounting Brackets & Special Hardware
TJXTREME Installation and Operation Manual 7.5. Bolt-On Mounting Brackets & Special Hardware ITEM PART NUMBER DESCRIPTION PICTURE TJ-001 COMPRESSOR BRACKET, DRILL GUIDE, CUT TJ-101 COMPRESSOR & HORN BRACKET, CUT, FORMED & WELDED TJ-201 TANK BRACKET, CUT, FORMED & WELDED 7.6. - Page 17 TJXTREME Installation and Operation Manual ITEM QTY. PART DESCRIPTION PICTURE NUMBER/SIZE M8-1.25 FLANGE LOCK NUT, CLASS 8, ZINC-PLATED ***USE ONLY WITH ITEM H4 5/16"-18 X 1.5" RIBBED NECK CARRIAGE BOLT, LONG GRADE 2, ZINC-PLATED 5/16"-18 FLANGE LOCK NUT, GRADE 2,...
-
Page 18: Add-On Accessories
TJXTREME Installation and Operation Manual 7.7. Add-On Accessories ITEM PART NUMBER DESCRIPTION PICTURE 1302 QUICK COUPLER MOUNT KIT - BRACKET, HARDWARE, FITTINGS, 1/4" X 15FT AIR TUBING INF-1 INFLATOR KIT – COIL AIR HOSE, QUICK CONNECT COUPLER/COVER, TIRE CHUCK, STORAGE BAG... -
Page 19: Bench Assembly
TJXTREME Installation and Operation Manual 8. Bench Assembly Complete following steps off vehicle to facilitate final installation. 8.1. Assemble Air Fittings to Air Tank 8.1.1. Gather all necessary Air Fittings and Air Tank; ensure all threads on fittings and inside ports are clean. -
Page 20: Assemble Air Compressor To Bracket (Tj-101)
TJXTREME Installation and Operation Manual 8.2. Assemble Air Compressor to Bracket (TJ-101) 8.2.1. Remove Compressor from packaging, included hardware, and air filter. 8.2.2. Pry-open plastic air filter housing and install foam filter inside. If desired, attached fittings for remote air filter; otherwise assemble air filter to end of Compressor (filter shown installed in figure below). -
Page 21: Disassemble Trumpets From Air Horn Drivers
TJXTREME Installation and Operation Manual 8.3. Disassemble Trumpets from Air Horn Drivers 8.3.1. Remove Air Horns and included Air T-Fitting from packaging; Air Tubing and Hardware are not used. 8.3.2. Disassemble Trumpets from Air Horn Drivers by firmly grasping Trumpet around Metal/Chrome Collar and twisting counter-clockwise, as shown below. -
Page 22: Connect Air Compressor Leader Hose
TJXTREME Installation and Operation Manual 8.5. Connect Air Compressor Leader Hose 8.5.1. Apply two small drops of Kleinn Air Horn Juice to male pipe thread on end of Compressor Leader Hose. 8.5.2. Attach Fitting #F8 to end of Leader Hose and hand tighten, then use wrench to further tighten 1/4-1/2 Turn. -
Page 23: On-Vehicle Mechanical Assembly
TJXTREME Installation and Operation Manual 9. On-Vehicle Mechanical Assembly Complete following steps on-vehicle using a lift, vehicle ramps, or other safe lifting method. 9.1. Replace Driver Seat Rear Mounting Bolts 9.1.1. Move Driver’s Seat fully rearward and lift forward using Rear Seat access latch. -
Page 24: Drill Holes Through Rear Passenger Floor
TJXTREME Installation and Operation Manual 9.2. Drill Holes through Rear Passenger Floor 9.2.1. Remove Passenger Rear Seat and any Carpet/Mats to gain access to Driver’s side Seat Striker Bracket. This is front most Bracket that seat pivots/rotates on. 9.2.2. Remove both OE Bolts holding Bracket to vehicle floor, place Guide Plate (TJ-001) over Bracket, then re- install Bolts and tighten snugly, as shown below. -
Page 25: Install Ribbed Neck Carriage Bolts Through Floor
TJXTREME Installation and Operation Manual 9.3. Install Ribbed Neck Carriage Bolts through Floor 9.3.1. Install Hardware #H7, H8 & H10 through rear floor, as shown below. It’s recommended to apply a liberal amount of RTV silicone to washer and bolt during install, in case vehicle is driven through water. -
Page 26: Install Air Tank Bracket (Tj-201)
TJXTREME Installation and Operation Manual 9.4. Install Air Tank Bracket (TJ-201) 9.4.1. Lift Air Tank Bracket (TJ-201) into place over upgraded Seat Bolts, as shown below. Use Hardware #H3 & and loosely tighten Nuts by hand; final tightening will occur later. Recommended to apply medium- strength Loctite to threads. -
Page 27: Install Horn & Compressor Sub-Assembly (Tj-101)
TJXTREME Installation and Operation Manual 9.5. Install Horn & Compressor Sub-Assembly (TJ-101) 9.5.1. Lift Horn and Compressor Sub-Assembly into place, by first inserting Flange Nuts from earlier step through Bracket key slot holes, then slide Bracket forward until contacting Tank Bracket. -
Page 28: Install Air Tank
TJXTREME Installation and Operation Manual 9.6. Install Air Tank 9.6.1. Insert Hardware #H9 into four (4) Tank Bracket slots, as shown below, then lift Air Tank into place over Bolts. Ensure Tank is oriented properly with Pressure Switch toward Transfer Case. -
Page 29: Final Trumpet Installation
TJXTREME Installation and Operation Manual 9.8. Final Trumpet Installation 9.8.1. Re-attach Trumpets to Air Horn Drivers, as shown below. Ensure Trumpets are firmly tightened by grasping Metal/Chrome Collar, as performed earlier. 9.8.2. Reposition Air Horn Drivers if needed to ensure at least 1/4” of space exists between them and vehicle, especially any moving parts such as Brake Cables, Lines, Wiring, etc. -
Page 30: On-Vehicle Electrical Installation
TJXTREME Installation and Operation Manual 10. On-Vehicle Electrical Installation CAUTION: Follow all recommended safety precautions for working on vehicle’s electrical system; consult vehicle owner’s manual for further instruction. 10.1. Relay and Fuse Diagram for Air Horn System PRESSURE AIR HORN... -
Page 31: Suggested Wire Routing For Air Horn System
Installation and Operation Manual 10.2. Suggested Wire Routing for Air Horn System FRONT Figure 21 – Suggested Wire Routing for Horn, Air Compressor, and Pressure Switch (TJXTREME Shown) 10.3. Disconnect Vehicle Battery(s) 10.3.1. Consult Owner’s Manual. 10.4. Connect Wiring to Fuse and Relay; route through Vehicle 10.4.1. -
Page 32: Install Horn Button
TJXTREME Installation and Operation Manual Fuse Relay Figure 22 – Relay and Fuse location example under hood (1999 Wrangler Sport 4.0L Shown) 10.4.2. Install supplied fuse holder on end of power wire by cutting the loop in fuse holder and connecting supplied Ring terminal to one end and Butt connector on other end. -
Page 33: Connect Pressure Switch
TJXTREME Installation and Operation Manual If your vehicle is equipped with factory upfitter (i.e., auxiliary) switches, you may elect to use them for your Kleinn Air Horn kit; consult Owner’s Manual, or dealership for further instructions on what wire terminals/fuse block location to use and programming required. -
Page 34: Final Steps & Testing Of Kit
TJXTREME Installation and Operation Manual without substantial hearing protection (i.e., > 11. Final Steps & Testing of Kit Ear Plugs and Ear Muffs) for all persons closer 11.1. Reconnect Vehicle Battery(s) than 100 feet from vehicle. Never operate train CAUTION: Before connecting vehicle battery(s),... -
Page 35: General Operation Of Kit
TJXTREME Installation and Operation Manual 13.1. Yearly, or every 12000 miles verify all 12. General Operation of Kit mounting fasteners are properly torqued; 12.1. Compressor Operation applying witness marks across fasteners and mounting parts is good practice to quickly WARNING: NEVER operate Air Compressor ensure fasteners have not moved. -
Page 36: Warranty Information
TJXTREME Installation and Operation Manual 14. Warranty Information Thank you for purchasing TJXTREME. Shall you experience any unexpected problems during installation or have problems with any part at any time please contact Kleinn support. End of Technical Manual © Kleinn Air Horns 2020, All rights reserved.
Need help?
Do you have a question about the TJXTREME and is the answer not in the manual?
Questions and answers