Clark Synthesis Aquasonic Diluvio AQ339 Installation Manual
Hide thumbs
Also See for Aquasonic Diluvio AQ339:
- Installation manual (12 pages) ,
- Specifications (1 page) ,
- Parts list (1 page)

Related Manuals for Clark Synthesis Aquasonic Diluvio AQ339

Summary of Contents for Clark Synthesis Aquasonic Diluvio AQ339
-
Page 1: Table Of Contents
Diluvio ™ AQ339 Installation Guide Table of Contents Important Product Information Warranty Product Overview Installation Overview Diagrams Speaker Images Mounting Hardware In-Wall Installation Drop-In Installation Stainless Steel Screen Installation Isolation Transformer Installation Troubleshooting Diluvio Placement Clark Synthesis, Inc. Phone:303.797.7500 www.clarksynthesis.com... -
Page 2: Important Product Information
IMPORTANT PRODUCT INFORMATION DO NOT DROP SPEAKER- The speaker can be damaged both internally and externally if dropped. Damage caused by dropping the speaker is not covered by the warranty. 2. DO NOT EXPOSE SPEAKER TO HIGH DISTORTION LEVELS- Exposing the speaker to high levels of distortion may damage the speaker. -
Page 3: Warranty
United States Warranty and Return Policy THE DILUVIO™ WARRANTY Clark Synthesis, Inc. warranties the Diluvio™ to be free from defects and workmanship under normal use for a period of six (6) years from date of original purchase. Should warranty service be necessary, Clark Synthesis, Inc. will (at its discretion) repair or replace the defective merchandise with equivalent merchandise at no charge. -
Page 4: Product Overview
• A power amplifier rated between 125 and 150 watts @ 4 ohms is required to run the Diluvio™. • In-wall mounting hardware is available through Clark Synthesis, Inc. Please contact us for more information. Diluvio Underwater Speaker www.clarksynthesis.com... -
Page 5: Installation Overview Diagrams
INSTALLATION OVERVIEW DIAGRAMS Figure 1. Side view of in-wall installation. Junction Box Pool Deck Wall of Pool Conduit Speaker in Niche Light Niche Figure 2. Side view of drop-in installation. Junction Box Sturdy Object Audio System to Attach Rope Speaker Cable Pool Deck Rope Speaker... -
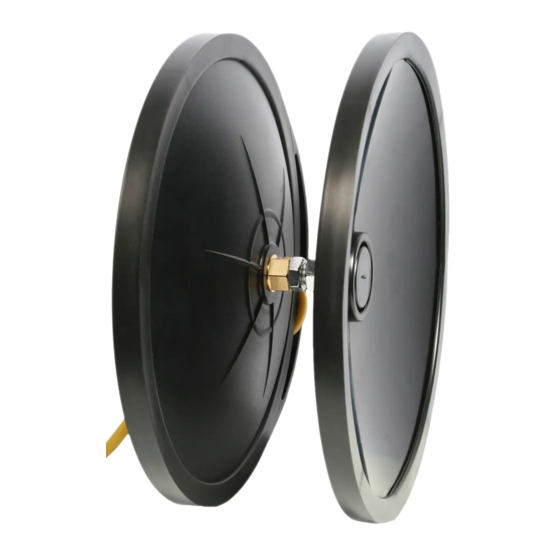
Page 6: Speaker Images
SPEAKER IMAGES The Diluvio™ Acoustic Sound Lens Speaker body Threaded Stud, Brass Mounting Nuts, Jam Nuts Strain Relief Speaker Cable Diluvio Underwater Speaker www.clarksynthesis.com ™... -
Page 7: Mounting Hardware
MOUNTING HARDWARE In-Wall Mounting Hardware (Purchased Separately) Face Ring Mounting Gasket Back View Face View Screw & Rubber Washer Clamp Tabs Lock Tab Wire Clamp Diluvio™ Screen Large Light Niche Threaded Receiving Hole Lock Tab Receiving Plate www.clarksynthesis.com Diluvio Underwater Speaker ™... -
Page 8: In-Wall Installation
IN-WALL INSTALLATION NOTE: The Face Ring Kit, Stainless Steel Screen, Niche and Isolation Transformer are not included and may be purchased from Clark Synthesis. Carefully remove the speaker from its box and set aside. Remove the black o-ring from inside the red gasket and dispose. - Page 9 IN-WALL INSTALLATION Loosen the nut on the wire clamp. With the mounting gasket facing up, place the wire clamp over the speaker. The screw & nut should be facing down towards the speaker not the sound lens. Wire Clamp NOTE: If using the Stainless Steel Screen, install now. See page 13 for Screen Installation. Place the speaker on a non-abrasive surface with the sound lens facing up.
- Page 10 IN-WALL INSTALLATION Place the wire clamp under each clamp tab, verifying the nut and bolt adjuster is accessible when the clamp is placed under the tabs. Insure the mounting gasket and face ring are still evenly centered. Use a wrench and a Phillips screwdriver to tighten the wire clamp. When fully tightened, the wire clamp should be firmly seated in each clamp tab and the speaker should be secure.
- Page 11 IN-WALL INSTALLATION Carefully set the lock tab located on the bottom of the face ring behind the receiving plate located on the bottom of the niche. Align the bolt/rubber washer on the face ring with the threaded receiving hole on the niche. Attach the trim ring securely to the niche by gently tightening the bolt. You are now ready to connect the speaker to your audio system.
-
Page 12: Drop-In Installation
DROP-IN INSTALLATION Find a length of rope (1/4” (6mm) outside diameter) that will allow you to place the speaker in the area of the pool where you would like sound (see General Information section at the beginning of this manual for precautions when using this type of application). Carefully remove the speaker from its box. -
Page 13: Stainless Steel Screen Installation
STAINLESS STEEL SCREEN INSTALLATION Carefully remove the rubber Remove the screw from the Put on a pair of work gloves ring from face ring screw. face ring. Save the screw. to avoid being cut by the Save the rubber ring. screen’s sharp edges. -
Page 14: Isolation Transformer Installation
ISOLATION TRANSFORMER INSTALLATION Place the Isolation Transformer Transformer may be mounted Locate the Neutrik Speakon in a dry, indoor, location. to a wall using mounting connector. Remove the The transformer is not tabs. (The transformer is connector from the bag. designed to be mounted heavy and must be securely outdoors. - Page 15 ISOLATION TRANSFORMER INSTALLATION Plug the Diluvio Speaker Plug the amplifier cable Repeat steps 3 - 9 to attach connector into the the Speakon connector to cable connector into the transformer input. Make the Diluvio Speaker cable. transformer output. Make sure to turn the connector Connect the positive wire sure to turn the connector until it locks in place.
-
Page 16: Troubleshooting
TROUBLESHOOTING Diluvio Underwater Speaker www.clarksynthesis.com ™... - Page 17 TROUBLESHOOTING www.clarksynthesis.com Diluvio Underwater Speaker ™...
-
Page 18: Diluvio Placement
If a question remains as to the best placement after reading this document, the professionals at Clark Synthesis are happy to assist you in determining the best placement for your speakers. You can either fax or email a blueprint of the pool design to us and our staff will work with you to pinpoint the best speaker locations. - Page 19 TST329 The TST329 Gold Transducer has a proven record of superb performance, sound fidelity and efficiency. Available only from Clark Synthesis, the TST329 is one of our ProSound products and provides superb, reliable performance. The Gold Profes- sional Transducer is a great choice in many audio/video applications such home theater furniture and commercial/military vehicle simulators.
- Page 20 Underwater Speaker Placement Essentials Video How do Underwater Loudspeakers Work? Diluvio Install, Pentair Face Ring, with screen Diluvio Install, Pentair Face Ring, without screen FAQ’s PHOTOS & MORE! © 2019 Clark Synthesis, Inc. All Rights Reserved. Clark Synthesis, Inc. Phone:303.797.7500 Fax: 303.797.7501 www.clarksynthesis.com...
Need help?
Do you have a question about the Aquasonic Diluvio AQ339 and is the answer not in the manual?
Questions and answers