Advertisement
I n t r a o r a l V i d e o C a m e r a S y s t e m
Thank You and Congratulations
latest standard definition camera in the dental video imaging product line
from Air Techniques, a leading manufacturer of dental equipment since 1962.
Polaris offers the flexible benefits of USB Plug-N-Play technology that is easily
integrated into any practice. The lightweight one-piece handpiece is extremely
maneuverable and produces crisp, clear images.
This document provides brief information to help you get started using your
Polaris for the first time.
Please refer to the Operator's Manual PDF file on the Drivers and Utilities
Disk for detailed information.
1
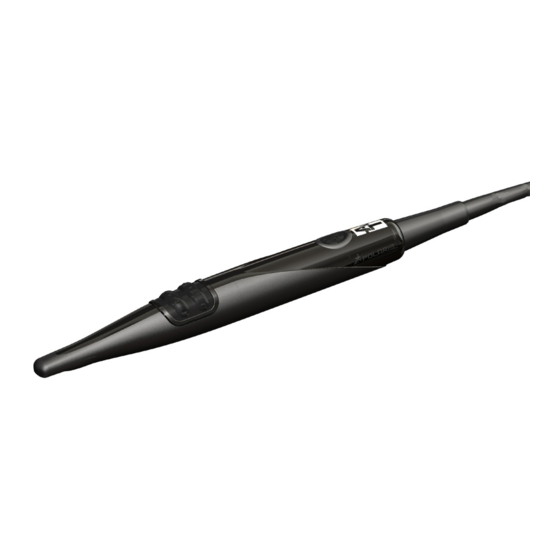
C o m p o n e n t s
Polaris Camera Handpiece
2
S o f t w a r e I n s t a l l a t i o n
Before connecting Polaris to your
computer or attempting to use it for
the first time, run the Setup program
on the Drivers and Utilities Disk.
This CD contains the necessary
device drivers to communicate with
the imaging software installed on the
user's computer.
Note: If the startup screen does not appear, double-click
My Computer, double-click the CD drive and
then double-click Autorun.exe.
4
U S B I n t e r f a c e C o n n e c t i o n s
Use a High Power (500 mA) USB 2.0 Port Only
1. Connect the USB Type A connector side of the Handpiece Cable to any
available USB 2.0 high speed, high power port on the user supplied
Computer System.
2. Always make sure to use the same USB port whenever re-connection of the
USB cable is necessary.
3. A self-powered USB hub can be used to extend the handpiece cable
length.
4. Do not use a BUS - powered hub or extension cable.
on your purchase of Polaris, the
USB 2.0 Cable,
10 Feet
IMPORTANT:
Online Warranty Registration.
Quickly register your new Polaris online.
Just have the product model and serial numbers
available. Go to the Air Techniques web site,
www.airtechniques.com, click the Warranty
Registration link and complete the form.
Registration ensures a record for the warranty
period and helps to keep you informed of product
updates and other valuable information.
Handpiece Holder
with Wall Mount
Disposable Camera
Sheaths Sample Pack
H a n d p i e c e C o n n e c t i o n
3
Do not twist or turn the Handpiece Cable
connector. The connector is keyed and mates
straight on with Handpiece connector.
Handpiece
1. Using the black molded connector end of the Handpiece
Cable, align the connector key with the keyway of the
Handpiece connector.
2. Insert straight into Handpiece connector until it securely snaps
into place.
Computer USB
2.0 Ports
USB Type A
Connector
Q u i c k S t a r t
G u i d e
Quick Start Guide
Disk P/N G1415 Rev L
Melville, NY U.S.A.
Software Drivers
and Utilities Disk
Quick
Connector
Disconnect
Key
Collar
Typical
Handpiece
Cable
Note: Desktop computer shown.
Laptop can be used.
Includes:
►Operator's Manuals
• Spectra
• Polaris
• Luna HD
►Software Installation and
Conguration Guide
►Acrobat Reader
►Installation Program
Handpiece
Cable
Advertisement
Table of Contents

Related Manuals for Air Techniques CAM-X Polaris

Summary of Contents for Air Techniques CAM-X Polaris
- Page 1 Online Warranty Registration. latest standard definition camera in the dental video imaging product line from Air Techniques, a leading manufacturer of dental equipment since 1962. Quickly register your new Polaris online. Polaris offers the flexible benefits of USB Plug-N-Play technology that is easily Just have the product model and serial numbers integrated into any practice.
- Page 2 1295 Walt Whitman Road Melville, New York 11747- 3062 Phone: 800-247-8324 Fax: 888-247-8481 Western Facility 291 Bonnie Lane, Suite 101 Corona, CA 92880 - 2804 Phone: 800-247-8324 Fax: 951-898-7646 • • © Air Techniques, Inc., P/N G5403, Rev. E February 2016...
Need help?
Do you have a question about the CAM-X Polaris and is the answer not in the manual?
Questions and answers