Table of Contents
Advertisement
Advertisement
Table of Contents

Subscribe to Our Youtube Channel
Related Manuals for Rich electric Invertek CombiPlus


Summary of Contents for Rich electric Invertek CombiPlus
- Page 2 Page 2 Rich Electric Co. “CombiPlus” User Manual V7.19 Copyright 2009...
-
Page 3: Table Of Contents
1.15 Remote Control Panel (RCP-4) ..............25 1.16 Ventilation (Standard Single Unit)..............26 1.17 Ventilation (Optinal Fan Cover Application) "Standard Single Unit" ..26 1.18 Ventilation (Multible or 3-Phase Appliaction) ..........27 Page 3 Rich Electric Co. “CombiPlus” User Manual V7.19 Copyright 2009... - Page 4 4.5 Main Menu: Programing "Key Selections" ........... 45 4.6 Main Menu: Operation "Monitor"..............46 4.7 Main Menu: Operation "Fault Trace" ............49 4.8 Main Menu: Operation "Fault History" ............52 Page 4 Rich Electric Co. “CombiPlus” User Manual V7.19 Copyright 2009...
- Page 5 C Group: Inverter....................112 D Group: Battery Charger..................113 E Group: Aux-Relay ....................113 F Group: Solar Charger..................118 O Group: Operator....................118 Chapter 9 Trouble Shooting Table..................124 Page 5 Rich Electric Co. “CombiPlus” User Manual V7.19 Copyright 2009...
- Page 6 Appendix B: LVD for Wall-Mounting/Vertical CombiPlus Appendix C: C-Tick for Wall-Mounting/Vertical CombiPlus Appendix D: EMC for Table-Mounting/Horizontal CombiPlus Appendix E: LVD for Table-Mounting/Horizontal CombiPlus Appendix F: C-Tick for Table-Mounting/Horizontal CombiPlus Page 6 Rich Electric Co. “CombiPlus” User Manual V7.19 Copyright 2009...
-
Page 7: Introduction
AC Generator. Powerful Interactive Bi-Directional True Pure Sine Wave Inverter / Charger. *Requires optional accessories, please see installation section for more information. Page 7 Rich Electric Co. “CombiPlus” User Manual V7.19 Copyright 2009... -
Page 8: Layout
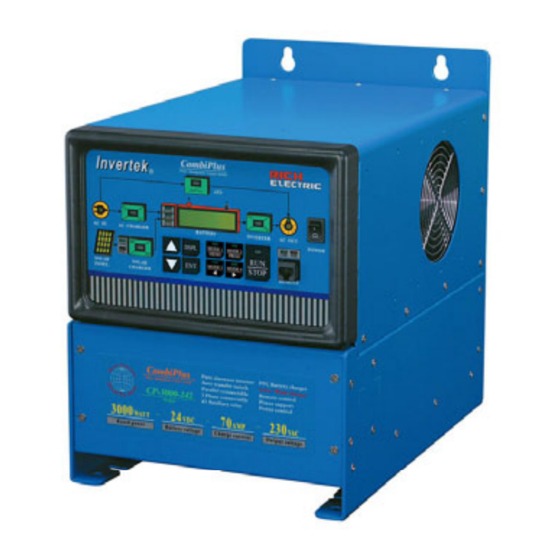
Layout: Page 8 Rich Electric Co. “CombiPlus” User Manual V7.19 Copyright 2009... -
Page 9: About Combiplus
CombiPlus can also automatically start your compatible backup generator in the case of a low battery or excessive high load usage and then turn the generator back off when not required. Page 9 Rich Electric Co. “CombiPlus” User Manual V7.19 Copyright 2009... -
Page 10: Specifications
(Max. 5 sets) (Max. 5 sets) Requires optional CP-PX) 3-phase capacity (Requires optional CP-3PX) Battery voltage sensor Battery Temperature sensor (BTS-3 Optional Remote control port Extension Port (Port C) Page 10 Rich Electric Co. “CombiPlus” User Manual V7.19 Copyright 2009... - Page 11 13.8V / 27.6V / 55.2V Equalize Voltage default (VDC) 13.2V / 26.4V / 52.8V Output Charge Voltage (min ~ max) 8V~16V / 11V~32V / 22V~64V Battery Temperature sensor BTS-3 (optional) Page 11 Rich Electric Co. “CombiPlus” User Manual V7.19 Copyright 2009...
- Page 12 424 x 258 x 370 mm Weight (kgs) 21 kgs 27 kgs ) X should be 1, output voltage = 94~128 VAC or 2, output voltage = 210~245 VAC Specifications subject to change Page 12 Rich Electric Co. “CombiPlus” User Manual V7.19 Copyright 2009...
-
Page 13: Dimensions
Power Management Control System FLOAT ABSOR BULK AC IN CHARGER BATTERY INVERTER AC OUT POWER DSPL MODE MODE COM. ERR. COM. ERR. MODE MODE STOP SOLAR SOLAR PANEL CHARGER REMOTE Page 13 Rich Electric Co. “CombiPlus” User Manual V7.19 Copyright 2009... - Page 14 Dimensions 1500watt Model Installation Holes for Wall Mounting/Vertical CombiPlus 1500W CP-1500W-12/24 M8-4 M 6 -4 Backside Mounting Holes Bottom Mounting Holes Page 14 Rich Electric Co. “CombiPlus” User Manual V7.19 Copyright 2009...
- Page 15 Power Management Control System FLOAT ABSOR BULK AC IN CHARGER BATTERY INVERTER AC OUT POWER DSPL MODE MODE COM. ERR. COM. ERR. STOP SOLAR SOLAR MODE MODE PANEL CHARGER REMOTE Page 15 Rich Electric Co. “CombiPlus” User Manual V7.19 Copyright 2009...
- Page 16 Dimensions 3000watt Model Installation Holes M8-4 M 6 -4 Backside Mounting Holes Bottom Mounting Hole Page 16 Rich Electric Co. “CombiPlus” User Manual V7.19 Copyright 2009...
-
Page 17: Chapter 1 Installation
National Standards and Practices. 1.1 Box Contents CombiPlus USER MANUAL Quick Reference Guide Warranty Card Bag Containing connection items, Four M8 mounting bolts (including spring washers) Four DC terminals and casing Page 17 Rich Electric Co. “CombiPlus” User Manual V7.19 Copyright 2009... -
Page 18: Location
If the batteries are not earthed then protection should be provide on both the Positive and Negative sides of the battery. NOTE: The DC cabling should always be kept separated from any of the AC cabling. Page 18 Rich Electric Co. “CombiPlus” User Manual V7.19 Copyright 2009... -
Page 19: Requirements
For more information on battery bank enclosures and installations please refer to AUS/NZ standards AS 2676, AS4509, AS3010 & AS4086. For other regions, the installation and wiring should comply with relevant National Standards and Practices. Page 19 Rich Electric Co. “CombiPlus” User Manual V7.19 Copyright 2009... -
Page 20: Connection Of Ac Cabling
External fuses or circuit breakers must be installed. For correct sizing see table below. AC output Circuit breakers and Earth Leakage protection is recommend for Protection of the AC output from the Inverter. Page 20 Rich Electric Co. “CombiPlus” User Manual V7.19 Copyright 2009... - Page 21 AC wiring is installed by a Licensed Electrical Contractor. MAKE SURE THE COMBIPLUS IS SWITCHED OFF AND DISCONECTED FROM ALL AC AND DC SUPPLIES BEFORE WORKING ON THE SYSTEM! Page 21 Rich Electric Co. “CombiPlus” User Manual V7.19 Copyright 2009...
-
Page 22: Ac Cabling Schematic Layout (Multiple Ciruits Ac Output)
ALL AC WIRING MUST BE CARRIED OUT BY A LICENSED ELECTRICIAN AND MUST CONFORM TO AS3000 WIRING REGULATIONS OR RELEVANT STANDARDS For other regions, the installation and wiring should comply with relevant National standards and practices. Page 22 Rich Electric Co. “CombiPlus” User Manual V7.19 Copyright 2009... -
Page 23: Ac Cabling Schematic Layout (Single Ciruit Ac Output)
ALL AC WIRING MUST BE CARRIED OUT BY A LICENSED ELECTRICIAN AND MUST CONFORM TO AS3000 WIRING REGULATIONS OR RELEVANT STANDARDS For other regions, the installation and wiring should comply with relevant National standards and practices. Page 23 Rich Electric Co. “CombiPlus” User Manual V7.19 Copyright 2009... -
Page 24: Second Battery
• The Battery Temperature Sensor (BTS), voltage sensor (V-SENS) and remote control panel (RCP) must be connected to Master. • The cables for each CombiPlus must be equal in length (AC and DC) Page 24 Rich Electric Co. “CombiPlus” User Manual V7.19 Copyright 2009... -
Page 25: 3-Phase Operation
For connection of a remote control panel, see page 28. Note: The display panel and operation flow of the remote control panel is exactly the same as the upper-front display panel. Page 25 Rich Electric Co. “CombiPlus” User Manual V7.19 Copyright 2009... -
Page 26: Ventilation (Standard Single Unit)
Aux-Relay 1 can be used to turn ON, when the internal fan switches on. E1-08: Fan ON for ? sec used together with the E2-08: Fan OFF for ? sec setting to control an external fan. Page 26 Rich Electric Co. “CombiPlus” User Manual V7.19 Copyright 2009... -
Page 27: Ventilation (Multible Or 3-Phase Appliaction)
When there is more than one CombiPlus in parallel connection or 3-phase connection, the optional accessory, fan covers, are highly recommended to be installed for each CombiPlus to have better ventilation in cooling down the temperature. Page 27 Rich Electric Co. “CombiPlus” User Manual V7.19 Copyright 2009... -
Page 28: Chapter 2 Wiring
Chapter 2 Wiring Connections 2.1 Lower-Front Panel Connection for Wall-Mounting/Vertical CombiPlus Page 28 Rich Electric Co. “CombiPlus” User Manual V7.19 Copyright 2009... - Page 29 Connecting terminal for AC input Ground N AC IN N Connecting terminal for AC input Neutral O AC IN L Connecting terminal for AC input Line P Battery POS+/ NEG- Battery cables. Page 29 Rich Electric Co. “CombiPlus” User Manual V7.19 Copyright 2009...
-
Page 30: Battery "Star Connection" Schematic
Battery Connection: 2.2 Star Connection Schematic Page 30 Rich Electric Co. “CombiPlus” User Manual V7.19 Copyright 2009... -
Page 31: Battery "Rail Connection" Schematic
2.3 Battery : Rail Connection Schematic Page 31 Rich Electric Co. “CombiPlus” User Manual V7.19 Copyright 2009... -
Page 32: Ac Parrellelconnection Schematic
2.4 AC Parallel Connection Schematic Page 32 Rich Electric Co. “CombiPlus” User Manual V7.19 Copyright 2009... -
Page 33: Ac 3-Phase Conection Schematic
2.5 AC 3-Phase Connection Schematic Page 33 Rich Electric Co. “CombiPlus” User Manual V7.19 Copyright 2009... -
Page 34: Ac 3-Phase System 15 Modules
2.6 AC 3-Phase System 15 Modules Page 34 Rich Electric Co. “CombiPlus” User Manual V7.19 Copyright 2009... -
Page 35: Chapter 3 Battery Types
(15°F) over 25°C (77°F). It is very important not to exceed the gas recombination capabilities of the AGM. The optimum charging temperature range is from 5 to 35°C (40 to 95°F). Page 35 Rich Electric Co. “CombiPlus” User Manual V7.19 Copyright 2009... -
Page 36: Gel
However, a solar system is limited to what the solar array can provide. If the equalization voltage is too high, the array I-V curve may go over the “knee” and sharply reduce the charging current. Page 36 Rich Electric Co. “CombiPlus” User Manual V7.19 Copyright 2009... -
Page 37: Lead-Calcium
NOTE: Consult the battery manufacturer for the recommended batter charging settings for the battery being used. Page 37 Rich Electric Co. “CombiPlus” User Manual V7.19 Copyright 2009... -
Page 38: Chapter 4 Operation
NOTE: The AC Output is turned OFF when the inverter is Switched OFF at the Master Power Switch or in Standby mode. The AC Bypass (ATS) is also disabled. Page 38 Rich Electric Co. “CombiPlus” User Manual V7.19 Copyright 2009... - Page 39 Flashing: AC input is not stable. Green: CombiPlus® turn on. Red: CombiPlus® turn off / standby. RUN/STOP NOTE: Green Blink : Auto-Restart is in use COM./ERR. Remote control port in communication/in error Page 39 Rich Electric Co. “CombiPlus” User Manual V7.19 Copyright 2009...
-
Page 40: Front Panel Button Operations
The Combi Inverter has Priority to Support the AC load with AC Power Support. MODE 4: Renewable Energy has Priority to Charge the batteries with AC Charger Support. The Combi Inverter has Priority to Support the AC load with AC Power Support. Page 40 Rich Electric Co. “CombiPlus” User Manual V7.19 Copyright 2009... - Page 41 1 second to return to Main Menu “Programming” immediately. Press key to move cursor to the left (one digit) Press key to move cursor to the right (one digit) Page 41 Rich Electric Co. “CombiPlus” User Manual V7.19 Copyright 2009...
-
Page 42: Main Menu
Users can program and modify constants Note: On any Menu screen, pressing “DSPL” key will return you to the previous Menu. Page 42 Rich Electric Co. “CombiPlus” User Manual V7.19 Copyright 2009... -
Page 43: Main Menu: Programing "Operation
Use constant O1-02 to set the idle time when the keyboard is not operated and once any key is pressed, the display will return to the LCD monitor selection value set in constant O1-01. Initial Setting=180 sec, setting range: 10~600 sec. Page 43 Rich Electric Co. “CombiPlus” User Manual V7.19 Copyright 2009... - Page 44 Use constant O2-06 to set the time it takes to press MODE key to transfer from one of four modes to another mode. (This has to be done in STOP mode) Initial setting=5 sec, setting range: 2~10 sec. Page 44 Rich Electric Co. “CombiPlus” User Manual V7.19 Copyright 2009...
-
Page 45: Main Menu: Programing "Key Selections
RUN/STOP indicator is active. Once any key on the panel is pressed, it will return to the display before Idle status. Initial setting=10 min, setting range: 0~60 min. Page 45 Rich Electric Co. “CombiPlus” User Manual V7.19 Copyright 2009... -
Page 46: Main Menu: Operation "Monitor
Use constant U1-06 to monitor the battery ripple voltage in unit of 0.1V. U1-07: Battery Current Main Menu>Operation>ENT>Monitor>ENT> Use constant U1-07 to monitor battery current value in unit of 0.1A. Page 46 Rich Electric Co. “CombiPlus” User Manual V7.19 Copyright 2009... - Page 47 Use constant U1-12 to monitor the temperature that has been detected by Battery Temperature Sensor (BTS-3) in unit of 1℃. U1-13: CPU ID1 Main Menu>Operation>ENT>Monitor>ENT> Use constant U1-13 to check the software version 1. Page 47 Rich Electric Co. “CombiPlus” User Manual V7.19 Copyright 2009...
- Page 48 “Master Input” and the CombiPlus will switch to Mode 1 automatically. When the AC power supply comes from the Slave input of AC generator, this constant will show “Slave Input” and the CombiPlus will switch to Mode 2 automatically. Page 48 Rich Electric Co. “CombiPlus” User Manual V7.19 Copyright 2009...
-
Page 49: Main Menu: Operation "Fault Trace
U2-05: AC OUT Voltage Main Menu>Operation>ENT>Fault Trace>ENT> Use constant U2-05 to monitor the AC output voltage value in unit of 0.1V when the current fault occurs. Page 49 Rich Electric Co. “CombiPlus” User Manual V7.19 Copyright 2009... - Page 50 Use constant U2-12 to monitor the ON/OFF status of 3 sets of Aux-Relay (RY1, RY2, RY3) when the current fault occurs. Please see NOTE 2 in Chapter 8. U2-13: Elapsed Time Page 50 Rich Electric Co. “CombiPlus” User Manual V7.19 Copyright 2009...
- Page 51 Use constant U2-26 to monitor the current temperature that has been detected by Battery Temperature Sensor (BTS-3) in unit of 1℃ when the current fault occurs. 4.8 Main Menu : Operation “Fault History” Page 51 Rich Electric Co. “CombiPlus” User Manual V7.19 Copyright 2009...
-
Page 52: Main Menu: Operation "Fault History
Use constant U3-04 to monitor the most recent fourth fault stored in the software. U3-05: Elapsed Time 1 Main Menu>Operation>ENT>Fault History>ENT> Use constant U3-05 to monitor the elapsed time before the latest fault occurs. Page 52 Rich Electric Co. “CombiPlus” User Manual V7.19 Copyright 2009... - Page 53 Use constant U3-07 to monitor the elapsed time before the most recent third fault occurs. U3-08: Elapsed Time 4 Main Menu>Operation>ENT>Fault History>ENT> Use constant U3-08 to monitor the elapsed time before the most recent fourth fault occurs. Page 53 Rich Electric Co. “CombiPlus” User Manual V7.19 Copyright 2009...
-
Page 54: Chapter 5 Mode Settings
AC Power Support. MODE 4 Renewable Energy has Priority to Charge the batteries with AC Charger Support. The Combi Inverter has Priority to Support the AC load with AC Power Support. Page 54 Rich Electric Co. “CombiPlus” User Manual V7.19 Copyright 2009... -
Page 55: Mode 1: Ac Power As Priority Support
INVERTER Mode: When AC IN=0 A, AC OUT load is completely supplied by INVERTER. It goes to the inverter mode. Grid,Shore,Generator Load Power AC IN AC OUT ATS OFF Battery Page 55 Rich Electric Co. “CombiPlus” User Manual V7.19 Copyright 2009... - Page 56 The AC CHARGER will not take more than 5A with limits to battery charge current to 75A. Shore Power Load M ax 5A AC IN AC OUT ATS ON B2-05=5A Battery Page 56 Rich Electric Co. “CombiPlus” User Manual V7.19 Copyright 2009...
- Page 57 ※ Note: Shore current is automatically limited to 5A and the AC input circuit Breaker will not trip! Shore Power Load Max 5A AC IN AC OUT ATS ON B2-05=5A Battery Page 57 Rich Electric Co. “CombiPlus” User Manual V7.19 Copyright 2009...
- Page 58 The charge current is automatically reduced to 0A, and the AC input circuit breaker does not trip! Shore Power Load Max 5A AC IN AC OUT ATS ON B2-05=5A Battery Page 58 Rich Electric Co. “CombiPlus” User Manual V7.19 Copyright 2009...
- Page 59 As soon as the load reduces to less than 5A, any current that is left over will be used to recharge the battery. Shore Power Load Max 5A AC IN AC OUT ATS ON B2-05=5A Battery Page 59 Rich Electric Co. “CombiPlus” User Manual V7.19 Copyright 2009...
-
Page 60: Mode 2: Ac Generator Support With Dynamic Power Shifting
INVERTER Mode: When AC IN=0 A, AC OUT load is completely supplied by INVERTER. It goes to the inverter mode. Grid,Shore,Generator Load Power AC IN AC OUT ATS OFF Battery Page 60 Rich Electric Co. “CombiPlus” User Manual V7.19 Copyright 2009... - Page 61 The AC CHARGER will not take more than 5A with limits to battery charge current to 75A. Shore Power Load Max 5A AC IN AC OUT ATS ON B2-05=5A Battery Page 61 Rich Electric Co. “CombiPlus” User Manual V7.19 Copyright 2009...
- Page 62 ※ Note: Shore current is automatically limited to 5A and the AC input circuit Breaker will not trip! Shore Power Load Max 5A AC IN AC OUT ATS ON B2-05=5A Battery Page 62 Rich Electric Co. “CombiPlus” User Manual V7.19 Copyright 2009...
- Page 63 The charge current is automatically reduced to 0A, and the AC input circuit breaker does not trip! Shore Power Load Max 5A AC IN AC OUT ATS ON B2-05=5A Battery Page 63 Rich Electric Co. “CombiPlus” User Manual V7.19 Copyright 2009...
-
Page 64: Green Power Smart Feature
This ingenious smart power feature will make sure your batteries always get the charge they require, helping them to last longer in demanding installations. Page 64 Rich Electric Co. “CombiPlus” User Manual V7.19 Copyright 2009... - Page 65 AC Power Support MODE 4 Renewable Energy has Priority to Charge the batteries with AC Charger Support. The Combi Inverter has Priority to Support the AC load with AC Power Support. Page 65 Rich Electric Co. “CombiPlus” User Manual V7.19 Copyright 2009...
-
Page 66: Mode 3: Renewable Energy With Power Support
AC OUT for load consumption. (INVERTER ON+ ATS OFF + AC CHARGER OFF) Shore Power Load Ready AC IN AC OUT ATS OFF B2-05=5A Solar Panel Solar Battery Charger Page 66 Rich Electric Co. “CombiPlus” User Manual V7.19 Copyright 2009... - Page 67 This is why MODE 3 is called Green Power as Priority Support Mode (INVERTER OFF+ ATS ON + AC CHARGER OFF) Shore Power Load AC IN AC OUT ATS ON AC Charger B2-05=5A Solar Panel Solar Battery Charger Page 67 Rich Electric Co. “CombiPlus” User Manual V7.19 Copyright 2009...
- Page 68 As soon as the load reduces to less than 5A, power assist function stops. Shore Power Load AC IN AC OUT ATS ON B2-05=5A Solar Panel Solar Battery Charger Page 68 Rich Electric Co. “CombiPlus” User Manual V7.19 Copyright 2009...
- Page 69 B2-14 voltage value and longer than second time set in B2-15, inverter mode takes priority to supply voltage to AC OUT again for load consumption. Shore Power Load Ready AC IN AC OUT ATS OFF Solar Panel Solar Battery Charger Page 69 Rich Electric Co. “CombiPlus” User Manual V7.19 Copyright 2009...
-
Page 70: Mode 4: Renewable Energy With Ac Charger Backup Support
AC OUT for load consumption. (INVERTER ON+ ATS OFF + AC CHARGER OFF) Shore Power Load Ready AC IN AC OUT ATS OFF B2-05=5A Solar Panel Solar Battery Charger Page 70 Rich Electric Co. “CombiPlus” User Manual V7.19 Copyright 2009... - Page 71 (INVERTER OFF + ATS ON + AC CHARGER ON + Power Share Mode ON) Shore Power Load AC IN AC OUT ATS ON B2-05=5A Solar Panel Solar Battery Charger Page 71 Rich Electric Co. “CombiPlus” User Manual V7.19 Copyright 2009...
- Page 72 As soon as the load reduces to less than 5A, any current that is left over will be used to recharge the battery. Shore Power Load AC IN AC OUT ATS ON B2-05=5A Solar Panel Solar Battery Charger Page 72 Rich Electric Co. “CombiPlus” User Manual V7.19 Copyright 2009...
- Page 73 B2-15, inverter mode takes priority to supply voltage to AC OUT again for load consumption. Shore Power Load Ready AC IN AC OUT ATS OFF B2-05=5A Solar Panel Solar Battery Charger Page 73 Rich Electric Co. “CombiPlus” User Manual V7.19 Copyright 2009...
-
Page 74: Chapter 6 Programming
A1-01=0 Use this setting to prevent user constant settings from being changed. A1-01=1 This setting allows all user constants to be changed or displayed. (Initial setting) Page 74 Rich Electric Co. “CombiPlus” User Manual V7.19 Copyright 2009... - Page 75 Setting Function A1-03=0 Returns to initialize Display without initializing any user (Initial setting) constants. A1-03=1 Initializes the user constants to factory settings. Page 75 Rich Electric Co. “CombiPlus” User Manual V7.19 Copyright 2009...
- Page 76 1. Enter the password in A1-04 to be exactly the same as the one earlier set in A1-05 2. When the password in A1-04 matches the one earlier set in A1-05, the unlocking is completed. A1-01=1 (Constants set) would appear again for programming. Page 76 Rich Electric Co. “CombiPlus” User Manual V7.19 Copyright 2009...
-
Page 77: B Group: General
When B1-01=0: Acceptable AC input frequency is 50Hz ±5Hz (45~55Hz) B2-08=0 When B1-01=1: Acceptable AC input frequency is 60Hz ±5Hz (55~65Hz) B2-08=1 Accept wide AC input frequency range between 45~65Hz (Initial setting) Page 77 Rich Electric Co. “CombiPlus” User Manual V7.19 Copyright 2009... - Page 78 The result of this is that when changing B2-04 level, this level (B2-03) also changes. B2-03=B2-04–offset voltage For example: CP-1500-122, when B2-03=265V, B2-04=270V, offset voltage=5V (270-265), B2-03 will automatically go to 255V(260–5) after B2-04 is changed to 260V. Page 78 Rich Electric Co. “CombiPlus” User Manual V7.19 Copyright 2009...
- Page 79 (Active) load suddenly changes. The fast detection will detect a failure in such a case. This will result in a slightly longer transfer time. Page 79 Rich Electric Co. “CombiPlus” User Manual V7.19 Copyright 2009...
- Page 80 When B1-01=0: Acceptable AC input frequency is 50Hz ±5Hz (45~55Hz) B2-08=0 When B1-01=1: Acceptable AC input frequency is 60Hz ±5Hz (55~65Hz) B2-08=1 Accept wide AC input frequency range between 45~65Hz (Initial setting) Page 80 Rich Electric Co. “CombiPlus” User Manual V7.19 Copyright 2009...
- Page 81 This is powerful option in combination with Power Support but even without Power Support, it can prevent unnecessary switching to INVERTER because the charge current will reduce when AC input current becomes higher than the effective AC input current limit. Page 81 Rich Electric Co. “CombiPlus” User Manual V7.19 Copyright 2009...
- Page 82 MODE 4: B2-12 and B2-13 are used to set ATS to be “OFF” when the battery voltage is higher than B2-12 voltage value and longer than the second time set in B2-13 in MODE4. (INVERTER ON+ATS OFF+AC CHARGER OFF) Page 82 Rich Electric Co. “CombiPlus” User Manual V7.19 Copyright 2009...
- Page 83 > > Main Menu Programming General Auto transfer Switch Constant B2-29 is used to select to enable or disable the external ATS for the AC power supply control selection. Page 83 Rich Electric Co. “CombiPlus” User Manual V7.19 Copyright 2009...
- Page 84 If more CombiPlus® per phase are connected in parallel, then only the masters of parallel system must have 2-3 phase enabled. Setting Function B4-01=0 2-3 Phase connection disabled. (Initial setting) B4-01=1 2-3 Phase connection enabled. Page 84 Rich Electric Co. “CombiPlus” User Manual V7.19 Copyright 2009...
- Page 85 Output is 2-phase with phase 180°shift Two Leg 3 Phase 120°Type: Two CombiPlus® are required. B4-03=2 Output is 2-phase of a normal 3-phase system so two phases with 120°phase shift. Page 85 Rich Electric Co. “CombiPlus” User Manual V7.19 Copyright 2009...
-
Page 86: C Group: Inverter
230V model and to be 72 for 110V model. Setting C1-04=0 can disable the auto power saving and the output voltage would be Continuously supplied to the AC Output even when there is no load connected. Page 86 Rich Electric Co. “CombiPlus” User Manual V7.19 Copyright 2009... - Page 87 (C1-06) to achieve better results with sudden load changes. Page 87 Rich Electric Co. “CombiPlus” User Manual V7.19 Copyright 2009...
-
Page 88: D Group: Battery Charger
Batteries should be placed in a dry and well-ventilated area during charging. The product default settings are for charging gel batteries. For the recommended battery voltage initial settings, see D1 (Charger) Group parameters Page 88 Rich Electric Co. “CombiPlus” User Manual V7.19 Copyright 2009... - Page 89 Page 89 Rich Electric Co. “CombiPlus” User Manual V7.19 Copyright 2009...
- Page 90 A low AC IN Current Limit (B2-05) in combination with a high load. A high environmental temperature A too high ripple voltage due to improper cabling. Page 90 Rich Electric Co. “CombiPlus” User Manual V7.19 Copyright 2009...
- Page 91 D1-10: Equalize Mode Select (Storage Mode Select) Main Menu>Programming>ENT>Charger>ENT This setting is used for enabling/disabling the Equalize Mode. Setting Function D1-10=0 Equalize mode is disabled D1-10=1 Equalize mode is enabled (Initial setting) Page 91 Rich Electric Co. “CombiPlus” User Manual V7.19 Copyright 2009...
-
Page 92: E Group: Aux-Relay
This will switch the Aux-Relay 1 ON when the internal fan switches on. This can be used together with the E2-08: Fan OFF for ? sec setting to drive an external fan. Page 92 Rich Electric Co. “CombiPlus” User Manual V7.19 Copyright 2009... - Page 93 As with other Aux-Relay 1 setting, a delay value (E1-16) must be specified also. This can be done with Delay value for set Aux-Relay 1 ON when overload alarm (E1-16) setting. Page 93 Rich Electric Co. “CombiPlus” User Manual V7.19 Copyright 2009...
- Page 94 Use these settings to switch off the Aux-Relay 1 when battery voltage becomes higher than a certain limit (E2-05) for a certain time (E2-06) ※ Note: If E2-06=0 sec (Initial setting), then E2-05 is ignored. Page 94 Rich Electric Co. “CombiPlus” User Manual V7.19 Copyright 2009...
- Page 95 Use this setting (E2-11) to disable re-starting of a generator which is switched off by hand when the Aux-Relay 1 is used to generate a start signal for that generator. Page 95 Rich Electric Co. “CombiPlus” User Manual V7.19 Copyright 2009...
- Page 96 As with other Aux-Relay 1 setting, a delay must be specified also. This can be done with the Delay value for set Aux-Relay 1 OFF when No OverLoad Alarm (E2-17) setting. Page 96 Rich Electric Co. “CombiPlus” User Manual V7.19 Copyright 2009...
- Page 97 ※ Note: The functions and the settings of E3, E4, E5 and E6 Groups are exactly the same as those of E1 and E2 Group so please refer to above E1 and E2 Group description and setting for E3, E4, E5 and E6 Groups. Page 97 Rich Electric Co. “CombiPlus” User Manual V7.19 Copyright 2009...
- Page 98 ※ The functions and the settings of E8 and E9 Groups are exactly the same as those of E7 Group so please refer to above E7 Group description and setting for E8 and E9 Groups. Page 98 Rich Electric Co. “CombiPlus” User Manual V7.19 Copyright 2009...
-
Page 99: Chapter 5 User Constants "Flow Chart
MODE 2 MODE ENTER ENTER ENTER ENTER *** Main Menu *** Group B Function B1 Output Frequency B1-01=0 *** Programming General Output Frequency 50Hz 50Hz DSPL DSPL DSPL DSPL Page 99 Rich Electric Co. “CombiPlus” User Manual V7.19 Copyright 2009... - Page 100 A1-03 = 0 No Initialize No Initialize Entry Accepted A1-03 = 1 Default Setting Password 1 Password 1 A1-04 = 0 00"0" Entry Accepted Access Level Password 1 Constant Set 00"1" Page 100 Rich Electric Co. “CombiPlus” User Manual V7.19 Copyright 2009...
- Page 101 60Hz Group D Function B3 Charger Parallel System Group E Function B4 Aux-Relay 2-3 Phase Group F Function B1 Solar Charger Output Frequency Group O Operator Group B General Page 101 Rich Electric Co. “CombiPlus” User Manual V7.19 Copyright 2009...
- Page 102 MODE 3: HigherfFor ?sec B2-17 = 0sec MODE 2: Udc Higher ? V B2-12 = 28.8V AC IN Low Disconnect B2-01 = 180V MODE 2: HigherFor ? Sec B2-13 = 0sec Page 102 Rich Electric Co. “CombiPlus” User Manual V7.19 Copyright 2009...
- Page 103 Entry Accepted Group F Function B1 2-3 Phase Master B4-01 = 1 Solar Charger Output Frequency Slave Enable Group O 2-3 Phase Type Operator 3 Phase Group B General Page 103 Rich Electric Co. “CombiPlus” User Manual V7.19 Copyright 2009...
- Page 104 DC In Low Restart Aux-Relay C1-03 = 21.80V Group F Power Assist Select Solar Charger Enable Group O Power Assist Level Operator Group B Inverter Out Voltage General C1-01 = 230V Page 104 Rich Electric Co. “CombiPlus” User Manual V7.19 Copyright 2009...
- Page 105 Udc Ripple Alarm Sel Set Aux3 ON E1-05 = 32.0V Alarm Function E6 Udc Higher for ?sec UdcRipAlarm for ?sec Set Aux3 OFF E1-06 = 0sec E1-18 = 0sec Page 105 Rich Electric Co. “CombiPlus” User Manual V7.19 Copyright 2009...
- Page 106 Udc Ripple Alarm Sel Set Aux-Relay3 ON E2-05 = 32.00V Alarm Function E6 Udc Higher than for ?sec UdcRipAlarm for ?sec Set Aux-Relay3 OFF E2-06 = 0sec E2-19 = 0sec Page 106 Rich Electric Co. “CombiPlus” User Manual V7.19 Copyright 2009...
- Page 107 Inverter Key Selections O1-02 = 180sec Battery RippleVoltage Group D Power-On Monitor Sel Charger Battery Voltage Group E Aux-Relay Group F Solar Charger Group O Operator Group B General Page 107 Rich Electric Co. “CombiPlus” User Manual V7.19 Copyright 2009...
- Page 108 MODE Key Hold Time Display Idle Time Set Operator O2-06 = 5sec O2-09 = 10 Minute Group B RUNSTOP KeyHoldTime Key Pressed Beep Sel General O2-07 = 5sec Enable Page 108 Rich Electric Co. “CombiPlus” User Manual V7.19 Copyright 2009...
-
Page 109: Chapter 5 Constants List
Chapter 8 Constants list Page 109 Rich Electric Co. “CombiPlus” User Manual V7.19 Copyright 2009... -
Page 110: U Group: Monitor
- - - U2-11 NOTE 1 Aux-Relay Status - - - U2-12 NOTE 2 - - U2-13 Elapsed Time 1hour - - - U2-14 Solar Charger Status NOTE 5 Page 110 Rich Electric Co. “CombiPlus” User Manual V7.19 Copyright 2009... - Page 111 AC IN Waveform Check 0: Ignore 1: Active 0: Disconnect B2-07 Ground Relay 1: Connect 0:50/60Hz+-5Hz B2-08 ACIN Frequency Range 1:45Hz~65Hz 0: Normal B2-09 AC IN DynaCur Shift 1:Dynamic Page 111 Rich Electric Co. “CombiPlus” User Manual V7.19 Copyright 2009...
-
Page 112: C Group: Inverter
Inverter Out Voltage NOTE 3 NOTE 3 C1-02 Bat Low ? V Shut-down NOTE 3 0.01V NOTE 3 C1-03 Bat Low ? V Restart NOTE 3 0.01V NOTE 3 Page 112 Rich Electric Co. “CombiPlus” User Manual V7.19 Copyright 2009... -
Page 113: D Group: Battery Charger
0~255 1sec 0sec 0:Disable E1-09 When bulk Protection 1:Enable 0:Disable E1-10 System Fault Occurs 1:Enable 0:Alarm E1-11 Temp. Alarm Sel 1:Pre-alarm E1-12 Temp. Alarm for ?sec 0~255 1sec 0sec Page 113 Rich Electric Co. “CombiPlus” User Manual V7.19 Copyright 2009... - Page 114 No OL Alarm Sel 1:Pre-alarm E2-17 No OL Alarm for ? sec 0~255 1sec 0sec 0:Alarm E2-18 No UdcRipple Alarm Sel 1:Pre-alarm E2-19 No UdcRipple Alarm ?sec 0~255 1sec 0sec Page 114 Rich Electric Co. “CombiPlus” User Manual V7.19 Copyright 2009...
- Page 115 Charging for ? sec 0~255 1sec 0sec E4-08 Fan OFF for ? sec 0~255 1sec 0sec E4-09 Charge Finished ?Min 0~1000 1min E4-10 RY2 not ON for ?mins 0~1000 1min Page 115 Rich Electric Co. “CombiPlus” User Manual V7.19 Copyright 2009...
- Page 116 Low Batt. Alarm Sel 1:Pre-alarm E5-14 Low Batt. for ? sec 0~255 1sec 0sec 0:Alarm E5-15 Overload Alarm Sel 1:Pre-alarm E5-16 OL Alarm for ? sec 0~255 1sec 0sec Page 116 Rich Electric Co. “CombiPlus” User Manual V7.19 Copyright 2009...
- Page 117 0:Do not use Aux E7-01 Aux1 Usage Select Relay 1 1: Use Aux Option 0: Normal E7-02 Aux1 Invert Select 1: Invert switch E7-03 Aux1 notSwitchOff T 0~1000 1 min Page 117 Rich Electric Co. “CombiPlus” User Manual V7.19 Copyright 2009...
-
Page 118: F Group: Solar Charger
MODE Key Hold Time 2~10 1sec 5 sec O2-07 RUN/STOP KeyHoldTime 2~10 1sec 2 sec 0: Manual O2-08 Auto Run Select 1: Auto O2-09 Display IdleTime Set 0~60 1min 10 min Page 118 Rich Electric Co. “CombiPlus” User Manual V7.19 Copyright 2009... - Page 119 0=AC IN disconnect 1=AC IN connect AC OUT: 0=No output 1=output Remoter: 0=Remoter disconnect 1=Remoter connect 0=OK 1=OH Pre-alarm Battery Low: 0=OK 1=Battery low pre-alarm 0=OK 1=Over load pre-alarm Page 119 Rich Electric Co. “CombiPlus” User Manual V7.19 Copyright 2009...
- Page 120 101V 119~142 138V 120~143 143V 94~120 95~121 101V 119~142 138V 120~143 143V CP-3000-121 CP-1500-241 94~120 95~121 101V 119~142 138V 120~143 143V 94~120 95~121 101V 119~142 138V 120~143 143V CP-3000-241 Page 120 Rich Electric Co. “CombiPlus” User Manual V7.19 Copyright 2009...
- Page 121 0.01V 11.75V CP-3000-121 CP-1500-241 0~35.0 0.01V 23.5V 0~35.0 0.01V 32.0V 0~44.75 0.01A 3.18A 0~35.0 0.01V 23.5V 0~35.0 0.01V 23.5V 0~35.0 0.01V 32.0V 0~83.0 0.01A 6.37A 0~35.0 0.01V 23.5V CP-3000-241 Page 121 Rich Electric Co. “CombiPlus” User Manual V7.19 Copyright 2009...
- Page 122 Control Mode Operation Status Aux-Relay Status Elapsed Time Bat.Temp.Sensor CPU ID 1 CPU ID 2 Solar Charger Status Solar Supply Current Solar Supply Power Solar Amp-Hours Solar Total A/Hours Page 122 Rich Electric Co. “CombiPlus” User Manual V7.19 Copyright 2009...
- Page 123 3. Enter the password in A1-04 to be exactly the same as the one earlier set in A1-05 4. When the password in A1-04 matches the one earlier set in A1-05, the unlocking is completed. A1-01=1 (Constants set) would appear again for programming. Page 123 Rich Electric Co. “CombiPlus” User Manual V7.19 Copyright 2009...
-
Page 124: Chapter 9 Trouble Shooting Table
DC loads must be disconnected from the batteries and the AC loads must be disconnected from the INVERTER before the INVERTER and/or battery charger (AC CHARGER) is tested. Consult your Rich Electric dealer if the fault cannot be resolved. Problem/Error message... - Page 125 1.5 times larger than the set ‘ ’: blink current value (D1-08) when “CombiPlus®” will need to AC CHARGER is operating. be sent to service for repair. Idc-OC Over current. Page 125 Rich Electric Co. “CombiPlus” User Manual V7.19 Copyright 2009...
- Page 126 Adjust the float voltage to set to an incorrect value. the correct value. The internal DC fuse is “CombiPlus®” will need to defective be set to service for repair. Page 126 Rich Electric Co. “CombiPlus” User Manual V7.19 Copyright 2009...
- Page 127 Battery Temperature Sensor then wait 5 seconds and (BTS-3) is faulty Power on again. 2. If the “CombiPlus®” AC CHARGE normally, the BTS-3 is faulty and needs to be replaced. Page 127 Rich Electric Co. “CombiPlus” User Manual V7.19 Copyright 2009...
- Page 128 NOTES: Page 128 Rich Electric Co. “CombiPlus” User Manual V7.19 Copyright 2009...
Need help?
Do you have a question about the Invertek CombiPlus and is the answer not in the manual?
Questions and answers