Advertisement
Quick Links
Advertisement

Related Manuals for Josef prusa PRUSA RESEARCH MINI


Summary of Contents for Josef prusa PRUSA RESEARCH MINI
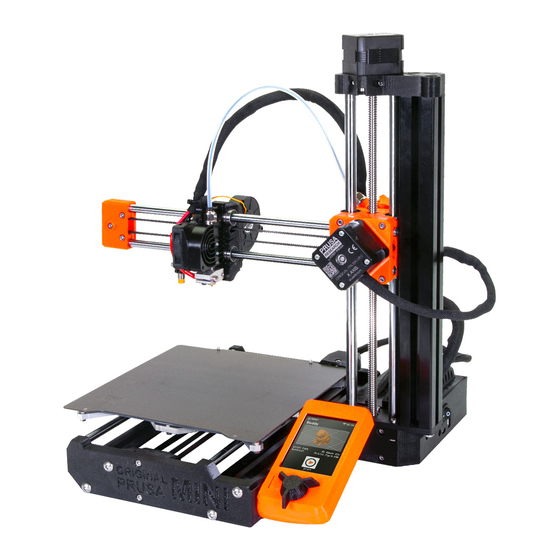
- Page 1 3D PRINTING HANDBOOK USER MANUAL FOR ORIGINAL PRUSA MINI...
- Page 2 Original Instructions: Basic Info Please always refer to the www.prusa3d.com/drivers/ for an updated version of this 3D printing handbook (PDF download). Failure to read the handbook may lead to personal injury, inferior results, or damage to the 3D printer. Always ensure that anyone who operates the 3D printer knows and understands the contents of the Manual/Handbook.
-
Page 3: About The Author
About the author Josef Prusa ’born jeb 23rdU 1))8E became interested in the 39 printin@ phenomenon before !oinin@ Pra@ueJs Bniversity of Aconomics in 288) - at FrstU it was a hobbyU a new technolo@y open to chan@es and improvements. ghe hobby soon became a passion and Oosef @rew into one of the leadin@ developers of Vdrien 4owyerJs internationalU open-sourceU RepRap pro!ect. - Page 4 ° Introduction ’ Glossary 3 Package contents K Accessories (bundled / optional) “ 8 Handling / Transporting the printer “ V ”uickKStart Info °q I.1 9isconnectin@ the power supply I.2 Dow to contact tech support I.3 Bnpackin@U assembly and Frst start 6 Your Lrst print °’...
- Page 5 18.) jilament sensor ’optional accessoryE 18.).1 Runnin@ out of Flament 18.).2 jalse sensor readin@s and debu@@in@ 18.18 “ozzle cleanin@ 18.11 Replacin@ / chan@in@ the nozzle 18.12 jlashin@ unsi@ned Frmware °° FA” K common issues and how to solve them 8’ 11.1 ,kewed ;-aqis 11.2 Printer canJt read the B,4 drive 11.3 0oose ;- and/or …-aqis belts...
- Page 6 Product details Title: Mri@inal Prusa CT“T Manufacturer: Prusa Research a.s.U Partyz6nsk6 1((/:VU Pra@ueU 1:8 88U 'zech Republic Contacts: phone G528 222 2X3 :1(U e-mail° infoHprusa3d.com EEE group: 3 ’Tg and/or telecommunication eLuipmentEU 9evice use° indoor only Power supply: V'/9' ,YTg'DT“% V9VPgMRU T“PBg 188-258 NV'U I8/X8 DzU 2.8 V / MBgPBg 25NU XUX:VU 1X8 Y CV;U complies with Part 1I of the j'' Rules Working temperature range: 1( Z' - 3( Z'U indoor use only Working humidity: (I K or less...
- Page 7 Please be very cautious during any interaction with the printer. This printer is an electrical device with moving and highKtemperature parts. ghe device is for indoor use only. 9o not eqpose the printer to rain or snow. Vlways keep the printer in a dry environment at a minimum distance of 38 cm from other ob!ects. Cake sure none of the vents/fan outlets are blocked.
- Page 8 1 Introduction ghank you for purchasin@ the Mri@inal Prusa CT“T 39 printer from Oosef Prusax …our purchase supports us in the further development of the CT“T and other devices. Mri@inal Prusa CT“T is our compact, smart and aUordable 3D printer, which was designed as a 3D printing workhorse and a great starter printer.
- Page 9 2 Glossary Spring steel sheet - comes in two variantsU smooth and teqtured. ghis is where the printed ob!ect appears. Please read the maintenance instructions carefully to ensure optimal conditions for 39 printin@. Heatbed - located directly under the sprin@ steel sheet. Deatbed ensures @ood adhesion of the printed ob!ect.
- Page 10 Print head - 0i@htwei@ht print head consistin@ of the hotend ’printin@ nozzleEU C.T.“.9.V. probe and two fans. ghe heaviest parts of the eqtruder were moved onto the Q-aqis tower to improve print Luality. 12. Nozzle - 8.5mm nozzleU can be replaced with e.@. 8.2Imm or 8.Xmm A39-compatible nozzles to achieve various eWects.
- Page 11 5 Quick-Start Info Original Prusa MINI 3D Printer Place in a safeU dry and 9o not place near runnin@ horizontally stable location ’e.@. water or outside workbenchE 9o not pull the power plu@ from the printer directly. Tt has Place the power brick where a lockin@ mechanism - pull the nobody can trip over the power cover of the plu@ back to unlock...
- Page 12 .1w Disconnecting the poyer suppl2 The power supply plug that goes in your printer has a locking mechanism K do not pull it with force0 Do not pull the cable0 jirstU unlock the mechanism by pullin@ the cover of the plu@ away from the printer. Mnce the mechanism is unlockedU you can pull the plu@ out of the printer.
-
Page 13: Your First Print
6 Your first print Preparin@ the printer for the Frst print takes about 38-I8 minutes includin@ assembly. Please pay attention to the following steps to ensure the machine will operate as intended. Tn this chapterU you will learn how to° 'ontrol the printer Bpdate the Frmware Prepare the print surface for the Frst print... - Page 14 B1k Updating the 5rmyare The printer is shipped without Lrmware K the Lrst step is 7ashing the Lrmware from a ZSX drive. …ou can simply take the B,4 drive that came with your printerU insert it into the B,4 slot on the side and start ’or restartE the printer.
- Page 15 Heatbed and powder-coated steel sheet surface go achieve the best adhesion of the printed ob!ectU it is important to keep the surface clean. Please see the information in the chapter °q Regular Maintenance for more information about print surface preparationU recommended cleaning products and warranty info. B1z Cali6ration fiLard Mnce the printer starts for the Frst timeU the Wizard will show up.
- Page 16 -oading Llament 'ut the end of the Flament strand to create a sharp tip. Tnsert the Flament into the eqtruder PgjA tube ’ri@ht side of the deviceEU or into the short PgjA tube of the Flament sensor ’optional accessoryE. 'hoose LCD Menu - Filament - Load Ulament and press the button to conFrm. ghe preheat menu will be automatically displayed.
- Page 17 B19 First 8a2er Cali6ration ghis process will calibrate the distance between the tip of the nozzle and the probe. …ou can launch the calibration at any time from LCD Menu - Calibration - First lager cal. Cake sure the steel sheet is clean and thereJs no @rease on itU even Fn@erprints can cause an issue.
- Page 18 What to check: • ghe top of the eqtruded plastic is sli@htly sLuished • ghe corners of the zi@-za@ line are sharp and do not lift from the sheet • ghe lines are strai@ht and stay on the sheet Frmly •...
- Page 19 The nozzle will preheat to °9q QC independently on the selected Llament - this is to prevent oozin@ of the Flament durin@ the initial phaseU which is Cesh 4ed 0evelin@. Mnce C40 is doneU the printer will preheat the nozzle to the correct printin@ temperature and start with the initial pur@in@ line at the ed@e of the print bed.
-
Page 20: Advanced Features
7 Advanced features 91w Menu structure • Print • Preheat • • PAg% • • j0A; • 'ooldown • jilament • 0oad Flament • • PAg% • • j0A; • Bnload Flament • Pur@e Flament • 'alibration • Yizard • Q-MWset •... -
Page 21: Printing Your Own Models
91k Mesh 4ed 8e-eling explained Cesh bed levelin@ can be found in LCD Menu - Calibration. ghis procedure is performed before every print. Tt is also the same procedure that also happens at the start of jirst 0ayer 'alibration ’see neqt chapterE ghe C.T.“.9.V probe @oes throu@h a 8x8 grid pattern spread across the sheet ’whether it is a powder-coated or smooth PAT does not matterE and measures the distance to the sheet. - Page 22 01w O6taining a printa6le model ghe easiest way to @et started with 39 printin@ is to Lnd models on the internet - they are usually in .3mfU .stl or .ob! formats. jortunatelyU 39 printin@ has many fansU so there are sites from which you can download a lar@e variety of ready-made 39 models for free.
- Page 23 iPad. ghe website provides a Luick @uide alon@ with detailed video tutorials so it is an ideal choice both for be@innin@ enthusiasts and professionals. 013 fhat is a Gjcode 5leq Yhen you download 39 models from the internet or create your own modelsU you will need to convert the 39 model ’.stlU .ob!U .3mf and similar formatsE into a set of instructions for the printer called GKcode.
- Page 24 PrusaRlicer interface ghe Add button loads models into Prusa,licer Delete and Delete All buttons remove the model’sE from Prusa,licer Mpens the detailed settings of printU FlamentU and printer CoveU scaleU rotateU Place on jace and cut tools ,lice and @enerate .@code button uality / ,peed settin@ of a print Caterial selection Printer selection...
- Page 25 diWerentU so thereJs no default orientation that would work for every ob!ect. ghe rule of thumb here is to select the largest 7at surface of the object as the base - the bi@@er the baseU the better the adhesion. ,elect a perfectly Sat side of the model for the best result. 01B Using supports Support material is a 3DKprinted supporting structure ’similar to a scaWoldin@E used to print compleq ob!ects correctly - you can remove the support material after the print !ob is Fnished.
- Page 26 Vreas above supports usually have a less-than-ideal surface Luality. 4efore you decide to use supportsU try to move/rotate the ob!ect to Fnd an orientation that will reLuire less or even no supports. 019 Print speed -s Print Xualit2 Printin@ a small ob!ect takes a few minutesU but printin@ lar@er models are more time consumin@ - there are prints that will take dozens of hours to Fnish.
- Page 27 Print Sualitg Ts print time ghe speed can also be chan@ed while printin@. %o to LCD Menu - Yune - Rpeed. 4y turnin@ the control knob clockwise you can increase the print speed up to 1I8 K. gurnin@ the knob counterclockwise decreases the print speed - the minimum speed is I8K.
- Page 28 V special case is when you want to print ob!ects lar@er than the heatbed. ghe Frst option is to resize the ob!ect to a printable size. ,elect the Scale tool from the left menu ’or press the , keyE. ghen use the 39 @izmo to chan@e the scale of the ob!ect.
- Page 29 01ww Print multijcolored o6/ects ghere is a simple way to create layer-based multi-colored 39 prints directly in Prusa,licer - see the instructions below. Multicolored obIect printed usinv color chanve feature in PrusaRlicer Color change in PrusaSlicer ,witch to the layer preview usin@ the button in the lower-left corner Bsin@ the slider on the ri@ht sideU select a layer where the color chan@e should occur 'lick on the orange plus icon V preview is instantly displayed.
-
Page 30: Material Guide
01wk Slicingb exporting One of the most important parts of the slicing process is the inspection of the sliced object in the Preview window. Bse the slider on the ri@ht side of the window to @o throu@h all the layers of the sliced ob!ect. - Page 31 ?d-antages Disad-antages • • Aasy to print 4rittle • • 9etailed prints of small models 0ow-temperature resistance ’X8 Z'E • • grouble-free printin@ of lar@e ob!ects 9iWicult to post-process • • DardU low Seqibility “ot suitable for outdoor use • Vlmost odorless •...
- Page 32 Typical use • mechanical components • holders and cases • waterti@ht prints ’potsE Tips and tricks Bnlike P0V or V4,U PAg% tends to ooze a bit and may leave strin@s of plastic on your print. …ou can F@ht this by increasin@ retraction and playin@ with hotend temperature. 4ut if you use our presets in Prusa,licerU we already did that for you and the amount of strin@in@ is minimal.
-
Page 33: Regular Maintenance
parts to@ether. Tn additionU prints can be smoothed with acetone vapor to @ive a perfectly @lossy Fnish. 4e careful when handlin@ acetonex Nozzle temperature: 25I - 2XI Z' Xed temperature: )8 - 188 Z'. ’a lar@er ob!ect reLuires a hi@her temperatureE Heatbed: Cake sure the surface is cleanU as described in 18.1 jleqible steel sheet surface preparation chapter v1z Flex... - Page 34 Smooth PEI sheet Tsopropyl alcohol )8KG Bse Yindeq when printin@ ’TPVE - best de@reaser with PAg% Yindeq - de@reasin@ eWect Bse @lue stick when is worse compared to TPV printin@ j0A; Yarm water G few drops TPV G PAg% will cause the with dish soap ’in case print to adhere very stron@ly to TPV/Yindeq donJt remove...
- Page 35 wA1k Spring steel sheet yith TE)TURED dou6lejsided PEI • • ,cratch-proof surfaceU dama@e-resistant P0V prints with a small contact area may need a brim • gransfers teqture onto the Frst layers of • P0V prints with a hu@e footprint ’across the your prints entire sheetE may warp •...
- Page 36 wA1z Increasing the adhesion Tn some special casesU such as printin@ a tall ob!ect with a very small contact area ’with the print surfaceEU you mi@ht need to increase the adhesion. jortunatelyU PAT is a very chemically resistant polymer and you can temporarily apply various adhesion solutions without dama@in@ it. ghis also applies to certain materials that would not stick to PAT under normal circumstances.
- Page 37 wA10 PTFE tu6es ghe CT“T has four PTFE tubes that may need a basic level of attention from time to time. PgjA tubes are used to lead Flament strand from the spoolU throu@h the eqtruderU all the way to the nozzle. Over time, Llament debris can accumulate in the PTFE tubes over time.
- Page 38 and it needs to be connected to the mainboard. Tt uses a simple mechanism to detect whether a strand of Llament is inserted or not. ghanks to the Flament sensorU the printer can pause the print in case you run out of Flament. Mnce you insert a new Flament strandU you can resume the print. Tnstallation instructions can be found at manual.prusa3d.com.
- Page 39 Dust on the sensor and how to clean it ghis is not a common causeU but as a last measureU try to unscrew the Flament sensor cover and take out the Flament sensor carefully. 'lean the sensor in the marked area as depicted in the picture below - the easiest way is to use a can of compressed air from a safe distance.
- Page 40 Epen idler - gou can see the strand of loaded Ulament inside wA1wA NoLLle cleaning 9o not touch the nozzle durin@ these procedures - itJs very hot and it may cause burnsx go make cleanin@ easierU move the print head all the way up in the LCD menu - Rettinvs - MoTe aZis - MoTe k aZis.
- Page 41 Yait 3-I minutes and then @o to LCD Menu - Load Ulament. Tf you cleared the clo@ and the Flament went throu@hU simply lower the temperature to normal and re-do load Flament a@ain. Tf the Flament loads successfullyU you can resume printin@. wA1ww Replacing ( changing the noLLle Tf you are replacin@ the Olsson Ruby nozzle, please visit this website for instructionsU otherwiseU you mi@ht dama@e it -...
- Page 42 Bse pliersU or preferably a :mm socket to unscrew the nozzle. 4e carefulU the nozzle is still hotx Put the ori@inal nozzle in a safe location and carefully insert the new nozzle and ti@hten it @ently - do not use eqcessive forcex Tnsert a Flament and you are ready to print.
- Page 43 ynbro(en )left, and bro(en appendiZ )rivht, the correct location of the Iumper )lower photo, 11 FAQ - common issues and how to solve them ww1w S,eyed )jaxis Tf Mesh Xed -eveling fails, there are two possible causes of this° a faulty C.T.“.9.V. sensorU or a skewed ;-aqis.
- Page 44 ww1k Printer can#t read the US4 dri-e Tf the printer canJt read the B,4 driveU Frst try restartin@ the printer. Tn case you see an error say ”Arror mountin@ B,4 drive+U your B,4 drive probably has an incompatible Flesystem ’e.@. eqjVgE. There are two common situations after inserting the ZSX drive: •...
-
Page 45: Print Quality Troubleshooting
ww10 Doyngrading the 5rmyare Tn some casesU you mi@ht need to down@rade the Frmware to an older version. go do thisU place an older Frmware Fle onto a jVg32-formatted B,4 drive. Tnsert the drive into the printerU press the restart button and once the screen shows the Mri@inal Prusa CT“T lo@oU press the knob once. ghis will activate the Frmware Sashin@ screen. - Page 46 Print and share! Do not 7orget to tag 2our prints yith prusamini yhile sharing so ye can 5ndb pin and shoycase them yith our http ((yyy1prusa3d1com(originaljprusaj3djprints( Happy Printing :)
Need help?
Do you have a question about the PRUSA RESEARCH MINI and is the answer not in the manual?
Questions and answers