Advertisement
Available languages
Available languages
Advertisement
Table of Contents

Related Manuals for ELAC Miracord 60


Summary of Contents for ELAC Miracord 60
- Page 1 BEDIENUNGSANLEITUNG & SICHERHEITSHINWEISE. OPERATING & SAFETY INSTRUCTIONS...
- Page 3 Herzlichen Glückwunsch! Sie sind stolzer Besitzer des Wir beglückwünschen Sie zum Kauf eines ELAC Plattenspielers, der unter strengen Qualitäts- und Umweltauflagen hergestellt wurde. Um alle Leistungsmerkmale optimal auszunutzen, lesen Sie bitte die Bedienungsanleitung gründlich durch. Wir raten Ihnen, diese Anleitung für späteres Nachschlagen gut aufzubewahren.
-
Page 4: Table Of Contents
INHALTSVERZEICHNIS / CONTENTS Seite / page Deutsch Beschreibung Erste Inbetriebnahme Wartung Störungshilfen Service / Pflege / Fertigungskontrolle / Entsorgung / Recycling Technische Daten English Description Initial Starting-Up Maintenance Troubleshooting Service / Production control / Disposal / Recycling Specifications... -
Page 5: Beschreibung
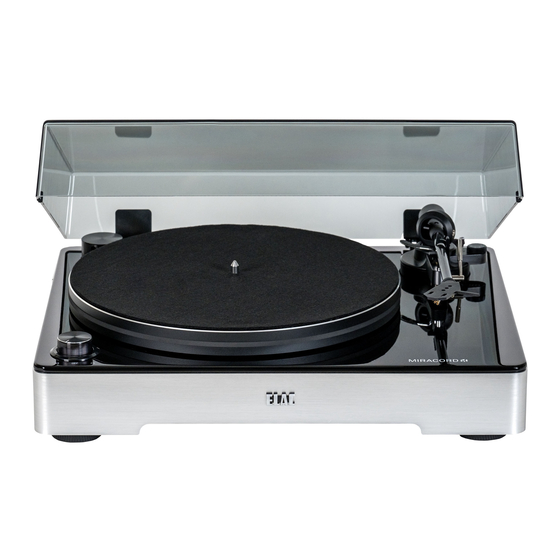
BESCHREIBUNG 1. Gegengewicht Das Gegengewicht dient zur genauen Einstellung des Auflagegewichtes der Tonabnehmernadel auf der Schallplatte 2. Anti-Skating Einrichtung Dieser Drehknopf dient zur Einstellung der Anti-Skating-Funktion des Tonarms. 3. Tonarm-Hebel Dieser Hebel dient zum Heben und Senken des Tonarms. 4. Tonarm-Arretierung (Tonarmhalter) Diese dient zur Arretierung des Tonarms in seiner Halterung, wenn er nicht verwendet wird. - Page 6 BESCHREIBUNG 9. Ausgänge Verbinden Sie den Miracord 60 mittels Cinch (RCA)-Kabeln mit einem Phono-Vorverstärker. 10. Stromversorgungsanschluss Zum Anschließen des DC 12 V / 0,5 A Netzteil-Adapters für die Stromversorgung. 11. Stromschalter Im PAUSE-Modus (der 33 / 0 / 45-Schalter ist in „0“-Stellung) ist die Elektronik des Plattenspielers noch im Betrieb.
-
Page 7: Erste Inbetriebnahme
ERSTE INBETRIEBNAHME AUFBAU UND EINSTELLUNG 1) Legen Sie den Plattenteller auf. Legen Sie nun den Riemen um den Antrieb. Drehen Sie den Teller einige Male um sicherzustellen, dass der Riemen sauber auf dem Pulley und dem Plattenteller läuft. Legen Sie nun die Filzmatte auf. 2) Montieren Sie einen Tonabnehmer auf den Tonarmkopf (Headshell). - Page 8 ERSTE INBETRIEBNAHME NETZVERBINDUNG Bei diesem Plattenspieler ist ein externer Netzteil-Adapter (DC 12 V / 0,5 A) im Lieferumfang ent- halten. Das Netzteil kann mit einem Stromnetz von 110 V / 60 Hz oder 230 V / 50 Hz verbunden werden. VERSTÄRKERVERBINDUNG Schließen Sie den Plattenspieler an einen geeigneten Phono-Vorverstärker mit RIAA-Entzerrung an.
-
Page 9: Wartung
WARTUNG DIE TONABNEHMERNADEL ERSETZEN - Arretieren Sie den Tonarm. - Nehmen Sie die Schutzkappe von der Tonabnehmernadel ab. - Ziehen Sie die Tonabnehmernadel nach unten vorn und entfernen Sie sie. - Installieren Sie die neue Tonabnehmernadel, führen Sie dabei die Arbeitsschritte in umgekehrte Reihenfolge durch. -
Page 10: Störungshilfen
STÖRUNGSHILFEN Symptom / Mögliche Ursache Abhilfe Betriebszustand Motor dreht nicht Drehen Sie den Geschwindigkeitswahl- Geschwindigkeitswahlschalter schalter auf die korrekte Geschwindig- steht auf „0“ keit der abzuspielenden Platte. POWER-Schalter steht auf Drücken Sie den POWER-Schalter auf „OFF“ „ON“. Tonsignale werden Der Plattenspieler ist an Schließen Sie den Plattenspieler an sehr leise und evtl. - Page 11 Werte der elektrischen Bauelemente sehr stark einzuschränken, da sich Ungenauigkeiten der Einzelkomponenten im Gesamtsystem addieren können. Um eine maximale Fertigungsqualität zu realisieren, ist die Einhaltung der ELAC-Qualitätskriterien und Vorgaben größte Pfl icht. Entsorgung Der Karton und das Verpackungsmaterial sollten aufbewahrt werden. Sie stellen einen idealen Behälter für das Gerät dar und sollten im Hinblick auf spätere Transporte aufbewahrt werden.
- Page 12 Congratulations! You are the proud owner of the Congratulations on the purchase of your ELAC turntable that has been designed in accordance with strict quality and environmental requirements. Please read the instruction manual carefully. We recommend keeping it in a safe place for future reference. Please note the enclosed safety instructions.
-
Page 13: Description
DESCRIPTION 1. Counterweight The counterweight is used for precise adjustment of the stylus pressure on the vinyl, to properly balance the tonearm. 2. Anti-Skating Control Use this to set the anti-skating force of the tonearm. 3. Tone arm Lever Use this lever to lower and raise the tonearm. 4. - Page 14 DESCRIPTION 9. Signal Connectors 9. Signal Connectors 9. Signal Connectors 9. Signal Connectors Plug in the RCA cable, and connect the cable to the phono amplifi er. Plug in the RCA cable, and connect the cable to the phono amplifi er. Plug in the RCA cable, and connect the cable to the phono amplifi er.
-
Page 15: Initial Starting-Up
INITIAL STARTING UP MOUNT AND ADJUST 1) Place the aluminum turntable platter over the center spindle. Take the belt and stretch it over the motor pulley and platter. Be sure the belt is not twisted. Spin the platter a few times to be sure the belt runs smoothly. Spin the platter a few times to be sure the belt runs smoothly. - Page 16 INITIAL STARTING UP MAINS CONNECTION An external switching power adaptor (DC 12 V / 0.5 A) is supplied with this turntable. Your unit is ready to be connected to a mains voltage of 110 V / 60 Hz or 230 V / 50 Hz. AMPLIFIER CONNECTION Connect the Miracord to a phono preamplifi er with RIAA equalization.
-
Page 17: Maintenance
MAINTENANCE TO REPLACE THE STYLUS - Put the rest clip on the pick-up arm. - Remove the protective cap from the stylus. - Pull the stylus to the lower front and remove it. - Put in the new stylus following the reverse procedure. - Replace the protective cap on the stylus. -
Page 18: Troubleshooting
TROUBLESHOOTING Symptom Possible root cause Remedy No connection to the mains Motor doesn’t work Check mains plug, receptacle and fuse or mains fuse is blown Power supply not Check the low voltage plug for connected properly correct fi t and fi x it. Switch the front switch to correct position Front switch in position „0“... - Page 19 To be able to observe the tolerance limits, variations e.g. the values of the electric com- ponents must be severely restricted, since inaccuracies of single components may add up in the total system. To achieve maximum production quality, compliance with ELAC quality criteria and guidelines can be regarded as the most important duty.
- Page 20 TECHNISCHE DATEN PLATTENTELLER • Antriebssystem Riemenantrieb Gleichstrommotor • Motor • Wählbare Geschwindigkeiten 33⅓ und 45 U/min • Variation der Drehgeschwindigkeit +/- 0,33 % • Wow and Flutter < 0,12 % • Plattenteller Aluminiumguss TONARM • Typ Carbonrohr • Überhang 18,6 mm •...
-
Page 21: Specifications
TECHNICAL SPECIFICATIONS TURNTABLE SECTION • Drive System Belt-drive • Motor DC motor • Selectable Speeds 33⅓ and 45 rpm • Rotation Speed Variation +/- 0.33 % • Wow and Flutter < 0.12 % • Platter Aluminum die cast TONEARM SECTION •... - Page 22 Material handelt. Die Garantie erstreckt sich nicht auf Mängel, die in Verbindung mit anderen Produkten auf- treten, die nicht von ELAC hergestellt wurden oder in sonstiger Weise durch nicht bestimmungsgemäßen Gebrauch auf- treten. Auf die sachgerechte Bedienung gemäß der den Produkten beiliegenden Bedienungsanleitung wird ausdrücklich hingewiesen.
- Page 24 ELAC Americas llc. ELAC Electroacustic GmbH 11145 Knott ave. Suites e & f Fraunhoferstraße 16 Cypress, Ca. 90630 D-24118 Kiel, Germany...
Need help?
Do you have a question about the Miracord 60 and is the answer not in the manual?
Questions and answers