
Related Manuals for Makerfire Armor 85 HD

Summary of Contents for Makerfire Armor 85 HD
-
Page 1: Table Of Contents
Makerfire Armor 85 HD Contents 1 Product Introduction 2 Product Specification 3 Product Introduction 4 Basic Setting 5 Binding Instructions 6 Smartaudio Transmitter Binding Method and Steps 7 About Caddx V2 Recording 8 Upgrade Flight Controller Firmware 9 FAQ... -
Page 2: Product Introduction
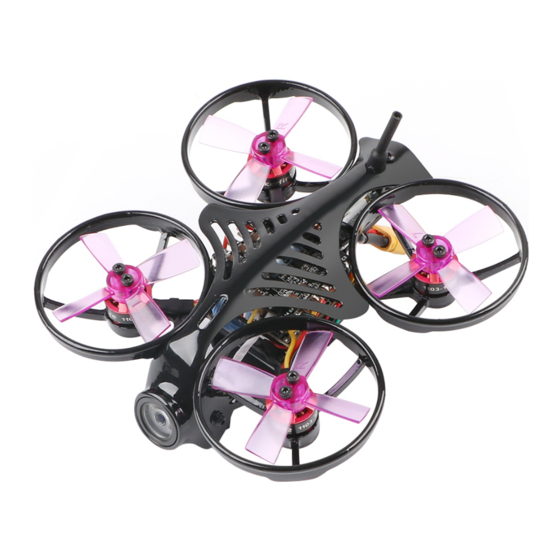
Product Introduction Armor 85 HD is another full HD video recording indoor brushless quadcopter of Armor series produced by Shenzhen Makerfire Technology Co., Ltd. This product is safety and light. The quadcopter only weigh 76g(excluding battery),with powerful 1103 brushless motors, support 2s/3s batteries. - Page 4 Know Your Flight Controller Board...
- Page 5 LED Status Indicator Currently connected interface is Strip port. It cannot be programmed to define the light color which only as a tail light to indicate battery voltage. The LED light will stay red when single-chip battery voltage between 3.4-4.3V; The LED light will flash slowly when the single-chip battery voltage between 3.2-3.4v;...
-
Page 6: Basic Setting
Forbid to plug the positive and negative ends of the battery directly into the power socket; Forbid to cause the battery short circuit, or it will cause damage of battery and fire; Forbid to transport or storage the battery with metal(such as hairpin, necklace); Forbid to hit, throw, tread on,fall,disassemble or strike the battery;... - Page 7 PID Tuning: Default Setting Parameters Modes Setting Turn on CH5 channel unlock(aux 0 0 0 1400 2100);turn on CH6 Full-automatic mode(aux 1 1 1 900 2100)
-
Page 8: Binding Instructions
Binding Instructions Frsky XM Binding Instructions 1.Take the Frsky X9D as an example. Turn on the remote control and create a new receiver configuration (it’s ok if you want to modify a original one).Please set Mode to D16 and Channel Range to CH1-16. 2.Press bind button on ARMOR 85HD XM receiver and power the quadcopter at the same time. - Page 9 status on Betaflight/Receiver interface after binding. Spektrum DSM2 Binding Instructions(take SPEKTRUM DX6E as an example) 1.Press bind button of DSM2 receiver and power the quadcopter at the same time. The orange light will flash quickly when entering bind mode and ready to bind. 2.Turn on the remote control and enter bind state (select the Bind State on the remote control).
- Page 10 3.Re-power the receiver, the green light will stay lighted if binding successfully. lease check the remote control channels’ corresponding status on Betaflight/Receiver interface after binding. Futaba S-FHSS Binding Instructions(take Futaba T14SG as an example) 1.Set MODEL TYPE of the remote control to MULTIROTOR 2.Set SYSTEM of the remote control to S-FHSS 3.Turn on the remote control, then press bind button on the receiver and power it at the same time.The green LED will stay lighted if binding successfully.
-
Page 11: Smartaudio Transmitter Binding Method And Steps
Statement: 1) XM receiver is compatible with Frsky brand X12S, X9D, X9E, QX7 model remote control; 2) DSM2 receiver is compatible with Spektrum brand DX18, DX9, DX8, DX6 model remote control,also compatible with some JR brand remote control which supporting DSM2 protocol, remote control with high frequency head (LNB)conversion DSM2 protocol remote control and Walkera brand root remote control;... - Page 12 Adjust transmitter power and frequency VTX SA(VTX Smartaudio), From the VTX SA,you can adjust the power and frequency of the VTX. Frequency set Information in the first line is the currently saved transmitter frequency point. As the picture below, the current frequency is the first one of group F.
-
Page 13: About Caddx V2 Recording
VTX Frequency List About Caddx V2 Recording Recording Pressing on the button for 1 second to start recording; Pressing on the button for 5 seconds to stop recording; Notes: If the power is cut accidentally when video recording, please power on again, then the camera will automatically restore the memory; and the video records before power cut will be still saved in TF card. -
Page 14: Upgrade Flight Controller Firmware
Regarding the video frame rate setting, you need to use the OSD menu adjustment board to enter the menu for debugging configuration. Operation as below: Right Button:pressing Right button for 3-5 seconds to active video recording, the light on right button will flash at the same time. Left Button:pressing Left button for 3-5 seconds to stop recording. -
Page 15: Faq
2. Open Zadig. Select STM Device in DFU Mode or STM BOOTLOADERDevice (Option/View All Device, click Reinstall Driver to install the driver) What to do if it was restored to factory settings? 1.Changing flight controller direction(YAW Rotate 90 degrees clockwise) set align_board_yaw = 90 2.Factory MODE Setting and Configuration PID parameter by default(Betaflight)
Need help?
Do you have a question about the Armor 85 HD and is the answer not in the manual?
Questions and answers